
This is a quick step-by-step guide on how to use Hypernetworks in Stable Diffusion Automatic1111 Web UI, teaching you what Hypernetworks really are and showing you how to make use of them. Learn how to apply pre-made custom styles to your Stable Diffusion AI image generations, while harnessing the power of one of the most popular SD fine-tuning methods – Hypernetworks. Let’s get straight into this short and straight to the point tutorial!
- What are Hypernetworks in Stable Diffusion?
- Where Do You Put Hypernetwork Files?
- How To Use Hypernetworks in Stable Diffusion WebUI
- Hypernetwork Aided Generations – Examples With Prompts
- Some Interesting Hypernetworks For You & Where To Get Them
- How To Train Your Own Hypernetworks?
Check out also: How to Use LoRA Models with Stable Diffusion WebUI – Quick Tutorial – the better method!
What are Hypernetworks in Stable Diffusion?
Hypernetworks are one of the most popular methods of fine-tuning Stable Diffusion models/checkpoints. Fine-tuning is essentially influencing the image generation process by supplying the latent diffusion image algorithm with additional data to force apply custom styles to your images during the generation process. Hypernetworks in the context of Stable Diffusion were originally invented by Novel AI.
Some of the other popular ways of fine-tuning Stable Diffusion models are making use of: textual inversion, checkpoint merging and LoRA models – the last being arguably the most efficient way to do that.
You might also like: Stable Diffusion WebUI Settings Explained – Beginners Guide
To be more exact, Hypernetworks are pre-trained fine-tunings of the Stable Diffusion cross-attention layer, and even more precisely, a trained neural network attached to the cross-attention layer of the U-Net noise predictor.
Training Hypernetworks has quite a few advantages, as it is a relatively fast process (faster than for example creating custom Stable Diffusion checkpoints using Dreambooth), and it doesn’t really require a lot of computational power from the hardware on which the Hypernetwork is trained.
You can learn much more about the more efficient way of fine-tuning Stable Diffusion models and using these fine-tunings here: How to Use LoRA Models with Stable Diffusion WebUI – Quick 2-step Tutorial
Where Do You Put Hypernetwork Files?
In the Stable Diffusion Automatic1111 WebUI, the Hypernetwork files have to be placed in the ~stable-diffusion-webui/models/hypernetworks directory.
All the Hypernetworks that are in this location will display in the Styles Browser under the Hypernetworks tab.
The /models/ directory is also the directory in which you’ll put all the other additional model files should you get any of these. We really recommend you to take a look at the LoRA models we already mentioned. They can yield much better styling results than Hypernetworks in many cases!
How To Use Hypernetworks in Stable Diffusion WebUI
Using Hypernetworks in Stable Diffusion Automatic1111 WebUI is actually very simple and it’s a matter of two simple steps.
First, before doing anything else, make sure that your downloaded Hypernetwork files are placed into the WebUI Hypernetwork folder (refer to the paragraph above).
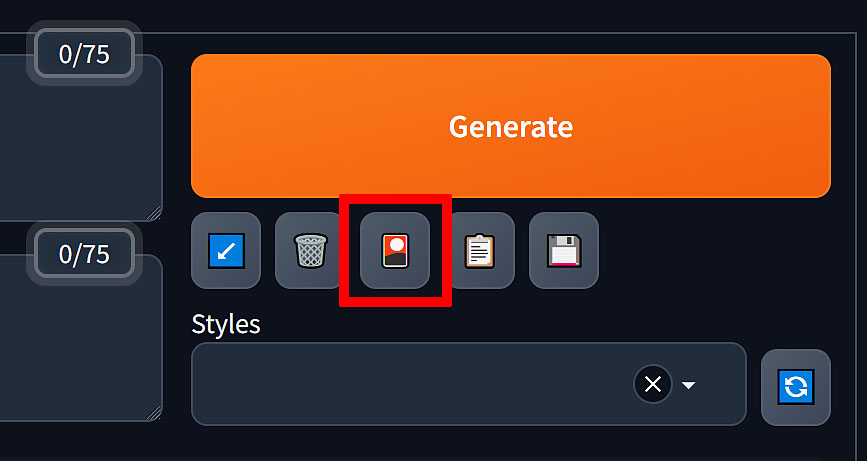
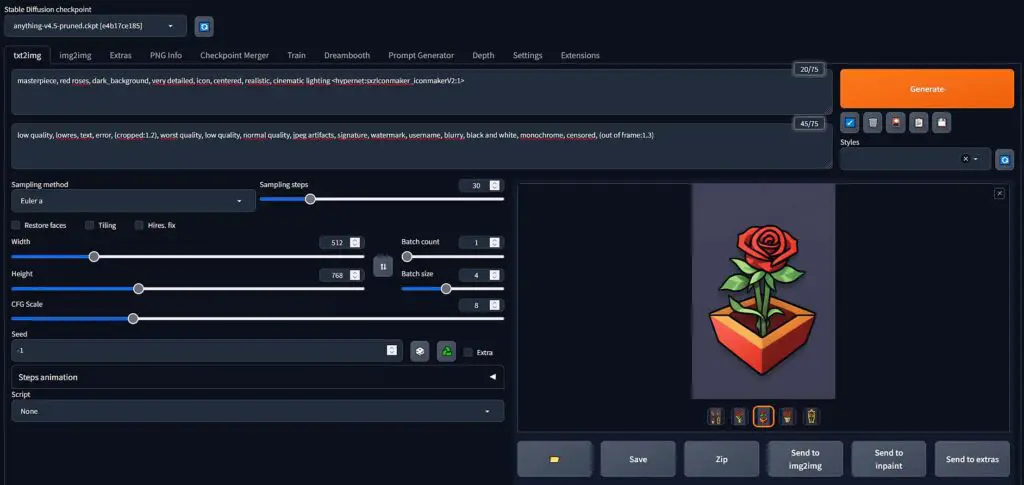
Then, open up the WebUI, and click on the “Styles Browser” button which is located on the top right of the UI, right under the “Generate” button (see the image above).
After you click on the button, you’ll see the style library menu in which you’ll have a few tabs available. We’re interested in the “Hypernetworks” tab, so click on it.
If you’ve done everything right, and have placed your Hypernetworks in the right directory, you should see them displayed here. If not, make sure that they are in the right place, and either hit the “Refresh” button, or restart the WebUI.
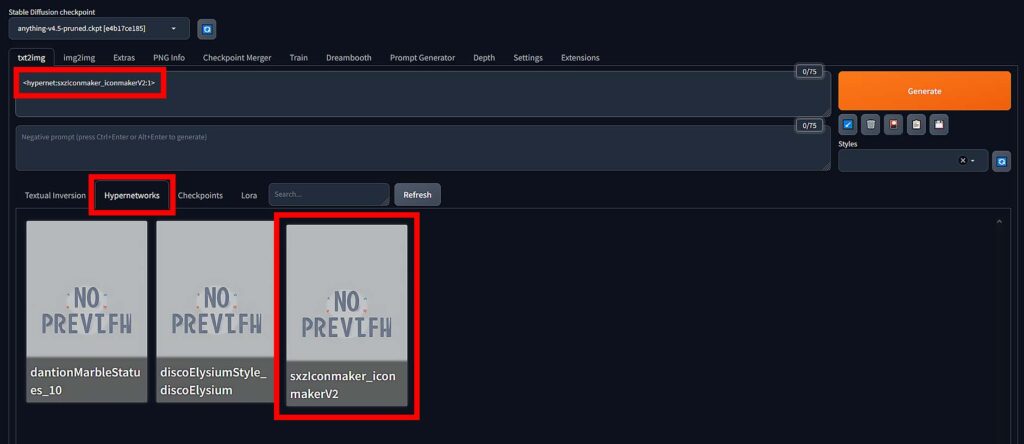
To use one of your Hypernetworks during image generation, you need to either: enter the chosen Hypernetwork name after your prompt like this: <hypernet:your_hypernetwork_name:1>, or click on the chosen Hypernetwork name in the style library and let the WebUI automatically insert it after your prompt for you.
The number after the Hypernetwork name is the weight which by default is equal to “1”, and means that the Hypernetwork styling will be in full effect. You can decrease this number, to for instance “0.5”, if you want the Hypernetwork induced style to be less prominent in your image generations, or increase it to get more styled results.
Remember though, values that are too high (generally everything around “2.0”), can easily produce distorted images so keep that in mind.
Now, simply click the “Generate” button after inputting your desired image generation settings and voila! You’ve used a Hypernetwork in the Stable Diffusion WebUI for the very first time!
Hypernetwork Aided Generations – Examples With Prompts
Here are some of our Stable Diffusion image generations with Hypernetwork-based styling applied, to give you an example of how a nicely trained Hypernetwork can affect the style of your image outputs. Under each of the examples we’ll disclose the prompts used.
The first example consists of two sets of images generated using the same model (anything-v.4.5-pruned) and the same prompt (see below), the top row made without any Hypernetwork active, and the bottom row made with the SXZ Iconmaker Hypernetwork in effect.

- Prompt: masterpiece, red roses, dark_background, very detailed, icon, centered, realistic, cinematic lighting <hypernet:sxzIconmaker_iconmakerV2:1>
- Negative prompt: low quality, lowres, text, error, (cropped:1.2), worst quality, low quality, normal quality, jpeg artifacts, signature, watermark, username, blurry, black and white, monochrome, censored, (out of frame:1.3)
- Hypernetwork link: SXZ Iconmaker Hypernetwork
Check out also: Stable Diffusion Prompts How To For Beginners (Quickly Explained!)
The second example was made using the dantionMarbleStatues Hypernetwork.
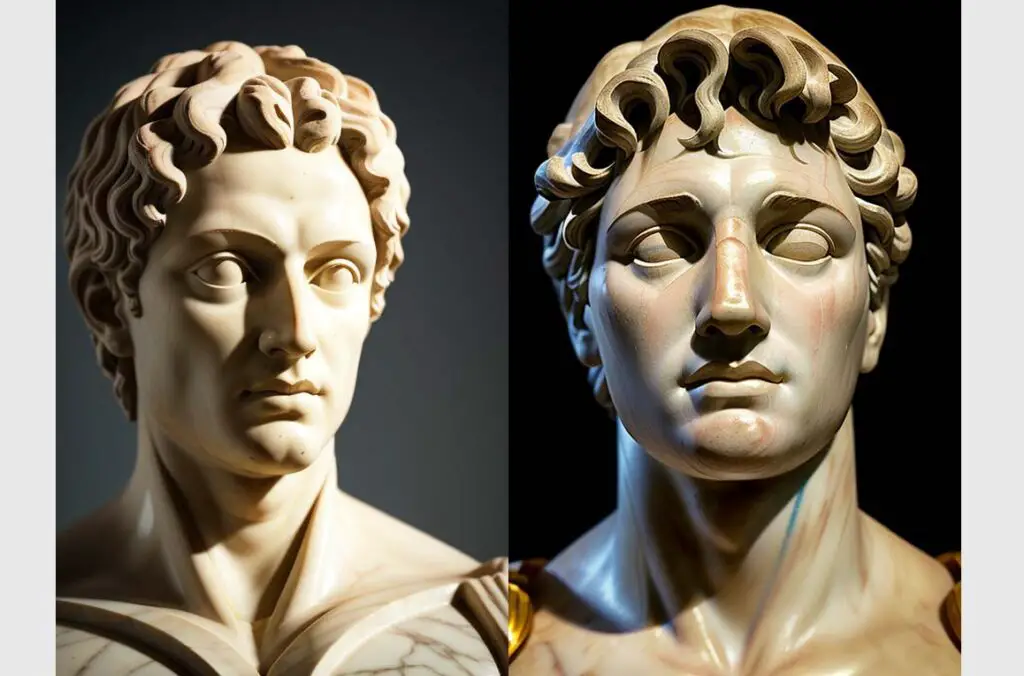
- Prompt: masterpiece, man, white marble statue, greek style, portrait, face closeup, dark_background, very detailed, icon, centered, realistic, cinematic lighting, no pupils <hypernet:dantionMarbleStatues_10:1>
- Negative prompt: low quality, lowres, text, error, (cropped:1.2), worst quality, low quality, normal quality, jpeg artifacts, signature, watermark, username, blurry, black and white, monochrome, censored, (out of frame:1.3)
- Hypernetwork link: dantionMarbleStatues Hypernetwork
Learn an even better way of using lighter Stable Diffusion fine-tunings – in a matter of 5 minutes! – check out our quick guide on using LoRA models in the Stable Diffusion WebUI.
Some Interesting Hypernetworks For You & Where To Get Them
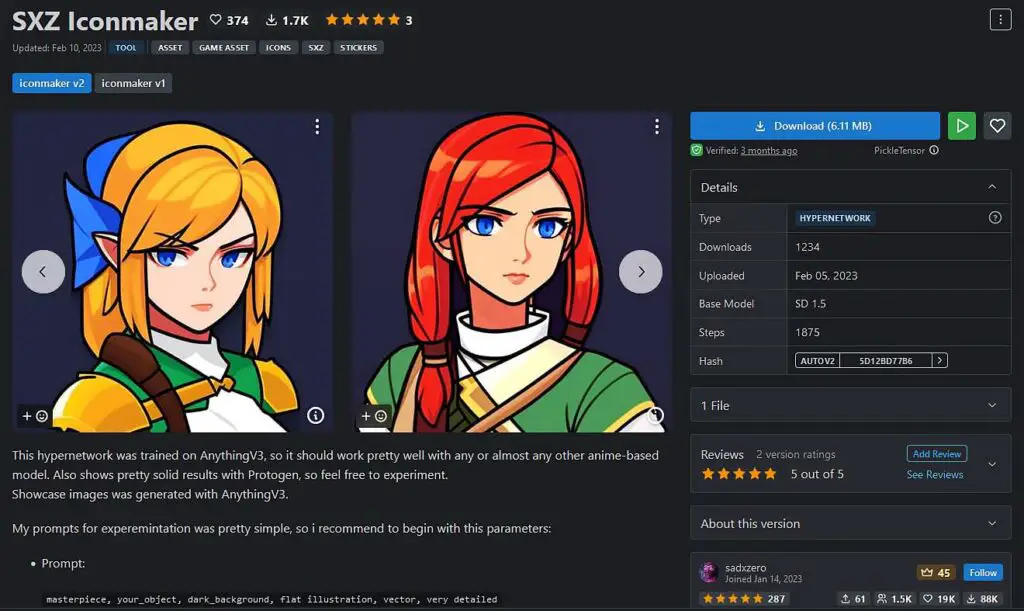
The first Hypernetwork that we found pretty interesting is the SXZ Iconmaker Hypernetwork. This one is trained to turn your prompts into simple multipurpose icons. Testing it with the Anything 4.5 model it yielded really great results, and from all the Hypernetworks we tested out, it affected the final generation the most in terms of style.
The second hypernetwork that we tested out was the Dantion Marble Statues Hypernetwork. This one, tested with the Dreamlike Photoreal 2.0 model was also pretty fun to use, although the Dreamlike Photoreal checkpoint already has a pretty well defined marble statue style “trained-in” so to speak. Nevertheless, it changed was helpful with changing human figures to neat statues in the img2img mode, so there is that.
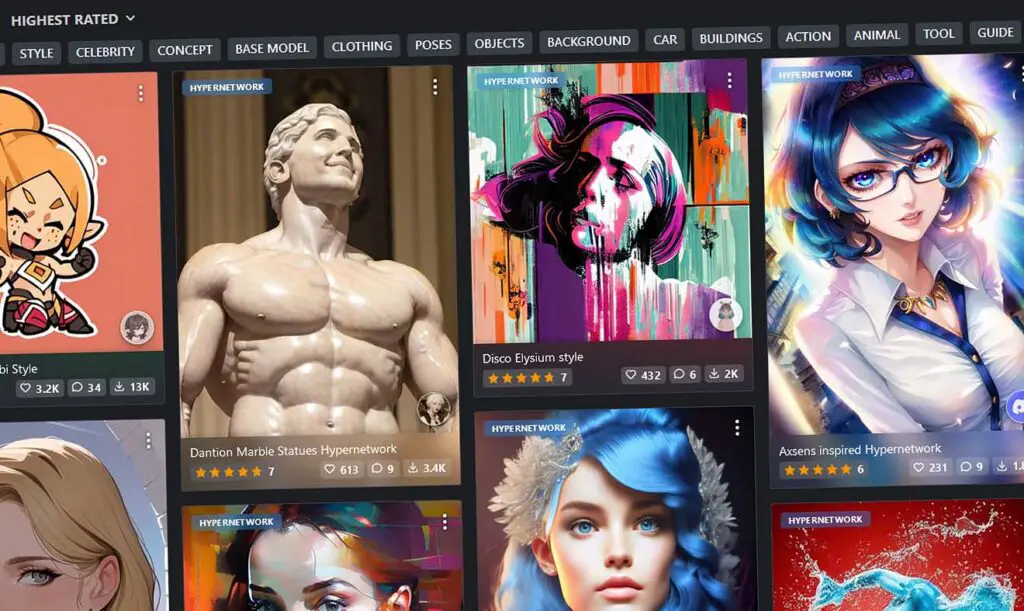
Once again, it turns out that just like with LoRA models, Hypernetworks are distributed through Civit.ai and Huggingface.co sites alike. Check these places out if you’re searching for some more Hypernetworks to try out!
How To Train Your Own Hypernetworks?
Training your own Hypernetwork is a little bit more complicated, but luckily it’s not really computation-heavy. This means that nearly every novice Stable Diffusion user can learn how to do that without having one of the latest GPUs on hand.
You can learn all about training your own Hypernetworks in this neat short guide here in the Automatic1111 Stable Diffusion WebUI GitHub repository. We link it here so as not to repeat the same material twice – it’s explained really well over there!
If you’re still not sure if you’re up to the task, here is the list of things you need to successfully train a Hypernetwork by yourself.
- Set of good quality (usually around 20 512×512) images.
- A set of textual labels for each image file (handcrafted or generated using BLIP/DeepBooru – this can be done in the A1111 WebUI).
- Any laptop/PC that’s capable of generating images using Stable Diffusion – it will most probably be more than capable of local Hypernetwork training.
So, what are you waiting for? Head on straight to the guide here.
Check out also: Why Do Watermarks Appear In Stable Diffusion Generated Images? (Explained!)