
In this quick tutorial we will show you exactly how to train your very own Stable Diffusion LoRA models in a few short steps, using the Kohya GUI. Not only is this process relatively quick and simple, but it also can be done on most GPUs, with even less than 8 GB of VRAM. Let’s go through each step of the best LoRA training guide you can find online!
Check out also: Kohya LoRA Training Settings Explained
Downloading The Kohya GUI With Dependencies
The only thing you need to go through with training your own LoRA is the Kohya GUI which is a Gradio based graphical interface that makes it possible to train your own LoRA models and Stable Diffusion checkpoints without dabbling with CLI commands.
You will also need to install a few dependencies to be able to run Kohya GUI on your system.
Can you train LoRA models using just the Stable Diffusion Automatic1111 WebUI? While you could also attempt training LoRA models using only the Stable Diffusion WebUI, our method utilizing Kohya GUI is much simpler, faster and less complicated.
To download the Kohya GUI, simply head over to its GitHub page, and locate the small “Releases” tab on the right of the page. Underneath, you should find a shortcut to the latest release of the Kohya interface – click on it.
On the newly opened page, you will see two downloadable files – you are interested in the “Source code (zip)” file which will contain the latest release of the Kohya GUI.
After you download this file, extract it. Now, here comes the time for the quick installation.
Alternatively, if you’re familiar with the git ecosystem, you can simply clone the files from the Kohya GUI repository directly onto your system.
Important note: As we’ve already mentioned, the Kohya GUI needs three dependencies to be installed on your system to work. You have to install these, otherwise you won’t be able to run the program.
Here are the dependencies that you’ll need for the Kohya GUI to work:
- Git – a simple and quick install, if you don’t have Git already installed in your system.
- Python 3.10 – Very important: during the installation click the checkbox that says “Add Python to PATH environment variable”.
- Visual Studio 2015, 2017, 2019, or 2022 redistributable – the last thing you need to get the Kohya GUI running.
Now let’s move to the actual Kohya GUI installation process.
How To Install The Kohya GUI

If you already have the needed dependencies installed and Kohya GUI files downloaded, you can proceed with the Kohya GUI installation (if not, go back to the previous paragraph).
In your newly extracted folder, you will find the “setup.bat” file. Right click it and select “Run as an Administrator” to run the installation script with elevated privileges.
A terminal with the installation script will show up, and during the installation process you will be prompted to tweak a few settings.
For most applications and in most cases, you’ll want to set these as follows:
- In which compute environment are you running? – This machine
- Which type of machine are you using? – No distributed training
- Do you want to run your training on CPU only? – No
- Do you wish to optimize your script with torch dynamo? – No
- Do you want to use DeepSpeed? – No
- What GPU(s) (by id) should be used for training on this machine? – All
- Do you wish to use FP16 or BF16 (mixed precision)? – If you have a 30XX series GPU (or higher) – select BF16, otherwise select FP16.
After inputting these settings the setup process will end, the terminal window will close, and you will be able to start the Kohya GUI by double clicking the “gui.bat” file that’s located in the very same directory.
Note: Keep in mind that the whole installation process might take quite a bit, depending on your network connection speed. The install script is downloading a lot of additional files.
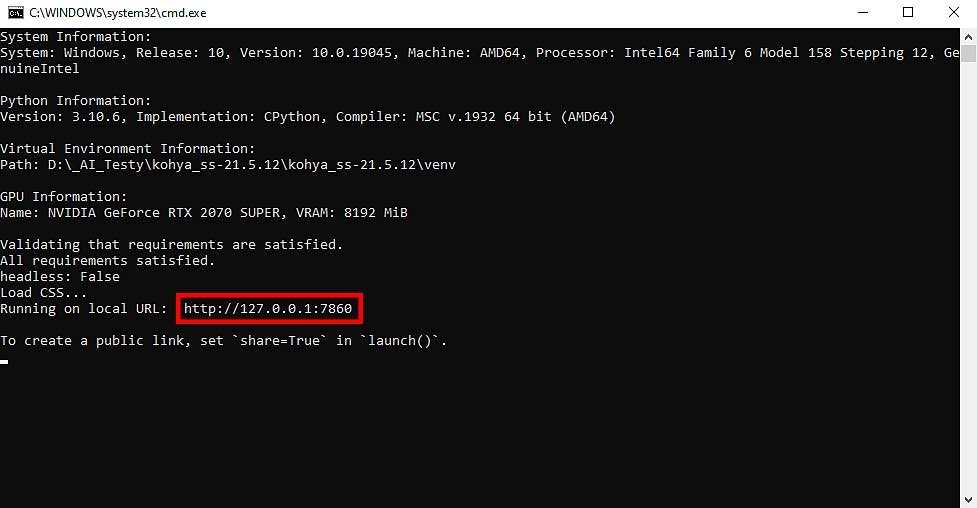
Once the Kohya terminal opens, the GUI will be hosted on your localhost on the port 7860. Enter “http://127.0.0.1:7860/” (without the parentheses) into your web browser address bar.
There you go! The Kohya GUI is up and running, and half the work is done!
Now, the only other things you need, is a set of images you want to train your new LoRA with.
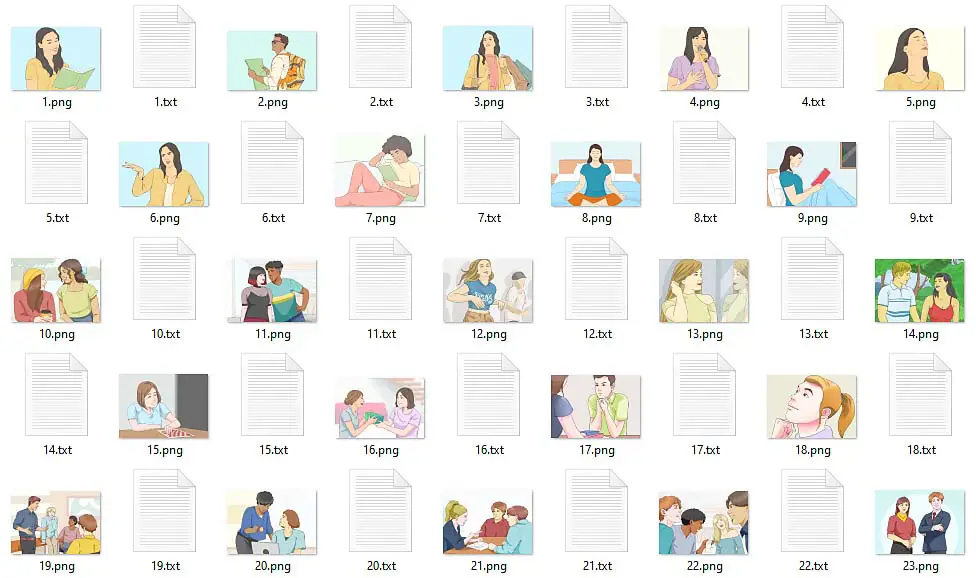
Generally you will want to get somewhere between 15 to 100 quality images with consistent styling to train your very first LoRA model. For now, the picture size doesn’t matter.
Check out also: Using Hypernetworks Tutorial Stable Diffusion WebUI – How To
How Many Images Do You Need To Train a LoRA Model?
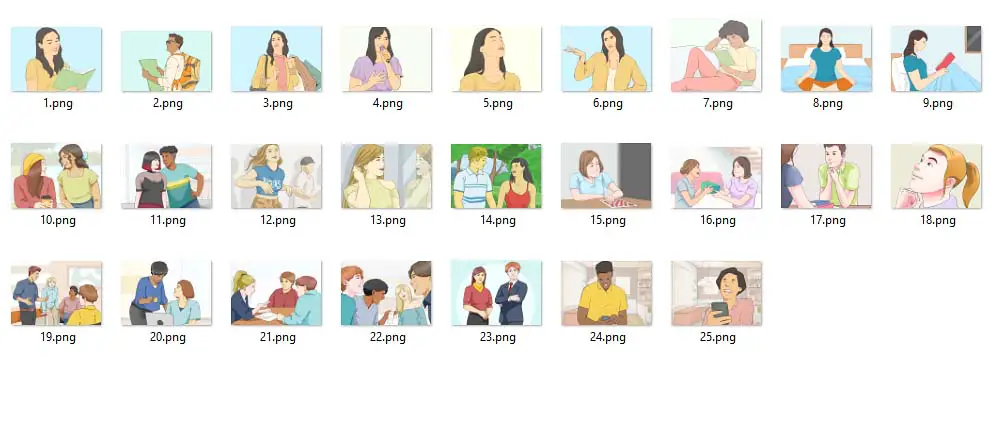
As we’ve already mentioned, you can get decent results with as little as 15-25 good quality images, however when I’m training my LoRA models, I like to go with 100-150 high quality images of the subject/style I’m going for, provided I’m able to find that much quality material.
In general it’s always better to have less images of decent quality and prominent subject presence, than hundreds of images that are low quality and don’t convey the style that you want your LoRA to invoke.
For starting out, I recommend picking around 20-50 images in the style you’re going for.
Remember: If you decide to use copyrighted material to train your LoRA models for private use, make sure that you don’t use them for any commercial work or for monetization purposes.
Check out also: Stable Diffusion WebUI Settings Explained – Beginners Guide
Do You Have To Cut Pictures to 512×512 px For LoRA Training?
The short answer is: no, you don’t have to resize your images to 512×512 pixels before LoRA training, at least not when using the Kohya GUI.
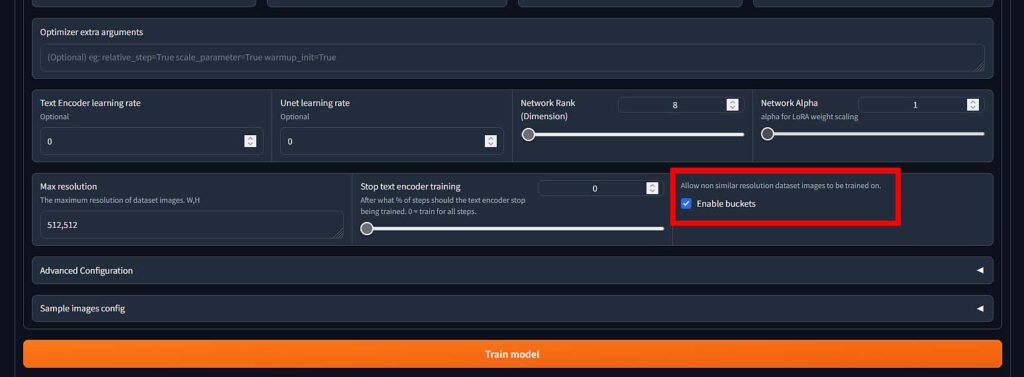
If you want to avoid wasting time on resizing your images by hand, or the hassle of doing so automatically and losing important details, check the “Enable buckets” box in the Kohya GUI LoRa training settings. This will allow for training the LoRA on differently sized images.
More on that in a very short while!
How To Train a LoRA Model in 4 Simple Steps
Here is the full tutorial on training your own LoRA model in 4 simple steps using the Kohya GUI. If you don’t know how to install the Kohya GUI and its dependencies yet, you can find this info in the very beginning of this article.
Step 1: Prepare 3 Folders

Now, you need 3 folders: image, log and model. These names are arbitrary, but we recommend to use them for clarity.
The images folder will contain another folder with your actual training images set – this folder is a folder which name should change depending on how many training steps per image you want when training your LoRA – this is very important.
So, the beginning of the name of your final image folder will define the number of training steps per one image. In our case the name is “100_My_Lora_Model”, so we’re going for 100 steps. You can choose your own name, but be sure not to leave the underscores out!
How many steps should you go for? If you only have around 10 images, set this number to around 150, if you have around 20 images and up, you can safely leave it as 100. For the sake of simplicity in our case we’ll leave it as 100.
The last two folders – log and model folders will be automatically willed with your final trained LoRA model file and log files from the training process.
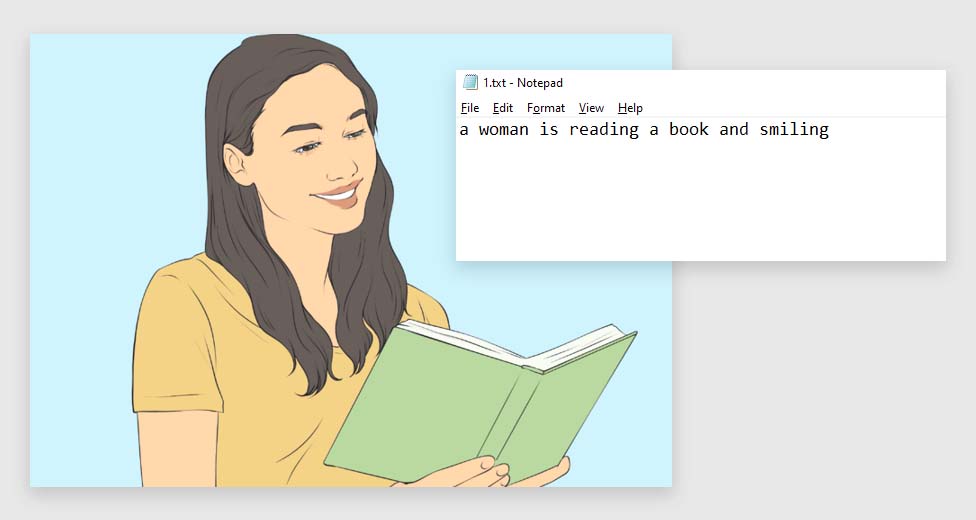
Step 2: Caption Your Images Using BLIP

For the training to be successful, you need to provide Kohya GUI with a text file containing a short description of each of the images in your training set. Luckily, the Kohya GUI allows you to utilize the BLIP model to automatically caption all the images you’ve prepared. You can find it under Utilities -> Captioning -> BLIP Captioning.
The option “Prefix to add to BLIP caption” allows you to automatically add a certain text prefix to all of the generated caption files. Use it if you want to link the LoRA embedding with for instance a specific style or character name you’re training your LoRA on.
For instance, if you decide to train your LoRA with the pictures of Charlie Chaplin only, you might want to add a prefix “Charlie Chaplin” to each of your captions using this option.
You can also add a postfix in addition to the prefix if you’d like to. These two settings are optional.
Select the folder containing your images and then click the “Caption images” button to begin the automatic captioning process. When BLIP is finished, you will see the confirmation message in the Kohya GUI terminal.
Note: Make sure that you don’t have images in your images folder that are in different formats but share the same filename (for example a.jpg and a.png). BLIP will pick up and describe only one of these files which can make the training process less effective.
After the captioning process is complete, you can further refine your captions by editing the .txt files manually. This is especially helpful if your images contain non-generic elements or characters which can’t be recognized by BLIP (ex. anime characters, photos of your friends, etc.)
After you’ve captioned all your image files, let’s move on tweaking the Kohya GUI settings for LoRA training.
Step 3: Input Right Settings
Now, we’re going to actually train our LoRA – to make the process fun, we will use a few images from WikiHow.com that you all know and love!
You can learn more about where do the bizarre WikiHow images come from in this article. It’s a really interesting story!
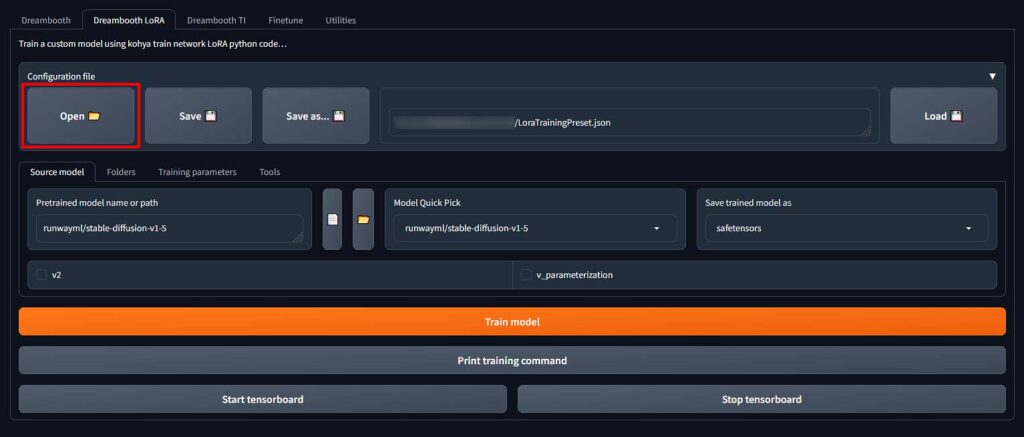
First things first, download our settings preset file here (this one was made for SD 1.5 LoRA models, but it can be adapted to ). Importing it will do most of the initial setup work for you.
What you need to do now, is to extend the configuration file menu in the Dreambooth LoRA tab in the Kohya GUI, and click on the “Open” button. Then, load the .json settings preset file you’ve just downloaded.
We did all the basic setup for you, however if you want more efficient training you might want to further tweak the settings after you train your very first test LoRA model.
Now, after importing the settings, take a look at the settings in the “Source model” tab. Here comes a very important step – you need to tell the Kohya GUI which Stable Diffusion model/checkpoint you want to use when training your LoRA model.
This depends on the style that you’re going for. If for example, you’re planning to train your LoRA on imagery containing a certain anime character, then you’d best specify the path to a base model that is trained on anime-style images. If you don’t have such a model/checkpoint downloaded, you can browser various different Stable Diffusion models over on civit.ai or huggingface.co
Another example would be if you’d like to train a LoRA model with pictures of your own face to use on various realistic photo type generations. Then, it would be best to use a model/checkpoint that is mostly trained on real photos and images, such as the base Stable Diffusion v1.5 model.
Note: If you select any of the pre-set models in the Model Quick Pick list, the selected model will be downloaded automatically by Kohya GUI.
Once you’ve imported our settings preset and set your source model, there are two things you might want to change here depending on your setup. The first one is the “Enable buckets” switch.
As we mentioned earlier, you can easily train a LoRA model on images that aren’t 512×512 px in size. If you have such images in your final image folder, and you want to proceed to train your LoRA using them, you need to check the “Enable buckets” box to enable Kohya GUI to segment the images in your training set.
No more tedious cutting your images to the right size by hand or missing the vital details on your training pics when cutting them using automated tools!
Step 4: Train Your LoRA Model
Once your images are captioned, your settings are input and tweaked, now comes the time for the final step.
One last thing you need to do before training your model is telling the Kohya GUI where the folders you created in the first step are located on your hard drive.
To do this, head over to the “Folders” tab, and input the exact file paths to your image, output and log folder. The paths will depend on the place where you’ve actually created these folders in the first place. You can also click the little folder buttons next to each path input to select the appropriate folders using your file browser.
Very important: When selecting the location of the image folder, select the image folder itself, not the actual “100_My_Lora_Model” folder with your training images that should be inside the image folder.
The “Regularization folder” field doesn’t have to be filled in in our case, so it’s safe to leave it empty.
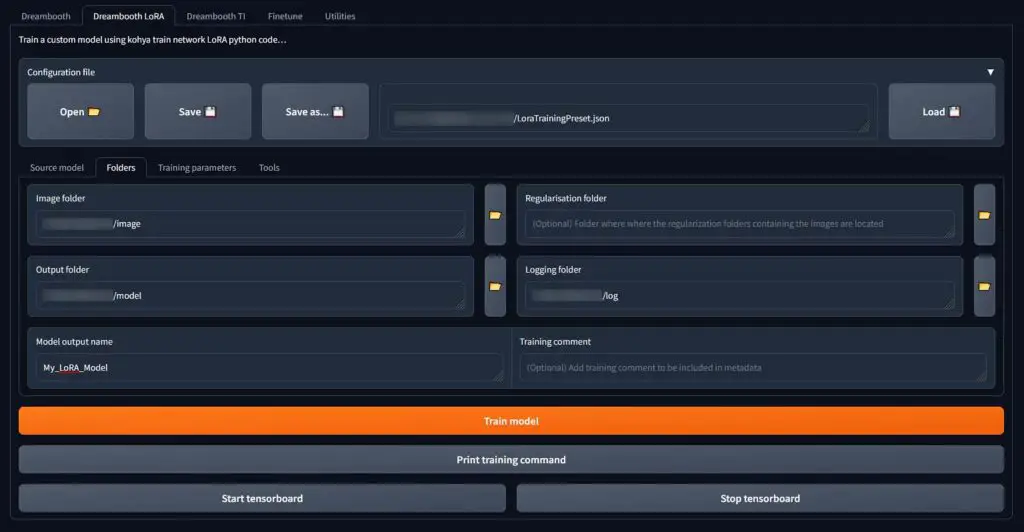
Now, input the desired name of your new LoRA model in the “Model output name” field, and press the orange “Train model” button.
How long will the LoRA training take? The training process can take a while, depending on your graphics card, Kohya GUI settings and the number of images, epochs and training steps for each image. Be prepared for training times anywhere from 15 minutes to over 1 hour on decent hardware.
I’m Getting The bf16 Mixed Precision Error – How To Fix That?
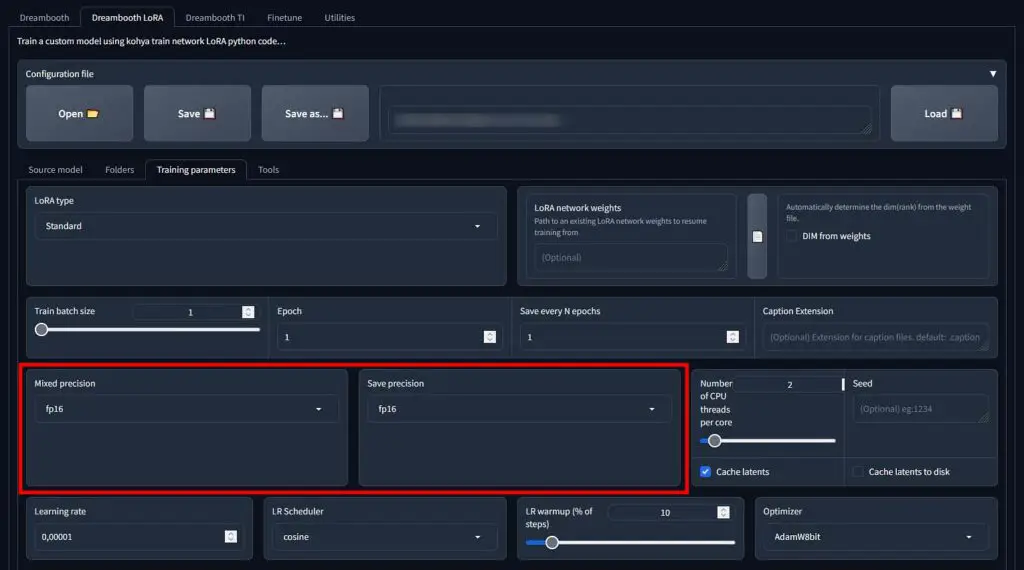
If you’ve set your “Mixed precision” and “Save precision” settings wrong, you might encounter the “ValueError: bf16 mixed precision requires PyTorch >= 1.10 and a supported device” error. This setting has to do with the floating-point format number representation in the software.
If you encounter this error, it most likely means that you have these settings set to bf16 floating point representation format and don’t have a GPU that is able to support it. If that’s the case, set both the “Mixed precision” and “Save precision” to fp16 and start the training process again.
LoRA Models & Fine-tuning – Important Legal Remarks

Important things right there. If you plan to use copyrighted material for training your LoRA models locally for private use, remember that you shouldn’t monetize the content you generate using them in any way, use the generated material commercially.
This is the case even if the base model (and/or application) you’re using gives you full commercial rights to all your generations) and just the material used for fine-tuning is protected by copyright laws.
In summary: Can you train a LoRA for your own private use using copyrighted material? – In most cases – yes. Can you use a LoRA trained on copyrighted material for anything other than personal use? – In most cases – no.
Read more about quite controversial legal issues with training material here: Why Do Watermarks Appear In Stable Diffusion Generated Images? (Explained!)
So, That’s It – You’ve Trained Your Very First LoRA model!
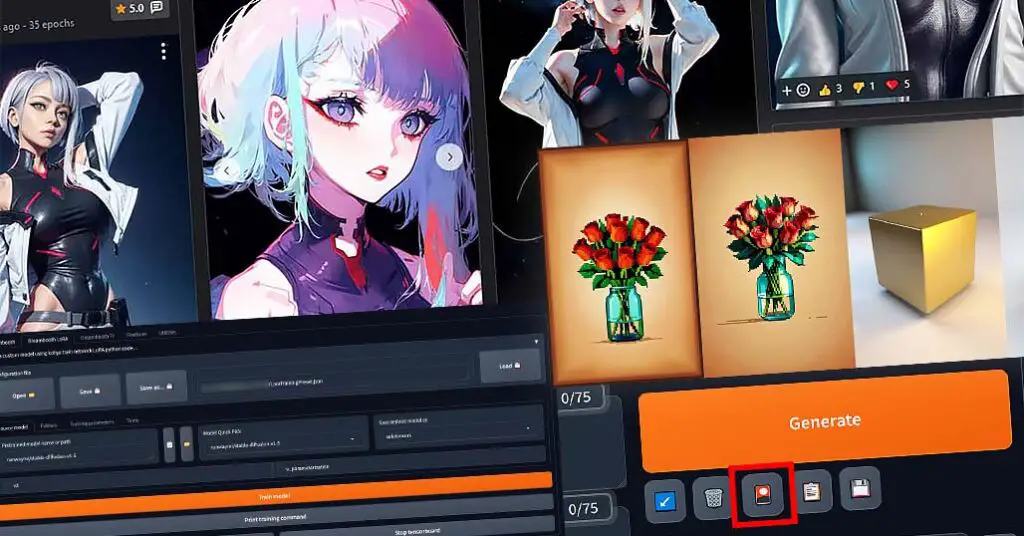
Yes, it’s this easy! Now you can experiment with different training settings, different image sets, captioning styles and much much more!
With the current version of Stable Diffusion Automatic1111 WebUI, you can use LoRA models trained with Kohya GUI without any additional plugins or extensions! To see how to use LoRA models with the Automatic1111 WebUI, click here.
Keep in mind that this was just a basic and bare-bones tutorial on training simple LoRA models quick without getting into much detail, and there are many things that you can do to optimize the whole training process and get even better results.
LoRA models are currently among the best and most efficient methods of fine-tuning Stable Diffusion checkpoints among textual inversion, checkpoint training and hypernetworks. We hope that now you’ll be able to train your own LoRA models fast and without any trouble. If you have any questions, be sure to ask in the comments below!
If you want to know more about LoRA models and how to best utilize them, check out this article: How to Use LoRA Models with Stable Diffusion WebUI – Quick Tutorial
Until next time!