
We’re about to show you how to use OBS Studio microphone audio in Discord in just 3 simple steps. Whether you want to enhance your call audio, make your mic sound better, or just apply some cool audio effects to your voice, you can do all this after you set up the connection. We promise you’ll be finished in 5 minutes total!
- Things You Need First – A Virtual Audio Cable
- How To Use OBS Audio In Discord In 3 Short Steps
- Troubleshooting – No Sound Solutions
- A Step Beyond – Audio Filters & Voice Effects
- Streamlabs OBS To Discord Audio Routing
If you’d like to learn how to use a free AI-based live voice changer with Discord, check out our guide for exactly that here! – How To Use Okada Live Voice Changer Client RVC With Discord – Quick Tutorial
Things You Need First – A Virtual Audio Cable
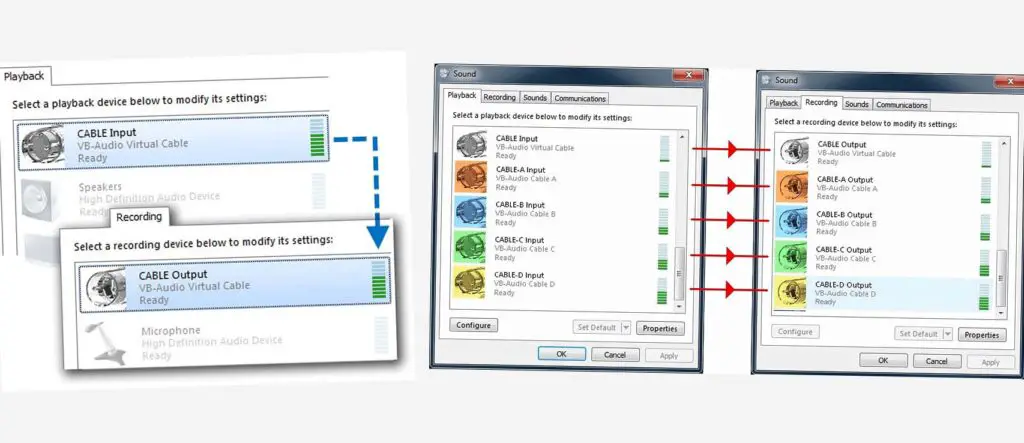
To direct the audio coming out from the OBS software to Discord you will only need one thing – the freeware VB-Audio Virtual Audio Cable software.
This neat piece of software allows you to connect two different apps with a virtualized audio connection and send sound between almost any computer program.
You can download it here, from the official VB-Audio website. After you download it, proceed with the installation process.
If you need aid with installing and setting up the virtual audio cable, check out our quick start guide here: How To Install & Use The Virtual Audio Cable – VB-Audio For Windows
How To Use OBS Audio In Discord In 3 Short Steps
Once you have the virtual audio cable software installed and you have restarted your PC, you can proceed with the following steps.
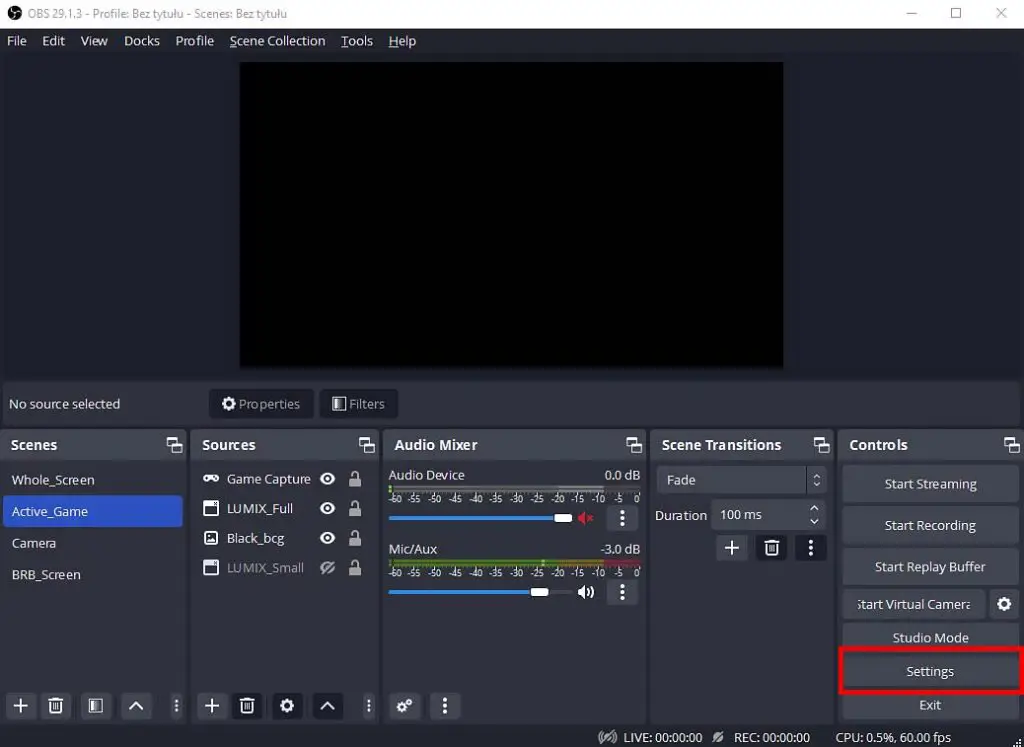
First, make sure that you have your microphone set up and assigned to the channel on your audio mixer. Then, enter the OBS settings menu. When you’re there we can begin.
Step 1 – Set Up The Audio Monitoring Device
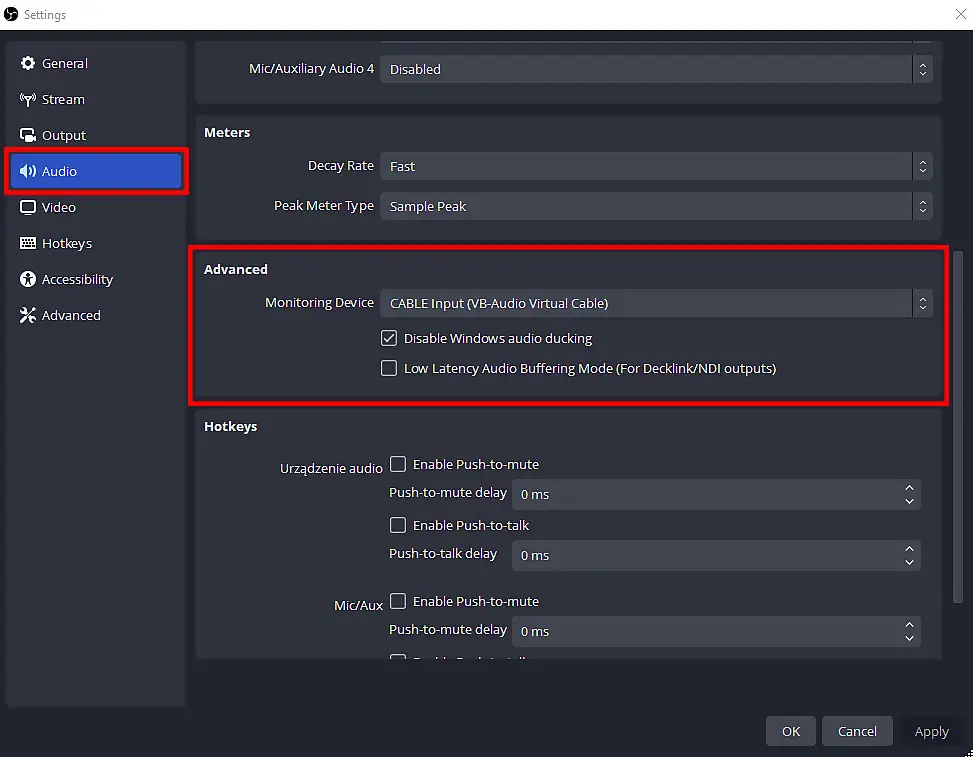
First we need to set the virtual audio cable as an audio monitoring device in OBS.
Open the OBS Settings, then click on the Audio menu. Scroll down and in the Advanced tab and in the Monitoring Device field select the “CABLE Input (VB-Audio Virtual Cable)” option.
If this option doesn’t show up, don’t panic. Just make sure you’ve got the Virtual Audio Cable software installed correctly on your system, and that you have restarted your computer after the installation process finished.
Once you have the cable input set as your audio monitoring device, make sure that you have checked the Disable Windows Audio Ducking feature. Now you can proceed to the next step.
For the curious: A monitoring device in OBS software is normally used to eavesdrop on selected audio channels that are directed to it, so that you as a streamer have a way to hear what’s going on with your audio outputs during your streams. Here we will use it in a different way – to route the audio outside the OBS app using the virtual audio cable connection. A neat trick, isn’t it?
Step 2 – Send The Microphone Output To The Monitoring Device
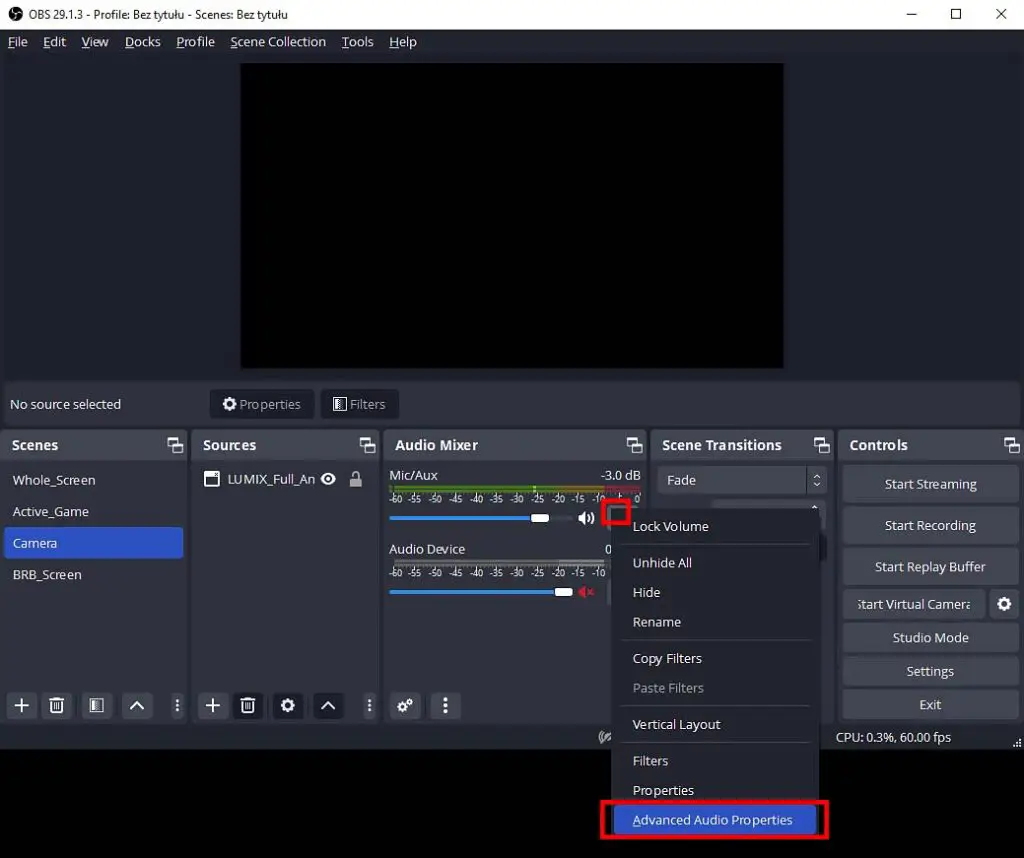
Now we need to make your microphone send the audio to our monitoring device which will send the sound into the virtual audio cable.
To do this, click on the three dot menu near your microphone device in the audio channel mixer, then select the Advanced Audio Properties option.
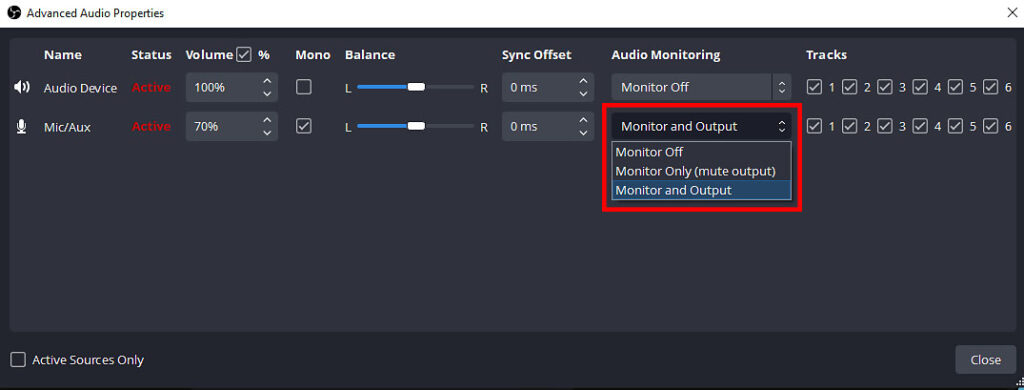
One you’ve entered the advanced options menu, change the Audio Monitoring setting for your connected microphone device to Monitor and Output.
This will send all the sounds coming from your mic both to the recording/streaming OBS output, and to the monitoring device (the input of our virtual audio cable).
Step 3 – “Plug In” The Virtual Audio Cable To Discord
The last thing you need to do is to set the end of our virtual audio cable (the virtual audio cable output) as the audio input in the Discord app.
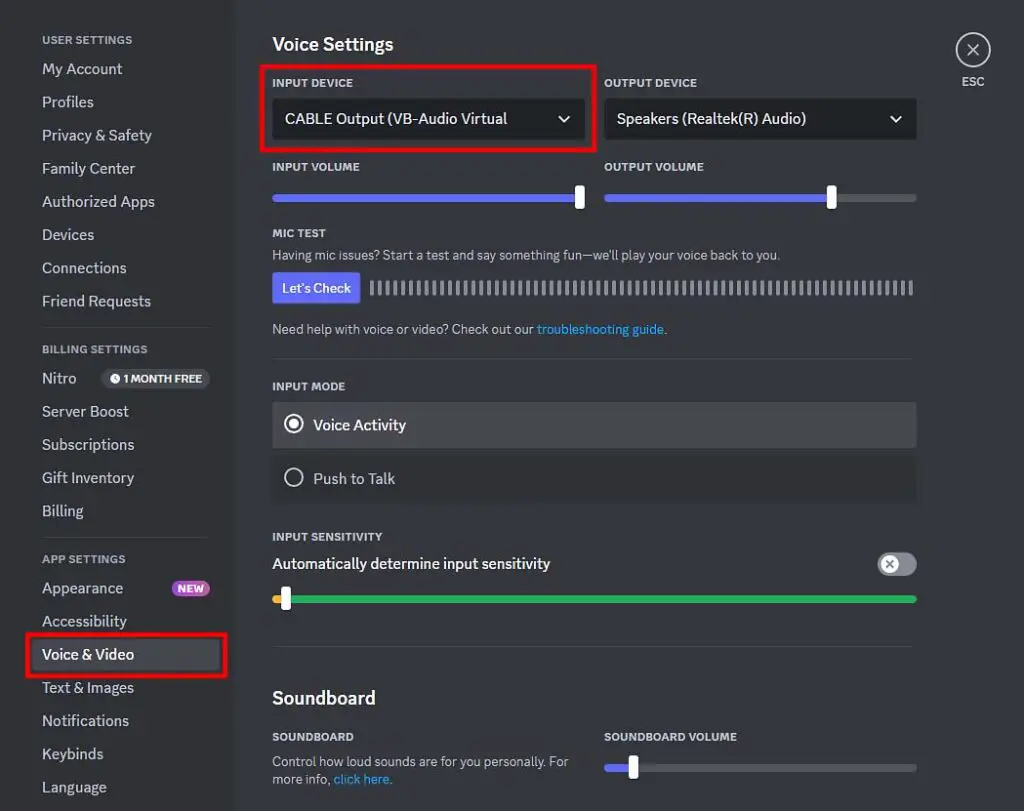
To do this, enter the main Discord settings menu, then find and click the Voice & Video tab.
Here you just need to select the “CABLE Output (VB-Audio Virtual Cable)” as the main audio input device to be used as a microphone.
All done! You’ve successfully set up the audio chain as follows: “Your Physical Microphone -> OBS -> OBS Audio Monitoring Device (Virtual Audio Cable Input) -> Discord Input (Virtual Audio Cable Output)”. We’re finally there!
Now, all the audio coming out from OBS will be coming through to Discord. Neat!
Troubleshooting – No Sound Solutions
If you don’t hear the audio coming through to Discord when doing the built-in mic test, do the following:
- Make sure that your microphone isn’t muted if it features a physical mute button.
- Check if your microphone audio channel in OBS isn’t muted, or that it isn’t simply too quiet.
- In Discord, disable the “Automatically determine input sensitivity” setting, and set the input threshold as low as you can without hearing noise. Also, turn off the noise suppression features in Discord. With this setup, it’s better to set your own noise gate in OBS anyway.
- Finally, check if you’ve followed all the steps correctly. Sometimes it’s easy to confuse some of the audio devices during setup when you’re doing this for the first time (for example you could switch around the virtual audio cable input with the output by accident – it won’t work this way!)
A Step Beyond – Audio Filters & Voice Effects
The main advantage of routing the audio from OBS to Discord, or any other VoIP app like Skype or TeamSpeak is upping your microphone audio quality by utilizing the set of built-in OBS audio filters. Be sure to play around with them a little bit to get the most out of the microphone you have!
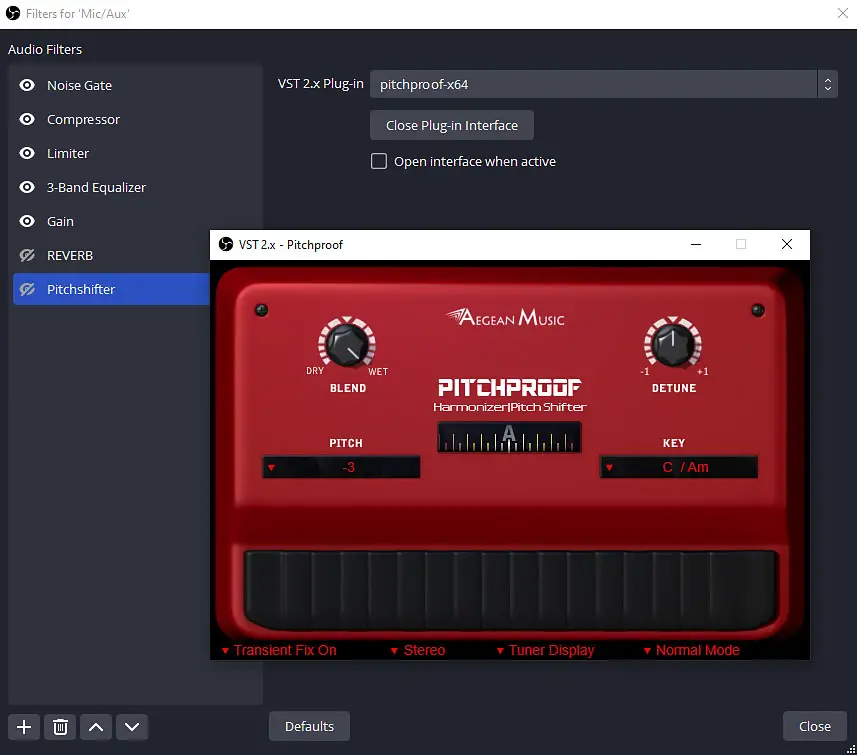
What’s even more fun, is that now you’re able to utilize hundreds of VST audio effect plugins thanks to the OBS VST plugin support. Search for cool free VST effects like pitchshifters, autotune effects, reverbs and much more and add them to OBS. You can even set custom hotkeys to activate them!
This is one of the best ways to get your own custom voice changing FX to Discord, so make the best out of it and surprise your friends!
Check out our guide for using VST plugins with OBS here: How To Use VST Plugins With OBS & Discord – Quick Guide
Streamlabs OBS To Discord Audio Routing
The process of routing the audio from Streamlabs OBS to Discord is almost exactly the same. Simply find the equivalent of the settings mentioned here in the Streamlabs app and proceed to connect the two pieces of software using the virtual audio cable!
Everything should work the exact same way once you’re finished with the setup. Enjoy your new superpower and happy streaming!
You might also like: Veadotube Free PNGTuber Avatar Software How To – Tutorial (+OBS Integration)