Are you looking for easy to use software tool that will help you begin your VTubing journey as a PNGTuber? In this tutorial we will show you exactly how to set up your very first voice controlled animated PNG vtuber avatar, in approximately 8 minutes total, to get you on the right track for becoming a full-fledged PNGTuber! Let’s begin!
- What Exactly Is a PNGTuber?
- VTubing – 2D PNG Avatars vs. Live2D/3D
- What Software Do You Need for Voice Controlled PNG Avatars?
- What Else Do You Need To Start?
- How To Download and Install Veadotube
- How To Set Up Your PNGTuber Avatar in 5 Minutes
- Most Important Veadotube Settings Explained
- How To Connect Veadotube With OBS – 4 Steps
- So There It Is! – Good Luck!
What Exactly Is a PNGTuber?
In the world of VTubing – streaming online content using an animated avatar, the most costly, complex and time consuming process is to get yourself an actual quality VTuber model.
These kind of models have to be designed, modeled, rigged and animated using different pieces of software, all of which you’d have to know reasonably good to be able to create and customize your online streaming virtual avatar to your liking.
Then, there come the so-called PNG avatars. These are a lot simpler, most of the time consisting of a few basic images of a character, which after using an appropriate software or app change their visual appearance based on the level of your microphone audio input.
You can even set your PNG avatar to blink and/or “breathe” when it’s idle, for a bit more realism! All this is possible with the software we’re about to show you.
VTubing – 2D PNG Avatars vs. Live2D/3D
In general, while PNG avatars tend to be a lot less interactive than the full-fledged Live2D or Live3D models (although as you’ll see in a while that’s not always the case), they can provide a great head start for aspiring VTubers with a lower starting budget.
The price and time effort put into the creation of each of the model types is the first and most notable difference here.
In general, the PNG avatars can be somewhat less emotive than PNG ones, although with PNG avatars you’re also able to set up different emotion/reaction macro hotkeys depending on the software (Veadotube lets you do that with ease).
Some “professional” VTubers also use their smaller and simplified PNG models during collabs to save valuable screen space on stream when a few people’s avatars are displayed at once.
Animated PNG avatars are also great to have as a fallback, should your Live2D/3D or tracking software ever fail you in a live situation.
Now, let’s head over to the tutorial!
What Software Do You Need for Voice Controlled PNG Avatars?

There are a few choices here, including PngTuber Maker and Gazo Tuber. Today however we will be using a different piece of software that is both simple to use and set up, and doesn’t take away much processing power from your gaming/streaming computer all while offering you a lot of customization options from the get go.
For this tutorial we are using Veadotube, a PNGTuber avatar app developed by olmewe, or rather Veadotube-mini which is a free “lite” version of the full Veadotube app which is supposed to be released in the near future.
This neat piece of freeware software allows you to import a transparent static .png image file into it, and then automatically animate it when your voice comes in from your microphone.
Your PNG avatar movements will be dependent on the level of the input audio, so your avatar will move only when you are speaking through your microphone, unless you set up a default “idling” animation. Now let’s get straight to how exactly to download and install Veadotube.
What Else Do You Need To Start?
Before we begin, you will need at least one PNG image to serve as a base state for your PNGTuber avatar.
For starters you can choose any PNG image with transparent background you have on hand. Remember that you can use any image as a placeholder during the tutorial and swap it later on!
Later you will be able to prepare and import different versions of your basic character avatar with eyes and mouth open and closed, which Veadotube will automatically switch between when you speak. You can even import different character variations for different emotions that can be triggered using Veadotube hotkeys. We’ll show you how to do this in a short while. There are so many options here!
Note that images in other formats such as .jpg or .webp can’t have transparent backgrounds by design, and so, they cannot be used when creating an overlay avatar. Keep that in mind and save your avatar state image files as .png images with transparent background enabled!
For image editing and designing your PNGTuber avatar you can use software such as Photoshop, Gimp or Canva.
If you want more than just the simple idle avatar with voice activated animation you better start preparing your character state assets! Let your creativity run wild!
How To Download and Install Veadotube
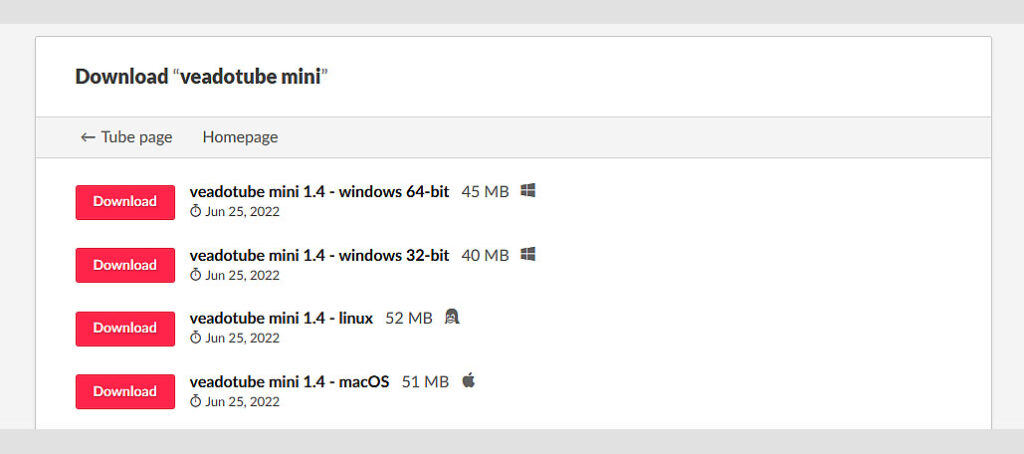
Piece of cake! Just head over to the official Veadotube software website and hit the link that will take you to their itch.io site. There, you’ll be able to find download links for the software with an option for a donation to the software developer.
Choose a version that corresponds with the operating system you’re using and download it.
Consider donating to the software creators, as much work has been put into creating this application!
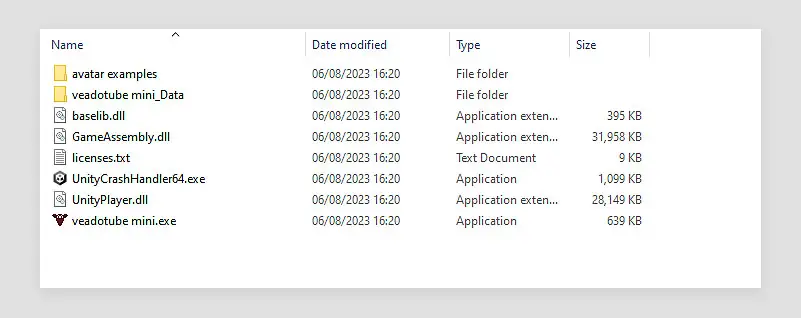
After downloading the file, simply unpack the archive and there you go! After running the veadotube mini.exe file the program will start and you’ll be able to begin setting up your avatar right away!
Note: If you’re experiencing any Windows Defender popups on Microsoft systems, simply run the app despite the displayed warnings. Sometimes unsigned 3rd party apps get caught by the built-in system antivirus as false-positives. If the app doesn’t open at all, you might have to add it to the Windows Defender exceptions list to be able to run it.
How To Set Up Your PNGTuber Avatar in 5 Minutes
Let’s get into the very much simple process of setting up your first PNGTuber avatar.
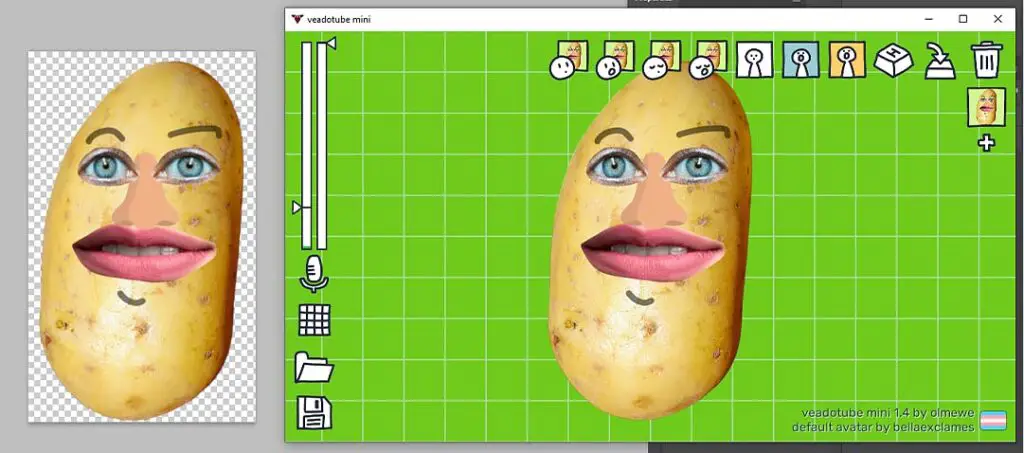
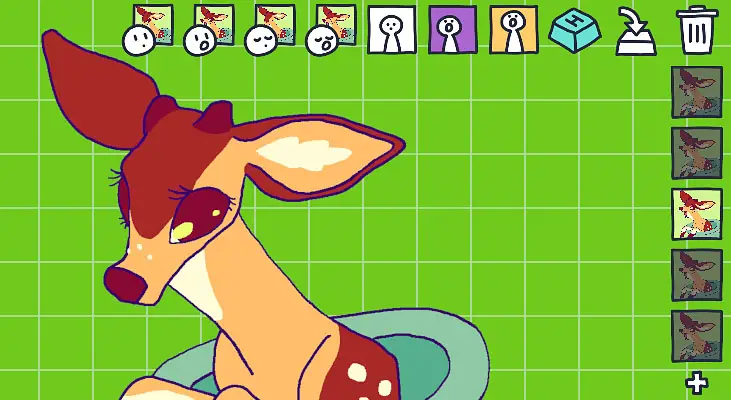
For the sake of an example we’re going to make the simplest avatar you could possibly go for. That is – a single image without eyes open/closed and mouth open/closed states, animated solely with the built-in Veadotube idle and talking animations. For that we’ll be using the glorious potato man you can see on the image above.
The whole avatar setup process will take, believe it or not, about 5 minutes total. Let’s begin!
Here is the exact list of the steps involved.
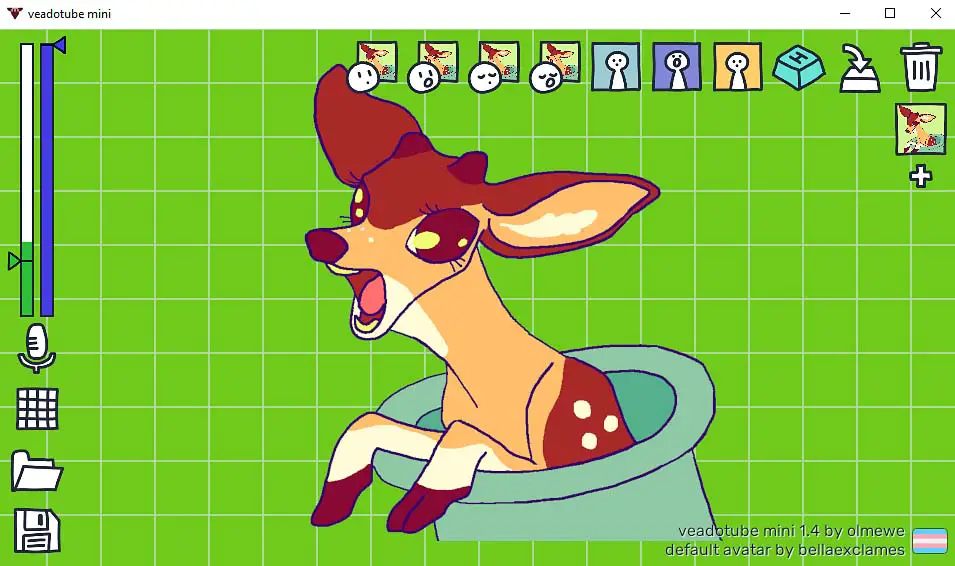
- Once you’ve opened the Veadotube sofwtare, you will see the default avatar (made by bellaexclames).
- The next thing you want to do is to click the small microphone icon in the bottom left of the Veadotube UI and select the microphone you’re planning to use for the voice input. Based on the audio input you choose, Veadotube will be able to animate the 2D model so that it moves when you’re speaking and stays idle when you’re silent.
- Now, if the audio from your microphone is coming through, you will see that the default avatar will start moving each time you speak and your voice passes the input threshold which you can set on the left side of the screen by moving the green dial up and down.
- Here comes the time to switch the default avatar with your own creation. You can do this by clicking one of the avatar state buttons on top of the Veadotube software interface. First, select the default avatar state button which is the leftmost button on the top of the main screen. Now, you will be prompted to import your chosen idle-state avatar into Veadtotube by choosing an appropriate image file from your filesystem.
- Once you do that, your avatar should now show up in the Veadotube interface. Now, you will notice that every time you speak, the avatar you set is changing back to the default-state avatar. To fix, that you will need to, at least for the time being, import your custom idle avatar into all the avatar states you can chose on the top of the Veadotube software interface. This way, only your own default avatar state will show up when the avatar is visible and active. Once you’re able to design different avatar states, this is exactly where you’ll be able to import them into the software.
- For the basic Veadotube setup, this is all you need to do! When you speak through the microphone that you’ve set as an input source in Veadotube, you will notice that the avatar starts moving around. It will move each time it detects a sound coming from your set microphone input.
- You can now explore all the different idle and talking animations for your basic avatar by playing around with the automatic animation settings displayed on the top part of the interface. These are controlled by the three buttons that are located right next to the avatar state image import buttons. Try changing things up a bit!
If you’d like to go for a little bit more complexity right away, you can prepare and import separate images of your character with eyes and mouth open and closed. Most PNGtubers make use of this feature with their avatars. Once you have your state images ready, you can do this by simply selecting the state image import buttons in the top part of the Veadotube window and importing appropriate model variations!
A step beyond this is setting up hotkeys for different states of your character. You can not only assign different images of your character to each state, but also different sets of in-built animations.
The possibility to upload animated gifs as avatar states gives you even more creative freedom. Overall, while Veadotube is a pretty simple piece of software, it gives you the possibility to set up a fully expressive and interactive 2D vtuber avatar in a matter of minutes if you have right assets at the ready. Let’s now get to the all the Veadotube settings that we haven’t mentioned yet.
Most Important Veadotube Settings Explained
Besides the settings we’ve already mentioned – so the avatar state import buttons and the buttons next to them that control the chosen avatar state animations, there are a few other nifty settings that you can tweak to further customize your Veadotube experience.
On the right side of the screen you can see a little plus button. This button will allow you to create different avatar state presets, that you’ll be able to control using your custom set keyboard shortcuts/hotkeys. You can delete your created avatar states using the trash can button in the top right of the screen and having the avatar state you want to delete selected.
How to set up the state select hotkeys? Well, the only thing you need to do is to click the button representing the computer key with the letter H, and then select the key on your keyboard that will be used to call and display the currently selected avatar state. Then you’ll be able to call the set state preset using your chosen keyboard hotkey.
You can create a few different avatar states, each one with their own customized graphics and different selected idle and speaking animations. You can prepare different avatar states to represent different emotions, so that you’ll be able to easily trigger them and switch between them live on stream using your chosen keyboard shortcuts.
It’s best to assign the state switch hotkeys to your numpad if you don’t have any OBS shortcuts assigned to them yet, or use your Streamdeck if you have one on hand!
On the left side of the Veadotube window you can switch between different background colors (you have blue, pink, grey and default green to choose from), and change the display mode from sharp to smooth. This can help you later on, when connecting Veadotube with your streaming software like OBS.
Here you can also set the microphone input level required for your avatar to trigger the talking state, and the microphone delay which defines how long should the animation stay on after activation.
This section also features two buttons for loading and saving .veadomini presets with all your settings, hotkeys and avatar states saved, if for instance you’d like to easily transfer your Veadotube settings from one computer to another, or send them to your streamer friends.
How To Connect Veadotube With OBS – 4 Steps
After setting up the animations and state changes, now comes the time to get the Veadotube avatar to show up in OBS so that you can actually use it during your live stream.
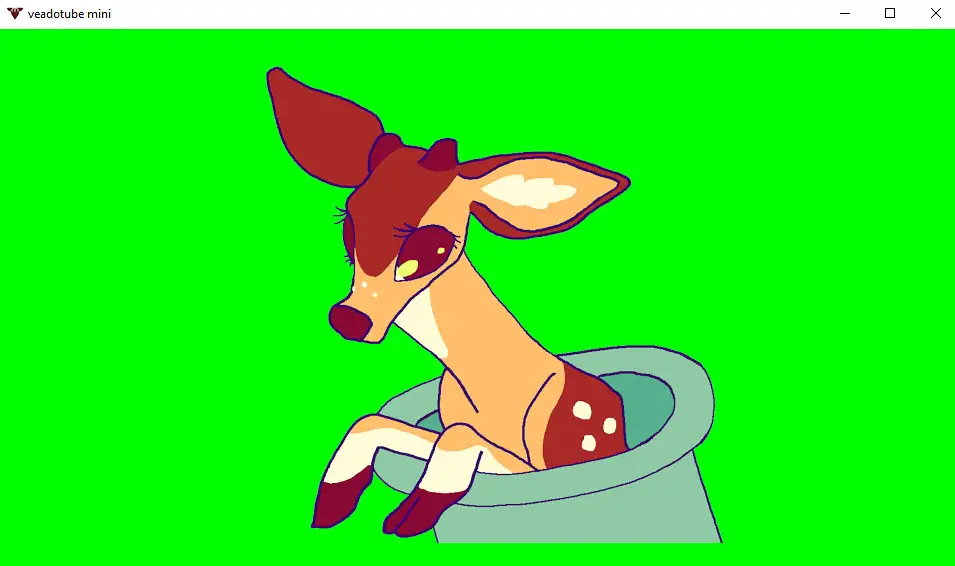
You’ve surely noticed that the background in the Veadotube app is kind of weird – it changes to a solid color right when you take your mouse cursor away from the main Veadotube window. This is a feature that will help us with automatic background removal in a short while.
To get your Veadotube avatar to show up in OBS, you’ll have to add the Veadotube app as a Game Capture source inside the OBS software.
First, start up the Veadotube app. Don’t close it! Next, select the scene you’re planning to use in the OBS menu (or create a new one if you don’t have any scenes created yet), and then right click in the Sources tab and select Add -> Game Capture.
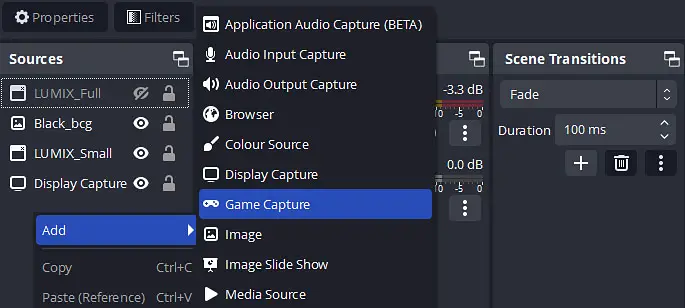
When you add a Game Capture source to your scene, you’ll be able to select the direct source for the Game Capture image – which will be our running Veadotube instance.
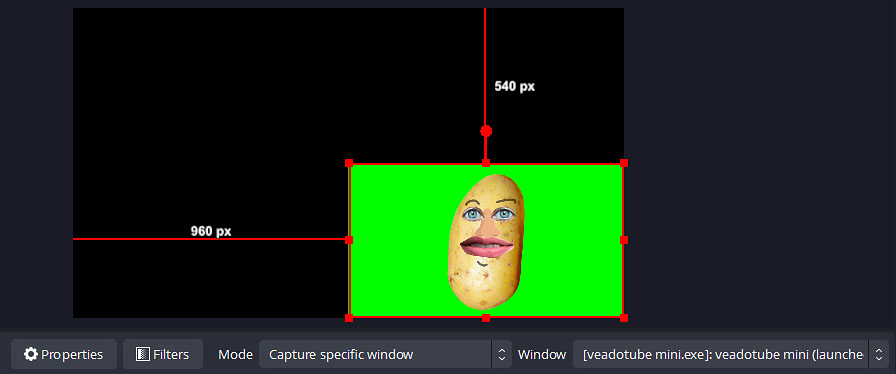
To do this, click on your newly created Game Capture source, and then in the Mode setting select Capture specific window, and point the Window setting to the Veadotube app (as seen on the image down below). Now your full Veadotube window should show up inside your OBS scene.
If it does not, double check that the Veadotube software is running and selected as a window content, and that your newly created Game capture source is dragged to the top of your sources panel if you have other sources active.
Now comes the time to remove the default green background. Luckily in the newest versions of OBS, we can do that automatically!
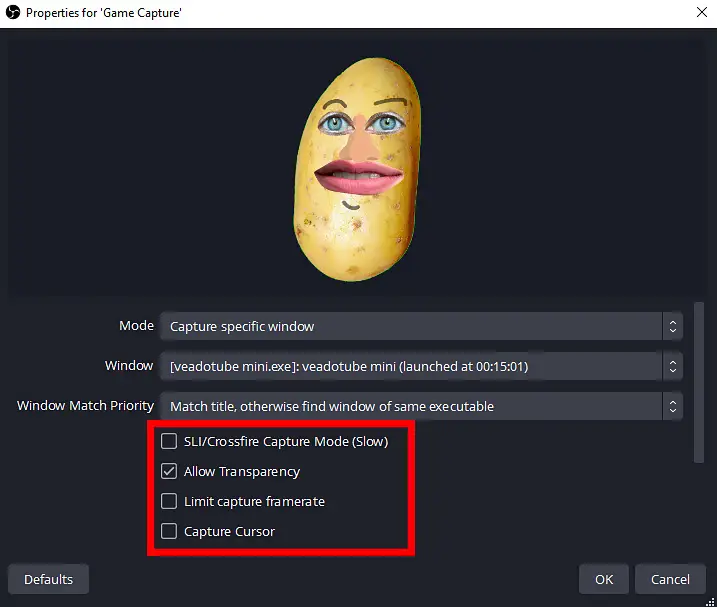
To remove the green-screen background from your Veadotube avatar in OBS, simply check the “Allow Transparency” checkbox in your “Game Capture” entity preferences menu which you can access by right clicking the Game Capture source and selecting the Preferences option. All done!
Now, if you still see some imperfections around the edges of your character, you can switch back to Veadotube and cycle through different background colors to see if the problem still persists. Find the background color that works best for the automatic background removal in case of your avatar!
If the simple game capture method doesn’t work for you, you will need to use the windows capture method, which is only a little bit more complicated. To do this you need select Window Capture as the image source in your scene, and then use Colour Key filter on the source to automatically cut out the solid background. You can see how exactly to do that in the official Veadotube OBS starter guide here!
So There It Is! – Good Luck!
So there we have it, our very first simply 2D PNGTuber avatar free of cost and quick to set up! From here, when you start streaming you can think about upgrading to either a Live 2D or a Live 3D model (you can either commission these on sites like Fiverr or Upwork, or try to design and rig them yourself).
Remember though, your streamer persona is much more important than your avatar when you’re just starting out! We hope we were able to help you jumpstart your VTuber journey and get you on the right track. All the best and until next time!