
Base Stable Diffusion, SDXL and FLUX models, WebUI tools like ComfyUI or Automatic1111 and their hardware requirements. There’s a lot to take in when trying to learn about locally hosted AI image generation models for enhancing your artistic visions or for image editing. It may seem overwhelming at first, but the effort is definitely worth it. Here is my final guide to local diffusion models, which includes all of the information you need to get started. Put on your reading glasses and grab your coffee, and let’s get to it!
Note: This guide is pretty long, but despite my love for everything AI, it was not written with the use of an LLM. I strongly recommend you bookmark this page to be able to easily come back to it later if you find it useful!
You might also like: List of Free Local AI Image Generation Software – Fooocus, Automatic1111, ComfyUI & More
A Quick Local Diffusion Glossary – Basic Terms You Should Know First
| Term | Meaning |
|---|---|
| Diffusion Model | An AI model that generates images by starting with random noise and gradually refining it to match a text prompt. |
| Checkpoint/Model | The main file containing all the trained data for a specific image style. SDXL, SD 1.5 and Flux are base models. |
| Fine-tune | A base model that has been further trained on a specific style (e.g., anime, photorealism) to produce better results. |
| LoRA | A small file that modifies a checkpoint to “teach” a model about a specific character, style, or concept, without retraining the whole checkpoint from scratch. |
| Prompt | The text description you provide to the AI to tell it what image to generate. Includes positive (what to add) and negative (what to avoid) prompts. |
| Inference | The process of the AI model generating an image based on your prompt. |
| WebUI | A web-based user interface that runs locally on your PC, allowing you to interact with the diffusion model through a graphical interface. |
| VRAM | Video Random Access Memory. The memory on your GPU, which is the primary bottleneck for image generation speed and maximum attainable image resolution. |
| Pixel Space | The actual grid of pixels (e.g., 1024×1024) that forms the visible image. Each pixel has a specific color value (like RGB). Working directly in pixel space is computationally very intensive, which is why diffusion models use latent space instead. |
| Latents / Latent Space | A compressed, lower-dimensional representation of an image’s data. Diffusion models perform the denoising process in this abstract space because it’s much faster and more efficient than working with raw pixels. The final latent image is then decoded into the final pixel image you see. |
How Is Local Diffusion Better Than Online Solutions?

Benefits of Local Image Generation
Using models like Nano Banana from Google, Dall-E by OpenAI, or Midjourney, can grant you fast and quality results depending on your final vision, and on the quality of your image prompts. However, using them is first and foremost not free, and second, it doesn’t really grant you any reasonable and certain level of privacy.
Every time you use online image generation tools and models to create your desired content, you rely on the assurance of the service provider that the data you’re sharing with them (both your prompts and input/output images) are private and won’t be stored, shared, or used to further train their model infrastructure.
Models like Stable Diffusion (SD), or Stable Diffusion XL (SDXL) though, allow you for much more freedom. Here are just some of the things you can do using them:
What Can Free Local Image Generation Software Do?
- Help you create images privately, without any data ever leaving your PC.
- Generate content that’s not subject to any censorship.
- Provide you with virtually unlimited attempts for generating your desired image.
- Grant you access to a vast libraries of third-party tools, plugins and extensions created and managed by the open-source community.
- …and as you might already suspect, much more.
All in all, these are just a few reasons why I personally think that getting into local image generation is more than worth it. Besides, it’s much easier than you think, as you will see below.
What Models Can You Choose From? (+Hardware Requirements)
Regardless of what software you’ll be using to generate your images, you will have to decide on a base model type you’ll try using first. In most cases, the best choice for starting out these days will be Stable Diffusion XL (SDXL).
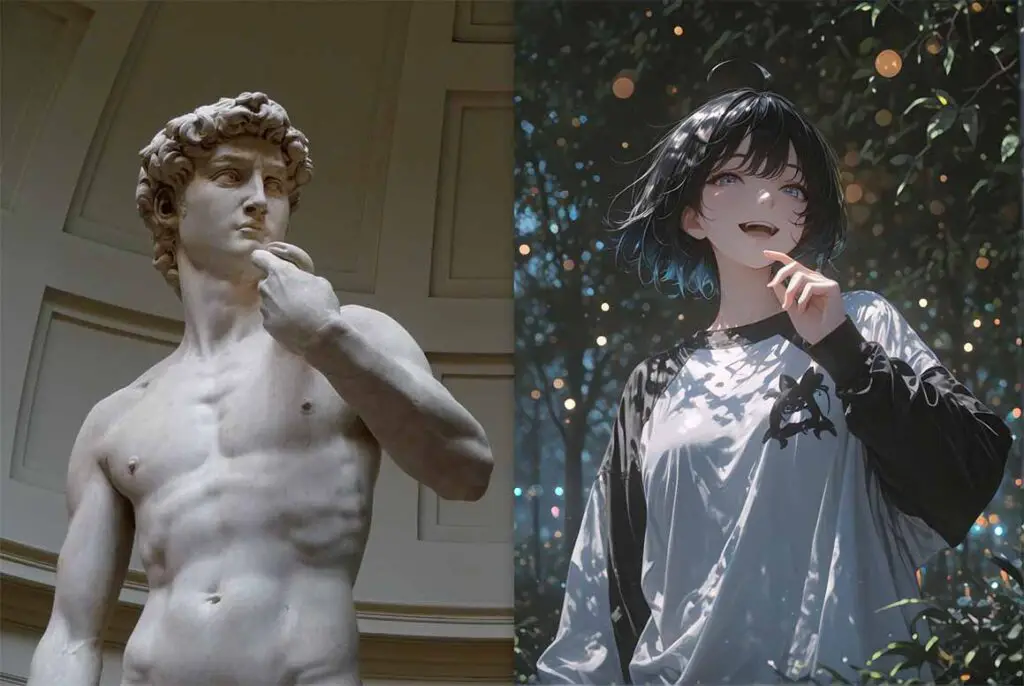
Its base version and plenty of available fine-tunes are among the most versatile models available, they can run on almost any mid-range hardware, and there are a lot of guides on how to use them both here on TechTactician and in other places online. By the way, all of the base models listed here can be used for generating both realistic imagery (like for instance stock photos), or anime/cartoon-style images.
See which GPUs can easily handle the models we’re talking about here: Best GPUs for Local Stable Diffusion, SDXL & FLUX
Other options you have are either the base Stable Diffusion 1.5/2, which is mostly superseded by the SDXL models these days and is can be a tempting option mostly on less capable hardware, as well as FLUX, which while it has higher requirements when it comes to video memory (VRAM), when it comes to some image styles it can grant you much higher default image quality than SDXL-based models. It also excels at generating text – which is something that both base SD and SDXL can’t really do that well.
While local AI video generation isn’t the main focus of this guide, it’s important to mention it here, mainly because getting used to software mentioned below (like ComfyUI) can easily serve as an simple introduction into generating short videos using open-source video diffusion models.
Video generation models require much more powerful hardware to grant you good results in a reasonable amount of time, and also are used with workflows that differ quite a bit from the ones used for generating still images. This is why these get only a brief mention here and in the hardware requirements section, and you can read much more about them here.
So, to sum it all up:
Image Generation Models
- Stable Diffusion (SD) [1.5, 2, 3, 3.5] – The base Stable Diffusion 1.x and 2.x models are good starting points if you’re dealing with extremely low-end hardware, all of the SD 3 and 3.5 models are a newer alternative to those, released back in 2024.
- Stable Diffusion XL (SDXL) – One of the best options to start out with, both of high quality, and with reasonably low minimum hardware requirements.
- Flux [Flux Dev, Flux Schnell] – Newer and more powerful diffusion model developed by Black Forest Labs, with higher hardware requirements, but at the same time better at text generation, and easier to use with natural language prompts.
While there are also some other options here, like the Stable Cascade which also emerged from the Stability.ai labs, the “big three” mentioned above are currently some of the most commonly used solutions in the open-source community, with the largest amount of learning resources and tutorials for them, and with the most high-quality fine-tunes available. That’s why I decided to list them here as viable first-choices.
Video Generation Models
Although video generation isn’t the main topic of this guide, I will quickly give you three of the best and most popular models/model families you can use to generate AI videos on your PC using the very same software you will learn about below:
- HunyuanVideo – A text-to-video model developed by Tencent, known for producing coherent and high-fidelity video clips.
- Wan2.2 – An open-source video generation model focused on creating anime-styled animations.
- LTX-Video – A model designed for generating longer, more story-driven video content with consistent characters and scenes.
A word of caution: local AI video generation is an VRAM-heavy process. If you’re planning ahead and want to make sure that your setup will be able to handle these kind of models without much trouble, it’s best to arm yourself with a high-VRAM GPU (16/24GB+), or a multi-GPU setup, if only you can afford it.
You might also like: 6 Best GPUs for Dual & Multi-GPU Local LLM Setups
Different Model Fine-Tunes (For Different Image Styles)

Once you know what kind of base model you will be using (once again, I really recommend you to start out with SDXL), you will be choosing a model fine-tune you want to experiment with first. Let me explain.
Base SD and SDXL models are models trained on billions of images, and are as capable as people working on them could get them to be. After their release, however, people from various open-source communities online have started training so called fine-tunes of these base models.
Fine-tunes are essentially the base models further trained on a large amount of consistently-styled image and caption data, created for the purpose of better steering the base model towards the desired outputs. There exist hundreds of SD/SDXL fine tunes, many of which are geared either towards better output image realism, higher quality anime-style generations, or a specific, highly complex output styling.
Note: Fine-tuning also often refers to other methods of tuning the generation outputs, such as using LoRA models (which we’re going to talk about in a bit), and methods much less commonly used nowadays such as hypernetworks. So in short: “model fine-tune” refers to a selected checkpoint further tuned on a curated set of image and caption data, while “fine-tuning”, more generally, refers to any method of refining a model with the goal of altering its outputs or improving its performance on new or specific tasks.
Models, Fine-Tunes, Checkpoints, Refiners – Terminology Alert
As the model training and/or fine-tuning process often consists of creating subsequent versions of the newly trained model version, fine-tuned base models are also called checkpoints. The name “checkpoints”, over time started to be used interchangeably with the word “model”. Nowadays, you can see it being used to describe both the base SD/SDXL models, and their respective fine-tunes available online.
So remember, every time you see the word “checkpoint” out in the wild and it doesn’t refer to one of the base models, it means exactly the same as “a fine-tuned version of a base model”. Simple as that!
Whenever you see a model/checkpoint on a site like civitai.com or huggingface.co (which are the two of the largest model repositories to date), you will encounter hundreds of fine-tunes of the base SD and SDXL models, created by the community to cater to different tastes of people seeking for a good starting point for the image styles they have in mind.
You might also like: 6 Sites Like Civitai – Best Alternatives Available
There are also so-called “model merges”, which are simply two or more fine-tuned models merged into one checkpoint, created mostly in attempts to achieve a final checkpoint that retains certain qualities of each of the fine-tuned models included in the merge.
While FLUX fine-tunes do exist, they are much less wide-spread, mostly because of FLUX being very versatile when it comes to output styles out of the box, and partly because FLUX fine-tuning is a process that’s somewhat more complex than fine-tuning SD/SDXL models.
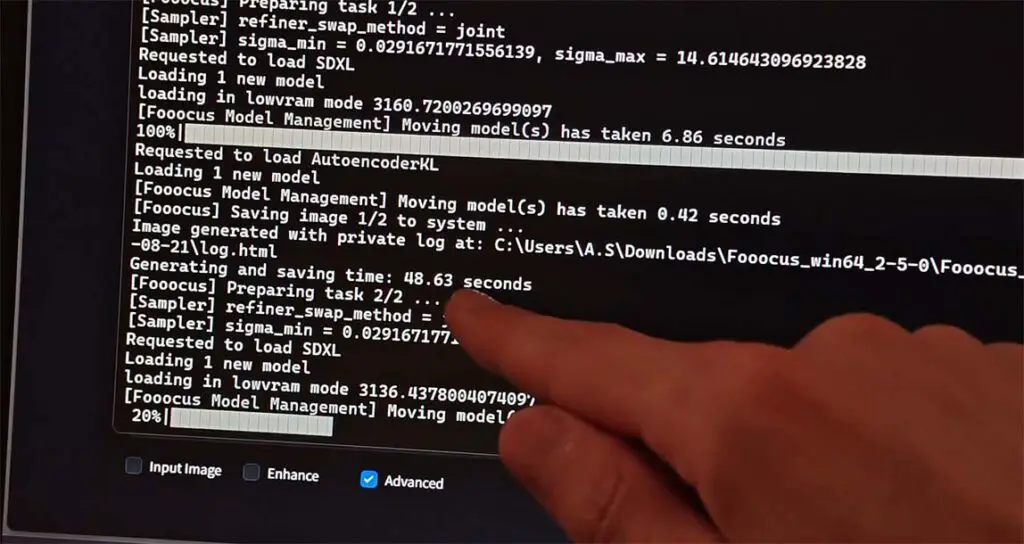
Note: You might also see a separate “refiner” model available for download alongside the main SDXL checkpoints. The original SDXL workflow was a two-step process: the base model created the image’s overall composition, and then the refiner model would take over for the last few steps to add fine-grained details. However, most modern, high-quality SDXL fine-tunes (like Juggernaut XL) are now trained to produce excellent details without a refiner, making the process less memory-intensive. For simplicity and to save VRAM, you can safely ignore the refiner and just use the main checkpoint file. It’s now considered an optional component for more advanced workflows.
VAE – The Variational Autoencoder
Diffusion models work in the efficient, compressed latent space to create the structure of an image. The VAE is a small model that is always a part of the Stable Diffusion image generation pipeline, that converts the final latent data representation back into the regular pixel space – an image that you can actually see, and that is not just the conveniently compressed data the model works on when it’s creating your image. It simply “decodes” the abstract data into a visible picture.
If you’re working on image to image workflows (when for instance you want to use a model to edit or change an existing image you have), then you will also use the VAE to encode your given image so that it can be converted to a latent space representation the model can do its work on. Once the image generation process is done, the VAE will then convert the image latents back to pixel space for you to see and save.
Most modern checkpoints already have a “baked-in” VAE that works perfectly fine. This is why most of the time you don’t need to worry about it at all. However, on some rare occasions you might also come across some model fine-tunes that do require you to download their VAE files separately to be able to make the most of the checkpoint.
First Model/Checkpoint Recommendations & Where To Get Them
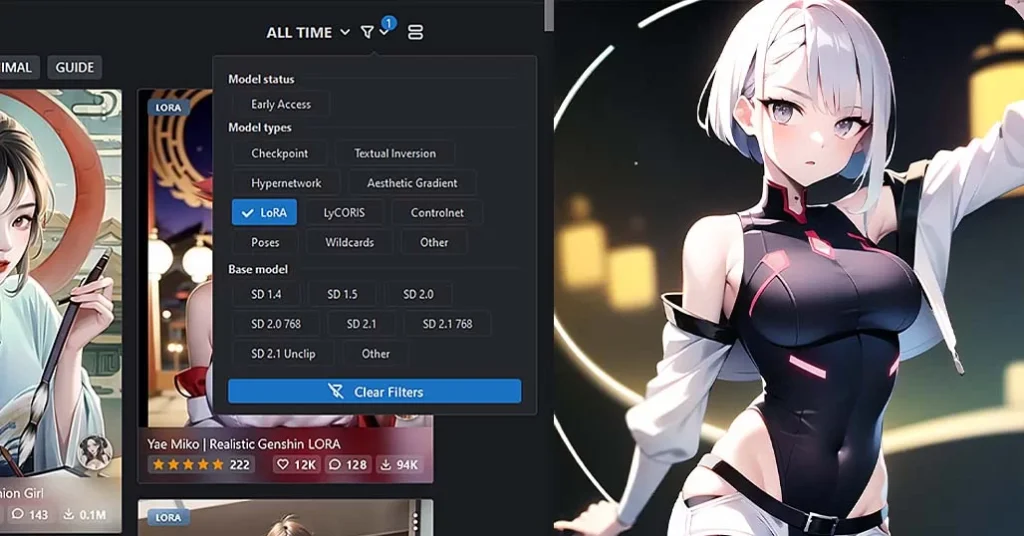
Whenever you’re in doubt on which model the fine-tune you’re looking at online is based on, rely on descriptions on the model download pages as well as the search filters. The checkpoint model filenames will also, in most cases, reflect what base model they were trained on.
When it comes to the best models you can start with, these are my recommendations after trying out a few dozen different SDXL checkpoints over the last 2 years:
- Juggernaut XL – one of the best SDXL fine-tunes for generating realistic imagery.
- Diving Illustrious Anime – a similar model for anime-style images (we have a basic guide for it right here).
Both SD and SDXL models can still be found in either .cpkt or .safetensors formats, although the former is largely considered deprecated. In general the .ckpt format is an older model packaging standard that’s superseded by .safetensors, which is more efficient, as well as more secure. You can learn more about that here: Ckpt vs. Safetensors In Stable Diffusion (Main Differences & Safety)
If you’re interested in model fine-tunes created specifically for generating anime-style outputs (but also some equally capable when it comes to generating realistic images), I’ve prepared this neat resource just for you: 8 Best Illustrious XL Anime Model Fine-Tunes Comparison
LoRA Models – Further Style Refinements

In rare situations (rare with the newer SDXL checkpoints anyway), when the model fine-tune you chose can’t be easily pushed towards your desired output style, or isn’t able to generate images of the characters from your favorite show, you can count on the help of LoRA models.
What Is a LoRA Model?
LoRA models, or Low-rank adaptation models, are small model files you can download and include in your image generation pipelines, which are able to introduce new elements and new styles into your outputs.
With the help of a LoRA model you can, for example, generate an image containing an animated character that was not present in the image training set of your chosen checkpoint, which would normally be impossible (as the checkpoint would have no data on what this character looks like, or what it’s called).
Another, quite obvious but very interesting and fun use of custom trained LoRA models is introducing your own face (or the faces of your friends) to your generations. Remember, as all of this is done on your system, and with default configurations of most local image generation software no data is leaving your PC, this data will never get exposed outside of your inference environment.
How To Use LoRAs – Trigger Words & The Weight Value
To use a LoRA in a local AI image generation software of your choice, you need to do 3 things:
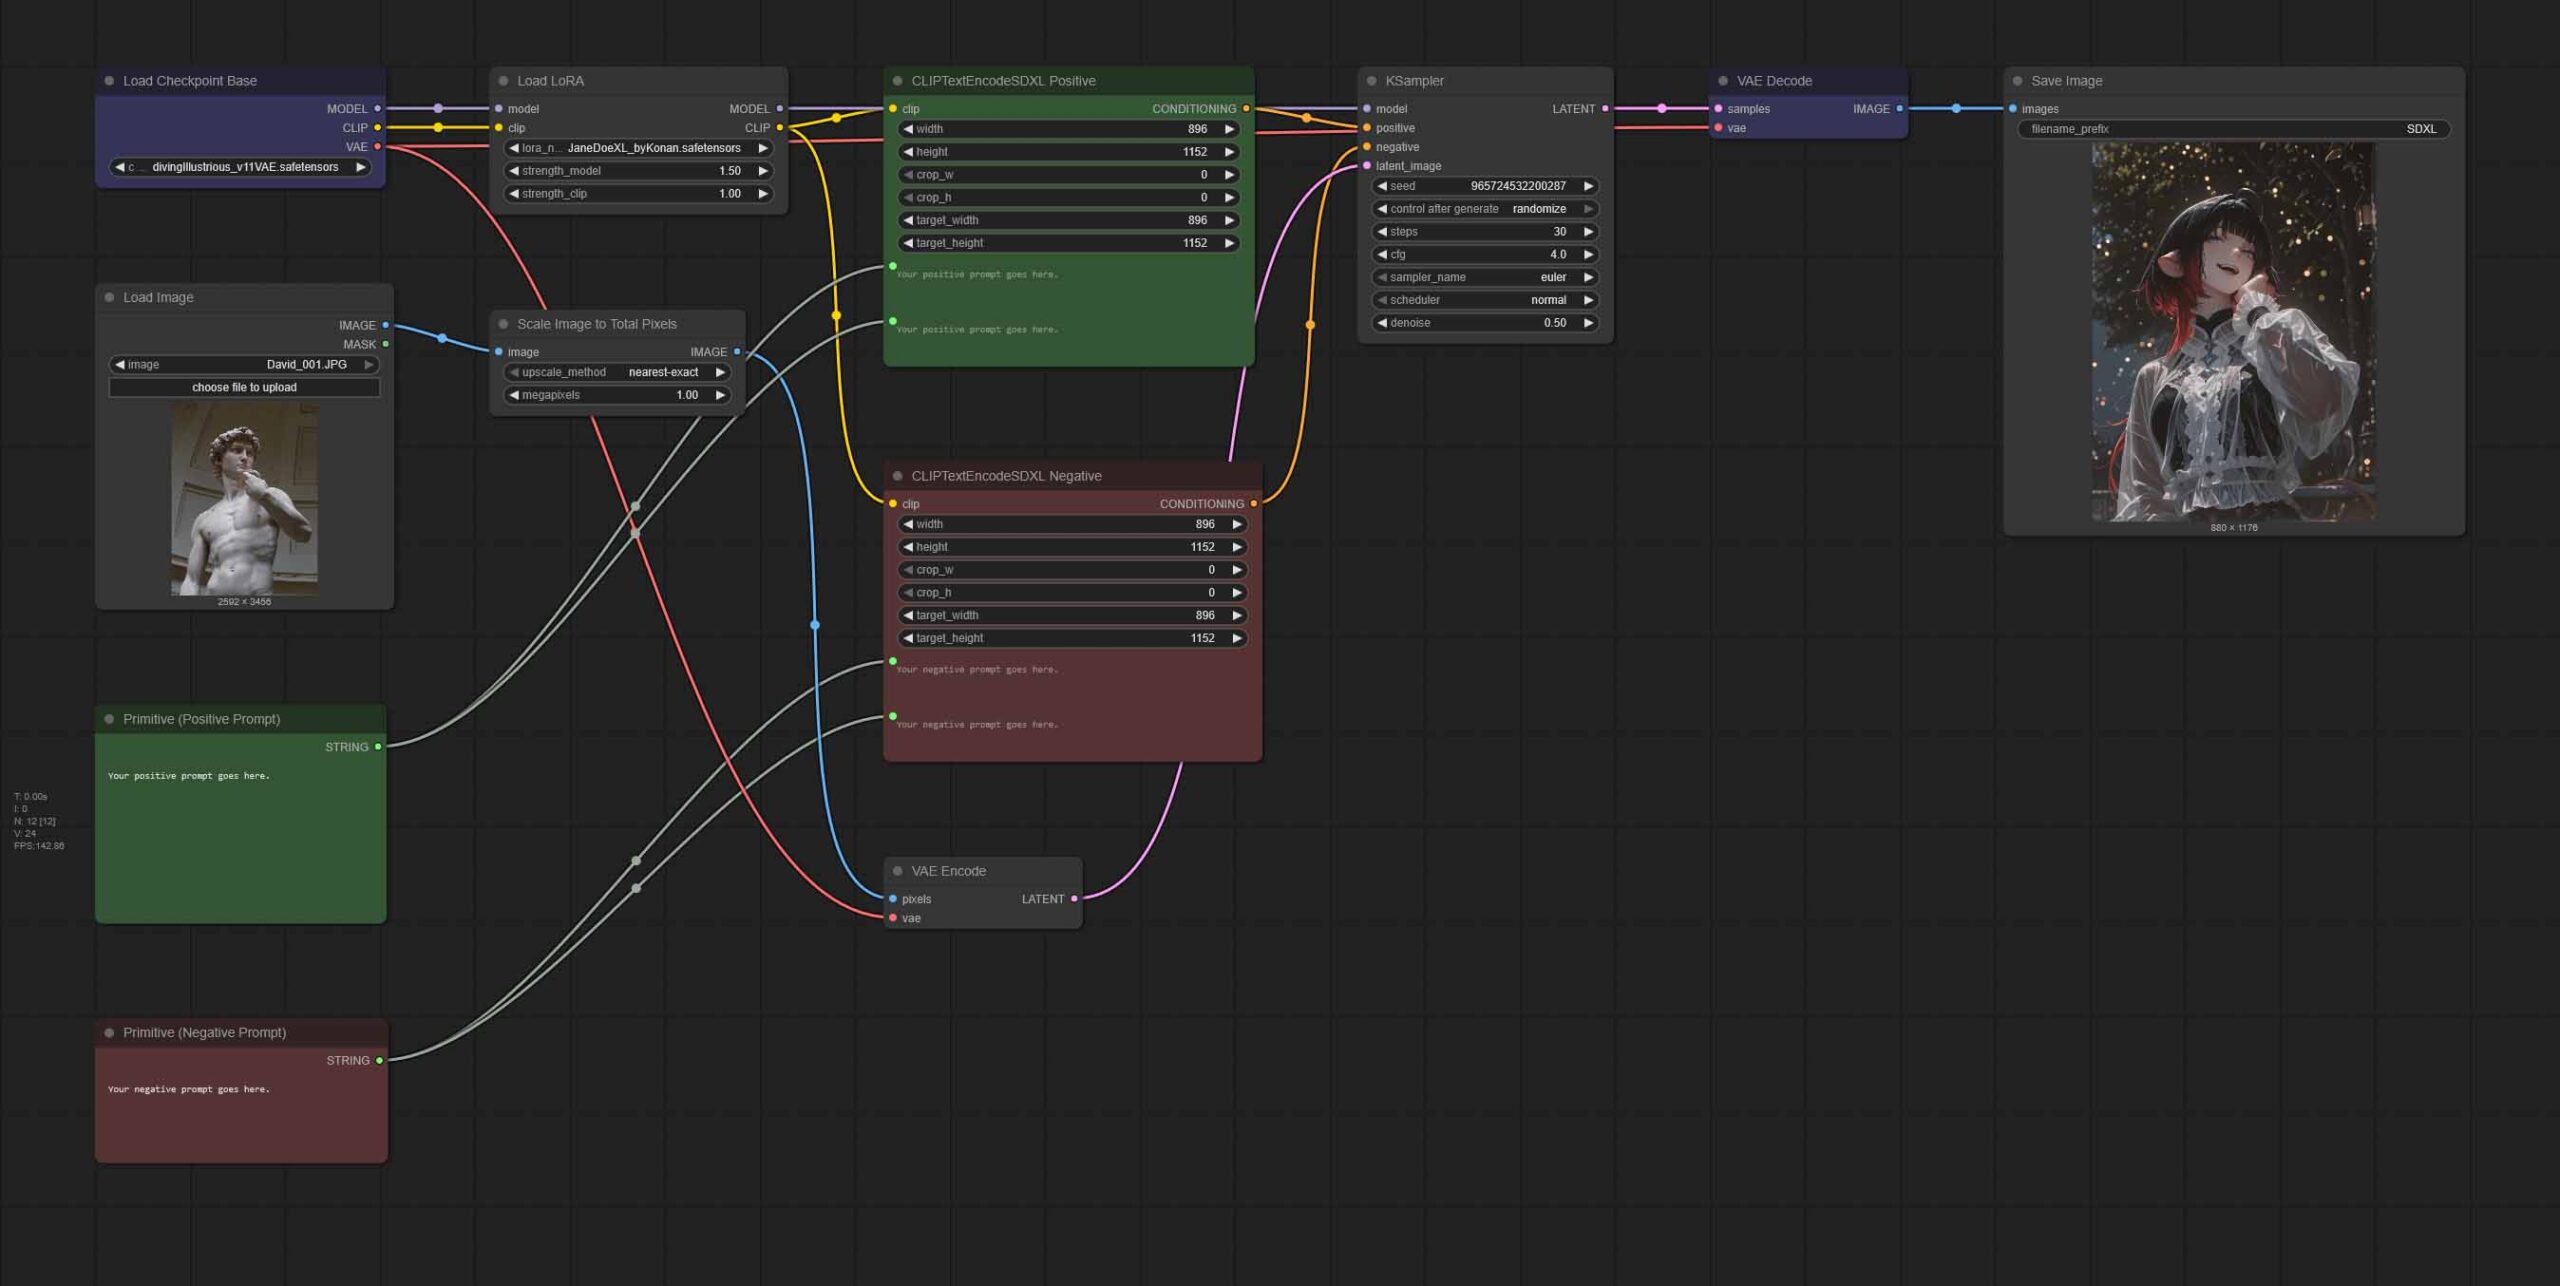
- Import/invoke your LoRA in your workflow – Each local image generation software has its own way of adding LoRA models to your image generation workflows. In Automatic1111 it’s a matter of selecting a LoRA from a model library window, in ComfyUI you need to import a separate node for your LoRA to be used by the model.
- Use a LoRA trigger word – While not all LoRAs have this requirement, most of them do. After you’ve imported the model into your workflow, you need to use one or more of the style trigger words which will make your LoRA actually affect your generated output in a meaningful way. The trigger words are almost always related to the names or visual aspects of characters/styles the particular LoRA was trained on. In most cases, a list of trigger words for a LoRA should be available directly on its download page.
- Choose a weight for your LoRA – Once you’re sure that you’ve loaded your LoRA correctly in the software you’re using, and used your desired trigger word/words (if applicable), the only thing that’s left to do is to set your LoRA’s weight. This setting simply controls how much will the LoRA affect your final output. Different LoRA’s work best with different weight settings. As a rule of thumb, trying out weights in the range of 0.8-1.2 is a good starting point.
This process looks a little bit different from software to software (for example in ComfyUI you import LoRAs by utilizng a separate Load LoRA node, while in Automatic1111 you simply click the name of the LoRA in the model browser), but the principle remains the same, regardless of the environment you’re using.
Where To Find Different LoRAs, and LoRA Compatibility
You can find hundreds of different LoRA models on sites like the previously mentioned Civitai or HuggingFace.
One word of caution. When you’re looking around for LoRA models online, make sure that the models you’re getting are compatible with the base SD or SDXL checkpoint you’re using – the model compatibility should always be described somewhere on the download page. SD LoRAs won’t work with SDXL, and the other way around.
If you’re curious about training your own SD/SDXL LoRA models already, we have a great resource for you here: How To Train Own Stable Diffusion 1.5 LoRA Models – Full Tutorial (Kohya GUI). It’s much easier than you think, and there is dedicated open-source software created for that very purpose.
Embeddings & Textual Inversion
Alongside model checkpoints and LoRAs, you will frequently encounter another type of file: Embeddings, also known as Textual Inversions. Like LoRAs, they are small files used to inject a very specific style, character, or concept into your generations.
However, they work in a fundamentally different way. While a LoRA modifies the model’s weights during generation, an Embedding teaches the model a new, highly specific “word” or “trigger phrase”. When you place this trigger phrase in your prompt, the model recalls the very specific visual concept the Embedding was trained on.
One of the most popular uses for embeddings is in the negative prompt. You will likely see a lot of prompts online, which will contain phrases like like “EasyNegative” or “bad-hands-5”. These are embeddings trained on thousands of examples of bad-quality images. By simply adding the trigger word (e.g., “EasyNegative”) to your negative prompt, you are efficiently telling the model to avoid a wide range of common flaws like deformed body parts, ugly faces, and blurry outputs.
Hardware Requirements – Continued
Following up on the hardware requirements for local diffusion models, the reality is this. For most intents and purposes the vast majority of GPUs manufactured in the last 5 years will be more than enough for basic local AI image generation with more or less bearable generation speed, with the video memory (VRAM) being one of the main limiting factors when it comes to creating higher resolution images, model fine-tuning and LoRA training, or generating images in larger batches.
While on much older graphics cards like for instance the RTX 2060 the image generation speed won’t be the best, it’s entirely feasible to run reasonably advanced SDXL workflows with face restoration and latent upscaling on cards such as my old RTX 2070 Super, and get your outputs in just about a minute.
You might also like: NVIDIA GeForce 2070 SUPER For AI (Stable Diffusion, LLMs & More)
Non-NVIDIA GPUs and Local Diffusion (AMD & Intel)

Just like with local large language model hosting, as things are now, most if not all local image generation software works the best with NVIDIA GPUs. This is because of the NVIDIA cards natively supporting the CUDA framework, which is what most software solutions utilize for handling inference calculations.
AMD GPUs with ROCm, and Intel cards with their support for AI frameworks like PyTorch through oneAPI are also supported by a rather wide range of inference environments and local image generation WebUIs, but when settling for these it’s important that you know about their limitations when it comes to software compatibility and computation speed in certain inference contexts.
The rule of thumb for now, both when it comes to local image generation and LLM inference software is: go with NVIDIA if you know that the software you’ll be using won’t play well with non-CUDA GPUs, and with either AMD or Intel, if you want to save some money, are not afraid of some tinkering, and know that the software you’re using is compatible with those.
You can learn more about AMD graphics cards here: 6 Best AMD Cards For Local AI & LLMs
And about the New Intel GPUs, here: Intel Arc B580 & A770 For Local AI Software – A Closer Look
How Much VRAM Do You Need For Local Image Generation?
This is one of the most frequently asked questions, as the VRAM debate is well known for everyone who had the pleasure of playing around with local LLM text generation tools. Image generation however, in general isn’t as VRAM hungry as both text and video generation workflow.
Still, it does require you to have a GPU that can fit the whole model in its video memory and generate your images in a reasonably quick manner. If you want to know which GPUs are up to that task, you can take a quick look at this list here.
The Automatic1111 WebUI has launch argument options you can set to run it on systems with less than 4GB of VRAM, and there even exist forks of the original A1111’s project, which allow you to use it with the base SD 1.5 models with no more than 2.4GB of video memory. Other forks of the project, like the Stable Diffusion WebUI Forge, offer further improvements on the VRAM front.
But let’s not talk about the minimums, but rather sum up the VRAM requirements of different model options in a quick list. Here it is:
- Stable Diffusion 1.5 – can work on as little as 2-4GB VRAM (albeit can be slow), 8GB VRAM should be sufficient for all of these.
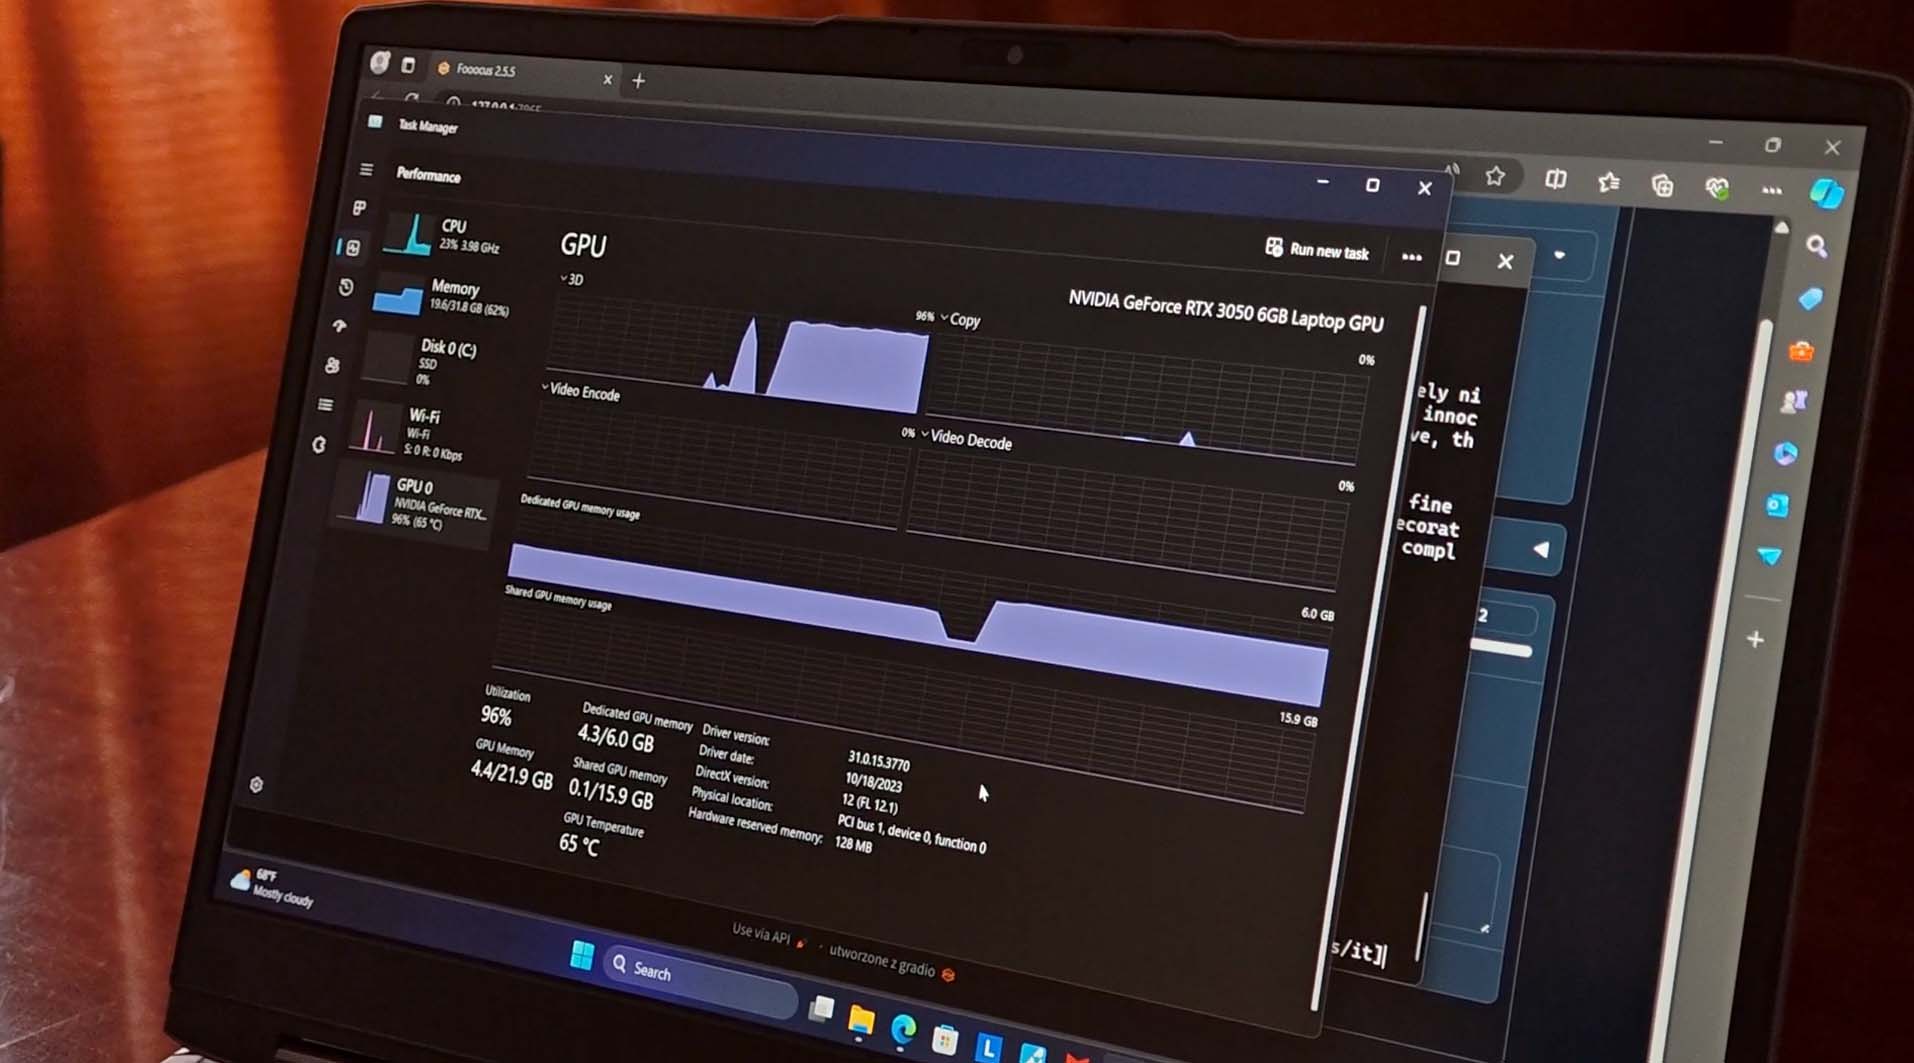
- Stable Diffusion XL (SDXL) – without using a refiner model, which most workflows tend to leave out anyway, SDXL can easily run on 8GB VRAM GPUs (and even on 6GB models with the right configuration), but will benefit from more video memory for both larger image generations and larger generation batches, and if you prefer to use the refiner without model switching.
- Flux – VRAM needs vary depending on the model type and quantization with full FP16 models requiring about 24GB VRAM for optimal performance, and quantized versions running on 6-16GB VRAM depending on quantization level and model variant.
Here you can see all the options within the A1111 WebUI that I mentioned above: How To Run Automatic1111 With Less Than 4GB of VRAM
If you want an even quicker and more general takeaway from all this, here it is:
- 8GB – An absolute minimum considering that it’s the lowest amount of video memory still present on commonly distributed consumer GPUs.
- 12-16GB – Safe bet for local image generation, lets you generate images in larger batches, train SD and SDXL LoRA models reasonably fast, and do simple model fine-tunes locally on your system. Sufficient for a few quantized versions of Flux.
- 24GB+ – The safe option if you’re also interested in other local AI workflows such as local LLM inference and more advanced image generation adjacent tasks such as LoRA training and model fine-tuning with full performance. If you plan to get into local video generation at all, having a graphics card with 24GB VRAM and up is a must. Or, you could think about getting into basic dual-GPU setups, which is actually much easier than you might think.
If you’re worried that your current GPU is either too old, or generally not up to the task, I have a great resource for you here: Best GPUs for Stable Diffusion, SDXL & FLUX Local AI Image Generation
How Much VRAM For LoRA Training & Model Fine-Tuning
While most of the current generation diffusion models aren’t really that large, and therefore do not need that much video memory during inference, you might benefit from some additional VRAM if you’re planning on either training your own LoRA models (and you really should, it’s extremely simple), or fine-tuning your own SD/SDXL checkpoints.
While you can slowly train a SD 1.5 LoRA on an older 8GB VRAM GPU like the RTX 2070 Super, generally it will take a very long time because of you being forced to train with a lower batch size setting.
The higher you can set the training batch size, which is simplifying things a bit the amount of images that can be used for training at the same time in parallel, the faster you can make the training process go by, regardless of how fast your GPU makes the required calculations. The very same rule applies to model fine-tuning.
Thus, the more VRAM you have, the faster you can train your SD/SDXL LoRAs and fine-tune your checkpoints, and the more leverage you have once larger diffusion models come forward in the years to come.
My advice is: get the most VRAM you can get for a reasonable price. Too little video memory on board is the most common bottleneck in almost all of the most popular local AI workflows. Don’t get caught by surprise in the near future.
Generating Images Without a GPU

Before you ask, yes, you can do local AI image generation without a GPU, doing CPU-only inference. Let me just warn you that it is much slower that using even one of the least powerful budget GPUs released in the recent years.
As CPU-only inference has to rely on your main system memory (RAM) for storing the model, it requires many workarounds to make this process as fast as possible with all the physical hardware data transfer constraints.
If you’re serious about trying out CPU-only local image generation, one of the better ways to go about it are projects such as the fastsdcpu by rupeshs, which is a local inference environment with all of the optimizations geared towards letting you create SDXL images as quickly as possible without having a GPU installed in your system.
Best Local Image Generation Software For Beginners
All of the software listed below I have used extensively throughout the last few years, finally settling with ComfyUI as my daily-driver.
All of these are the absolute best and most popular pieces of free open-source software used for local image generation, and all are equally worth trying out, especially considering that installing and configuring each of them is much easier nowadays, than it was when their first versions came out.
Check out my full list of open-source Stable Diffusion WebUI software here: List of Free Local AI Image Generation Software – TechTactician
What’s The Best Software To Start Out With?
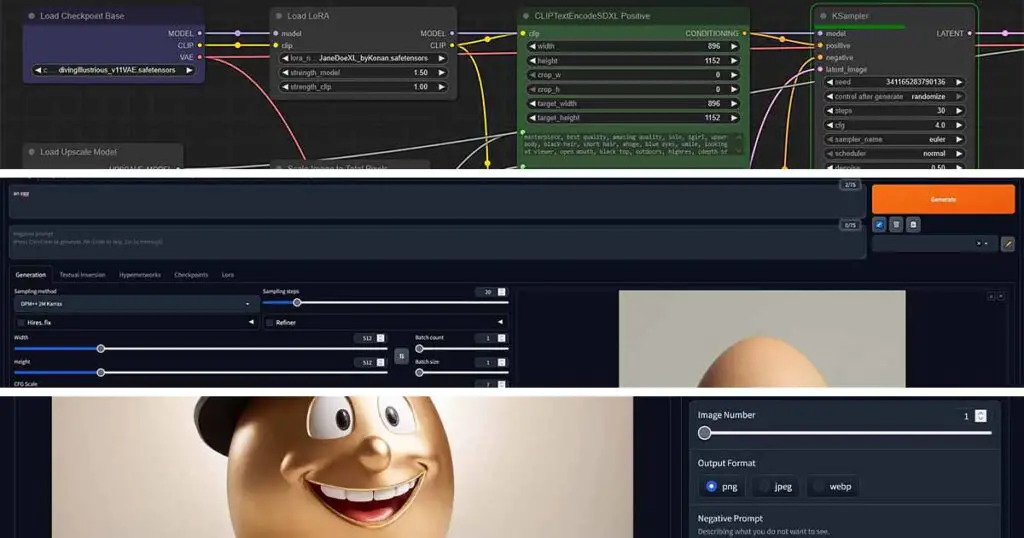
If you want the absolute best and most optimized option which can sometimes be a little bit intimidating for some less experienced users because of its node-based interface, go with ComfyUI.
If you want the easiest possible way of getting from this very moment to your first generated image, the Fooocus WebUI is probably the best option for you, at least for now.
If you don’t feel super comfortable thinking about node-based workflows yet, and at the same time you want more customization options that you’d have with Fooocus, the Automatic1111 WebUI (or its “Forge” fork) is a pick that should be just alright for you.
If you’re not satisfied yet, let me get into a little bit more detail on these.
Fooocus – Easy Way In, One Click Installer

The Fooocus WebUI is designed for simplicity, taking inspiration from Midjourney’s user-friendly approach. It gives you a simplified user interface (with an optional advanced settings mode), and lets you jump into generating images in just a few minutes, as you can see in my Fooocus WebUI guide in which I show you how to use the software, and teach you about all of its advanced options.
So in short, Fooocus is designed to be as simple as possible. It has a minimal interface, a simple one-click installer, and automates many of the complex settings behind the scenes. You just type a prompt, and it generates a high-quality image, and at the same time it also gives you quick access to some more advanced workflows such as image upscaling, inpainting and outpainting. It’s a great starting point if you feel overwhelmed by other options.
ComfyUI – The Go-To Local Diffusion Software
ComfyUI uses a node-based graph system to build your image generation pipeline (similar to how Blender’s shader or geometry nodes work). In the eyes of many newcomers this often seems intimidating, but not only it’s very easy to learn when it comes to the basic workflows most regular users like you and me use, but it can also be much faster than software like A1111 or Fooocus, because of the optimizations at play.
It gives you precise control over every step of the process, is very memory-efficient, and allows you to create easily shareable workflow files (hundreds of which you can easily find online and use right away). For me it’s the absolute best tool for dealing with both image and video generation, and after moving on from Automatic1111, I’ve switched to Comfy and never looked back.
A note of encouragement: Most ComfyUI workflows that you see online are very advanced and specific workloads that are much more complex and sophisticated than what you need to do to recreate most basic Automatic1111 functions using the ComfyUI nodes. The basic ComfyUI workflows I keep on mentioning can consist of less than 10 nodes with just a few settings to modify. If you’re still not sure, I really insist you try it out, or at least see how simple the most basic text to image or image to image workflows can be with Comfy: Basic ComfyUI SDXL Workflows Tutorial – No Custom Nodes Used
The Automatic1111 WebUI – The “Classic” Choice

The Automatic1111 WebUI is packed with features, has a massive community building extensions for it, and is still very well maintained to this day. For a long time, A1111 used to be the go-to choice for local image generation, as it was one of the first actual web interfaces that allowed you to work with the very first Stable Diffusion models.
It features a traditional user-friendly tab-based interface packed with sliders and options for every setting imaginable, and arguably might be easier to grasp for some users than ComfyUI. A popular, more optimized version of it, the so-called “Forge” fork, is also available and recommended for users with less VRAM on their GPUs.
If you need a guide covering all of the most important features, functions and settings of the Automatic1111 WebUI, you can find it here: Automatic1111 Stable Diffusion WebUI All Basic Settings Explained [UPDATED]
Other Software Options (SwarmUI, SD.Next, StabilityMatrix & More)

If you want even more options, there are still quite a few actively maintained projects that allow you to quickly jump into local image generation. All of these have different qualities and feature sets to offer, but they operate on the similar principle. You can learn much more about all of these here. One particularly interesting option is an option is MochiDiffusion, which is specifically aimed at Mac users.
Still thinking about which one to choose? Let me help you even further: ComfyUI vs. Automatic1111 vs. Fooocus – Full Software Comparison
Basic Image Generation Techniques & Settings
Before we get to the basic settings that each of the AI image generation software will grant you access to, we will quickly go through the most popular features of these programs. Here are the most common AI image creation and editing techniques that you will most certainly come across after installing your chosen image generation software.
Txt2Img (Text-to-Image)

The most basic workflow. You write a text prompt (positive and negative), input the basic generation settings, and the model creates an image from scratch. Nothing more to say here really.
Img2Img (Image-to-Image)
The second most common practice. You provide an initial image and your text prompts. The model then modifies the image based on your prompt, with how much of the original image is taken into account based on the denoise setting value. Great for modifying existing images, as well as as a starting point for new creations inspired by existing imagery.
Inpainting

Here, you draw a mask over a specific part of an image (e.g., a face, an object) and have the AI regenerate only that area, seamlessly blending it with the rest of the picture according to your input settings. Great both for fixing broken elements on your images, and for introducing new objects into your compositions.
Outpainting
This is simply extending an image beyond its original borders. The model fills in the new canvas area based on the existing image content. How far you want to outpaint your original image, on which side, how much you want to blend it with the original, and what element you want to appear in the outpaint is of course always up to you.
Image Generation Settings – The Basics
Now let’s quickly go through all of the most important basic settings that you will guaranteed find in most if not in all pieces of software that allow you to work with diffusion-based image generation models.
Image Size

Your declared image output size in pixels. It’s best to generate images at the model’s native resolution (e.g., 512×512 for SD 1.5, 1024×1024 for SDXL) to avoid artifacts. If you want to generate larger images, you can either utilize the Hires. Fix method (see below), or upscale your image in a different way (take a look at the image upscaling section further down).
Hires. Fix
A feature present in some form in most AI image generation software that generates a smaller image first and then upscales the image data before running the image in the latent form through another sampling process. This allows you to get extremely detailed high resolution output with minimal distortion, as well as do creative detail-generating upscaling on your images.
Batch Size & Batch Count

The batch size parameter regulates how many images you want to generate at once (which uses more VRAM, as your GPU needs to work on more images at the same time), while the batch count setting controls how many batches of images you want to generate one after another. The total amount of generated images will always equal your batch size times your batch count.
You can read more about this here: Batch Size vs. Batch Count In Stable Diffusion – All You Need To Know
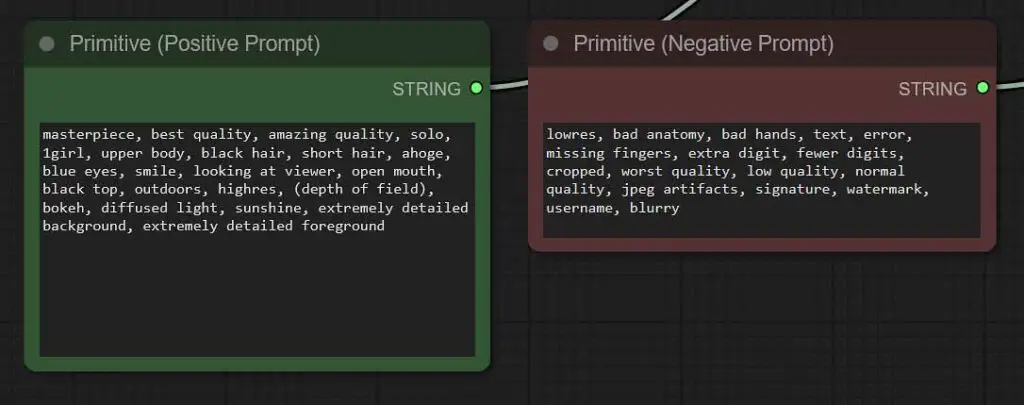
Positive & Negative Prompts

Although this one is pretty self-explanatory, it’s impossible not to mention it. The positive prompt tells the model what you want to see. The negative prompt tells the model what to avoid (e.g., “blurry, ugly, deformed hands”).
Prompt Weights
Words, sentences and phrases in your prompts can have different weights. The weight of a selected word or a group of words in your prompt tells the model to give more attention to that particular phrase or keyword when creating your image. Weights can be assigned to both positive and negative prompt elements.
The way of setting the weight of a chosen word or phrase will depend on the inference software you’re using, but in most cases weights are assigned either by encasing the chosen text tokens in parentheses (for ComfyUI for example, each pair of parentheses will increase the weight of the enclosed tokens by 1.1 times the original weight), or by specifying it directly as a numberical value, as shown below.
Both in Automatic1111 and in ComfyUI, you can change the weights of the chosen words or phrases in the two ways mentioned above. Here is what both of these can look like in a prompt:
- ((detailed face)) – a weight multiplier specified using solely using parentheses – in ComfyUI the weight of this prompt would be 1.1*1.1=1.21.
- (detailed face:1.2) – a weight multiplier directly specified with a numerical value encased in single parentheses
Check your software’s documentation or help materials to see how to assign weights to the parts of your prompt in your chosen WebUI. It’s one of the more powerful tools you have on hand.
Different Prompting Styles For Different Models
Depending on which model/checkpoint you’re using, the exact prompting techniques for getting the best results can differ. For instance, some model fine-tunes are trained to work best with keyword or tag-based prompts, while some of them work better with natural language image descriptions.
A good example of models which incorporate a non-standard prompting style are SD & SDXL model fine-tunes trained for creating high-quality anime-style images. These models are trained on content taken from the so-called “booru” sites, which are essentially imageboards containing large amounts of more and less savory anime-style art.
Models such as Illustrious XL or PonyXL, trained using anime-style images with captions directly scraped from different booru sites, are therefore best prompted using short booru tags/image keywords to describe the elements you want to see in your image. You can see what I mean by visiting the tagexplorer website, which exists for the sole purpose of cataloging all of the different “booru-style” tags you can use when prompting these types of models.
If you don’t plan on generating anime-style images however, in case of most fine-tunes created for the purpose of enhancing the photorealistic capabilities of the base SD/SDXL checkpoints, prompting with natural language sentences and short intuitive keywords will work without any trouble.
When coming up with your prompt try to be as descriptive as you can, taking into account all of the details of your desired scene. Character poses, background elements, face expressions, types of clothing and scene lighting are only a few things that you can freely manipulate simply modifying your positive prompt. Pretty cool, isn’t it?
Always remember the limitations of the models you use. Remember how we mentioned that both base SD and SDXL and their fine-tunes tend to struggle with generating coherent text on the images? If you know that, you can plan out your prompts in advance, for example including the word “text” in the negative prompt, so you don’t have to deal with garbled text remnants which can otherwise pop up randomly in your outputs.
If you need some inspiration, and trust me, you really do, for one to see how exactly an average image prompt is constructed, go over to the civitai.com community image gallery, select a few works, and then take note of some of the prompts used to create them. This will help you immensly when you’ll start coming up with your own image prompts.
CFG Scale (Classifier-Free Guidance)
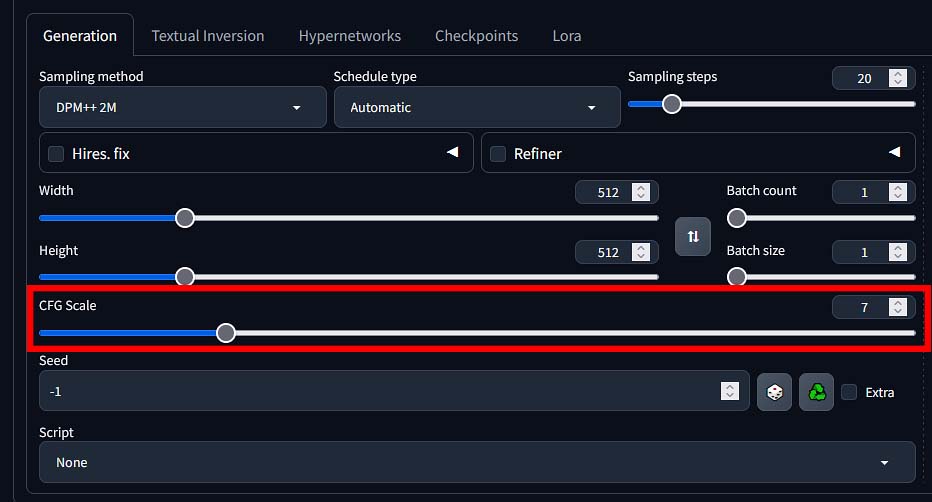
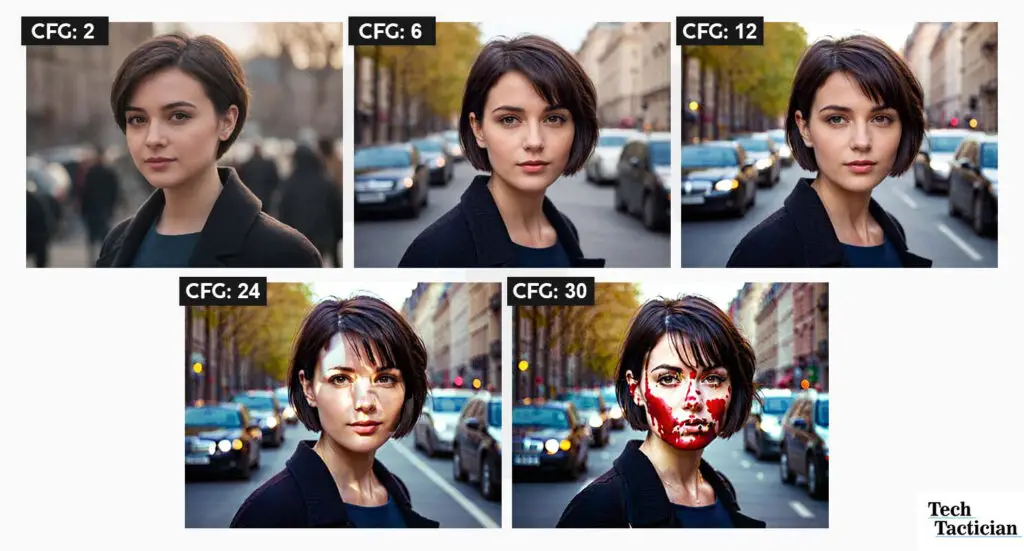
This is a value that controls how strictly the model should follow your prompt. Lower values (3-6) can give you more creative results and in most cases much “softer” looking images, while higher values (7-12) will stick closer to your prompt.
Using too high of a CFG value can make your images appear distorted, while going too low can easily make your outputs look “washed out”. The CFG scale value you should use will depend on the checkpoint you’re using, as different fine-tunes can have different sensitivity to CFG parameter changes.
Remember that different checkpoints can have different sensitivity to this setting. In the case of most SD & SDXL model fine-tunes a good CFG value to start with is commonly somewhere between 6 and 8. The Diving Illustrious Anime model that I’ve mentioned a few times on the other hand, performs best with the CFG scale setting set to as low as 2 or 3.
Sampling Methods (Samplers)
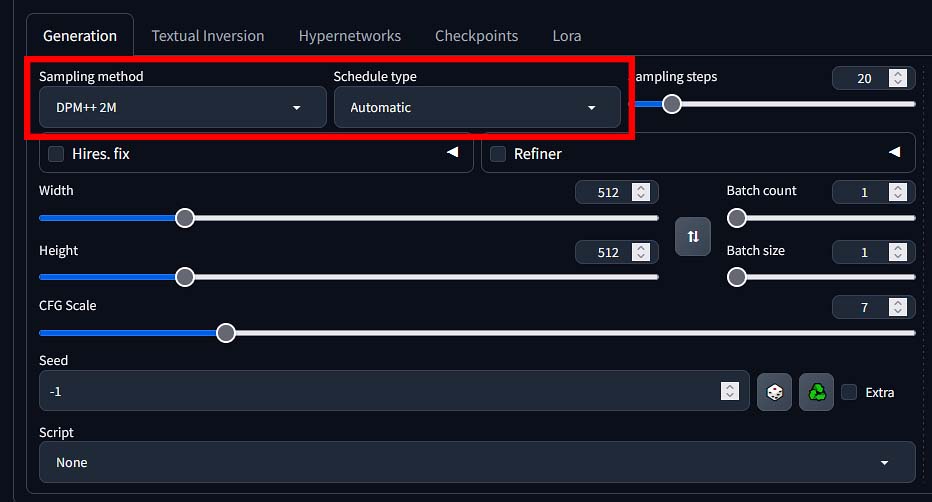
The “diffusion” process involves starting with noise and gradually removing it over a series of steps to produce an image. A sampler (or a sampling method) is the specific algorithm that guides this denoising process at each step. Different samplers take different mathematical approaches to navigating the path from noise to a clean image.
You’ll see names like Euler a, DPM++ 2M Karras, DDIM, and LCM. Some samplers are faster but might be less detailed at lower step values, while others are slower but can produce more coherent or higher-quality results.
There are, in general, two main types of sampling methods you’ll come across – ancestral, and non-ancestral. Ancestral samplers add random noise back to the image mid-creation at each denoising step, creating more varied and creative outputs but less consistency and convergence, while non-ancestral samplers produce more stable and reproducible images by steadily removing noise without reintroducing randomness. You will get a hang of this once you try out a few options yourself.

The sampler you choose can have a noticeable impact on your final image. There is no single “best” sampler, and the ideal choice often depends on the checkpoint you’re using, the number of steps you’re running, and your personal aesthetic preference. A great starting point for SDXL is often the Euler Ancestral sampler (Euler a), as it provides a good balance of speed and quality, and will work just fine for most of your new creations.
There is a great resource on samplers with data-backed comparisons and more detailed visual explanations over available over on stable-diffusion-art.com. You can find it here: Stable Diffusion Samplers: A Comprehensive Guide
Schedulers

A scheduler works together with a sampler. During the denoising process, the scheduler determines the size of the “step” to take at each interval. Simplifying things a bit, it dictates how much noise is removed at each point in the generation. You’ll often see scheduler options paired with samplers, like in our previous example “DPM++ 2M Karras” combination, where “DPM++ 2M” is a sampling method, and “Karras” is the scheduler used alongside it.
Different schedulers (like Karras, Exponential, SGM Uniform, etc.) have different “noise schedules.” Some might remove a lot of noise in the beginning and make finer adjustments at the end, while others might take more uniform steps throughout. This of course, will have an effect on your final image.
For most users, sticking with the recommended scheduler for a given sampler (like Karras for the DPM++ family or the Euler samplers) is the best practice. It’s an advanced setting that you can experiment later on, but the defaults are usually very well-chosen.
Sampling Steps
Right next to the sampler setting, you will always find a parameter for Steps (or Sampling Steps), regardless of the software you’re using. This number controls how many iterations the model takes to refine the image from pure noise to a finished picture.
- Low step settings – likely too low for most SD & SDXL models (~5-15 steps): The image will likely be blurry, undefined, and incomplete, as the model didn’t have enough time to create a coherent image of satisfying quality.
- The usual sweet spot for most common sampling methods (~20-40 steps): This is the sweet spot for most modern samplers. You’ll get a high-quality, detailed image without wasting time on unnecessary calculations.
- High step settings – often unnecessary (~60+ steps): While it might add minuscule details, with much higher step count you’ll experience significant diminishing returns with most commonly used sampling methods. Doubling the steps from 30 to 60 will double your generation time but will almost never double the quality of the image. Unless… you’re using one of a few samplers that do require high step counts to perform well. These however, in my experience are pretty rare.
As a beginner, starting with 25 steps is a fantastic and efficient baseline for most models and samplers, especially if you’re starting out with Euler Ancestral (Euler a).
Seed
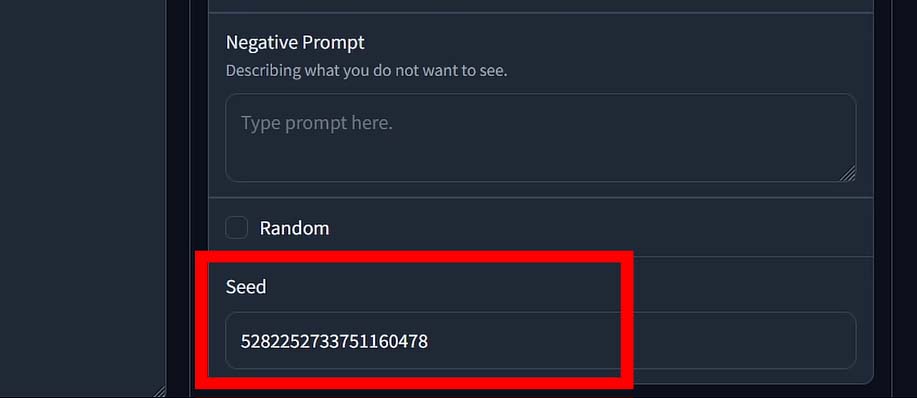
The seed is a number that initializes the random noise that every image generation starts with. Think of it as the starting point for the creative process. If you use the same checkpoint, same prompt, the same settings, and the same seed, the diffusion model will produce the exact same image every single time. If you change the seed, even by one digit, you will get a completely different image, even with all other settings remaining identical.
Most software is set to use a random seed (often represented by the number -1) by default, which is why you get a new image with every click.
The seed is incredibly useful for reproducibility and refinement. If you generate an image you really like but want to make a small tweak to the prompt or a setting (like the CFG Scale), you can re-use the same seed to ensure the core composition of the image remains the same. This allows you to experiment with small changes without completely losing the result you liked.
Denoise Value (Img2Img Only)
The denoise setting is present only in image-to-image workflows. It controls how much the original image is changed by the model. Low values (such as 0.2-0.4) imply very small, minute edits to the original image’s contents, while high values (for instance 0.6-0.9) create an image that’s much further from the original.
Denoise value of 0 means that the model will give you back your imported image without any changes. Denoise value of 1 on the other hand, means that there won’t be any trace of your original image in your new creation – which essentially transforms your img2img workspace to a txt2img workflow.
Here you can learn much more about different SD & SDXL image generation settings, on the example of the Automatic1111 Stable Diffusion WebUI software: Automatic1111 Stable Diffusion WebUI All Basic Settings Explained [UPDATED]
Faces, Eyes & Hands – Where Diffusion Models Struggle Most (+Tips)
You’ll quickly notice that AI models often struggle to generate realistic hands and sometimes produce strange faces or eyes. This is a well-known issue with most diffusion models, and there are quite a few ways you can try to mitigate that.
Here are some tips I learned along the way:
- Use More Direct Negative Prompts: Add terms like “deformed hands”, “extra fingers”, “mutated”, “ugly”, or “blurry” to your negative prompt. Depending on the model used, this might greatly decrease the probability of anatomical discrepancies appearing in simpler compositions.
- Use LoRA models for better anatomy: There are many LoRA models that are created with sole purpose of fixing anatomical details such as hands or faces in your images. A great example of such a LoRA compatible with many different checkpoints is Hands XL, that you can find here.
- Use Adetailer (After Detailer): This is a method that automatically detects faces, hands, and bodies after the main image is generated and fixes them using a specialized model. It’s available in the form of an extension (for A1111/Forge), which has its ComfyUI equivalent in the form of a Face Detailer node. It’s one of the best and foolproof ways of fixing deformed body parts on your generated images, and it’s really easy to set up.
- Inpainting: A somewhat tedious but reasonable way to fix bad hands or other body parts in your images is to manually mask the problematic area and regenerate it with a refined prompt until you get it right. The way this is done will depend on the software you’re using.
You can learn more about Adetailer/Face Detailer in ComfyUI here: ComfyUI FaceDetailer Simple Workflow Guide
Image Upscaling Techniques (With Examples)
The basic premise of image upscaling is easy to understand: you want to make a small resolution image bigger. But, using only “traditional” upscaling methods to enlarge your generations might not be any more effective than stretching your image out in MS Paint and calling it a day.
There are three main ways you can go about upscaling your images right after they are created, one using dedicated image upscaling models, and the other two, using iterative upscale with the aid of the diffusion model you used to create your image.
If you’re looking for a method that can add a lot of new detail to your images and at times simultaneously fix some anatomical errors as a side effect, then you can skip the first two and go right ahead to latent upscaling, which is definitely my go-to choice.
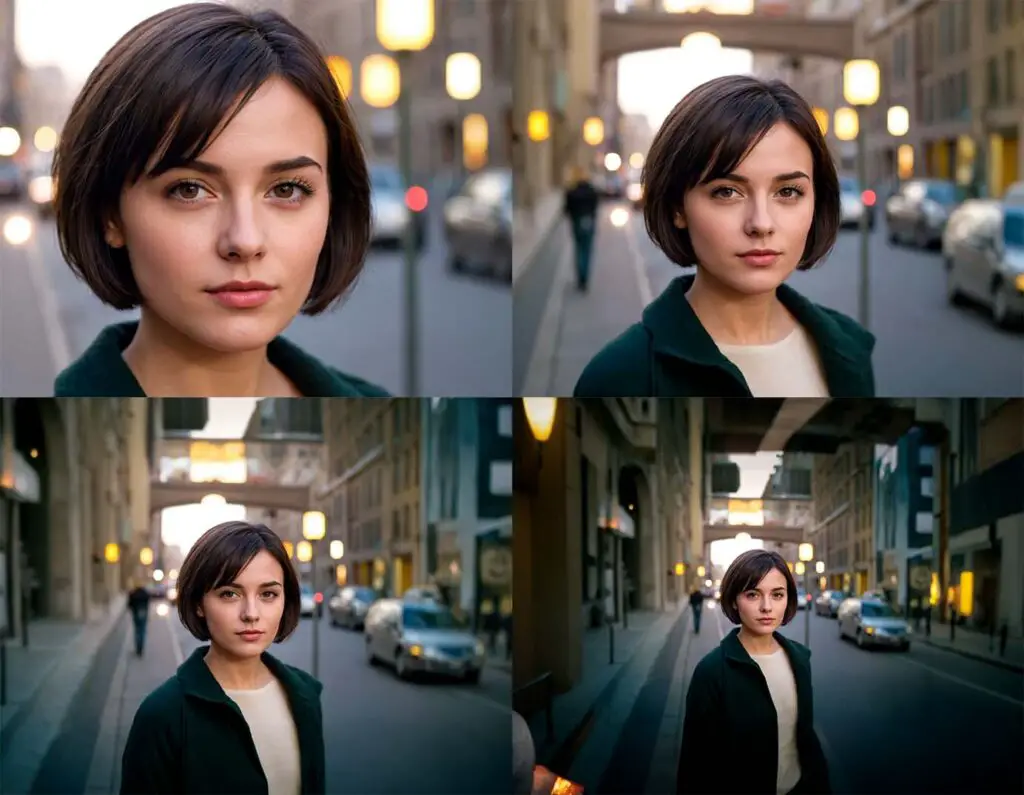
Very important note: you can click on the example images shown here to view them in full resolution – it’s the only way you can compare the tiny detail differences between different upscaling techniques.
Simple Image Upscaling Using an Upscaling Model
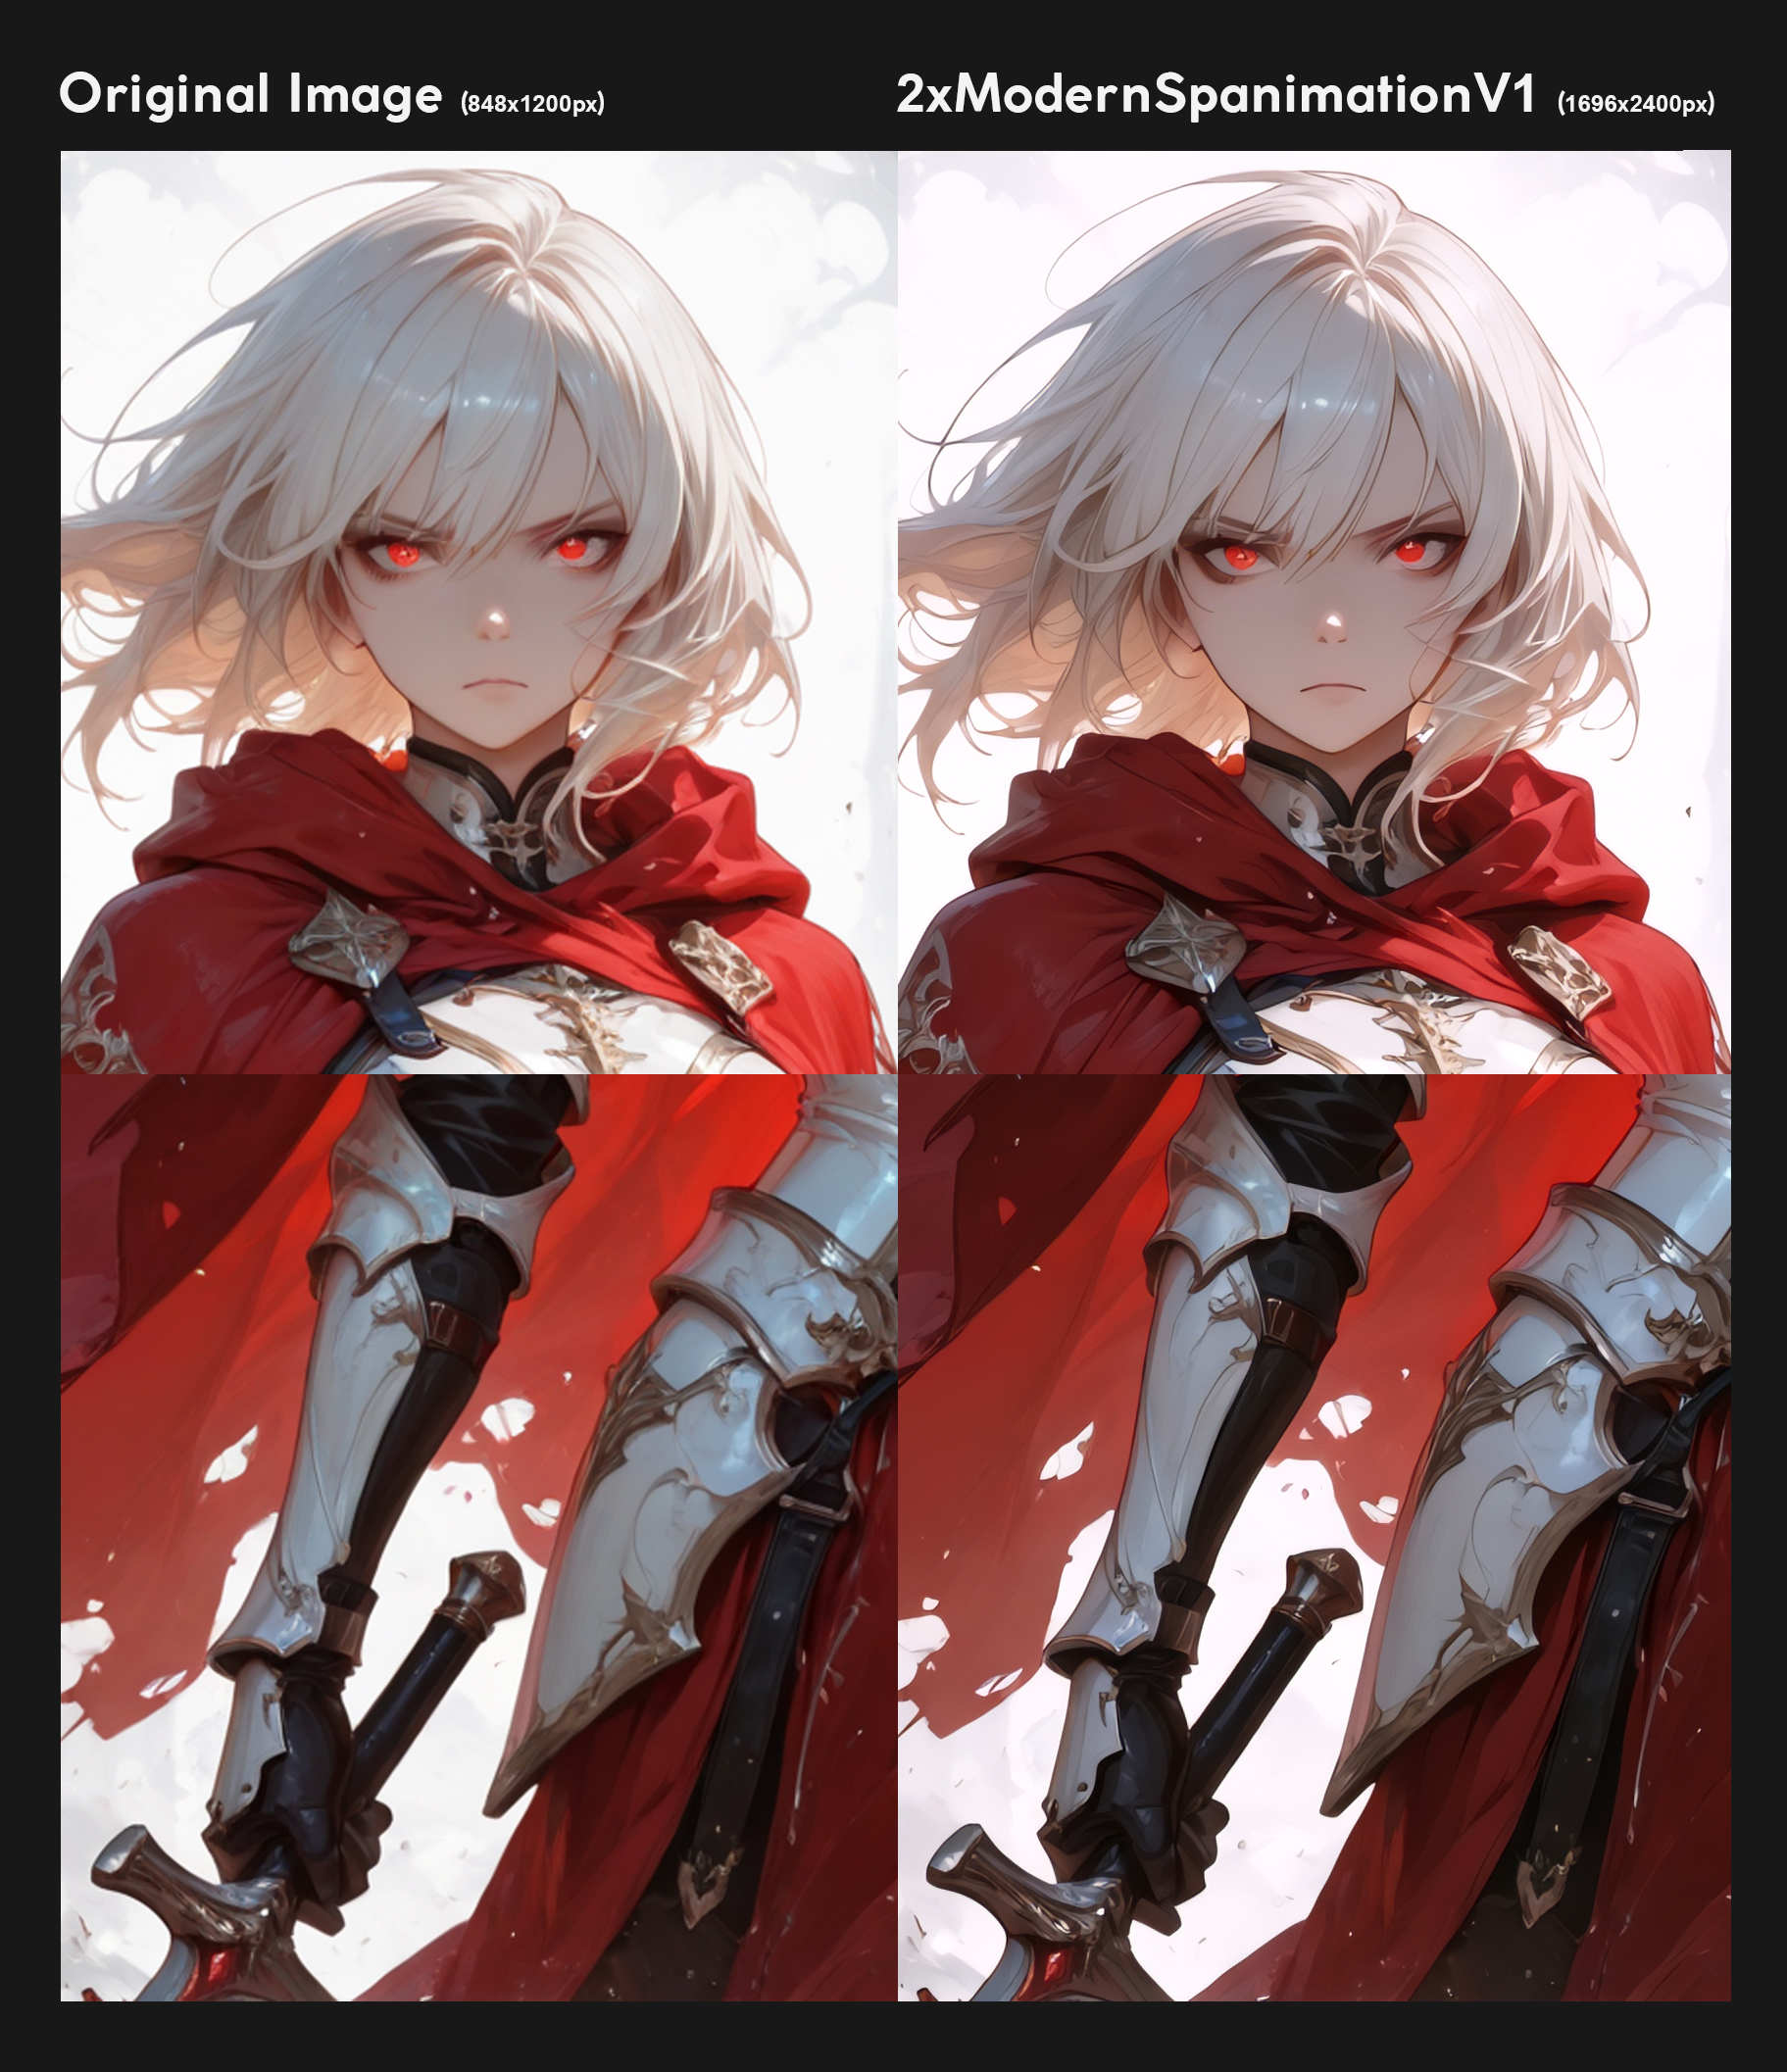
This is the most basic form of upscaling. It relies on using algorithms like Lanczos, Nearest Neighbor, or more advanced AI-based models like ESRGAN or 4x-UltraSharp to increase the pixel dimensions of your finished image.
Think of it as a post-processing step. The image is already generated, and the upscaler just makes it bigger either using a simple upscale algo, or, what is usually preferred, one of the aforementioned AI upscale models (you can quickly glance over on OpenModelDB to see what I’m talking about).
While AI upscalers like ESRGAN are very good at sharpening details and reducing blur, they can only work with the information that’s already in the image. They don’t add genuinely new details, which can sometimes result in a clean but slightly artificial or “plastic” look on very large upscales, and certainly doesn’t help when you’re looking for a “creative” upscale techniques with fine detail additions. So let’s get to that.
Pixel Space Image Upscaling
This is a clever two-step process that combines simple upscaling with the diffusion model’s creative power.
Here is how it works:
- First, a base image is generated at the model’s native resolution (e.g., 1024×1024 for SDXL).
- Next, that image is simply upscaled (using a method like Lanczos) to a higher resolution. This makes the image bigger, but also a bit blurry.
- Finally, this blurry, larger image is run through an Img2Img process with a low denoising strength – usually around 0.30-0.50, so that most of the original image’s details and composition stay intact. The model essentially “paints over” the upscaled image, adding fine details and textures based on your original prompt (or a modified version of it), effectively sharpening and refining it.
This technique is much more powerful than simple image upscaling if you want creative results, and is fantastic for producing high-resolution images with newly generated details without much extra effort.
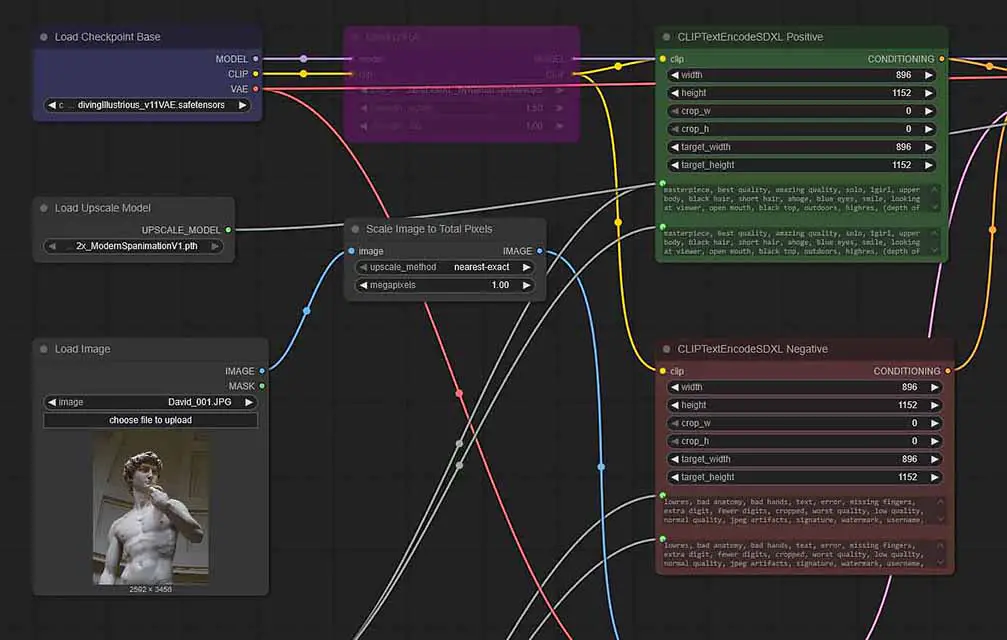
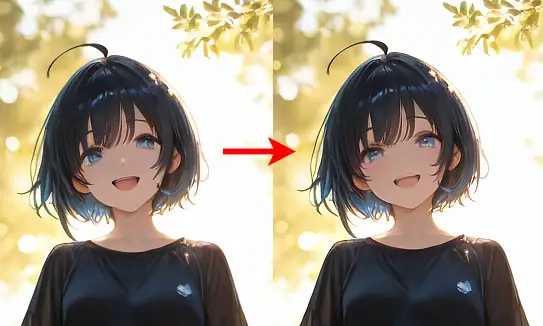
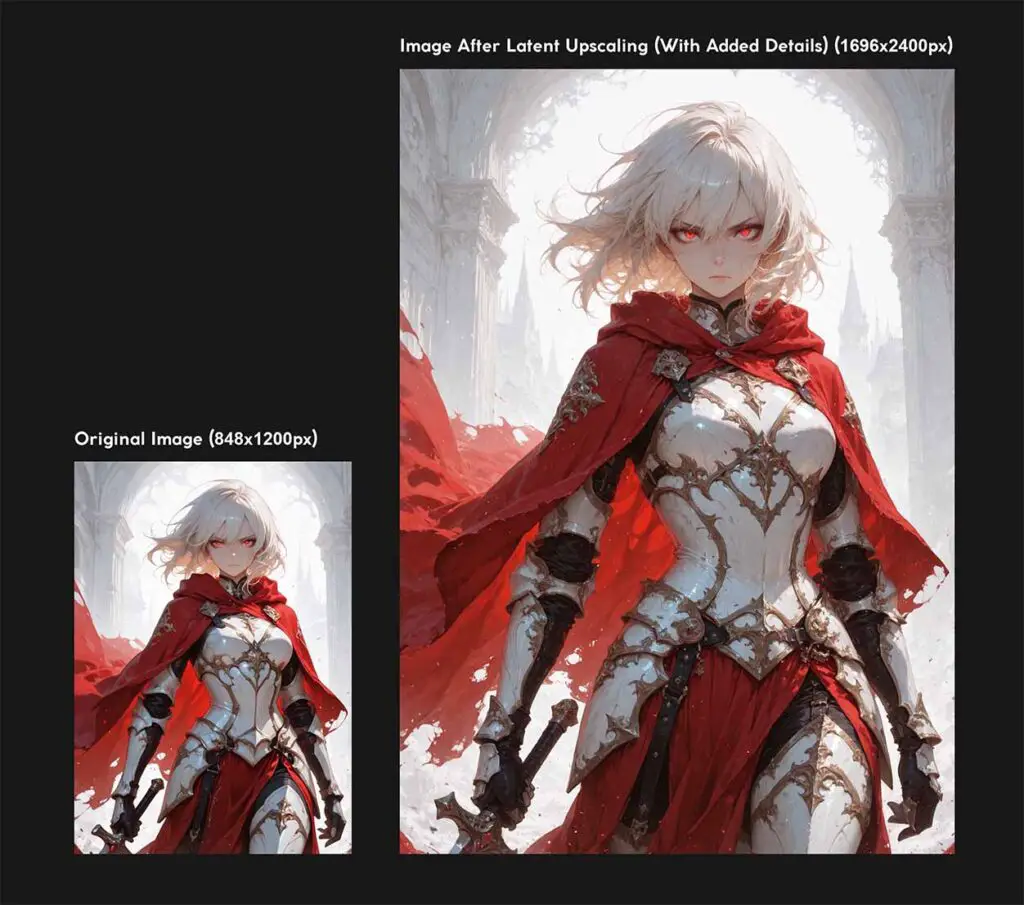
Latent Image Upscaling
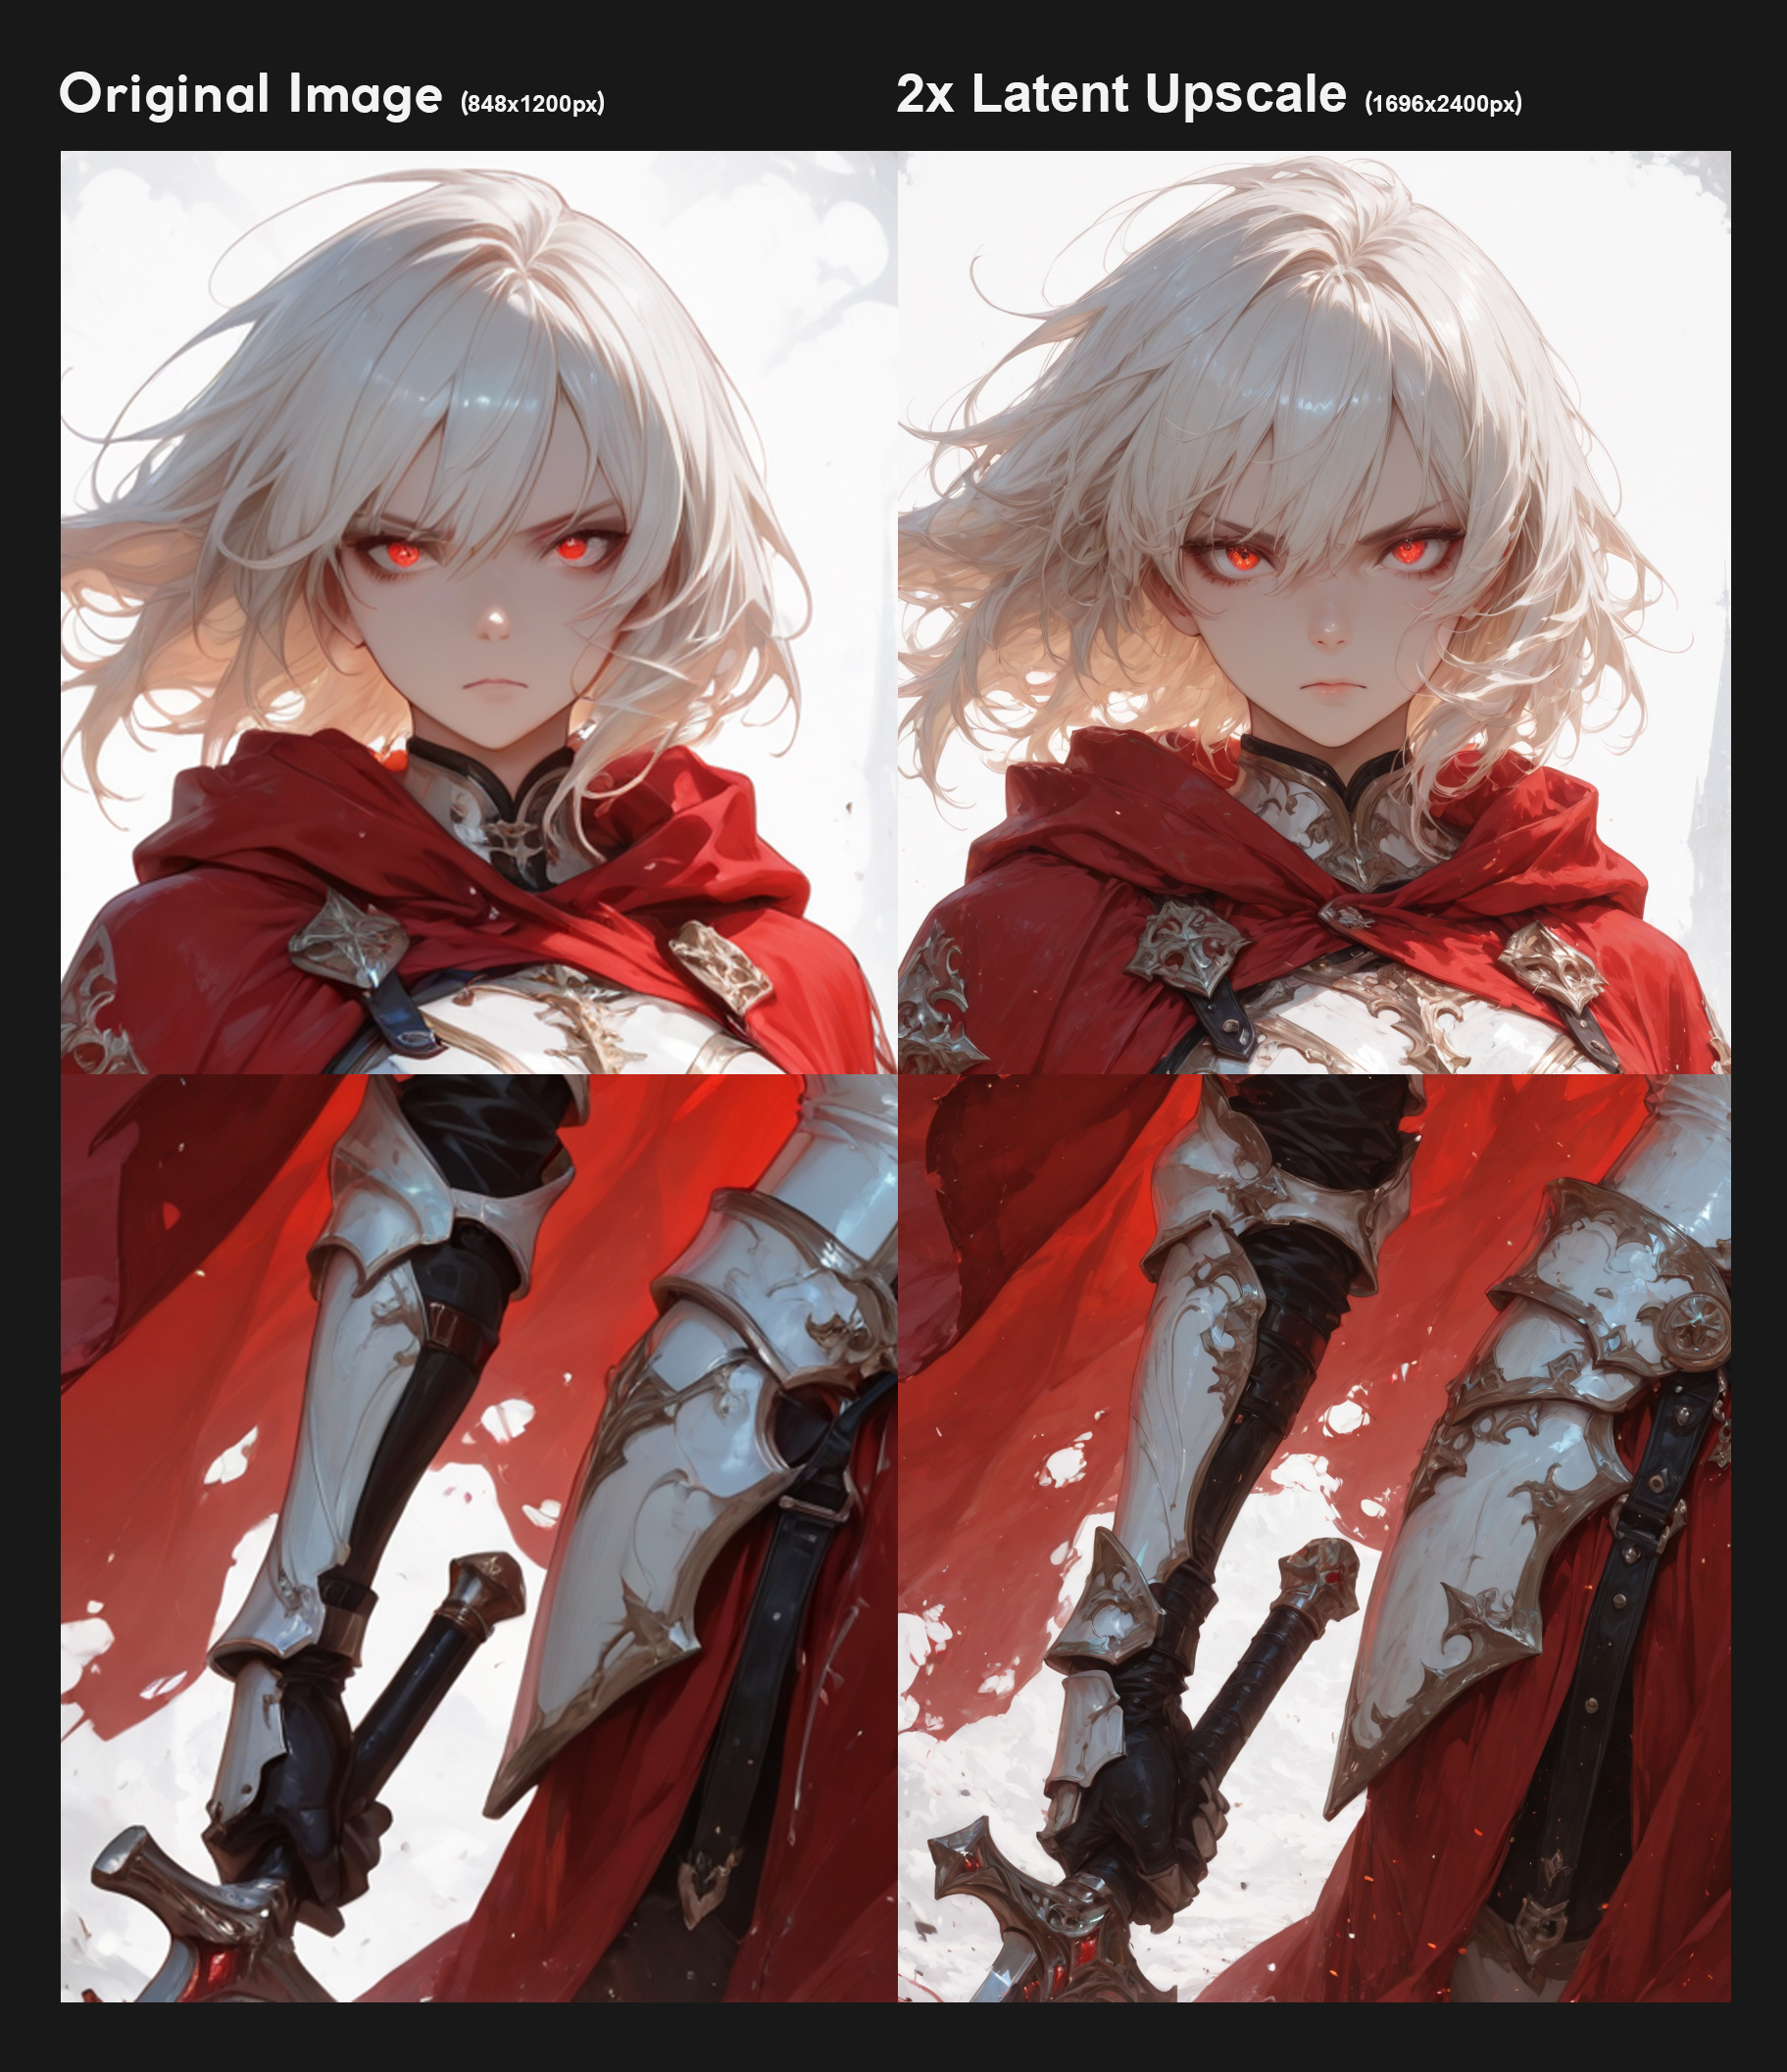
This method effectively identical to what’s known as “Hires. fix” in software like Automatic1111. Instead of upscaling the final pixel image, latent upscaling does its work on the image in the latent space.
This means that your inference software doesn’t need to utilize the VAE to bring your image back to pixel space, upscale it, and then pack it back to latent space to run it through the img2img pipeline just to then use VAE to let you save it at the very end (this is exactly what happened with our image in the previous method).
So, the process involves:
- Taking the latent representation of the image right after it’s been generated.
- Scaling this latent image representation up by a chosen factor.
- And then letting the model add new, coherent details within the latent space by running the latents through another sampling process with low denoising strength, in most cases using the same model and prompt you used to generate the initial image.
If you want to see how exactly to go through this entire process in ComfyUI, you can check out my full latent upscaling guide available here: Latent Upscaling in ComfyUI – Hires Fix Without Custom Nodes
As you can see, it’s almost exactly the same as the previous one, with the sole difference of the second sampler run being done on image latents, instead of the actual image itself.
This is another way of going about iterative upscale, this time without unneeded VAE runs. Beware though. Latent upscaling can often introduce unwanted artifacts into your creations. If you ever find that it fails you, your first step should be rolling back to the previous method and seeing if the results are any better.
What To Do Once You Get All The Basics – Where To Go From Here
Once you’re comfortable with the basics, a whole new world of possibilities opens up. Here are a few things to explore next:
- ControlNet: A pretty much revolutionary tool that gives you precise control over composition, poses, and shapes by using reference images like stick figure poses, depth maps, or scribbles.
- Training Your Own LoRAs: Capture a specific person, art style, or object and create your own LoRA to use in your generations.
- Have some fun with your prompts – seriously: You might not realize it yet, but in many cases when you get the ideal workflow setup, the things that will actually affect your final image quality the most are your prompts. Experiment, seek inspiration and research the best ways to prompt the model you’re using to get the most of it. It’s really worth it.
LLM Software Integrations, And More
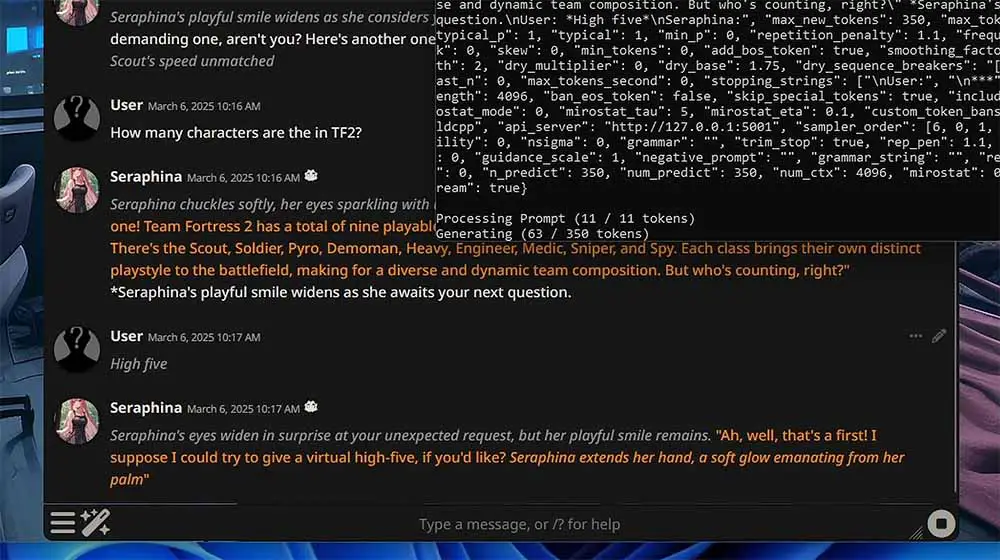
As here on TechTactician we’re all into different types of local AI software, many of which are equally fun to use as the programs I’ve shown you here, I’m obligated to tell you that many local LLM clients such as the OobaBooga WebUI, or KoboldCpp x SillyTavern, feature neat integrations with local AI image generation software if only you have the VRAM to spare.
These integrations can help you give some more life to your local AI chatbots letting the models or characters you’re speaking to generate images based on the conversation contexts, which sometimes can grant you really interesting results. I just thought that that’s yet another thing that just might interest you (besides some of the models also being able to describe imported images to you).
If you’re curious about local LLMs and software used for running large language models locally, I have another guide just like this for local LLM inference, that you can find here: Beginner’s Guide To Local LLMs – How To Get Started. Whether it’s chatting with your own free and private local AI assistant or AI character roleplay, it’s all once again only a few clicks away!
Thank you for reading, please do bookmark this page if you found it useful, and I hope to see you next time. Bye!