
Here is how to run the Stable Diffusion Automatic1111 WebUI locally on a system with >4GB of GPU memory, or even when having only 2 GB of VRAM on board. It’s actually quite simple, and we will show you all the setting tweaks you need you can do to make Stable Diffusion run and generate images even on a low VRAM graphics card. Here is exactly how to go about it.
If you don’t have the Stable Diffusion A1111 WebUI installed on your system yet, read this: Stable Diffusion WebUI Settings Explained – Beginners Guide. The WebUI by Automatic1111 is currently one of the best ways to generate images using the Stable Diffusion AI locally on your computer.
There is an even easier way to run SDXL models on systems with 4-6GB of VRAM, with the aid of the Fooocus WebUI – check out this guide to learn how to install and run it! – How To Run SDXL Models on 6GB VRAM – Fooocus WebUI Guide [Part 1]
VRAM vs. System RAM
VRAM, or GPU memory is the amount of memory your graphics card has on board – it’s simply short for “video RAM”. On your GPU you have a fixed amount of VRAM that is different for different graphics cards models on the market. It can’t be changed or upgraded, as the internal memory chips on graphics cards are by design permanently soldered to the GPU mainboard.
The more VRAM a GPU has, the more data it can generally hold/quickly process at the same time. GPU memory grants the video card a quick access to the data stored within it, allowing for quick calculations that don’t have to rely on reading data off the hard drive or main system memory (RAM).
Remember, all types of data transfer between different pieces of hardware inside your computer take time, so being able to hold a substantial amount of data inside the GPU memory during its operation gives you a huge advantage.
When dealing with most types of modern AI software, using LLMs (large language models), training statistical models, and attempting to do any kind of efficient large-scale data manipulation you ideally want to have access to as much VRAM on your GPU as possible. Stable Diffusion is actually one of the least video card memory-hungry AI image generators out there, as by design it makes use of the latent diffusion for the image generation process.
The most popular amounts of VRAM in GPUs are 2, 4 and 8 GB for older graphics cards, and 8, 12, 16, 24 GB for more recent GPU models. During the SD image generation process, all the processed image data is stored in VRAM.
For efficient image generation with Stable Diffusion we recommend having at least 8GB of VRAM, however as you will see in a short while, generating images is possible also with even less than 4GB of VRAM, provided you adhere to a few important rules and tweak your settings accordingly to avoid out-of-memory errors.
Stable Diffusion “CUDA out of memory” Error – How To Fix
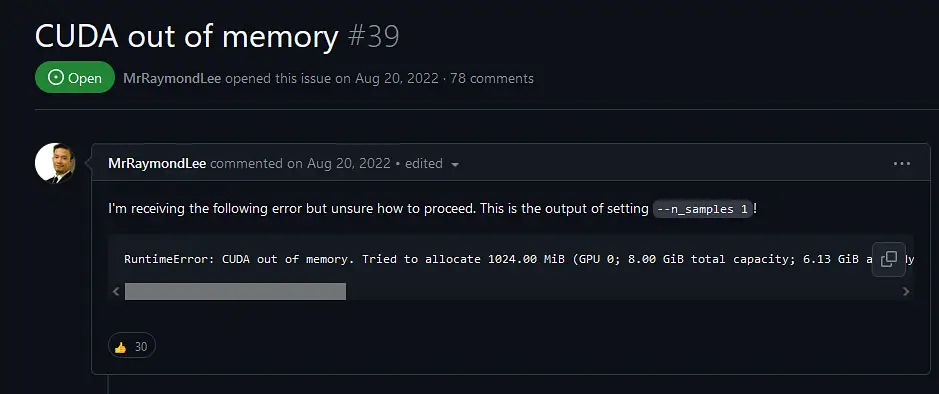
When for one reason or another you run out of your GPU memory (VRAM) during the Stable Diffusion image generation process, you will be faced with an out-of-memory error. In case of newer NVIDIA GPUs, this error may look something like this:
torch.cuda.OutOfMemoryError: CUDA out of memory. Tried to allocate 128.00 MiB (GPU 0; 3.00 GiB total capacity; 2.32 GiB already allocated; 0 bytes free; 2.45 GiB reserved in total by PyTorch) If reserved memory is >> allocated memory try setting max_split_size_mb to avoid fragmentation. See documentation for Memory Management and PYTORCH_CUDA_ALLOC_CONFWhat is the quick fix for the CUDA out of memory error in Stable Diffusion? Well, you need to somehow limit your runtime VRAM usage. There are quite a few ways to do that here, so let’s get to the best of the available optimizations for generating images on older GPUs with limited amounts of on-board VRAM using the Stable Diffusion WebUI.
The rest of this article contains all the tips and setting tweaks you’ll need to prevent this error from happening.
How To Run Stable Diffusion With Only 6, 4 or 2 GB Of VRAM – Quick Solution
Here is the official method of running the Automatic1111 Stable Diffusion WebUI with less than 4 GB of VRAM.
Running Stable Diffusion With 4-6 GB Of VRAM
To attempt to successfully use Stable Diffusion when having only between 4 and 6 gigabytes of memory in your GPU, is to run the Stable Diffusion WebUI in medvram mode.
The medvram mode is meant for GPUs with 4-6 GB of internal memory, while the lowvram mode which we’ll discuss next, was created to aid generating images on graphics cards that only have 2 GB of operational VRAM to spare.
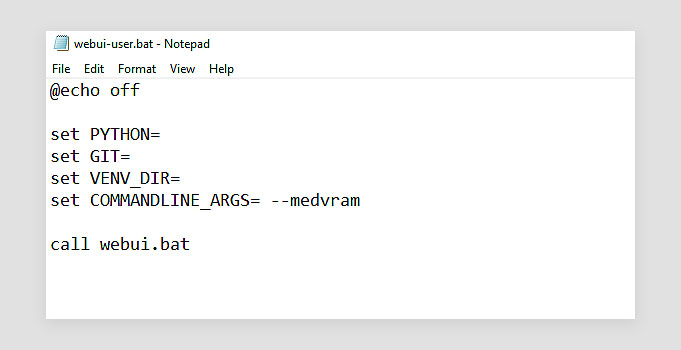
You can enable each of these modes by editing the webui-user.bat file which is located in the main directory you’ve got Stable Diffusion installed in, and inputting appropriate flags into the line starting with “COMMANDLINE_ARGS=”. Here are the exact steps you need to take:
- Go to the directory you’ve got Stable Diffusion WebUI installed in. Close the WebUI console window if you had it open.
- Edit the webui-user.bat file using a plain text editor (On Windows you need to right click the file and select the Edit option to open it in your system notepad).
- Change the line containing commandline arguments to look like this: COMMANDLINE_ARGS= –medvram
- Save and close the webui-user.bat file and run it. Stable Diffusion WebUI should now start with the medvram optimizations enabled.
The –medvram flag reduces your GPU VRAM usage by splitting the image generation process into 3 basic modules. Each of these modules is loaded into the graphics card’s memory one at the time and processed separately. Once one module resides in VRAM during runtime, other modules are being held in the main system RAM.
This greatly reduces the overall VRAM usage, at the cost of performance. As each of the modules has to do its work separately, the image generation time will naturally get a little bit more lengthy. This is the only tradeoff connected with using the –medvram flag, which has otherwise no impact on the final output image quality.
Note: Don’t use the Live Previews option together with either the –medvram or the –lowvram settings turned on. If you do, you will notice a further large negative impact on the performance.
You can read more about the low VRAM optimizations in the official Stable Diffusion Automatic1111 WebUI documentation over on GitHub.
If you’re still facing any out-of-memory errors after this, you can first try to apply some further setting tweaks we’re going to talk about in a short while, and then add the –always-batch-cond-uncond flag alongside the –medvram/–lowvram flag to the same commandline arguments line in the webui-user.bat file. This command will batch together positive and negative prompts in the sampling process, further lowering the runtime VRAM usage at the cost of performance.
For less than 2 GB of VRAM in your GPU, follow through to the next paragraph!
Running Stable Diffusion With >2 GB Of VRAM
The steps are almost the exact same here. Edit the webui-user.bat file in the same way as you did in the paragraph above, but this time use the –lowvram flag.
This way, the UNET will be split into even more modules that will be loaded into your graphics card memory separately as they enter the processing queue. Keep in mind though, that this can make the general image generation process take substantially more time to finish, and it will certainly be noticeably longer than when using the –medvram flag.
When using the –lowvram setting only one module is loaded into memory while others reside in your system RAM, similarly to the –medvram flag. This unfortunately means that while the final quality of your images won’t be affected in any way, the overall generation speed will suffer by a lot. This is a small price you have to pay for being able to successfully generate images using Stable Diffusion on older graphics cards equipped with only 2 GB of VRAM.
If you’re still getting out-of-memory errors after using the –lowvram flag, you can try to force close all the programs and applications that you don’t need when generating images and that may eat up a chunk of your VRAM that Stable Diffusion could otherwise make use of. This may include browser windows with running videos or video streams opened on a second monitor, image processing apps and so on. Free up as much VRAM as you can before beginning the image generation process.
If that didn’t help, and you still don’t have enough memory to generate your images, check out the next paragraph – there are some more vital generation settings in the SD WebUI itself that you can tweak to make most out of your limited GPU memory.
You might also like: Using Hypernetworks Tutorial Stable Diffusion WebUI – How To
Stable Diffusion Low VRAM Generation Settings
Generating images locally using Stable Diffusion (through the Automatic1111 WebUI or other GUIs and forks of the original project) can be efficiently done with as little as 8 GB of GPU memory, and as you have seen, with some modifications it’s also possible on older GPUs featuring less than that, for example 6, 4, or 2 GB of VRAM only.
Here are some of the most important settings you need to keep an eye one when attempting to generate images on systems with low VRAM GPUs using the Stable Diffusion WebUI.
- The –medvram or –lowvram flags set accordingly – on systems with less than 6/4/2 GB of VRAM you might need to make use of the built-in WebUI optimizations for low VRAM systems. You can learn how to do that in about 30 seconds in the paragraphs above.
- If you’re using the medvram/lowvram modes, try adding the –always-batch-cond-uncond flag to the starting file as well. It can further reduce the VRAM usage at the cost of performance.
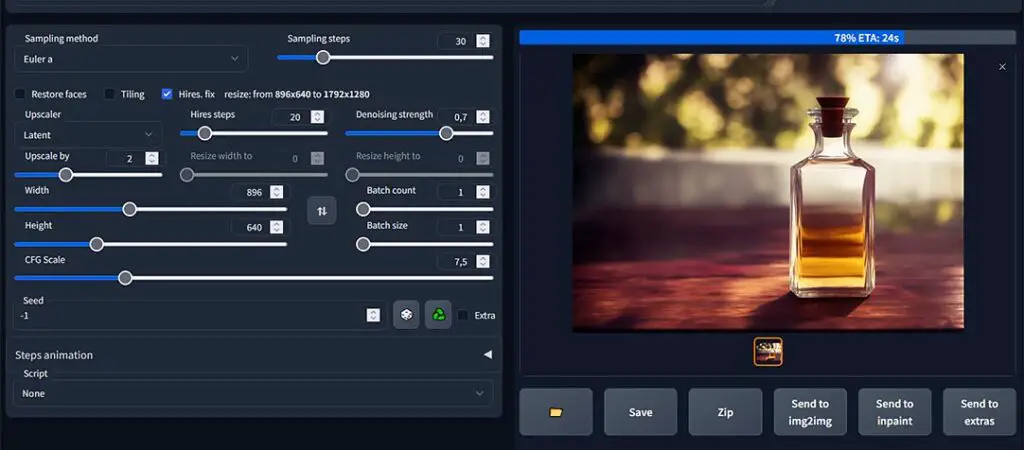
- The output image resolution – the larger the image you’re trying to generate, the more VRAM will the generation process require. If you’re planning to generate images with larger resolutions while being low on GPU memory, you have to in mind that you can hit the max res limit pretty fast.
- Batch size setting – The more images you’ll try to generate in one go upping the batch size setting, the more operational VRAM you’ll need during the generation process. On low VRAM systems be sure that you don’t try to set the batch size too high. Learn more about batch size and count settings in this short guide. There is much more to be said here!
- Use Xformers on NVIDIA GPUs for faster image generation – Xformers is a library that the Stable Diffusion WebUI makes use of to speed up the image generation. Keep in mind that it will only work on NVIDIA graphics cards. You can activate it with the –xformers flag in the webui-user.bat file, and in many cases it can help you counter the longer image generation times caused by activating numerous low VRAM fixes.
Once again, here you can learn what batch size and batch count settings are in Stable Diffusion – It’s really important when you’re running low on VRAM! – Batch Size vs. Batch Count In Stable Diffusion – All You Need To Know
Keeping an eye on these parameters and setting their values accordingly can ensure that you will be able to generate great quality images even with as little as 2GB of VRAM.
Solid Black/Green Image Instead of Meaningful Output?
If after the image generation process finished you’re left with green or black image instead of your desired picture, there is a quick fix for that too!
In low VRAM situations, this issue is in most cases caused by a GPU that doesn’t have built-in support for half-precision floating point numbers. This is an issue on many older graphics cards, so there is a high chance that you can run into it at some point.
Luckily we have a short guide on how to fix this error in a matter of 5 minutes total! See here for the quick solution: Stable Diffusion Black/Green Images Quick Fix (WebUI Tensor NansException Errors)
What Does More VRAM Give You In Stable Diffusion?
After all this you might ask: what does having more GPU memory allow you to do in Stable Diffusion? Do you even need more than 8 GB for using Stable Diffusion efficiently? Here is our answer to that.
There are quite a few benefits awaiting for you when it comes to Stable Diffusion if you’re lucky to have more than 8 GB on VRAM in your GPU. Here are some of the most important ones:
- Ability to generate more images at the same time quicker, by allowing you to set higher batch sizes.
- Ability to generate larger images by giving you access to higher image resolutions without out-of-memory errors.
- Compared to generating images with lower amounts of VRAM (6 GB and below), having more GPU memory lets you generate your pictures much faster, as you don’t need to resort to any kind of fixes that could otherwise compromise performance in a tradeoff for lowered VRAM usage (like the ones we mentioned in this article).
Other than that, more VRAM in your system also can give you more freedom when it comes to latest AAA games, high resolution video editing, 3D modeling software and so on. All in all, there are lots of benefits waiting for you if you plan to upgrade your GPU soon!
Check out also: How To Train Own Stable Diffusion LoRA Models – Full Tutorial!