")
Here you will learn how to quickly disassemble the R36H, as well as replace its battery. My recent review of the R36H was the perfect occasion to take a closer look at its internals. If you’re interested in the close-up shots of the vacant slots for the Wi-Fi and vibration motor modules, or simply taking a closer look at the R36H’s components and learning a thing or two about them, you’re in the right place.
This web portal is reader-supported, and is a part of the AliExpress Partner Program, Amazon Services LLC Associates Program and the eBay Partner Network. When you buy using links on our site, we may earn an affiliate commission!
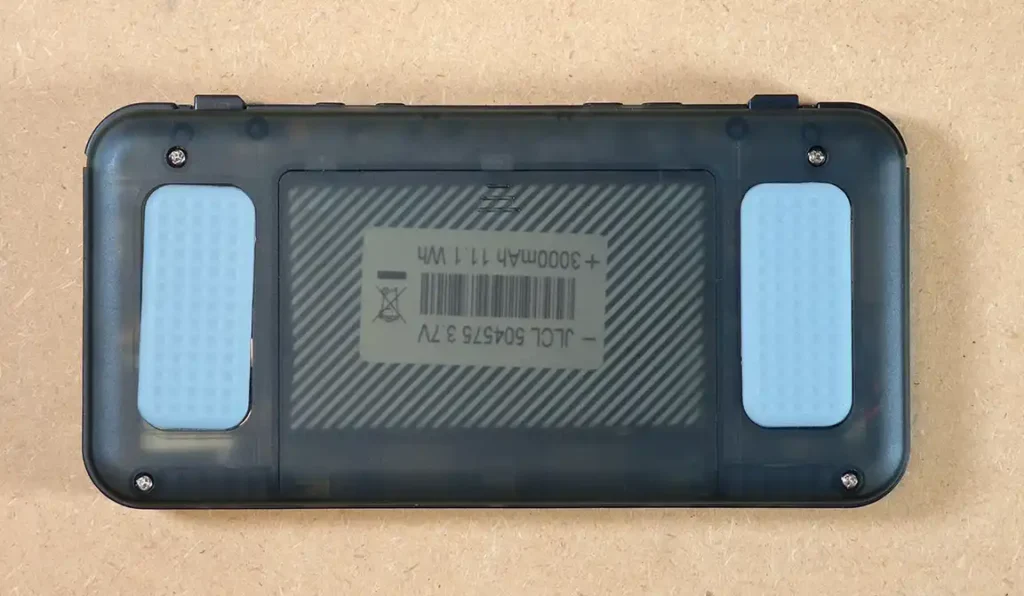
The Battery & Replacement
For those of you who are just curious about the battery replacement process, I’ve decided to put this section up first. To replace the battery in your R36H you don’t have to remove any screws or disassemble the device. The whole process consists of 3 short steps.
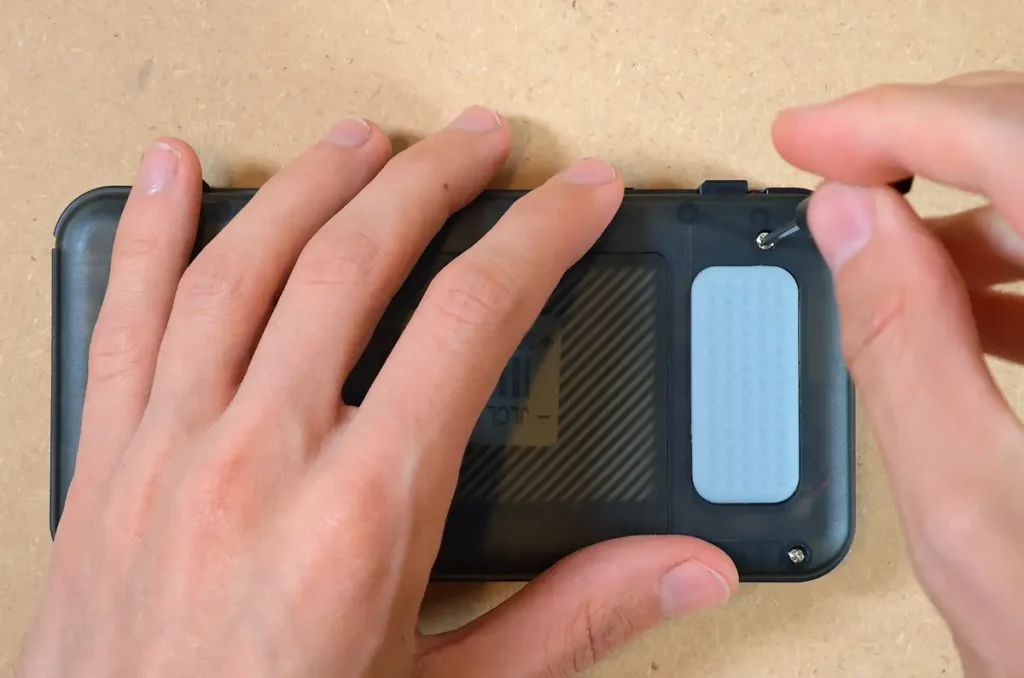
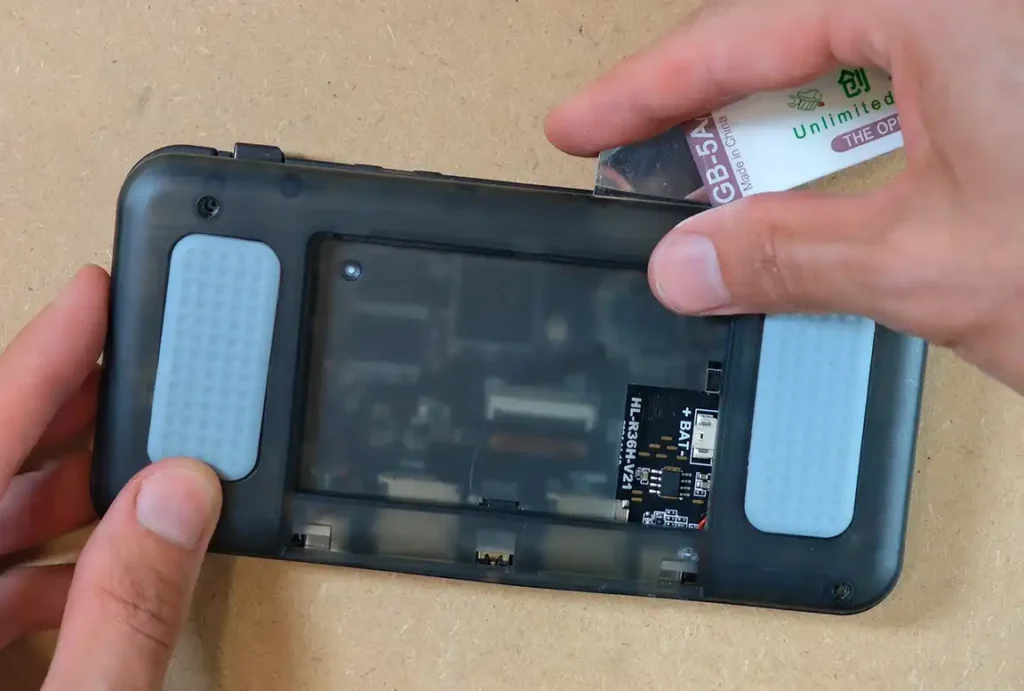
Step 1 – Remove the Battery Cover
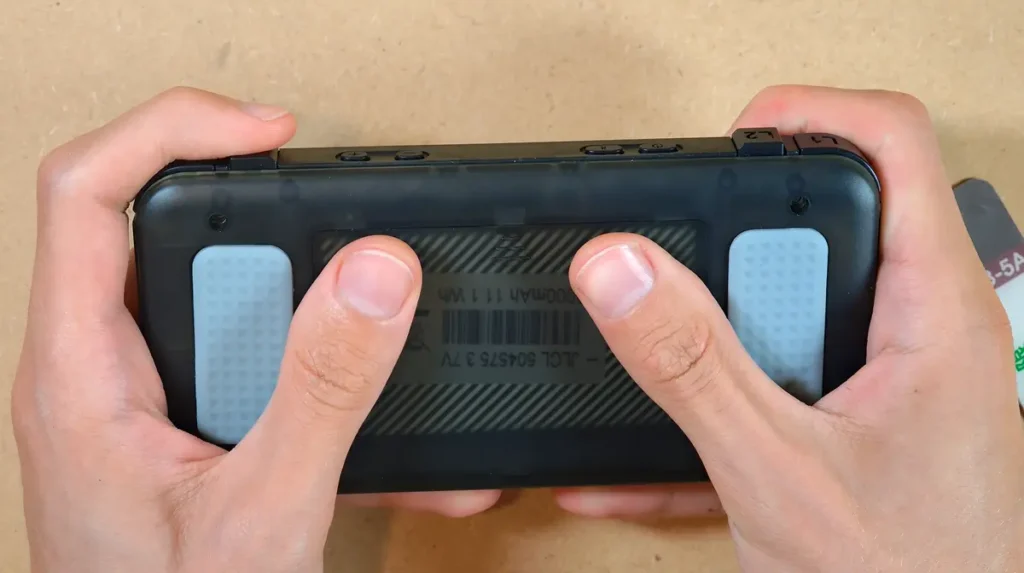
Power off the handheld, put your R36H on its back, and then slide off the battery cover door. Once you do that, you’ll have access to the battery compartment.
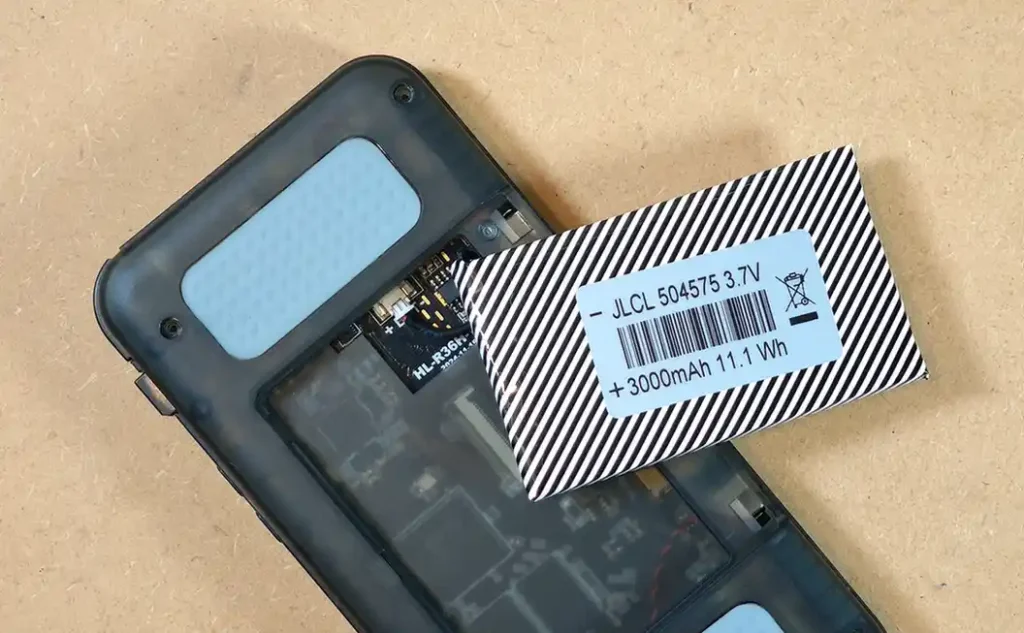
Step 2 – Disconnect the Old Battery
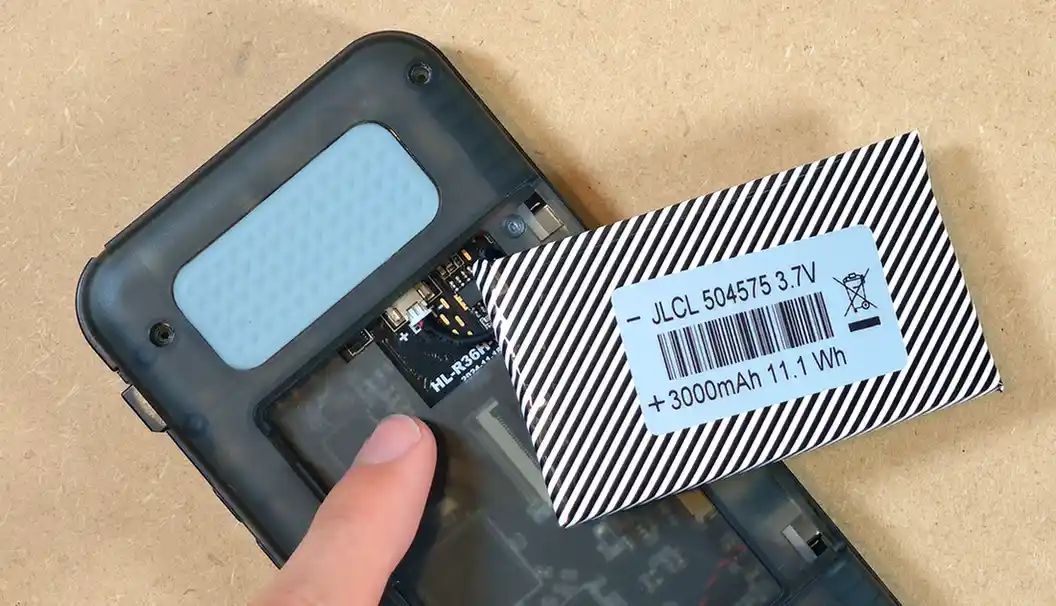
The battery on the R36H isn’t held down by any kind of glue or sticky pad, so you can remove it by carefully lifting it up either using your fingers or a pry tool of your choice. Just be sure not to damage the connector which is located at the top left of the battery if you’re looking at it from a top-down perspective.
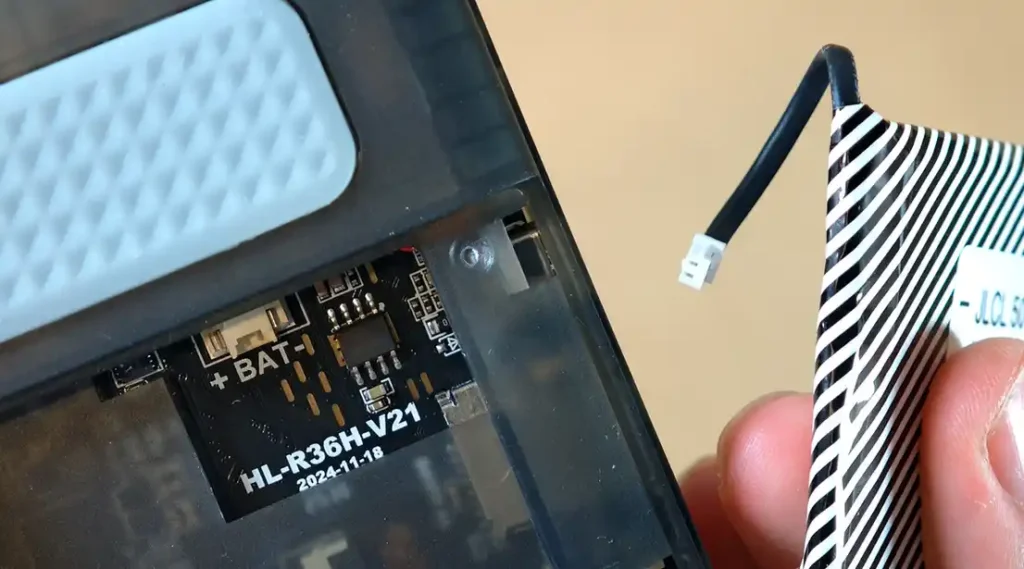
After you lift the battery up, you will notice that it’s connected to the mainboard with a cable ending with a small 2-pin JST type plug.
Removing this plug is very simple and you can do it using either your fingers or carefully using small plastic tweezers. If you cannot pull the plug out and you’re worried that you will damage your device, the best tip is to try and gently grab the plug with your fingernails and then start slowly wiggling it left and right instead of just pulling it. After a few wiggles and pulls the plug should be much easier to remove.
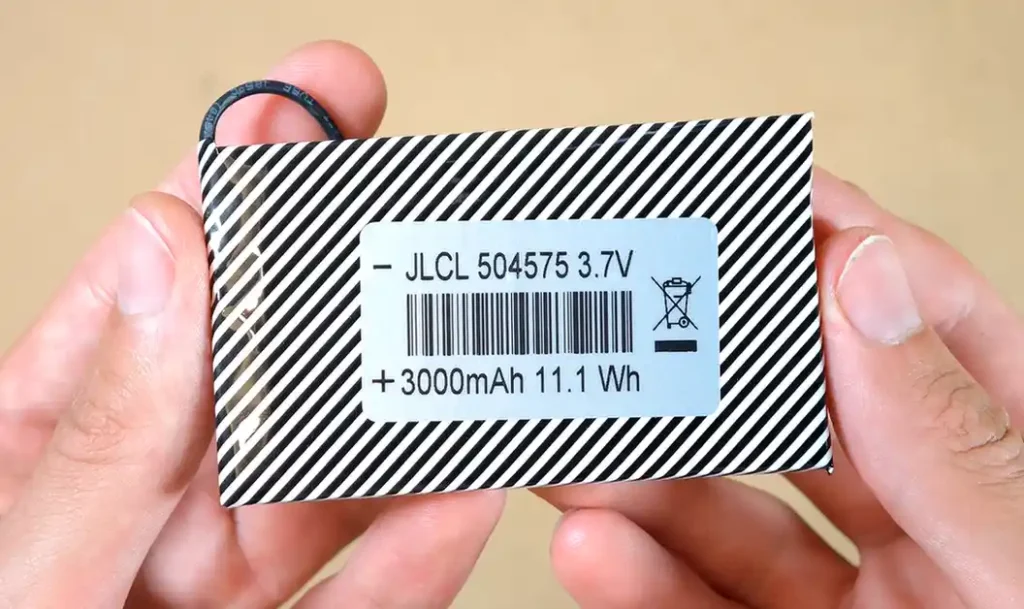
The R36H uses a 504575 3.7V 3000mAh cell. This is a standard battery that you can purchase in many online stores, including on AliExpress. The numbers in the battery name denote its size in millimeters, that is, 5x45x75 mm.
Once your old battery is disconnected, you can grab your new cell and proceed to the next step.
Step 3 – Connect the New Battery
Can you use a battery of a larger capacity? Not really, mainly due to the fact that you can’t fool physics. For the physical size of the 504575 cell, the 3000mAh capacity ceiling is as far as you can go. In fact, this capacity is already an upgrade from the second most popular version of the widely available 504575’s which is 2500mAh. If you find a cell of this exact size with capacity higher than 3000mAh anywhere online, there is a large probability that it’s not genuine.
Connecting the new cell, provided it has a cable with a JST plug attached to it is the same process but in reverse. There is one common error here that you should look out for.
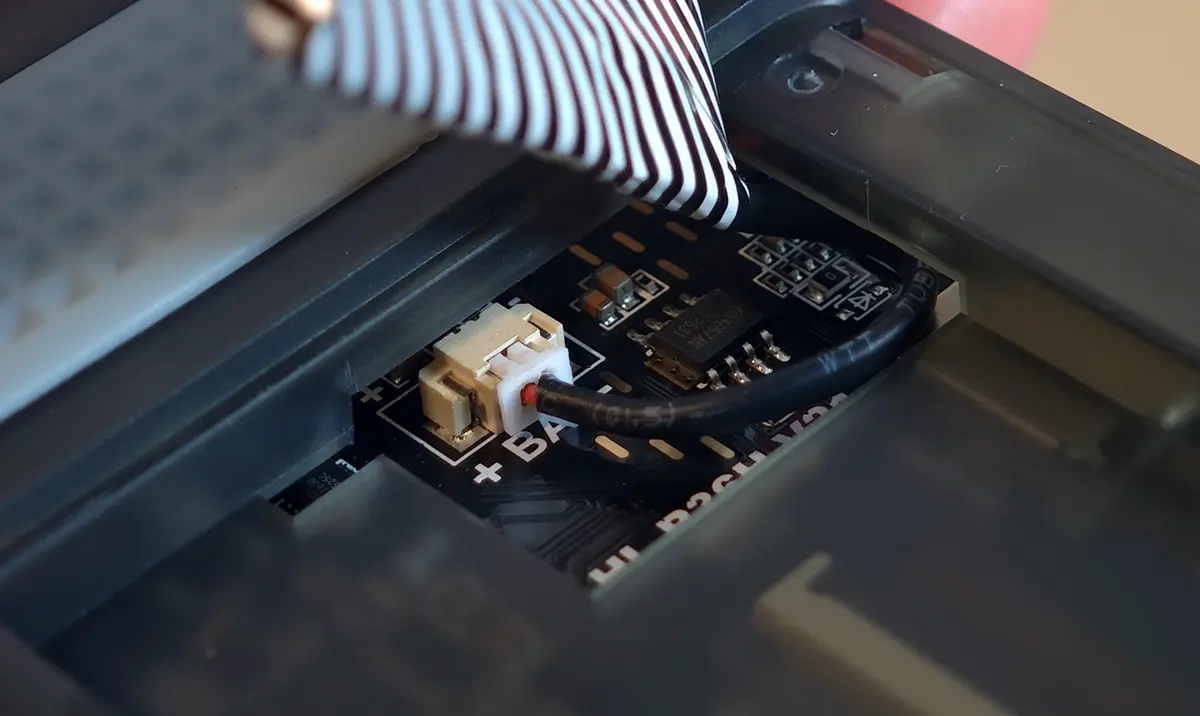
The small JST connector at the end of your new cell has its own predefined polarity. Just like any other battery, it has a positive and a negative terminal. In other words, you don’t want to force the plug the other way around. If you somehow managed to plug the battery the other way around, you can easily damage your device.
This can be tricky, as even with the correct position both removing and plugging in the JST connector can require quite a bit of force so if this is your first time doing this you might get confused.
Luckily, the engineers behind the JST plug standard made sure to make inserting the plug the other way around reasonably difficult. The plug is designed in a shape that’s compatible with the socket only when it’s positioned the correct way.
On the R36H’s mainboard, near the battery connector socket labeled BAT, you can find the plus and minus markings denoting the position of the positive and negative terminals.
Make sure that the plug is positioned in such a way that the ridges on the plug align perfectly with the slots on the socket to avoid bending the pins.
The colors of the wires on your new battery can also help you here. The red wire is almost always the positive one, while the black one should be negative. If your new battery has a rubber covering that completely hides the wire colors (like mine, as you can see on the images), you’ll have to either check the colors of the cables in between the isolating cover and the plug, or rely on the shape of the connector alone.
Once again, if you don’t have a battery with the cable/plug attached, you can get one for a few dollars from AliExpress.
How To Get To The Mainboard – The Disassembly
Disassembling the R36H is extremely simple. Four small Phillips screws and a few latches are all that stand between you and the device’s internals. Luckily, there are no screws hidden underneath the rubber grip pads.
You can either remove the screws on the back or the battery first. As the backplate is held in place with the aforementioned latches, it doesn’t matter what comes off first.
First, remove the screws using a simple small Phillips screwdriver. Once you’re done with that, open the battery cover by sliding it off.
After you’ve removed the battery cover, you can use your fingers or a pry tool to gently lift the battery up. Once you’ve done that, you will reveal the battery plug on the mainboard.
Use your fingers to gently wiggle the JST plug out of its socket. The plug can sometimes be pretty stubborn, so take your time. Once it’s done, set the battery aside.
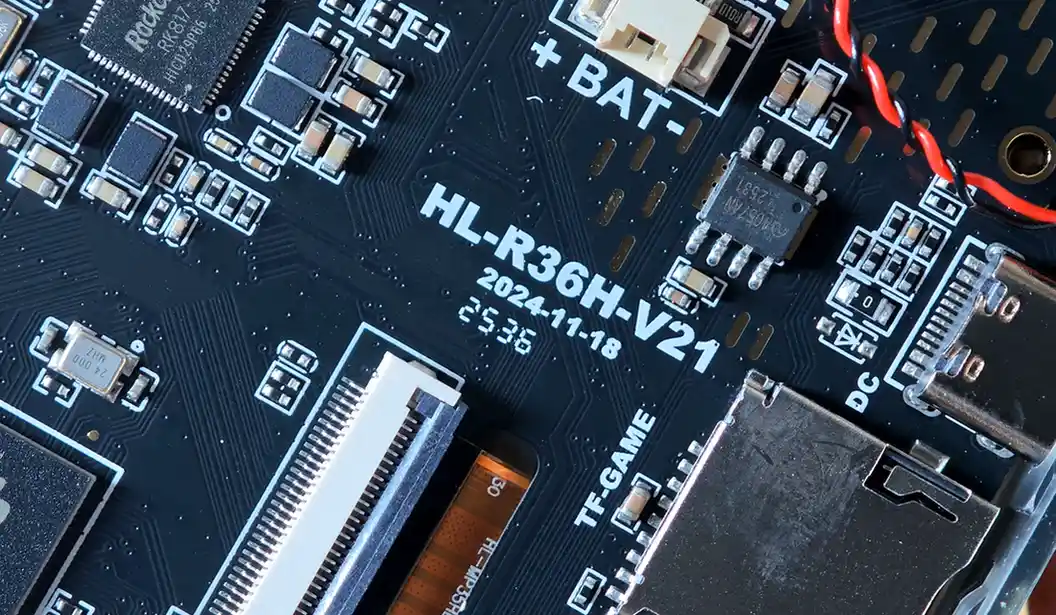
The R36H is designed in such a neat way that you can easily see the version number of your motherboard even without removing the back of the case. In my case, the mainboard is the HL-R36H-V21 2024-11-18.
This is the newer version of the board, with dedicated empty places for the Wi-Fi module and the rumble motor, as you will see below. Your R36H might come with a V20 board, in which case you’ll be faced with a slightly different layout of the internals.
After the battery is removed, it’s now time to lift the plastic back to reveal the whole motherboard hidden underneath.
The back part of the casing is held down by a few latches. This requires us to use a pry tool once again. I’m using one I got a while back from AliExpress with a whole bunch of other tools useful when doing basic maintenance on retro handhelds or other electronic devices.
Start from the edges, where you will find the most space to get the pry tool in between the front and the back part of the case, and work your way towards the middle along the top and bottom to get the latches to open. Do this carefully, so as not to break any of the plastic parts.
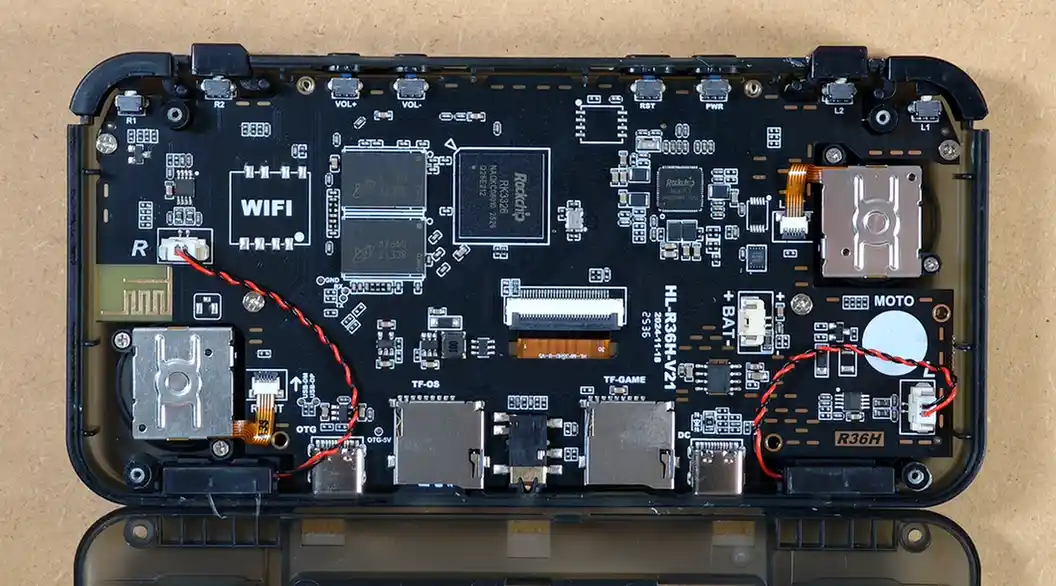
Once you’ve done that, you can finally open the back, and see the mainboard in all of its glory.
Let’s get to the meat and potatoes. The first and most important thing that we can see here is the Rockchip RK3326 SoC (system-on-chip), which is an ARM application processor. It’s quite a popular chipset, being the heart of many affordable retro handhelds, and almost all R36S-based devices.
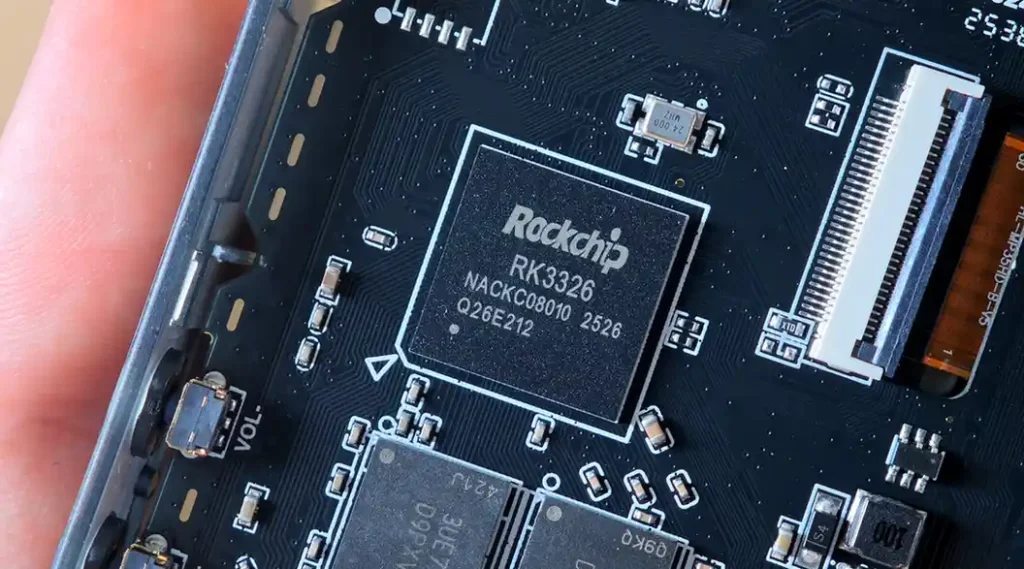
The RK3326 is a quad-core Cortex-A35 SoC up to 1.5 GHz, paired with a Mali-G31 MP2 GPU. It can handle most 8-bit, 16-bit, GBA, arcade and PS1 retro titles, but struggles with more demanding 3D systems such as N64, depending on the game, emulator core, firmware, and settings.
Another popular Rockchip chipset also commonly used in retro handhelds is the RK3566, which is in a way a one-up from the 3326. Compared with it, the RK3566 can handle many N64 and Dreamcast games, which the 3326 sadly doesn’t handle very well.
The number 2526, as per the chipset’s datasheet is the date code, likely meaning the chip was marked/assembled in week 26 of 2025. The longer strings are Rockchip internal lot and sub-lot traceability codes, that won’t tell us much more about this particular die.
After we’re done appreciating the main chipset, it’s time to take a look at the two RAM chips that you can see in the image above, on the right.
The R36H pairs the RK3326 with Micron’s D9PXV DDR3L SDRAM chips. With two chips, the board has 8Gbit total, that is 1GB RAM, arranged as a 32-bit bus (2×16 bit).
Although the RAM prices have skyrocketed as the demand for AI accelerators sadly still rises rapidly in the industry, the kind of chips the R36H makes use of are now largely considered legacy hardware, and go around for relatively low prices.
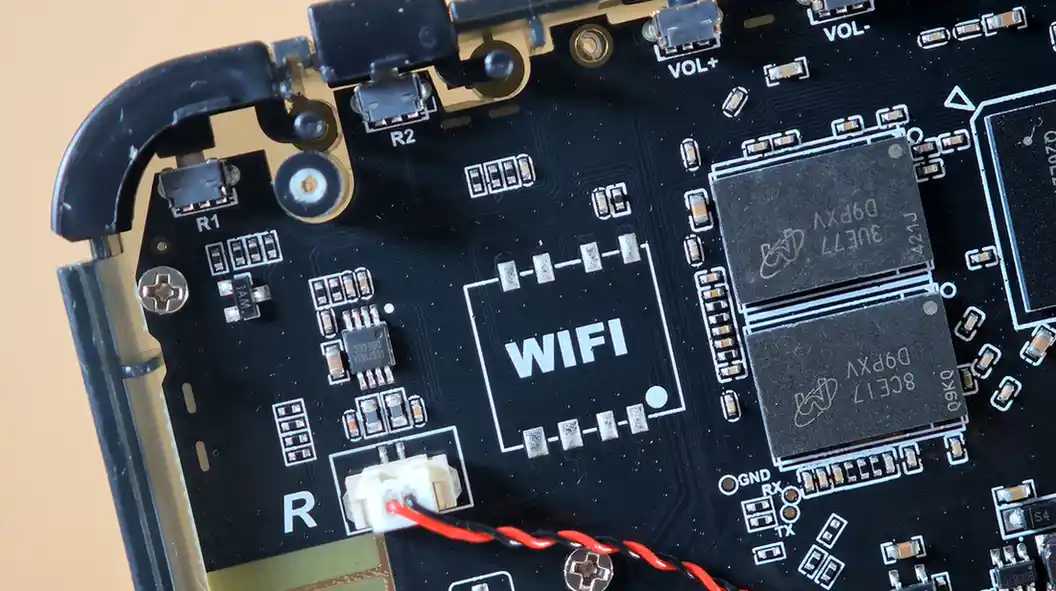
In the middle we can see the footprint for the Wi-Fi module, which many people have successfully used to install either the MediaTek MT7601UN or the Realtek RTL8188ETV chips to get access to a wireless network without having to resort to adapters connected to the console via the USB-C OTG port.
Curiously there have been reports of some R36H units with the newer V21 motherboard coming with a Realtek RTL8188ETV already soldered onto the board and working. Whether your model comes with one seems to be largely a matter of luck.
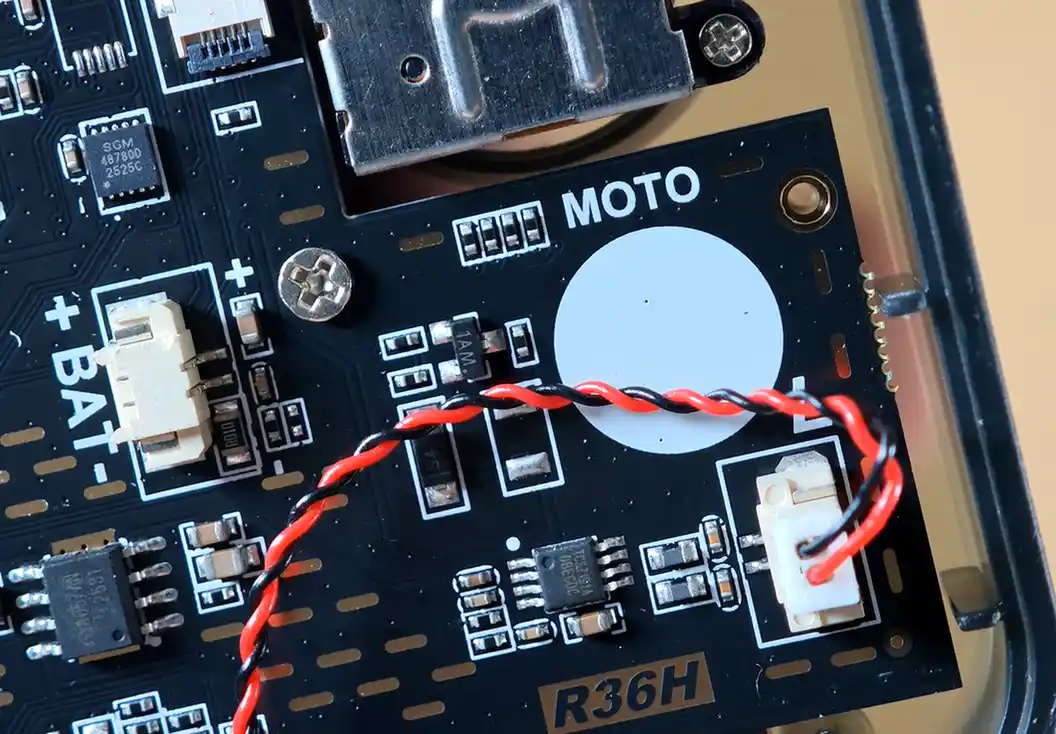
On the bottom left you can see a 2-pin connector with a red and black wire. This is a lead cable which is connected to the right speaker. On the other side of the device you can find an analogous contraption for the left one.
Other things you can notice in the image are the shoulder and volume button switches on top, and what I presume to be the right speaker amplifier, just over the plug.
Let’s now take a closer look at another interesting part of the board, this time on the right side.
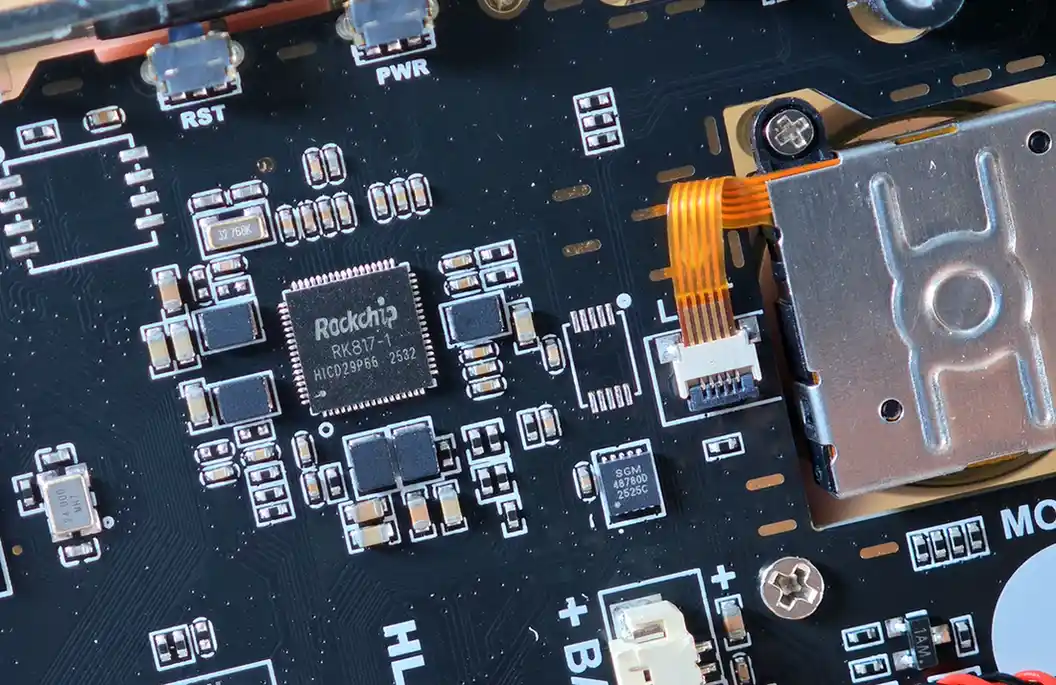
This area contains the Rockchip RK817-1 PMIC, that is, the chip responsible for power management, charging, battery monitoring, RTC, and audio-related functions.
The large metal-encased element you can see on the right is the left analog stick, fixed in place with two small Philips screws, and connected to the mainboard using a ribbon cable.
In between the PMIC and the analog stick, a little father down we can find the SGMICRO SGM48780D chip. This is a low-voltage 4:1 analog switch, here likely used for routing analog control signals from the stick area.
Next up is the aforementioned empty spot for the rumble motor. It’s the white dot that you can find below the left analog stick, on the bottom right of the board. Underneath it you can easily notice the lead cable for the right speaker, as well as the name of the handheld etched onto the PCB.
RicoR from XNL knows much more about the technicalities of doing the DIY rumble motor mod on the R36H/R36S, so if you’re interested in that, I strongly suggest you give his extremely detailed guide a read.
The inline shoulder buttons on the R36H are seated pretty loosely and they can easily fall out during the disassembly. Luckily, this also means that they are easy to place back in/replace.
As the only interesting thing you can find on the other side of the mainboard is the display connected to it via the ribbon cable you can see in the very middle of the PCB under the main chipset, I won’t be unscrewing the board from the front of the case. There is not much that can be done on the other side in terms of upgrades or repairs.
To assemble the handheld back together just do all the things we’ve done here, in reverse. The latches are much easier to pop back in, so just give them a little push, and the back cover should snap into place. Ensure that all of them are in place before you start placing the screws back in.
Make sure to connect the battery the right way and not force the plug the other way around, and you should be good to go.
And that’s it! This is a pretty simple disassembly, so I’d argue that if you’re careful not many things can go wrong along the way, especially if you’re not separating the mainboard from the front part of the case.
R36H is, much like the original R36S, a device that’s a pleasure to look at. I hope you’ve enjoyed this short disassembly as much as I did.
If, for some reason, your handheld doesn’t turn back on, make sure that you’ve reconnected the battery in the correct way. This is pretty much the main thing that can cause the console not to boot if you did everything right.
If you want to know more about handhelds similar to the R36S and R36H or want to clear some misconceptions when it comes to the different clone models, I’ve got you covered. Feel free to give this a quick read: R36S vs. R36XX, R36Plus, Max, Ultra & Others – Models Explained