
Here is how to quickly train your own Anima LoRAs using Anima-TrainFlow with as little as 6GB of VRAM. Let’s get to it.
Want to learn more about Anima? This is the best place to begin: Anima In ComfyUI – Quick Starter Guide
The “Conscience clause“: The example LoRA I’m training in this guide is trained on my own content that I have the rights to use and reproduce. If you’re training LoRA models on any content that can be subject to third-party copyright claims, always remember to be mindful of both the ethics of such actions and the laws that regulate reproduction of such content in your region. Make sure all your uses comply with the Anima model license.
Things You Need First
There are only three basic things you need when attempting to train your own Anima LoRA:
- A good-quality dataset with at least ~20 images in a similar style or depicting a similar concept.
- The three base Anima model files downloaded to your system (the main model file, the text encoder, and the VAE).
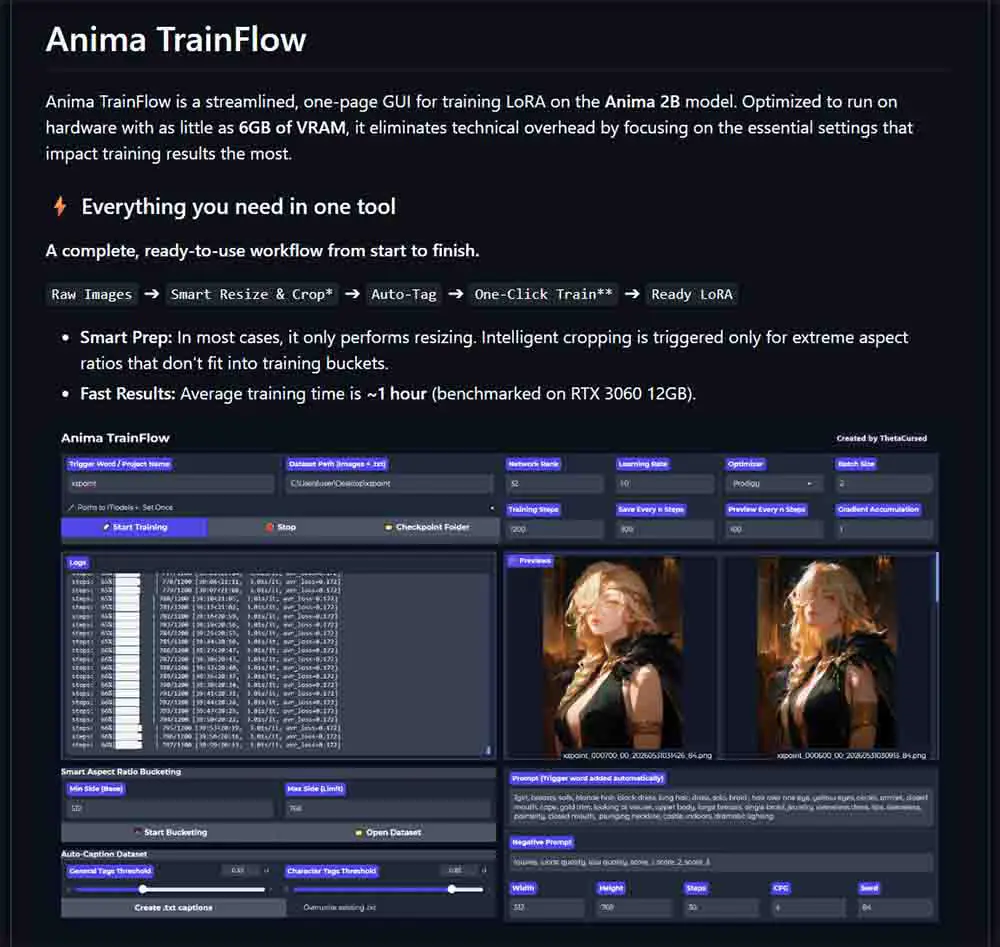
- Training software of your choice. In this guide, we’re going to work with arguably the easiest-to-use option available: Anima-TrainFlow by ThetaCursed.
Once you have these ready, you’re approximately 15-20 minutes from starting the actual training process, which depending on your hardware and dataset size can take from about one to several hours.
Quick compatibility note: Anima TrainFlow is currently aimed at Windows 10/11 systems and NVIDIA GPUs. The repository recommends 6GB+ VRAM for Anima 2B training and about 6.5GB of free storage for the tool and dependencies. Realistically you’ll need about 5.40GB more for the Anima model files themselves, so about 12GB of free space on your drive total.
The Basic Anima LoRA Training Process in 5 Steps
These are the full instructions for training your Anima LoRA from scratch, including dataset preparation, bucketing, captioning, figuring out the right training settings or using the generic defaults, and sorting out the prompt for test images.
1. Prepare Your Training Image Dataset
This is the most important step you really don’t want to downplay. The quality of the input images can make or break your LoRA before you even start thinking about how exactly to caption the input material, or what training settings to use.
What does “good quality” mean exactly? While this largely depends both on your overall goal and the type of images you’re training your LoRA on, there are some basic rules you almost always want to follow:
- The training images have to be consistent when it comes to the style, object, character or concept they represent. What I mean by that is that you should avoid adding images to your dataset just for the sake of having more content in it at all costs. If you’re training a character LoRA, adding one more image that features a vastly different outfit or scenario from the others will in most cases be detrimental to the overall quality of your model. The same goes for images of visibly lower quality relative to the whole dataset.
- Speaking of quality, make sure that your images:
- Are sharp and all the details important to you are clearly visible on them.
- Are not blurry, out-of-focus or otherwise distorted, unless you’re going for that kind of style.
- Do not contain large amounts of text. While with Anima single words consistently appearing on a part of character’s outfit can usually be reliably reproduced with enough source images, in general you should avoid large amounts of text like speech bubbles or text boxes in your input material.
- When it comes to the overall number of the images in your dataset, in the vast majority of cases 20-50 images can be enough for most character and style LoRAs, while larger datasets are mostly reserved for more complex concepts or styles and characters that include many different captioned image variants like different poses. Of course, rules of thumb are always approximate, your mileage may vary depending on the exact details you want your LoRA to reproduce.
- If you have any images that can be considered outliers, such as lower-quality picture scans, photos containing more than one character if you’re going for single-character outputs, or in general, content that is vastly different from the majority of images in your dataset, in most cases it’s best to remove them from the pool altogether.
These tips might sound quite obvious to many of you, but believe me – having a clean, high-quality dataset is one of the most important things when it comes to training pretty much any kind of machine learning model. In diffusion-based image models, problems with inconsistent or low quality input material become apparent especially quickly, often being visible in relatively early training previews.
Automatic Image Bucketing
Before moving on to captions, I recommend running the Smart Aspect Ratio Bucketing tool built into Anima-TrainFlow if your dataset contains mixed image sizes, large scans, or noticeably different aspect ratios.
In TrainFlow, clicking the “Start Bucketing” button when your training image folder path is already set up, creates resized PNG versions of your source images that fit the available training buckets, while keeping the originals backed up in an original_images folder that will get created automatically when the bucketing process starts.
With the default Min Side 512 and Max Side 768 settings, the tool prepares bucket sizes such as 512×512, 512×640, 640×512, 512×768, or 768×512.
If an image is already very close to a target bucket’s aspect ratio, TrainFlow resizes it. Otherwise, it selects the closest bucket and in some cases (with extreme aspect ratios) uses its U2Net-assisted subject-aware cropping before resizing.
If you’re planning to run auto-captioning on your dataset (explained below), it’s better to run bucketing before it. For the best results you want your captions to describe the final images that will actually be used for training and not the uncropped, original image variants.
For my test LoRA, I used buckets of maximum size of 512×768 pixels, which is a practical low-VRAM setup. I deliberately kept it there despite training on an RTX 3090 with 24GB of VRAM, as I want to show you what the end results can look like when training on lower-end hardware, even with a relatively complex artstyle.
The obvious trade-off with smaller maximum bucket sizes here is that with highly complex input material small pencil marks, scan texture, and fine background details can get softened or lost.
On higher-VRAM GPUs like mine, you can also try setting the max. bucket size to 768×1024. Using a few manual close-up crops of the densest linework, paper texture, faces, towers, and other repeated details can also help for even better complex style reproduction with input material like ours here.
If your LoRA learns the broad style but misses some details present in the input images, higher bucket limits and better detail crops are the first things you can test before changing your training settings too aggressively.
You can technically begin training without manually initiating the bucketing process, as long as your images already have matching .txt captions and are not too large. TrainFlow should still automatically enable training-time bucketing in the generated dataset config.
The second most important thing is the image captions, which we’re going to talk about next.
2. Sort Out The Image Captions
For your LoRA model to learn the rules of which image features should be associated with which keyword, you’ll have to prepare simple descriptions for each of your image files. There are two routes you can take here:
- Come up with all of your keywords manually.
- Let TrainFlow generate the tags for you using the WD Tagger auto-captioning.
If you’re preparing a simple anime-style or illustration-style character or concept LoRA and you don’t need to tag any unique, custom features that you want to be able to trigger, the auto-captioning feature can be just enough for you.
The WD Tagger built into TrainFlow will, upon pressing the “Create .txt captions” button automatically create a text file with premade tags for each of the images in your training folder. Of course, you can later edit them to your liking. Note that for this feature to work you need to have your image folder path already present in the “Dataset Path” box.
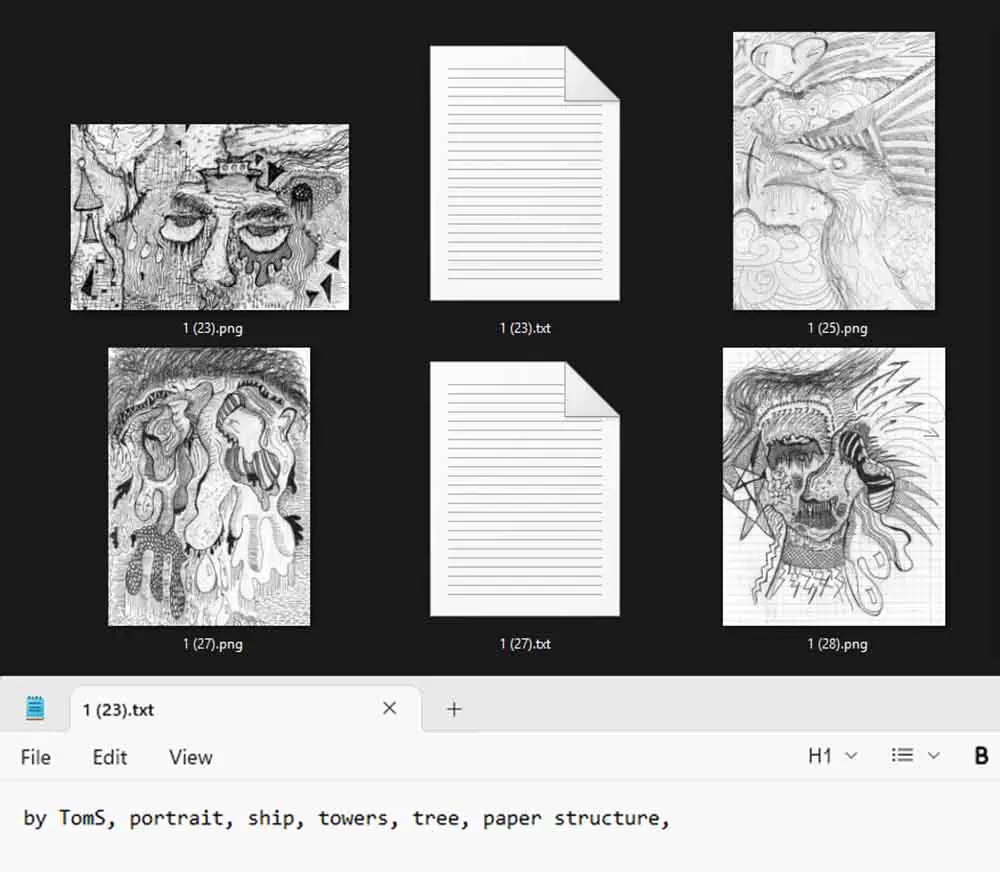
In my case, however, I decided to use a simple and short handmade tagging system an example of which you can see in the image above. I started by generating the text files using the auto-captioner, and then deleted their contents one by one and replaced them with my own keywords.
Aside from regular tags I’m also using two separate tag combos to mark the styles of the background. The images in the training set are evenly divided into two categories: sketches done on textured/grunge style thick white paper, and notebook pages with a grid pattern on them.
With this LoRA my goal is to be able to create images with certain controllable elements that often repeat in my original drawings, such as castle-like towers, simplified symbolic ship or tree depictions, and so on.
For your particular use case, here are some rules you should follow when it comes to the image captions.
Basic Captioning Rules for LoRA Training – TL;DR
Caption what you want to stay prompt-controllable, and let the trigger word (explained below) learn and be able to invoke the main thing your LoRA is for.
For a character LoRA, caption changing details like pose, outfit, expression, and background so the trigger can attach to the character’s identity.
For a style LoRA, caption the subject and scene, but avoid repeatedly describing the same linework, coloring, or rendering style unless you want those traits controlled separately.
For a concept LoRA, caption the parts of the concept that vary, while keeping the core idea tied to your unique trigger word. In short: Caption the things you want to control with prompts. Leave uncaptioned the things you want the trigger word to absorb.
To give you a concrete example, if you’re training a LoRA of the concept of an illustration-style character winking at the camera in a particular way not covered by the Anima base model itself, the things you’d want to tag besides the trigger word like “characterwink” which will get associated with the general concept of winking at the camera would be all the other things you want to be able to better control during the image generation process.
In this case, if you have different unique facial expressions in your winking dataset that are sufficiently well represented in the training material, you want to include these in the image captions.
Tagging things that appear in all of your training images and are also widely known by the base model generally shouldn’t be part of your caption files if that’s the main feature you want to train.
What happens if you use these generic tags anyway? The training process may attribute that feature to the generic tag instead of your trigger. Your trigger may become weaker or less specific because the concept is partly explained by the generic tag. Only use generic tags for things you want to separate from your trigger word and control later with prompts.
You might also like: Best GPUs For AI Training & Inference This Year – My Top List
3. Come Up With a Unique Trigger Word
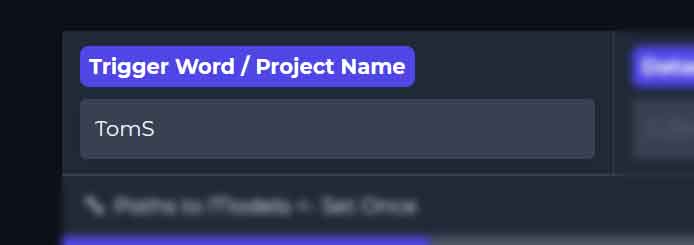
Before you touch any other training settings, you should settle on a good trigger word. This is a word that you’ll be able to use later in your image generation software to trigger the effects of your LoRA even without using any other tags associated with its training captions.
To choose an effective trigger word, select a rare, unique string (like “mycustomstyle” or “my_character”) that the base AI model does not already associate with a specific concept. Avoid common dictionary words like “cat” or “girl”, as this will make the model fight its pre-existing knowledge and corrupt your results.
While trigger words are not strictly necessary, they are the most effective way to tie all the distinct visual elements a LoRA has learned to a unique, consistent string.
Style LoRAs can often be trained and used without a trigger word, with their effect controlled mainly by the LoRA weight/strength in the inference workflow. However, with concept and character LoRAs trigger words are recommended to prevent their specific features from bleeding into unintended generations.
In Anima-TrainFlow you can put your trigger word either in the Trigger Word / Project Name box in the GUI. This way it will be prepended to each caption during training through the generated dataset config. Of course you could also put it manually in each of the caption files yourself instead.
Do only one or the other. If you do both, your trigger words can double, which can affect/degrade the quality of the entire training process.
4. Choose the Right Settings (Or Leave Defaults)
The default settings in Anima TrainFlow are already a very reasonable starting point for most simple character and style/concept LoRAs. Still, there are a few things you should know here.
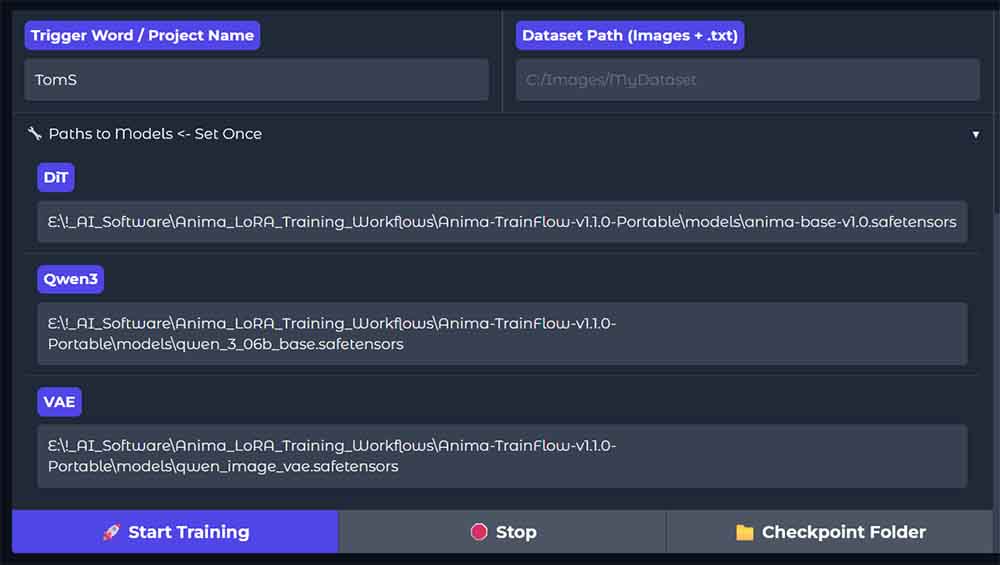
The first thing you need to do before you start training your model after sorting out the caption files and your trigger word is to input the paths to the base Anima model files in the TrainFlow GUI.
If you don’t have them already, you can get all 3 files from the official Anima Hugging Face repository. You need the base model file (preferably the latest version available), the Qwen3 text encoder, as well as the Qwen Image VAE.
Once you have the model files on hand, move them into a convenient location, click on the “Paths to Models” drop-down menu, and paste the paths to each of the model files. You have to do this only once, and for future runs TrainFlow should remember the paths for you.
If you want to know more about generating images using Anima, check out my extensive starter guide here: Anima In ComfyUI – Quick Starter Guide
The last and most important thing to review before training is the training settings themselves.
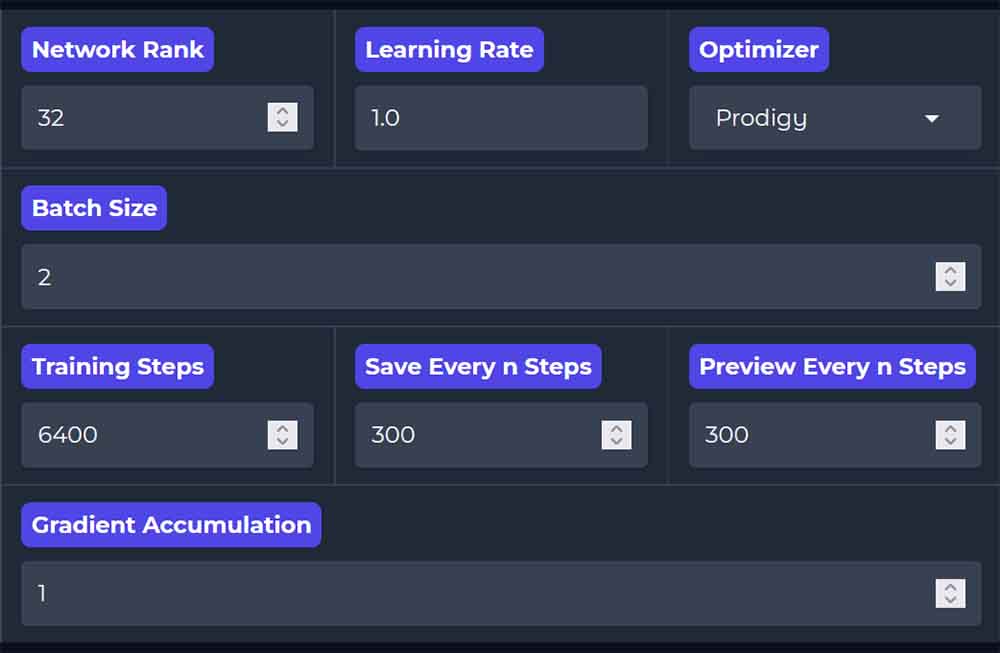
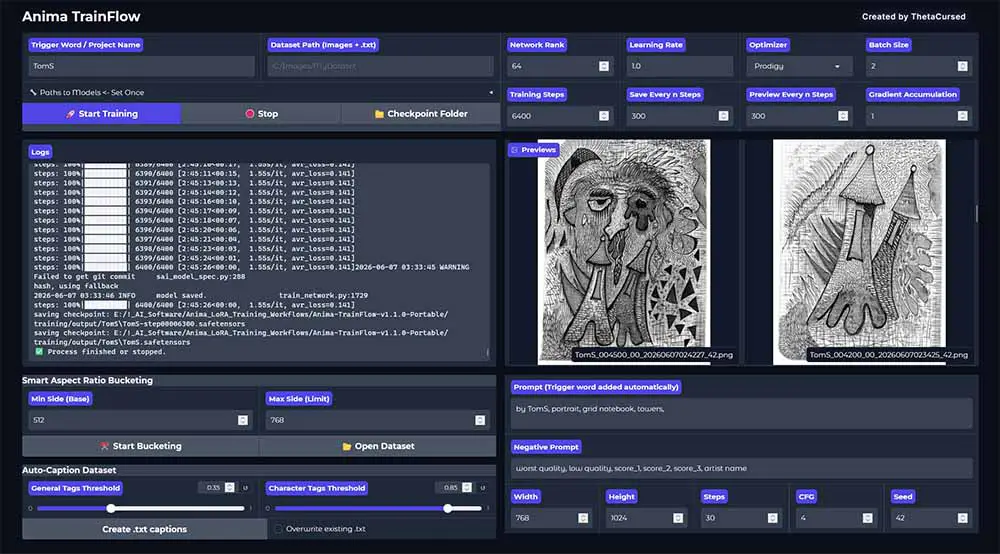
By default, TrainFlow is set to begin training with Network Rank of 32, the Prodigy optimizer, batch size of 1, and 2400 training steps. Usable training checkpoints will be saved every 300 steps.
While the learning rate parameter is set to 1.0, with the Prodigy optimizer this actually indicates an automatically adjusting learning rate throughout the whole training process. This solution is preferred in many training contexts especially if you’re just starting out.
If you wish to use a different kind of optimizer selectable from the list (AdamW and AdamW8bit are also available here), you’ll need to set a more conventional learning rate manually instead of relying on Prodigy’s default LR 1.0 setup. If you’re not sure why you’d want to do that, I’d recommend staying with the TrainFlow defaults.
Note: TrainFlow uses caption dropout, which is set to 0.05 in the current code but not exposed in the UI. This means that 5% of the time, the model randomly ignores the text descriptions during training, forcing it to rely entirely on the images themselves. For deeper control over training behavior, you would need to edit the generated config or use a lower-level Anima-compatible training setup.
If you’d like to know more about LoRA training settings for models such as SDXL or Anima, you can check my full Kohya GUI settings guide, which describes many of the mysterious lingo behind the training process.
How Many Training Steps Do You Need?
There is no universal way to know how many steps your particular LoRA will need before it starts giving satisfying results. This is something you have to judge from the preview images and the saved checkpoints.
Note: Because I was training using detail-heavy material, I bumped the Batch Size to 2 and finished the training at 4400 steps. For standard character LoRAs, doing this will likely overcook your model. Stick closer to the 1800-2400 step defaults if you aren’t doing complex style training like in my example.
That said, setting a higher maximum step count is not a big problem as long as you save checkpoints regularly and compare them afterwards. The final checkpoint is not automatically the best one. With small datasets especially, a LoRA can look good halfway through the run and then become too rigid, messy, or overtrained later on.
For this reason, if I were you, I’d rather set a slightly higher step limit, save checkpoints every few hundred steps, and then test the intermediate LoRA files manually. If the 1200-step checkpoint looks better than the 2400-step one, use the 1200-step file, and so on.
This is especially important because TrainFlow does not currently work like a pause-and-resume trainer. The saved checkpoints are usable LoRA files, not full training states with optimizer data.
If you stop the process and press Start Training again, you will be starting a new run, not continuing the previous one from the same step. In other words, TrainFlow checkpoints are there for comparison and final model selection, not for resuming interrupted training like you’re able to do, for instance, in the Kohya GUI.
5. Configure The Test Prompt & Start The Training
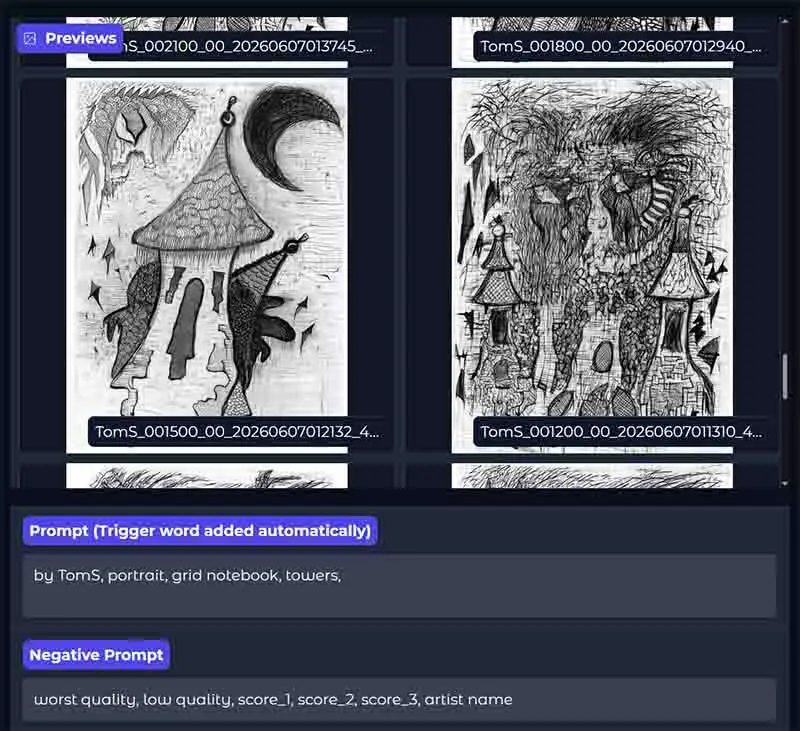
Before starting the run, you need to set up a simple preview prompt. This prompt is used for the sample images generated during training, so it should test the thing your LoRA is supposed to learn rather than trying to produce a perfect final image.
In most cases you can safely set the preview prompt to one of the image captions from your dataset, depending on the features you want to test.
Remember that in your actual image generation workflows you will have more control over the process, including being able to modify the generation settings, as well as the LoRA model weight parameter.
If you entered a trigger word in the Trigger Word / Project Name field, TrainFlow adds it to the preview prompt automatically. In my case, a short test prompt like “portrait, grid notebook, towers” is enough to check whether the LoRA is learning the pencil texture, notebook-paper background, and repeated tower shapes included in the training captions.
Keep the negative prompt simple or leave it as the default one already present in the input field, set your preview width and height if you want it to be different from the recommended one (for your first training I recommend leaving it as default) and start the training process by pressing the “Start Training” button.
Every few hundred steps, depending on your preview settings, TrainFlow will generate new sample images and save intermediate LoRA checkpoints. Don’t ignore these earlier checkpoints. The final file will not always be the best one, especially with uniform datasets where the model can easily start overfitting before the training run ends.
On the image above you can see the early-step image previews in my training process. These, knowing the input material, indicated that the LoRA needed some more time to bake in my 3090-powered oven before it was ready.
In general, you want to watch whether the previews are becoming more accurate without becoming too rigid (for one, too close to one of the original images in your training set). If the LoRA is still too weak, later checkpoints may work better. If the previews start copying the training images too closely, losing prompt flexibility, or producing messy textures, an earlier checkpoint may be the better choice.
Training an Anima LoRA on My Own Art Style
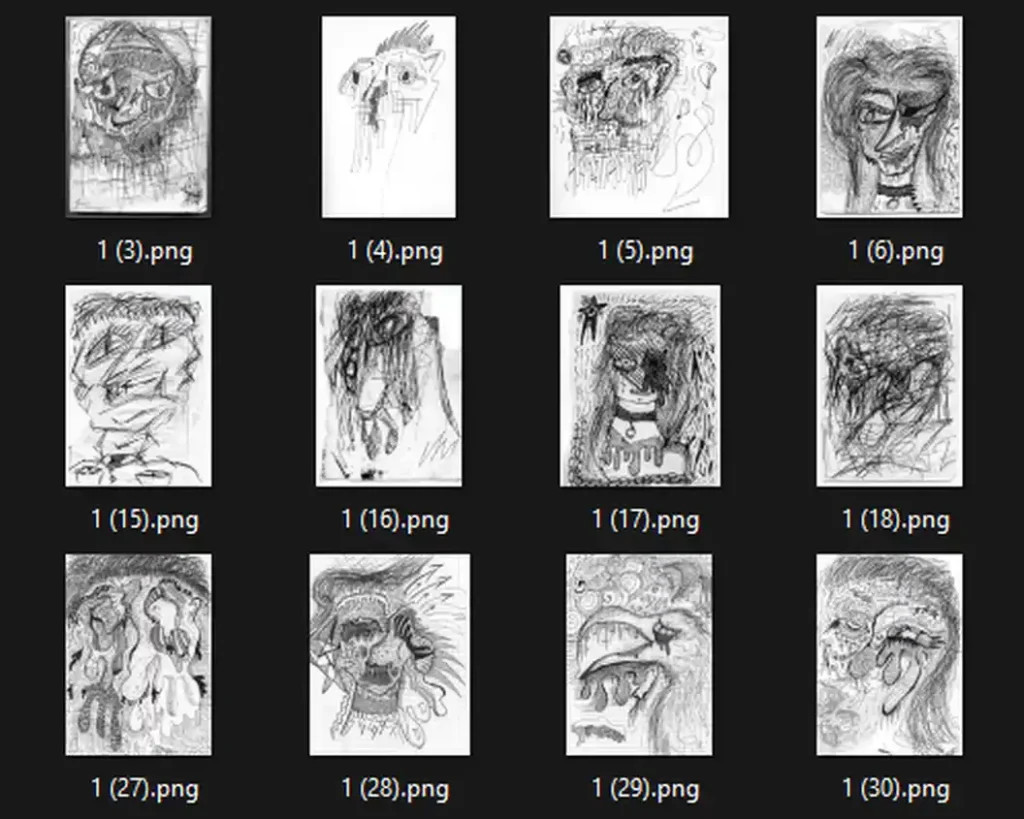
For this test, I trained a small LoRA on my own black-and-white drawings. As some of the scans I made were color images, I converted all of them to grayscale when preparing the dataset. I also cropped the image scans to contain only the drawings, and in some cases also the rough paper page edges I wanted the model to be able to recreate.
The main goal here was to teach Anima the specific visual language of my works with rather dense pencil linework, face-focused sketches, repeated abstract architectural elements, grid-paper backgrounds, and textured paper scans. I began with the following:
- Number of images: 30
- Captioning method: manual
- Trigger word: TomS
- Training images resolution (after bucketing): 512×704
- Batch size: 2
- Max. Training Steps Set: 6400 steps
- Final iteration used: 4400 steps
- Network rank: 64
- Optimizer: Prodigy
- Learning rate: 1.0 (automatic)
- Gradient accumulation: 1
- Save/preview every X steps: 300
The results, as you can see below, were quite interesting, especially for the very first training run.
You might also like: Hidden VRAM Hogs – How to Free Up GPU Memory (Local AI & Gaming)
The Results
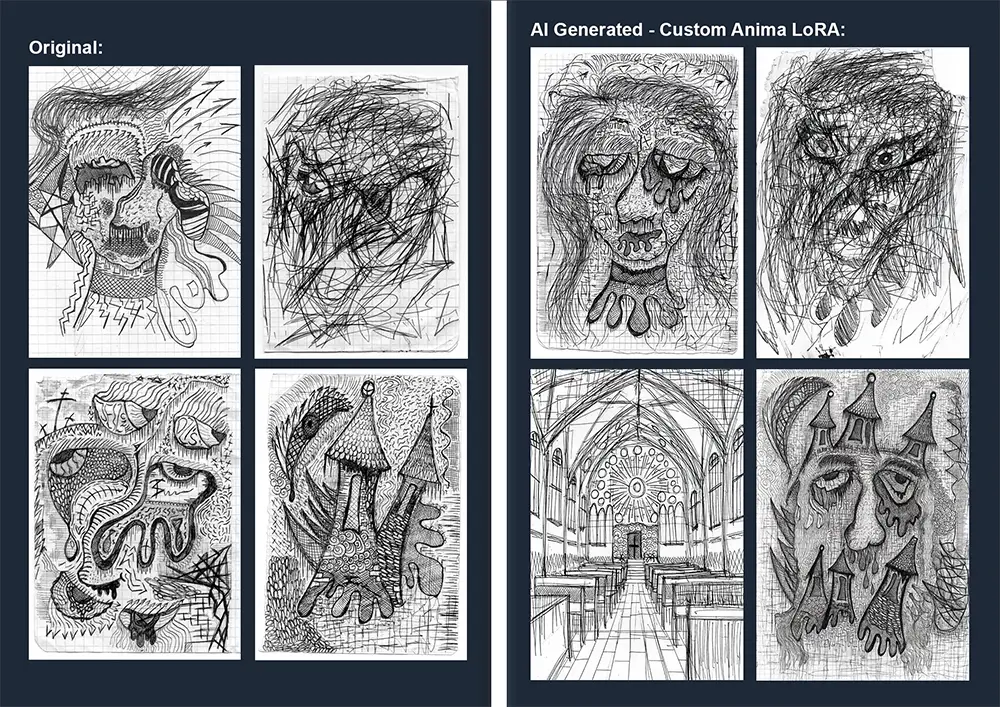
All in all, while this is only the first iteration of the LoRA without any refinements I’m very much satisfied with the initial results. The style reproduction is really on point, and the model also works well at applying the styling to concepts similar but not identical to the ones that it learned from the source material.
Overall, the results are reasonably impressive:
- Given the detail-heavy style of my drawings, I expected less “granular” style reproduction across the whole horror vacui aesthetic of the subject matter, mainly because of the lower-resolution max. bucket size used. The LoRA still did very well when it comes to the approximation of smaller details.
- With the right settings, the LoRA was also capable, to some extent, of working in certain img2img scenarios to apply the trained style to existing image content with the right prompt combinations.
Still, there are also some notable drawbacks here:
- As the source material was downscaled before bucketing, the fine-detail reproduction was still limited to what the model could “see” during the training process. Upon zooming into the raw generation outputs without any latent upscaling at play, you can definitely tell that not enough information was passed to the LoRA in that regard.
I’m planning to run the next iteration of this LoRA with about 20 more high-quality image examples, with refined captions and a network rank of 32 instead of 64. I’m already curious to see how it will turn out.
In further iterations an interesting experiment would be to also include partial close-up crops of the chosen images to better ground the LoRA in the fine texture details of both main subjects and the image backgrounds. That’s also on the to-do list.
Tips To Make Your LoRAs Even Better
One of the fastest ways to improve your own LoRAs is to look at how other Anima LoRAs are presented. Check the sample images, trigger words, prompt examples, and stated training goals. This way you can quickly see what kinds of concepts can work well with the model.
Regardless of that, there are a few rules of thumb you should follow when you’re starting out. To recap:
- The quality of your input images matters a lot.
- Lack of low-quality images in the training set is arguably more important than having a large dataset with mixed in low-quality content.
- If your LoRA doesn’t represent your subject matter in a satisfying way, make sure your trigger word is present in your captions, that your captions are of good quality, and that you’ve used enough training steps for the concept to show up correctly in your preview images. For more complex artstyles you can also increase the network rank of the LoRA.
- If your LoRA is “overbaked” and produces deformed content, you might test earlier saved checkpoints from your training process/use fewer training steps. In some cases you can also attempt to use lower LoRA weight value during image generation.
For all of your training runs, it’s good to keep notes on the dataset size, trigger word, rank, steps, batch size, optimizer, and final checkpoint used. This makes it much easier to compare versions instead of guessing what changed between runs.
So, keep track of things and make sure you don’t end up with an abundance of ambiguously named LoRAs without any record of how and with what settings you trained them a month later. Seriously.
If this guide helped you with training your very first Anima LoRA without getting too confused by the technicalities, I’d appreciate you sharing it with others who might find it helpful too. Thanks for reading, and see you next time!
You might also like: 6 Sites Like Civitai – Best Alternatives Available