
After the update for the Stable Diffusion WebUI by Automatic1111, the save style button and fine-tunings list button have disappeared from their usual spots. How to save custom prompt preset styles and invoke SD fine-tunings and LoRAs now that the old controls are gone? We’re about to show you!
- Where Is The Save Style Button Now?
- How To Save Custom Style Prompt Presets In Stable Diffusion WebUI?
- What About Fine-Tuning?
Check out also: How To Use Okada Live Voice Changer Client RVC With Discord – Quick Guide
Where Is The Save Style Button Now?
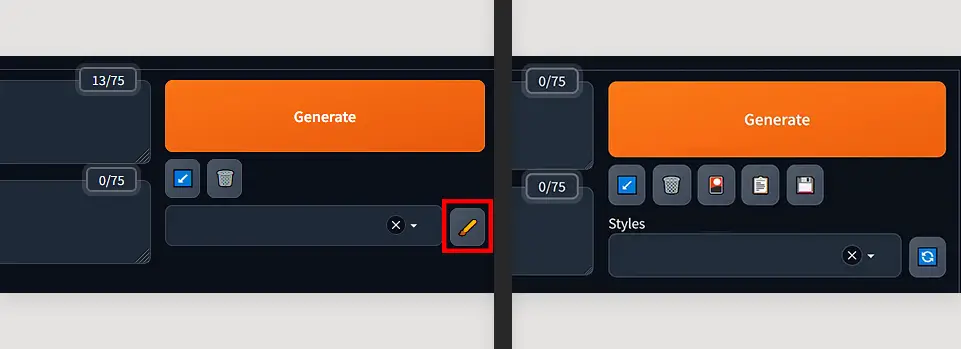
The save style button alongside with the fine-tuning menu button have been removed from the UI. The style saving is now done withing the Style Editor. The Style Editor button is positioned near the Generate button on the right side of the WebUI’s main screen.
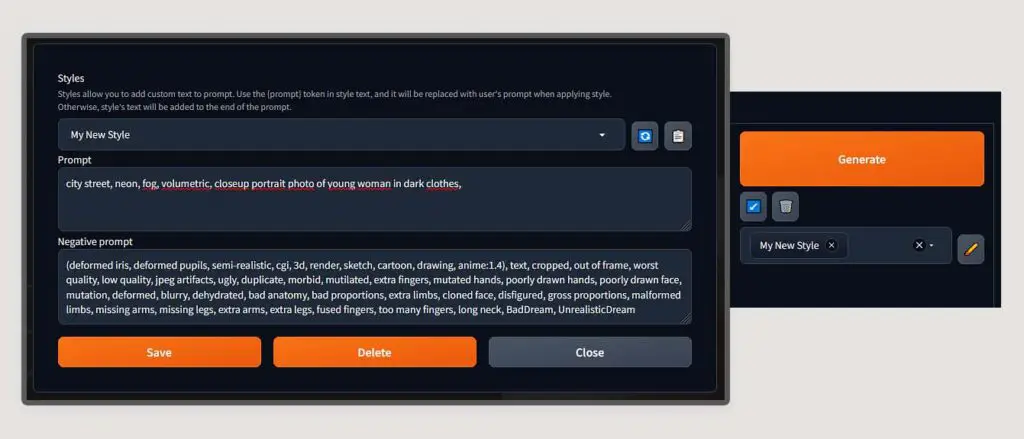
After you press it, you will be taken to the preset editor where you can save your custom image styles, that is positive and negative prompt combination presets, just like in the previous versions of the Stable Diffusion WebUI. The only difference is, now you need to copy your prompts over to the style editor window to do so.
Can you revert to the older version of the Automatic1111 WebUI? Well, yes, at least for now. If you’d like to come back to the earlier version of the style preset handling interface, there is a Revert Old UI WebUI extension available over on GitHub. Keep in mind though, that there is no saying for how long said extension will work correctly. The installation instructions are available in the extension’s repository.
How To Save Custom Style Prompt Presets In Stable Diffusion WebUI?
Stable Diffusion WebUI by Automatic1111 lets you save your favorite prompt pairs in so-called style presets. Here is how to use them.
After the UI changes you can save your custom styles by doing the following:
First, click the style edit menu button with a small paintbrush symbol, positioned near the Generate button. This will open the styles edit menu.
After you’ve entered the styles edit menu, you have to name your new style, and then paste your desired main prompt and negative prompt into appropriate input boxes. Now, click the Save button.
To invoke a created style preset for image generation, select your newly created style (or a few styles at once) from the drop-down style menu on the right side of the screen. Then, enter the style edit menu again and press the small clipboard button next to the edited style name. Your current prompts will be replaced with your chosen style presets.
What About Fine-Tuning?
So, what about fine-tunings such as LoRAs, LyCORIS, Hypernetworks and Textual Inversions?
The button that was used to enter the fine-tuning option selection menu was removed from below the Generate button. How do you apply fine-tunings now without doing it manually in the prompt window?
The process of applying fine-tunings using the style library has changed slightly since the last update. Previously it involved clicking the now deprecated button and then navigating to your chosen fine-tuning category tab.
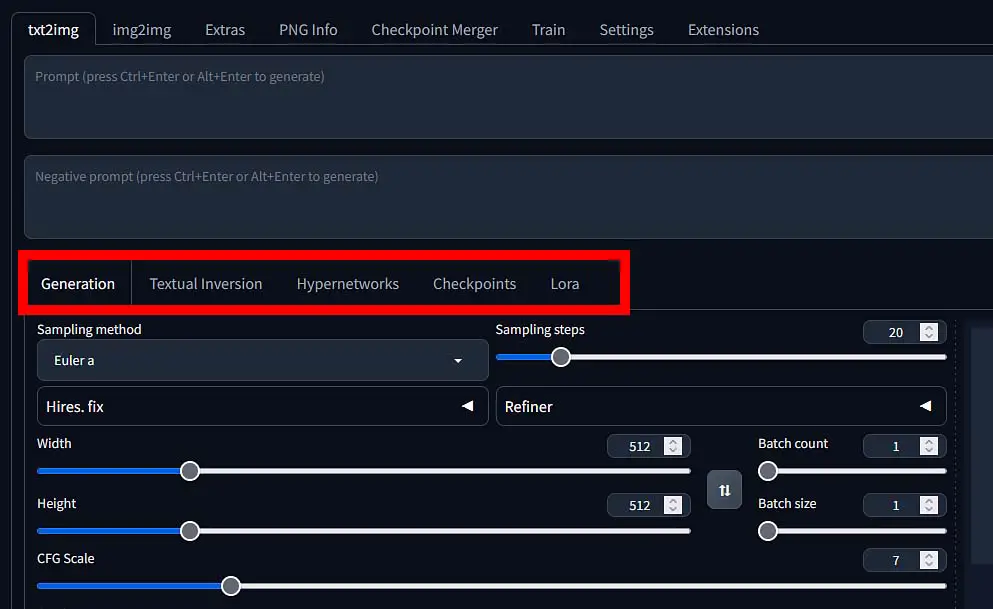
Now, the only thing you need to do is to select the appropriate chosen fine-tuning tab that is visible right in the main WebUI window, without the need to enter any other additional menus. See the image above!
The Textual Inversion, Hypernetworks, Checkpoints and LoRA tabs in that exact order are now positioned just above the main generation settings area on the main WebUI screen, now only one click away!
You might also like: How to Use LoRA Models with Stable Diffusion WebUI – Quick Tutorial