
How to use AI to change your voice live with minimal audio latency? In this quick guide you will learn exactly how to set up the Okada voice changer client and change your own voice into the voice of your favorite movie actor, singer, anime character or celebrity – live! We will also show you how to use your changed voice in your live Discord calls and online games – It’s really simple! Let’s get straight into the tutorial!
If you want to know more right away, you can learn how to train your own custom voice models that work both with the Okada live voice changer and with RVC WebUI for making quick AI song covers in a matter of minutes: RVC WebUI How To – Make AI Song Covers in Minutes! (Voice Conversion Guide)
Let’s get into the tutorial!
Check out also: Automatic1111 Stable Diffusion WebUI All Basic Settings Explained [UPDATED]
Okada Realtime Voice Changer
In this guide we will be using the w-okada voice changer, recently quickly gaining popularity on various social media sites.
To make it short, this software allows you to change the voice audio input from your microphone into various different character voices using AI.
The Okada voice changer client supports not only the better known and somewhat more popular RVC (Retrieval-based-Voice-Conversion) trained voice model format, but also MMVC, so-vits-svc and DDSP-SVC technologies. In this tutorial we will use RVC, but the general steps will be very similar for different models.
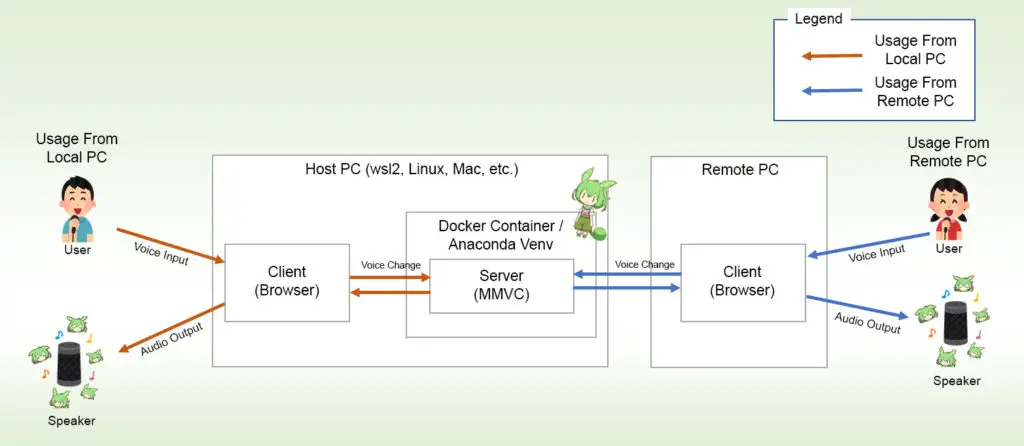
You can also use the Okada VC on a remote PC different from the one that you’re gaming on, for quicker audio conversion and better performance. Neat!
For now, there are Okada VC versions for Windows and MAC available in the official Okada GitHub repository. In a short while we will show you how to install and run it on your system!
The Only Two Requirements
For changing your voice live using the Okada voice changer you will need:
- Okada Live Voice Changer Client installed on your system (Windows/MAC).
- A custom trained model of the voice you want to change your voice into (optional, as Okada VC comes with a few pre-loaded default voices to try out).
If you don’t have the Okada voice changer on your system yet, read this next short paragraph to see how to install it. Then, you’ll be ready to proceed to change your voice right away!
How To Download and Install The Okada Live Voice Changer
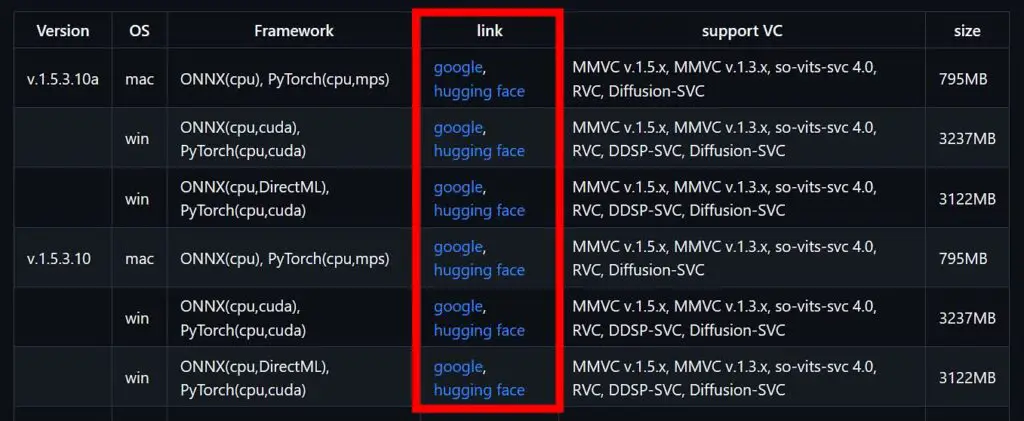
This will take approximately 5 minutes total. First, head over to the official Okada VC repository and scroll down to the releases table. You can click the “English” button near the top of the page if you’d like to view the English translation of the site’s contents instead of the Japanese original.
Select the latest version that matches your operating system, and then click the google or huggingface button to download the chosen version of the software.
Now that you’ve downloaded the Okada Live VC, you need to install it. Luckily, this is a one-click process.
Unpack the Okada Live Voice Changer Client file that you’ve downloaded. Then get into the folder you’ve just unpacked and locate the start_http.bat file. Double click it to run it.
When you see the “proceed at your own risk” alert from Windows, you can click the “Run anyway” option. The reason this pops up here is that the Okada Live VC software is not officially signed by its developer, so it raises the default Microsoft safety mechanism for detecting unkown executables.
At this point, a console terminal window will open, and the installation process will begin, first automatically downloading a few additional files that Okada Voice Changer needs to run.
Another warning from Windows might appear at that point, this time having to do with the Microsoft Windows Defender Firewall. Click the “Allow access” button to continue. This happens because the Okada VC installer calls for network access for its optional networking capabilities for remote processing that we’ve already mentioned earlier.
After a few minutes the installation process should finish. Close the console window, and run the start_http.bat file again.
This time the actual Okada Live Voice Changer will start a few seconds after the console windows pop up, and you will be greeted with the program’s GUI main window.
Do not close the underlying terminal, otherwise the program will terminate. The installation process is done!
Important: On Mac OS starting up the Okada VC is a little bit different: you have to start both the MMVCServerSIO and the startHTTP.command files after bypassing the warnings in privileged mode to run it. Keep that in mind.
What Kind of GPU Do You Need For Real-Time Voice Conversion?
The great thing about Okada Live Voice Changer is that you don’t really need that powerful of a GPU to run it.
The better graphics card you have, the lower latency levels you’ll be able to get (the model will take less time to change and output your desired voice), but Okada VC works on most modern systems as is.
We tested it using an older RTX 2070 Super and got very satisfying results. We were even able to go down to around ~150 ms latency with reasonable output quality without any trouble. All this while gaming and routing Okada VC output to Discord (we’ll show you how to do that in just a moment).
Ideally you should go for a relatively new GPU (manufactured in last ~4 years or so), that has at least 4 GB of VRAM on board).
How To Change Your Voice Using The Okada Voice Changer
How to use the Okada Voice Changer? Before we dive into all the settings you can tweak in the Okada Live VC, let’s go over how to quickly change your voice using one of the default models built into the software from the get go.
You are a few steps away from changing your voice into the voice of your favorite characters such as Scout from TF2, March 7th, the Little Mermaid and more!
There are only 3 steps to the whole process, and here they are:
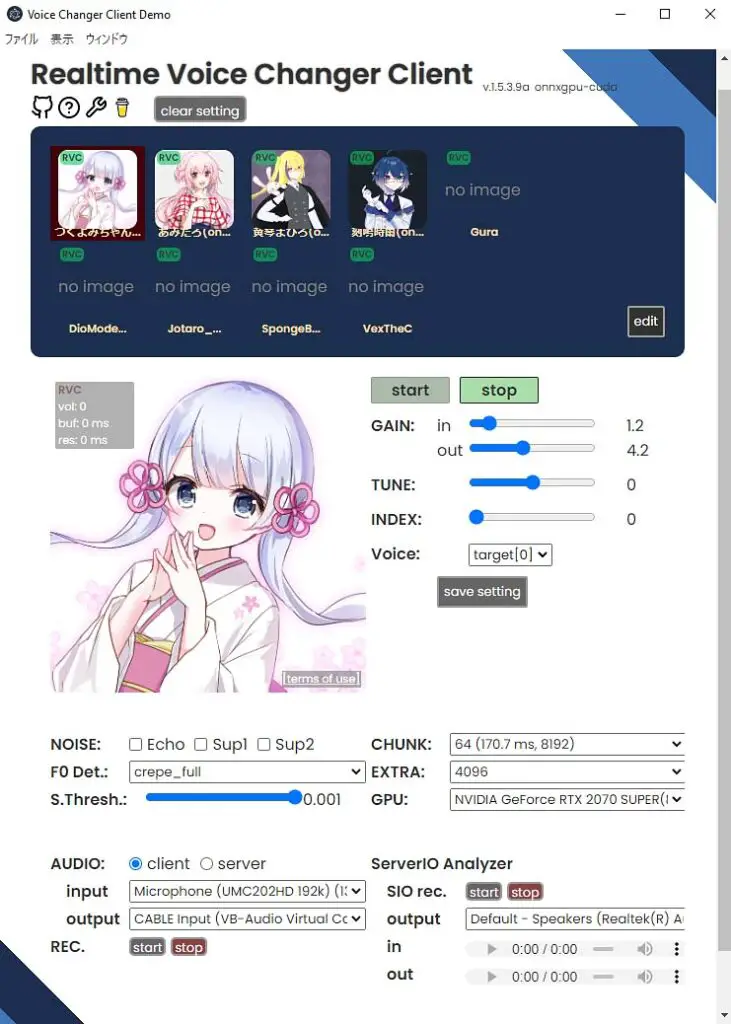
- In the audio section select your input, which should be the microphone you’re currently using, and your output which should be your speakers.
- Click on one of the anime avatars in the top section to select a pre-loaded voice model. Wait for it to load (it will take a few seconds).
- Click the Start button under the voice selection menu to begin the live voice conversion. After hitting the button it will take another few seconds until you’ll hear your changed voice.
Now you should hear the converted voice input through your speakers. Later on you can route the output audio to DAWs, audio editing software such as Audacity, or even online communicators such as Discord, TeamSpeak or Skype.
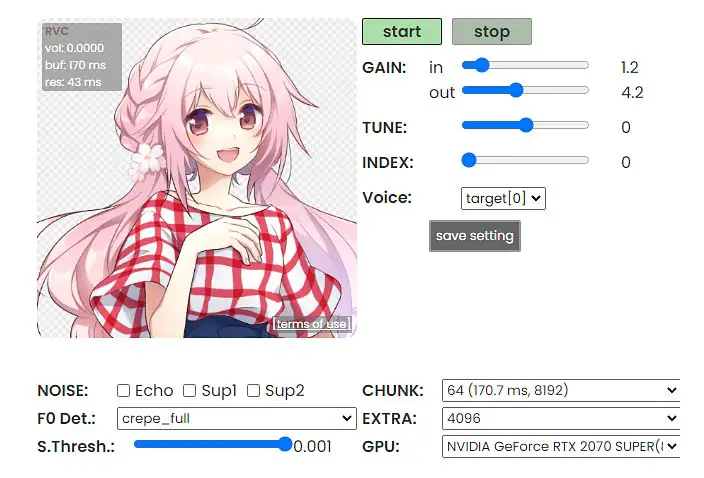
The first tweaks you can attempt to make the Okada Voice Changer conversion quality higher are the following:
- Change the pitch detection algorithm (the “F0 Det.” setting) to crepe, or crepe_full.
- Adjust the pitch of your converted voice using the “TUNE” parameter – higher for male-to-female voice conversion, lower for the opposite.
- If your input mic quality is rather low, try adjusting the noise correction settings (Echo, Sup and Sup1). You can also up your input gain a bit in the “GAIN” section.
If at any point you experience some interface related issues, you can always quickly restart the GUI using the Ctrl+R keyboard shortcut.
All Okada RVC Live Settings Explained
Now let’s take a deep dive into all of the basic settings you can tweak in the Okada VC to make your voice conversions sound even better.
Here is the list of all the Okada VC settings, with short explanations of what each one of them does.
- Start/Stop buttons – After pressing the start button, the voice conversion should start after a few seconds. When you press the stop button, the conversion will stop immediately.
- GAIN: in/out – Input and output gain.
- The input gain is the loudness of the sound coming from your microphone and going into the model input for conversion.
- The output gain is the loudness of the sound after the conversion is done.
- AUDIO (Client/Server) – By default, the application will start and function in the client mode. The server mode is meant for running the voice conversion on another computer to make the whole process more efficient and minimize latency if for example you’re attempting to game and stream on the same time on a lower-spec machine. We won’t get further into the server functionality in this tutorial.
- AUDIO (Input/Output) – Here you can set the input device (for example your microphone) and an output device (for instance your connected speakers). Your sound input will be converted by Okada Live VC and then output using the set output device. You can also set an input device as an existing audio file on your system if you wish to do so.
- TUNE – This parameter regulates the pitch of the output audio, enabling you to correct the pitch difference between the input voice and the trained voice model. For male to female voice conversion, you should generally set it to higher values. For female to male it’s best to do the opposite. Tweak to taste.
- INDEX – This is a setting exclusive to RVC models which had an additional index file loaded beside them during import. It controls the weights assigned to the model features.
- Save Settings – It saves most of the changed settings and associates them with the currently loaded model.
- Export to ONNX – Allows you to convert RVC PyTorch models to ONNX format.
- NOISE – The noise cancellation settings in Okada Voice Changer are pretty basic. The first one is a simple one-click echo cancellation function, and the two others (Sup1, Sup2) are the in-built Okada VC noise suppressors.
- F0 Det – This is the pitch extraction algorithm selection setting. You can find the whole list of different pitch extraction algos in the official Okada VC readme here. In general though, the most efficient one with the lowest conversion quality is the dio algorithm which utilizes CPU processing power only, while one of the best quality ones is the high precision crepe which utilizes your GPU for high quality pitch extraction.
- S. Thresh – This setting controls a noise gate positioned before the voice conversion algorithm input. Setting this to anything other than the default setting, will essentially change the threshold at which the voice conversion algorithm will kick in. Setting it too high might result in unwanted audio cutoffs.
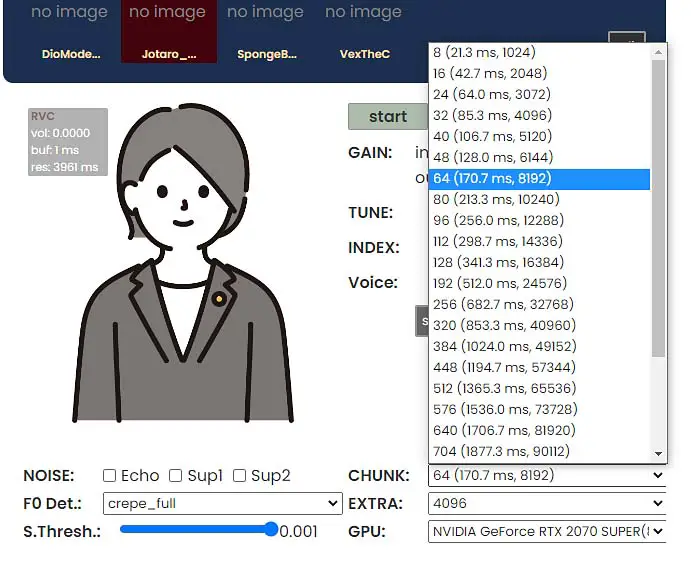
- CHUNK – The chunk value sets the size of the base chunk in which the audio will be converted. Setting it higher can up the quality of the voice conversion process by a lot, but will also result in higher audio latency (the higher the CHUNK value is, the more time it will take for your input voice to be processed). Set the CHUNK value higher for more quality, and lower for less output latency.
- EXTRA – This value will tell the Okada VC how much of the past input audio to feed to the conversion process. The higher you’ll set this value, the higher overall accuracy of the conversion process will be. Note that according to the official Okada VC documentation, the total conversion time will increase by the square of this parameter (!).
- GPU – Pretty simple – set the GPU you want to use for the voice conversion process. In most cases, when you have only one graphics card installed, it will be selected by default.
- REC – Here you can quickly record your changed output voice into an audio file.
- Server IO Analyzer (SIO Rec / Output / In / Out) – This is a neat tool that enables you to record both your audio input and the converted voice output in one go during the voice conversion process. Just hit the start button when the voice conversion is active, record some speech and then hit the stop button (mind the audio latency!). Then you will be able to play back your input and output audio to evaluate your overall conversion quality.
- Merge Lab – Voice model merging features.
- Server Info – Views the current configuration of the voice conversion server.
These are the most important settings you need to know about, excluding the advanced settings which can be accessed by pressing the Advanced Settings button in the bottom section of the Okada VC window.
How To Load Custom Models In Okada VC
Loading up custom voice models in the Okada Live Voice Changer is really easy! You can load both the compatible models you find online (see the next paragraph), or the models you’ve trained on your own computer!
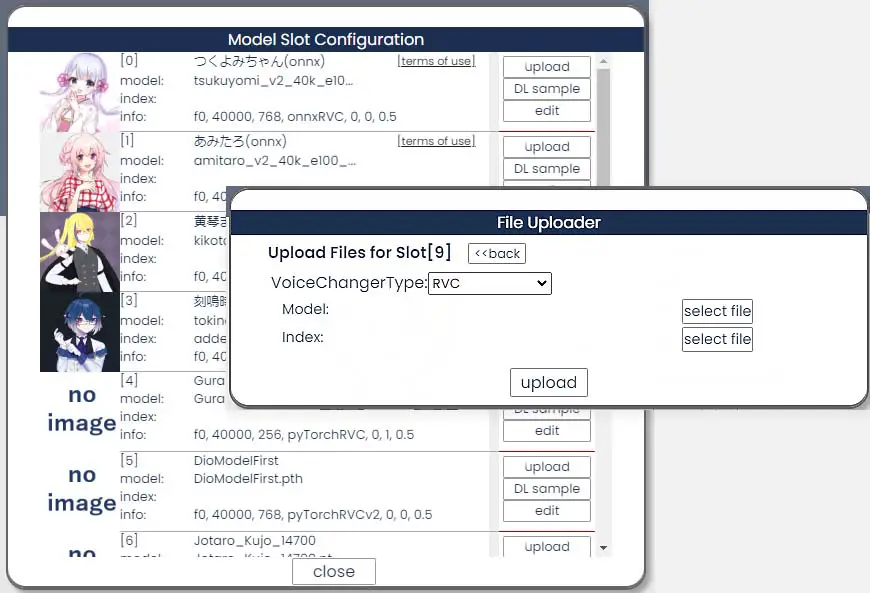
To make use of custom voices, start up the Okada VC, and then click on the edit button in the voice selection section.
Then, from the VoiceChangerType drop down menu, select the type of model you’re importing.
Next, click the upload button near a free empty slot, and select a model file you want to import. The index file import you can see below can be used optionally with RVC models, but is not mandatory for the voice conversion process to run.
Once you’re done, click the upload button, and your new voice will be added to the voice list.
If you want to, you can then import a custom image of the character or person the voice belongs to by clicking on the empty no image slot next to the voice in the Model Slot Configuration menu. If you don’t, the model will be added with a default placeholder picture associated with it.
By default, there are currently 9 free slots for custom voices in the Okada VC.
Where To Get RVC Voice Models For Free?
There are a few places online in which you can download custom trained RVC voice models both for making AI covers and for real-time voice changing with Okada VC.
One of the places you can download many different free RVC models ready to use, is the this voice model list made by kalomaze (the spreadsheet can lag a little bit – it’s updated in real time).
Remember that various models you find online can be distributed with different licensing. Always check what the model’s author has to say about the allowed uses of the model, and if your particular use of the chosen model does or does not require author attribution.
How To Connect The Okada Voice Changer To Discord?
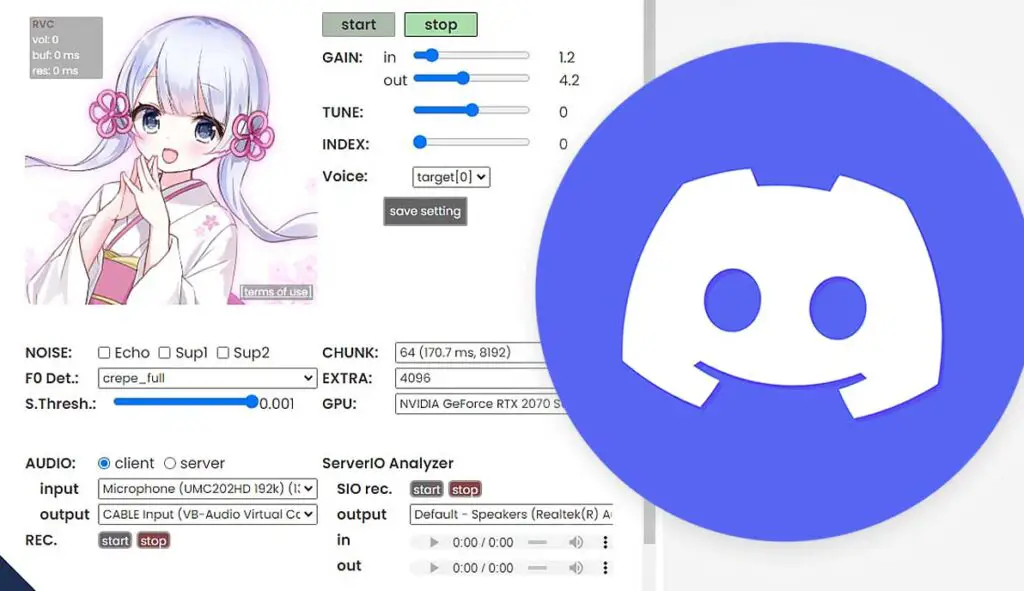
Yes, you can use the Okada Voice changer with Discord, and it’s really simple to set up! Whether you want to prank your friends or just test the voice changer out in a live environment, there is a neat way to route the audio from the Okada VC output to the Discord microphone input.
This quick and simple method involves using free Virtual Audio Cable software to make a virtual connection between the two pieces of software.
In this short tutorial we will show you exactly how to connect the Okada Voice Changer to Discord in a matter of 5 minutes total: How To Use Okada Live Voice Changer Client RVC With Discord – Quick Tutorial
You can use the very same method to route your changed voice into any other software that takes in audio input. This means that you can also use the voice changer in music production software, VoIP apps and many online games that feature a voice chat!
Most Common Error and a Quick Fix
There is a chance that after attempting to start up the Okada Live Voice Changer Client you will be faced with a blank white program window, or the window won’t open at all, and an error like this will show up:
electron: Failed to load URL: http://localhost:18888/ with error: ERR_CONNECTION_REFUSEDOne of the reasons for this error might be issues with your antivirus or active in-built system virus detection scan.
The solution for this is to either wait a bit and then attempt to run the Okada VC again, or exclude the folder containing the program from the threat scans (as always, add custom antivirus directory exclusions at your own risk).
Can You Train Your Own Voices + How To Do That

Actually training your own RVC based voices to use with the Okada Voice Changer (and for making AI vocal covers) is rather easy and can be done on most modern PCs and laptops.
Our simple way to do so involves using the Retrieval based Voice Conversion WebUI for the voice model training process. You can kill two birds with one stone here, as the RVC WebUI also enables you to swap acapella vocals and make AI covers right away!
To learn how to quickly train RVC models locally on your computer, check out this guide: RVC WebUI How To – Make AI Song Covers in Minutes! (Voice Conversion Guide)
It’s easier than you think!
If you enjoyed using the Okada Live Voice Changer, consider donating to its developers!
If You Want To Know More…
There are just so many cool things you can do with AI these days, ranging from text generation, image generation to audio and video cloning and much more! Check out the AI category here on techtactician.com to find more tips, tricks and easy to follow tutorials, with much more content to come!