
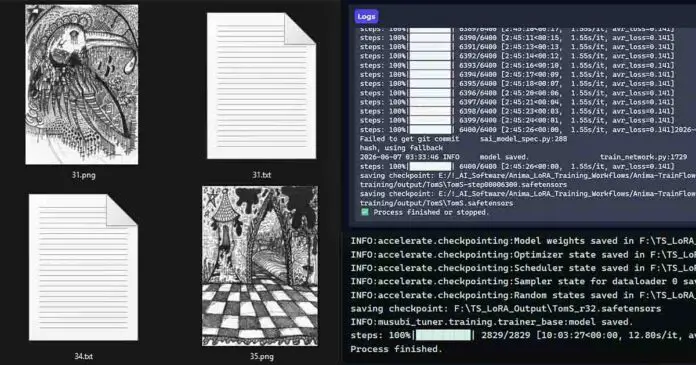
I’ve been training my own LoRA models since the Stable Diffusion 1.5 days. First on an RTX 2070 SUPER with the Kohya GUI, and nowadays on an RTX 3090, for SDXL, Anima and Krea 2. The tools and the models changed a lot over that time, but the method itself barely did. A good dataset, captions written in the language your model understands, sensible settings, and careful testing at the end.
This guide covers exactly that universal method, for nearly any image model you might want to train a LoRA for, together with the real numbers from my own training runs. For full step-by-step walkthroughs of specific models, I’ll link my dedicated guides along the way.
How To Train a LoRA – The Short Version [TL;DR]
- Pick the model you’ll actually generate with, and train on its base version (for example Krea 2 Raw, or Illustrious XL instead of a random finetune you might think is “better quality”).
- Pick a trainer that supports that model. DaSiWa TrainFlow, the Kohya GUI, AI Toolkit and OneTrainer cover almost everything, so they are the most versatile picks.
- Gather 20-50 sharp, consistent images of your character, style or concept. Quality matters a lot here, much more than quantity.
- Caption them the way the model was trained: booru tags for SDXL anime models like Illustrious and Pony, plain sentences for newer models like Flux, Qwen Image or Krea 2.
- Start with the trainer’s default settings, set a bit more steps than you think you need, and save a checkpoint every few hundred steps.
- Test the checkpoints side by side with the same prompt and seed, at a few LoRA strengths, and keep the one that looks best. Oftentimes it won’t be the last one.
The rest of this guide explains each of these steps, and the things that tend to go wrong along the way.
What a LoRA Can and Can’t Do
A LoRA (Low-Rank Adaptation) is a small file that teaches an existing image model something new, like a character, an art style or a concept, without retraining the whole model. You load it alongside the base model, and it nudges the model’s output towards what it learned from your images.
LoRAs also function in a very similar way for many other ML models like large language models, however this guide is strictly about models used for image generation.
What a LoRA can’t do is work across model families. It only works with the model architecture it was trained for. A LoRA trained for SDXL won’t do anything useful on Flux, Krea 2 or Anima, and a Flux.1 LoRA won’t work on Flux.2. Within one family things are more forgiving. Illustrious, Pony and NoobAI are all SDXL finetunes, so a LoRA trained on one of them will usually load on the others, although it will always look best on the model it was trained on.
Step 1: Pick The Model You’ll Actually Generate With
Decide which model you want to use your LoRA with first, and train it on that model’s family. Then, within that family, train on the most “neutral” version available. What I mean here is:
- Train on the base model, not a heavily stylized finetune. A LoRA trained on a base model like Illustrious XL v0.1 (which was released specifically as a base for LoRA training) tends to work well across the many finetunes built on top of it. A LoRA trained on one specific merge mostly works well on that merge.
- The exception: if you only ever generate with one particular checkpoint, training directly on it is perfectly fine, and can even give you better results with that model. I, for example, back in the day have trained quite a few LoRA models for Diving Illustrious XL, which was a fine-tune of Illustrious that I particularly enjoyed and they turned out pretty good, still being able to guide the base Illustrious model to some extent.
Base, Raw and Turbo Models – Which One Do You Train On?
Many of the newer models come in two versions: a base model, and a faster, distilled “Turbo” model that generates images in just a few steps. You are supposed to train your LoRA on the base, and then use it with the distilled version. The distilled models are a poor training target, as the distillation process changes how they react to further training. Some examples:
- Krea 2: you train on Krea 2 Raw, and use the LoRA with Krea 2 Turbo, or with Raw and a Turbo LoRA.
- Flux.2 Klein: Black Forest Labs released separate base versions (Klein Base 4B and 9B) for training, and the distilled Klein models for generation.
- Anima: the Anima model card says LoRAs should be trained on Anima Base, never on the Turbo version of the model.
When you move a LoRA from the base model to its distilled version, you may need to adjust its strength. This will change how much your LoRA affects your image outputs. Always test a few values before deciding your LoRA is too strong or too weak for your liking.
Not sure which model to pick in the first place? Here are a few places to start: the best Illustrious XL finetunes compared, my quick Anima setup guide, and running Krea 2 in 4-bit in ComfyUI.
Step 2: Choose a LoRA Trainer That Supports Your Model
If I were to be a judge of the current situation on the local image generation “market” today, there’s no single best trainer anymore. Most of them are free and open source, and the deciding factor is simply which models they support. Here is what I’d personally choose for each model family:
Swipe the table sideways to see all columns.
| Model | Trainers I’d use | My full guide |
|---|---|---|
| SDXL, Pony, Illustrious, NoobAI | Kohya GUI, DaSiWa TrainFlow, OneTrainer | SDXL & Kohya GUI guide |
| SD 1.5 | Kohya GUI | Same guide |
| Anima | DaSiWa TrainFlow, Kohya GUI, AI Toolkit | Anima LoRA guide |
| Krea 2 | DaSiWa TrainFlow, AI Toolkit, Musubi Tuner | Krea 2 LoRA guide |
| Flux.1 | AI Toolkit, FluxGym, OneTrainer, Kohya GUI | – |
| Flux.2 and Flux.2 Klein | AI Toolkit, OneTrainer, Musubi Tuner | – |
| Qwen Image, Z-Image | AI Toolkit, OneTrainer, Musubi Tuner | – |
- DaSiWa TrainFlow is my go-to trainer nowadays. It’s a portable GUI for Windows and Linux that runs Kohya’s sd-scripts and Musubi Tuner under the hood, with an Auto Calc button that can suggest settings based on your dataset and VRAM. It supports SDXL, Anima and Krea 2, as well as Wan 2.2 and LTX 2.3 video generation models.
- The Kohya GUI gives you the most settings of pretty much any GUI trainer, and it’s still my main pick for SDXL when I want full control over everything.
- AI Toolkit by Ostris supports the longest list of models, including Flux.2, Qwen Image, Z-Image, Krea 2 and many video models, with a reasonably simple web interface.
- OneTrainer is another solid all-rounder with a GUI, built-in captioning and masking tools.
- Musubi Tuner and diffusion-pipe are command line trainers. You’ll mostly use them indirectly, through GUIs like DaSiWa TrainFlow, but of course, if you feel like you don’t need to rely on a graphical interface, they are good picks as well.
Can you train a LoRA directly in ComfyUI? ComfyUI does have built-in LoRA training nodes, but a dedicated trainer is still much easier to set up and gives you more predictable results.
What about AMD GPUs, Macs and CPUs? All of these trainers are made with NVIDIA GPUs in mind. Some of them have experimental AMD support, mostly on Linux, and AI Toolkit has experimental support for Apple Silicon Macs with unified memory, but in general you should expect a lot more troubleshooting and fewer working settings in these environments. Training on a CPU alone isn’t practical at all, and even if possible for some models, would be extremely slow. If you don’t have a suitable GPU, renting a cloud GPU for a few hours is usually a better idea than attempting to run the training process on an average CPU.
Step 3: Check Your VRAM, RAM and Time Budget
Here are some numbers from my training attempts, together with what the trainers’ own documentation and other users report for the models I haven’t trained myself:
Swipe the table sideways to see all columns.
| Model | VRAM | Source | Notes |
|---|---|---|---|
| Krea 2 | 21GB + 7.5GB shared | My run | RTX 3090 with 32GB of RAM, rank 32, FP8 with block swap. About 10.8 seconds per step, and 2829 steps in 10 hours 3 minutes with previews. |
| Anima | 6GB+ | My run + developer notes | I trained mine on the RTX 3090. The Anima TrainFlow developer reports about an hour per LoRA on an RTX 3060 12GB. |
| SDXL, Pony, Illustrious | 8GB+ | My early training runs | Possible on 8GB cards, but pretty tricky. 12GB or more makes it a lot easier. |
| Flux.1 | 8-24GB | Kohya docs | 8GB only with heavy block swapping. 24GB runs the basic settings fine. |
| Flux.2 Klein 4B | 24GB | Black Forest Labs | About an hour for 1800 steps on an RTX 4090. |
| Qwen Image | 12-24GB | Musubi docs | 24GB with FP8 and some block swapping, 12GB only with heavy block swapping and 64GB of system RAM. |
| Z-Image | 12GB+ | User reports | Around 11.5GB at 1024px with FP8 and the Adafactor optimizer in AI Toolkit. |
Don’t forget about your system RAM. To fit big models on consumer GPUs, trainers swap parts of the model (or the text encoder) out to your main memory. Musubi Tuner recommends 64GB of RAM for its image models, and says 32GB with a swap file may work (albeit slower). My Krea 2 runs went just fine with 32GB of RAM, but that’s about the lowest I’d go for the large 12B+ models.
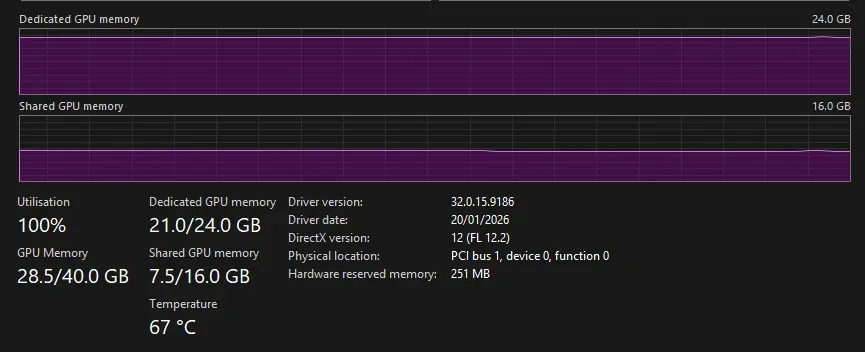
That shared memory number is what you should be watching very carefully when working with any larger AI models locally on your system. A bit of it is fine when your trainer swaps blocks on purpose, but if it suddenly fills up on a model that should fit in your VRAM, your training can slow down many times over. Here is what the shared GPU memory actually is, and how to fix slow LoRA training.
How Long Does LoRA Training Take?
Training time is simply the number of steps multiplied by the time per step, and the time per step depends on your GPU, the model, the resolution and the memory savers you use. You’ll see the speed in seconds per step/iteration (s/it) in your trainer’s log within the first few minutes, so you can calculate the total for your particular system right away. Most training tools will give you a total estimate automatically.
For reference, my Krea 2 run took about 10.8 seconds per step, so 2800 steps meant an overnight run. Smaller models like Anima or SDXL train a lot faster on the same card. Also, keep in mind that the preview images generated during training cost time too. In one of my past Krea 2 runs for example, the previews took about 2 of the 10 hours (!), so depending on the available memory and the base model generating them less often or changing the preview settings can be one of the easiest ways to speed things up.
You might also like: Best GPUs for Stable Diffusion, SDXL & FLUX Local AI Image Generation
Step 4: Build a Good Training Dataset
The dataset almost always matters more than any setting you’ll ever change. Even with perfect settings, a LoRA can only be as good as the images it learns from.
How Many Images Do You Need?
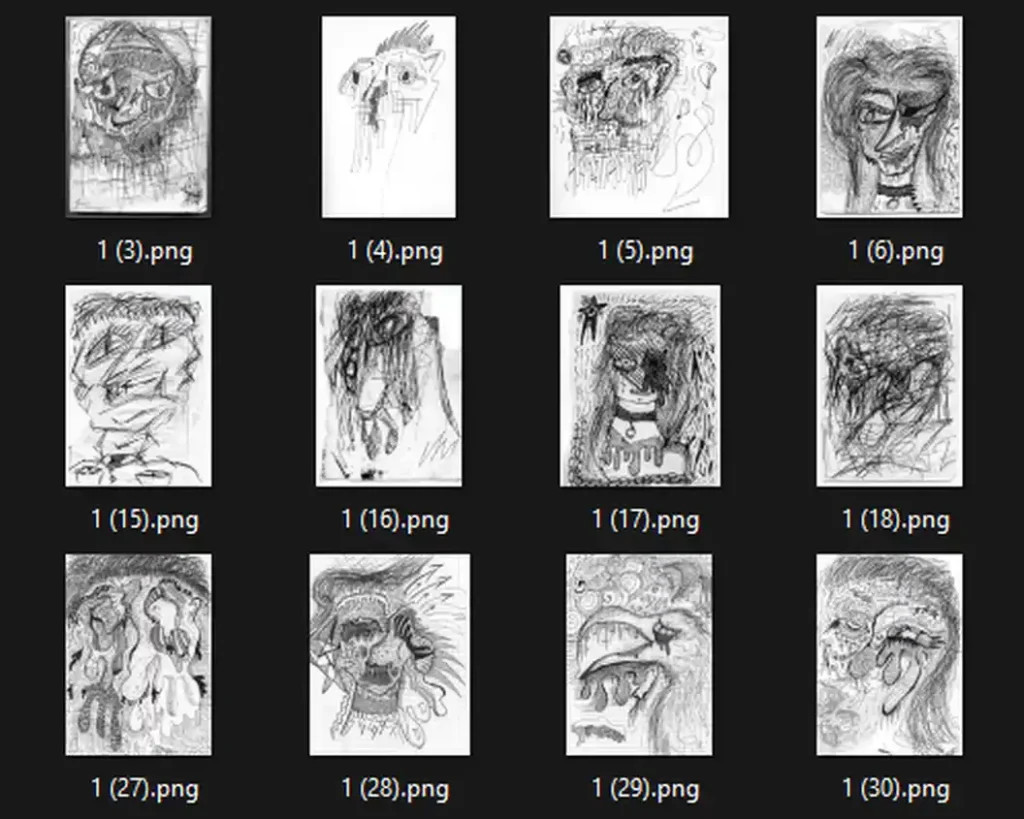
For most character and style LoRAs, 20-50 good images are enough. My two latest style LoRAs used 30 and 41 drawings. Here is roughly how the number changes with what you’re training:
- Character or person: ~20-40 images, with different poses, angles, expressions, outfits and backgrounds, so the LoRA learns the identity and not one specific photo.
- Art style: ~30-50 images or more, showing the style on many different subjects, so the LoRA learns the way things are drawn and not the things themselves.
- Object or concept: anywhere from ~15 to 50 images, depending on how unusual the concept is for the base model.
More images aren’t automatically better. Ten great images will in most cases beat fifty mediocre ones, which is why you should always prune blurry or otherwise low-quality content before you even start captioning.
What Makes a Good Training Image?
- Consistency. One image with a vastly different style, outfit or setting can do more harm than good.
- Sharpness and quality. Skip blurry, heavily compressed or low-resolution pictures. The LoRA will learn their flaws too.
- Variety where you want flexibility. If every image has the same background or pose, your LoRA will “think” it’s part of the character or style.
- No text or watermarks, unless you want them to show up in your generations. This rule is especially important with older generation models like SDXL which are not trained to generate coherent text to begin with.
Do You Need To Crop Your Images?
No. All of the trainers mentioned here support automatic aspect ratio bucketing, which groups your images by size and aspect ratio instead of forcing them into one square. What you do need to watch is the size. Most modern models expect training images of around one megapixel, so aim for at least 1024×1024 pixels, or the same pixel count in other aspect ratios.
The 512×512 rule you can come across in some older guides mainly applies to SD 1.5, which today can easily be called a legacy model. While you can train a model like Krea 2 or Anima on lower-resolution content buckets, this will affect the details and overall quality of your LoRA.
Step 5: Caption Your Images The Way Your Model Understands
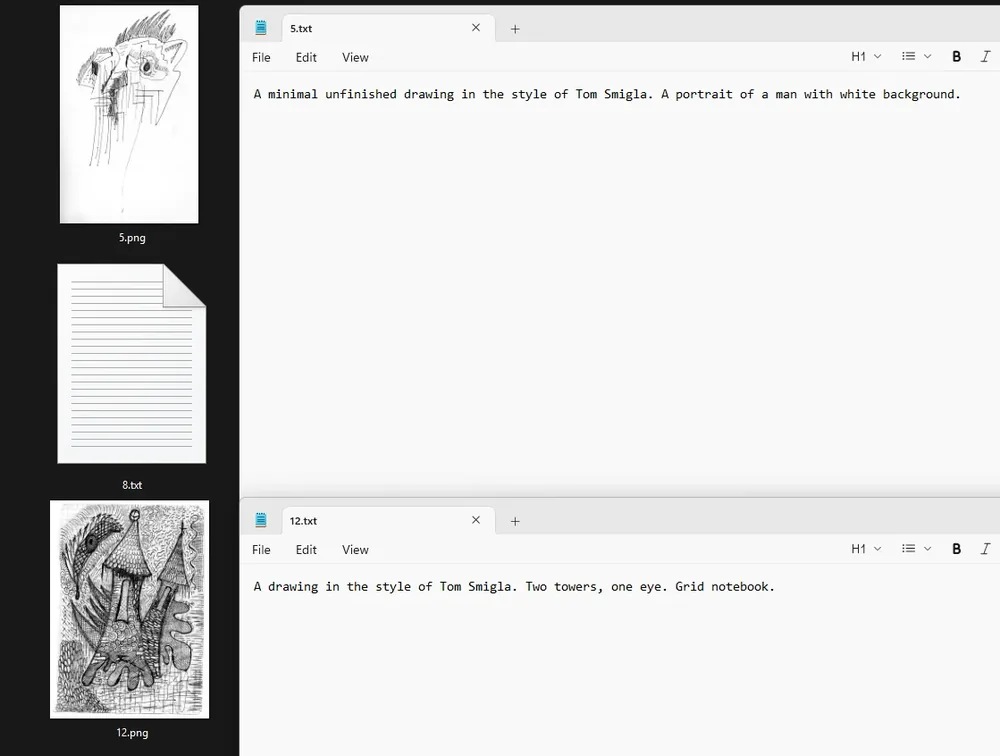
Each training image is paired with a .txt caption file of the same name. The most important rule is to write your captions in the same “language” the model was trained with, which depends on its text encoder:
| Model | Caption style |
|---|---|
| Illustrious, Pony, NoobAI | Booru tags. Here is how booru tags work. |
| Base SDXL, realistic SDXL models, SD 1.5 | Short natural language descriptions, or a mix of tags and short phrases. |
| Anima | Tags, sentences, or a mix of both. |
| Krea 2, Flux, Qwen Image, Z-Image | Plain sentences, written the way you’d prompt the model. |
What Should You Put In Your Captions?
You’ll find a lot of contradicting advice on this, but the logic is actually very simple, and is based on how the models soak up new knowledge. Caption the things you want to be able to change with your prompts, and leave out the things you want the LoRA to learn. Whatever you don’t describe gets absorbed into the LoRA itself (or into your trigger word).
- Character LoRA: describe the pose, outfit, expression, background and framing, as these change from image to image. Don’t describe the character’s permanent features in detail, unless you want to be able to change them later.
- Style LoRA: describe the subject and the scene, but not the style itself. Let the LoRA figure out the linework, colors and textures on its own.
- Concept LoRA: describe everything around the concept, and keep the concept itself tied to your trigger word.
The knowledge of visual elements that your LoRA “absorbs” by you not referencing it in the caption files will be used by it regardless of whether you include these elements in your prompts or not.
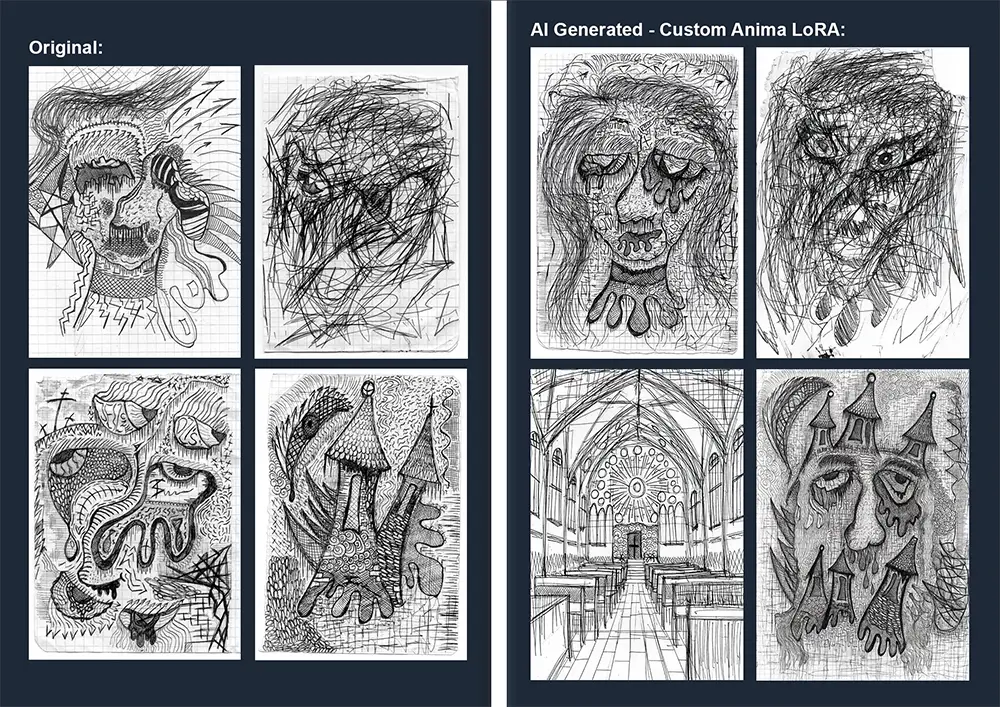
A good example to understand it better is me not prompting “monochrome drawing made with a black pen” in all of the caption files of my art style LoRA. As all of the images in the training dataset are black and white and drawn using a black pen, I want this style to affect the image when my LoRA is added to the main model during image generation regardless of my prompt, with just the trigger word used.
Do You Need a Trigger Word?
A trigger word is a unique word or phrase you put in your prompts to call up your LoRA. For character and concept LoRAs, it’s strongly recommended. Use something the model doesn’t already know, like “zxq_mycharacter”, and never a common word like “girl” or “cat”.
For style LoRAs it is optional, although not using it doesn’t grant you any real benefits. My Anima LoRA used the trigger word “TomS”, while for my Krea 2 LoRA every caption simply started with “A drawing in the style of Tom Smigla”, so I left the trigger word field empty. Both approaches worked well. Just make sure the trigger ends up in your captions once, and you will be good to go.
Once again, words or phrases that repeat in all of the caption files absorb (and later are able to represent) the whole idea and characteristics of your trained concept or style.
Captioning Tools
For tags, the WD EVA02 tagger is the standard, and it’s built into the Kohya GUI, DaSiWa TrainFlow and Anima TrainFlow. For sentences, JoyCaption and Florence-2 are popular local options, and you can also use a vision language model like Qwen-VL, for instance through LM Studio, to describe your images for you.
Whichever tool you decide to use, remember that you captions matter at least as much as the quality of your images. Always inspect them carefully, and make sure that they describe the image contents and the included concepts in the exact way you want your LoRA to understand them.
Step 6: The Training Settings
Every trainer has dozens of options, but only a handful of them really change your results. Start with your trainer’s defaults or presets, train once, and change one thing at a time.
- Network rank (dim) and alpha: simplifying things a bit, these control the “volume” and size of your LoRA, which directly affects how much your LoRA can learn. 32 is a great default for both, and 64 can help with very detailed styles. You’ll hardly ever need more than 128. Higher ranks also mean bigger files, so keep that in mind if your training environment saves checkpoints often during the training process.
- Optimizer and learning rate: Prodigy with a learning rate of 1.0 adjusts the actual learning rate on its own, which is why I use it for most of my LoRAs, and it’s quite a popular choice overall. With AdamW or AdamW8bit you set the learning rate yourself, and the right value depends on the model. 1e-4 is a common starting point for SDXL, while the Anima model card suggests starting at 2e-5. Adjusting the learning rate manually is mostly trial-and-error, which is yet another reason why Prodigy is a commonly chosen alternative that costs just a little bit more VRAM during the training process.
- Batch size: how many images are processed per step. 1 or 2 is fine for most LoRAs on consumer GPUs. Higher values need more VRAM, and change how many steps you need.
- Resolution: 1024 for SDXL and newer models, 512 for older models like SD 1.5. Lower resolutions can be used for newer models and they train faster and use less VRAM, but using them comes at the cost of fine detail and overall output image quality.
- Memory savers: Using FP8 base models for training, gradient checkpointing, latent caching and block swapping let you fit big models on smaller GPUs, mostly at the cost of speed. Each training software has its set of VRAM optimization methods.
Steps, Epochs and Repeats
This is the most confusing part for most people, mostly because every trainer counts training time differently. The simplest explanation is:
- A step is one update of the LoRA, processing one batch of images.
- An epoch is one full pass through your dataset.
- Repeats tell the trainer how many times to show each image per epoch.
Put together: total steps = images × repeats × epochs / batch size (also divided by gradient accumulation, if you use it). Some trainers let you set the steps directly and work out the epochs for you, others make you set epochs and repeats and calculate the steps.
For example, 20 images with 10 repeats, trained for 10 epochs at a batch size of 2, give you 1000 steps.
The control over the total amount of training steps, as mentioned differs by software:
| Trainer | What you set |
|---|---|
| Kohya GUI | Repeats (in the image folder name, like 10_mycharacter), epochs, and optionally max train steps. |
| DaSiWa TrainFlow | Total steps. It rounds them up to full epochs. |
| AI Toolkit | Total steps. |
| OneTrainer | Epochs, plus repeats per concept. |
| Musubi Tuner | Epochs or max steps, plus repeats in the dataset config. |
So how many steps do you need? Unfortunately, as you might infer, there’s no universal number, as it depends on the model, the dataset and the learning rate. Somewhere between 1500 and 3000 steps is a common range for character and style LoRAs, but there is no telling how much or how little will be enough for your particular dataset.
The safest approach is in most cases to set a bit more than you think you’ll need, save a checkpoint every ~200-300 steps, and pick the best one afterwards. Some training software also lets you resume training from checkpoints using state files, so in these cases you can easily train your LoRAs further, if you’d like to.
The Settings I Used For My Own LoRAs – For Reference
Swipe the table sideways to see all columns.
| Setting | Anima (Anima TrainFlow) | Krea 2 (DaSiWa TrainFlow) |
|---|---|---|
| GPU | RTX 3090 24GB | RTX 3090 24GB |
| Dataset | 30 drawings, short tags | 41 drawings, short sentences |
| Rank | 64 | 32 (alpha 32) |
| Optimizer | Prodigy, LR 1.0 | Prodigy, LR 1.0 |
| Batch size | 2 | 1 |
| Resolution | 512×704 buckets | 1024px buckets |
| Steps set | 6400 | 2829 |
| Checkpoint I kept | Step 4400 | The final one, at 0.8-1.0 strength |
Step 7: Start The Training and Keep an Eye On It
Once you hit start, don’t walk away right away. Read the first part of the training log (most software presents it either in GUI or in the console), and check that the settings it lists match what you set.
Then check the speed in seconds per step to estimate the total time, and keep an eye on the VRAM use for the first few dozen of steps. If your trainer saves training states next to the LoRA files (folders ending in “-state” in DaSiWa, for instance), keep them until you’re done. They let you resume or extend the training later without starting over.
Step 8: Test Your Checkpoints and Pick The Best One
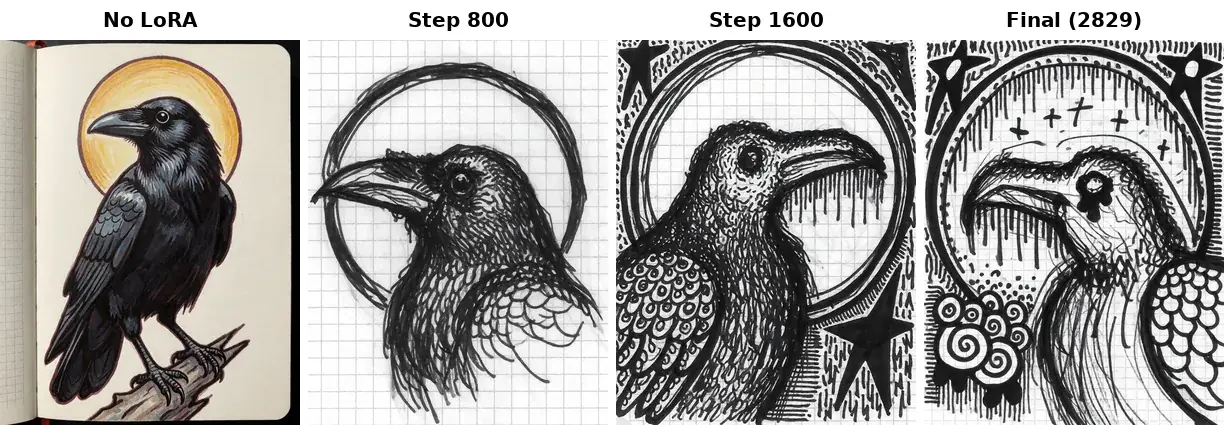
Don’t assume your last checkpoint is your best one. With my Anima LoRA, for instance, I set the training to 6400 steps and ended up keeping the checkpoint from step 4400. With my Krea 2 LoRA, it was the other way around, and the final checkpoint turned out to be my favorite.
The only reliable way to find out is a side-by-side test. Build a simple ComfyUI workflow that generates the same prompt with the same seed for several of your checkpoints, and run it with a few different prompts:
- One or two captions taken straight from your dataset, to see how closely the LoRA can recreate what it learned.
- One or two prompts with subjects that aren’t in your dataset at all, to see whether the LoRA can transfer what it learned to new ideas.
- One prompt that has nothing to do with your LoRA, like a plain photo, to check whether your LoRA leaks into images that don’t ask for it.
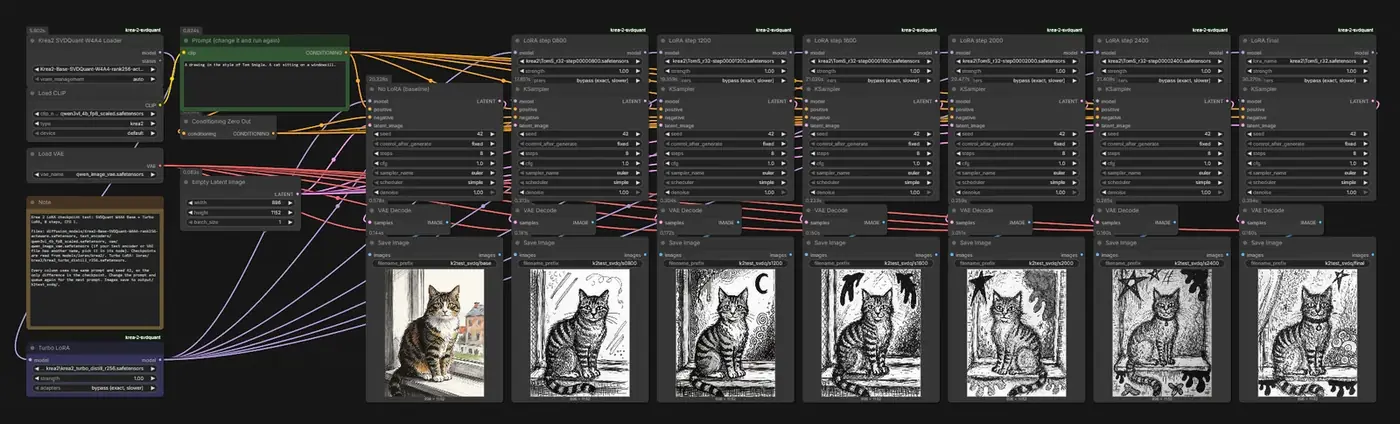
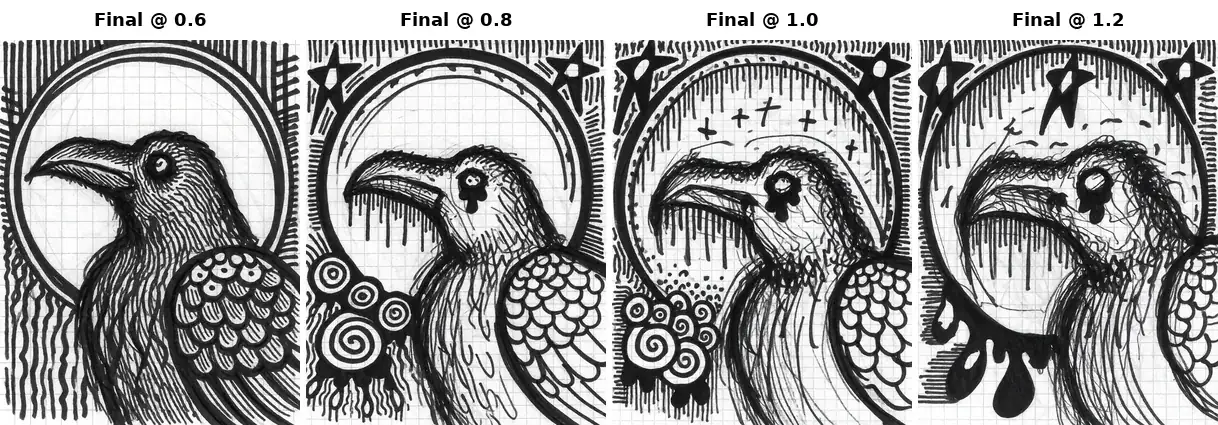
Here is what that can look like in practice, with the crow prompt from my Krea 2 test. Step 800 already picked up the pen-on-grid-paper look, step 1600 has strong but fairly generic linework, and only the final checkpoint has the recurring motifs and the messier lines that make it look like something I’d actually draw.
Juxtaposing different checkpoints you’ve made like this is the best way to assess the quality of your newly trained LoRA, and these days LLM-based tools like ChatGPT or Claude can prepare basic comparison workflows like the one you see above for you in a matter of minutes.
Signs Your LoRA Is Undertrained or Overtrained
- Undertrained: the effect is weak, and your images look like the base model with only a slight tint of your style or character. Try a later checkpoint or a higher strength.
- About right: the images look the way you wanted, and still follow your prompts. Keep it, and test it at a few strengths.
- Overtrained: the images copy your training data, ignore parts of your prompt, or look burnt and messy. Go back to an earlier checkpoint, or lower the strength.
- A dataset problem: the same pose, background or framing shows up in every image. Add more variety to your dataset, or describe those elements in your captions.
Test Different LoRA Strengths Too
A slightly overtrained LoRA can very often be saved just by lowering its strength. With my Krea 2 LoRA, the final checkpoint at 0.8 strength gave me almost the same result as the step 2000 checkpoint at 1.0 (the full comparison is in my Krea 2 guide). Lower strengths work great for prompts that are far from your dataset, while higher ones can push the style harder, at the cost of stability. With higher weights the image can become distorted, especially if you’re aiming at non-artistic, realistic imagery.
Last but not least, write down the settings of every run. The dataset size, the trigger word, the rank, the steps, the optimizer and the checkpoint you kept are all important info that is oftentimes hard to extract from the model’s metadata. A month later, you won’t remember which of your similarly named LoRA files was trained with what, and in many cases you’ll greatly benefit from that info when training your next model.
Two of The Most Common LoRA Training Problems – Quick Troubleshooting
Out of Memory Errors and Very Slow Training
Lower the batch size and the resolution, turn on gradient checkpointing and latent caching, use an FP8 version of the base model if your trainer supports it, and enable block swapping for big models. Your other apps matter too. Web browsers with hardware acceleration, Photoshop, DaVinci Resolve, the Steam Client – all of these have to be closed if you’re short on VRAM. Here is more on that: Hidden VRAM Hogs – How to Free Up GPU Memory (Local AI & Gaming).
On GTX 10 and RTX 20-series cards, you’ll also need to switch from bf16 to fp16 precision, as these GPUs don’t support bf16. I explain how in my SDXL LoRA guide.
The LoRA Does Nothing, or You Get “lora key not loaded”
- Check the model family first. A LoRA for SDXL won’t work on Flux or Krea 2, and a Flux.1 LoRA won’t work on Flux.2. This is the cause in most cases.
- Update ComfyUI. Support for LoRA formats of new models often lands in ComfyUI a bit after the trainers. “lora key not loaded” messages usually mean the LoRA’s format isn’t recognized by your version, or that it was made for a different model.
- Check your trigger word and strength. Make sure the trigger is in your prompt, and try a higher strength, especially on distilled models.
- If none of that helps, the effect is somewhat there but it isn’t at all what you want, the LoRA is probably severely undertrained. Try a later checkpoint, or train for longer. Of course there is also a slight risk that you’ve trained a LoRA with botched settings (like too low of a learning rate, or too low of a rank/alpha).
My Step-by-Step LoRA Training Guides
If you already know which model you want to train for, these guides walk you through the whole process with a specific trainer:
- How To Train Your Own Stable Diffusion LoRA Models – Full Tutorial (SDXL & Kohya GUI): SDXL, Pony, Illustrious and SD 1.5 LoRAs in the Kohya GUI, from the installation to the first test.
- How To Train Anima LoRAs – The Easiest Way (Anima TrainFlow): my style LoRA for the Anima model, trained with Anima TrainFlow.
- How To Train Krea 2 LoRAs – DaSiWa TrainFlow Guide (Tested on RTX 3090): a simple full Krea 2 run with DaSiWa TrainFlow, step-by-step.
- Kohya LoRA Training Settings Explained: every setting in the Kohya GUI, one by one.
So, Where Do You Start?
Pick the model you want to use, find a trainer that supports it, and spend most of your time on the dataset and the captions. Start with the default settings, save checkpoints often, and test them side by side before settling on one. Once you’ve done it once, every next LoRA gets a lot easier, whatever model it’s for.
Thanks for reading, and see you next time!
You might also like: Beginner’s Guide To Local AI Image Generation Software