

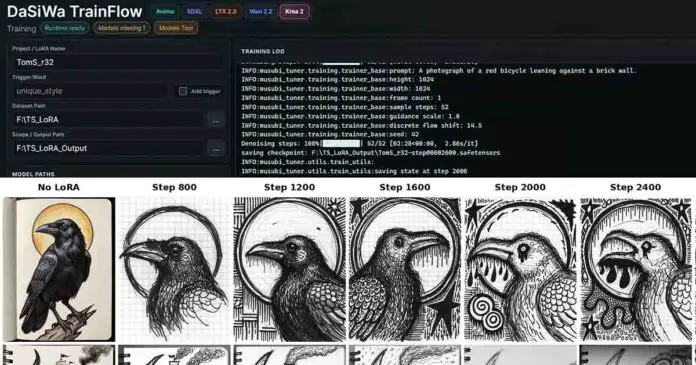
After training an Anima LoRA on my own drawings, I wanted to see what Krea 2 would do with the very same dataset. So I trained one overnight on my RTX 3090 with DaSiWa TrainFlow, then tested the chosen saved checkpoints at a few different strengths to find the one that actually resembles something I’d create by hand.
Here is the whole run, from the captions and the settings to the hours it took, and the final results next to my original drawings.
Quick Overview: My Krea 2 Style LoRA Training Settings
- Base model: Krea 2 Raw (FP8 created automatically by the trainer)
- Trainer: DaSiWa TrainFlow, Krea 2 profile (Musubi Tuner under the hood)
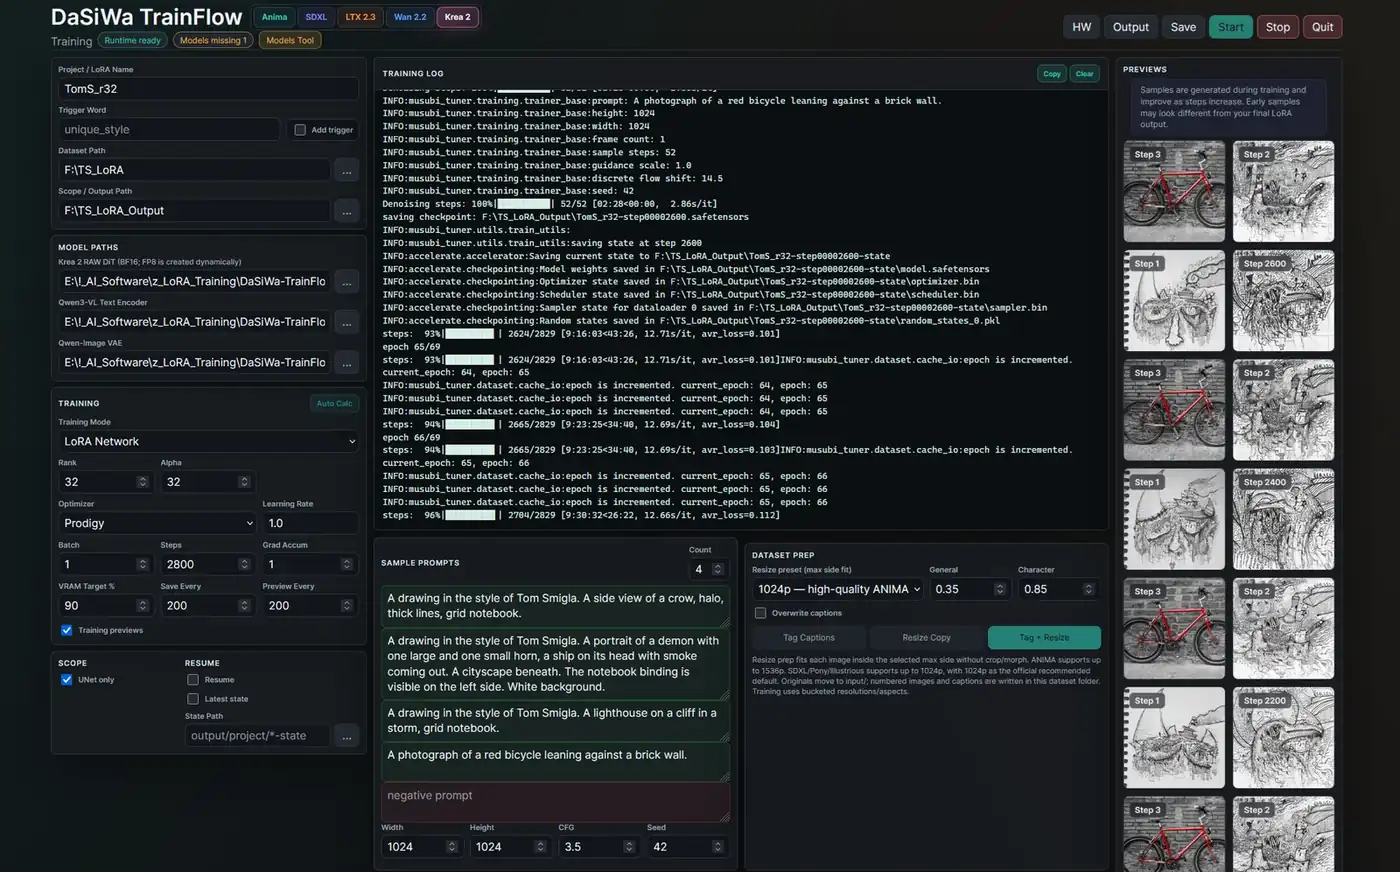
- Network: LoRA, rank 32, alpha 32, UNet only
- Optimizer: Prodigy, learning rate 1.0
- Batch size: 1 (gradient accumulation 1)
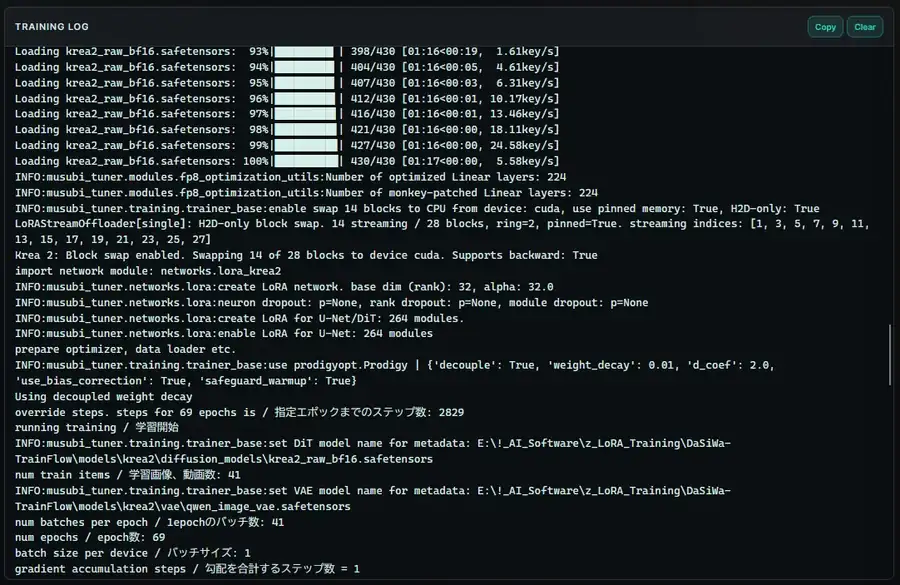
- Steps: 2829 (69 epochs), checkpoint saved every 200 steps
- Training resolution: 1024px, bucketed
- Memory savers: Block swap 14 of 28 blocks, VRAM target 90%
Why Train a LoRA For Krea 2 Instead of SDXL or Anima?
The main differences here have got to do with what each of these models was trained for, and their size.
Krea 2 is a 12-billion-parameter image model that handles both realistic photos and illustrated styles really well, and it understands long, natural language prompts a lot better than CLIP-powered SDXL-based models ever did. It comes in two versions. Krea 2 Raw is the base you train your LoRAs on, and Krea 2 Turbo is the fast, distilled version you generate your images with afterwards.
Anima with 2 billion parameters total is a smaller, more specialized model which was trained mainly on anime-style and cartoon-style images, using both natural language captions and booru-tags. It’s much worse at recreating realistic images, but much better when it comes to knowledge of specific anime concepts, styles and characters.
Another important difference is the hardware you need. Compared to Anima which trains on GPUs with as little as 6GB of VRAM, Krea 2 is much heavier to train requiring at least 12GB of VRAM (and a substantial amount of RAM) if you want to prepare your own LoRA models for it.
So in short, the first question is: can you actually train the model reliably with the amount of VRAM you have on your GPU? And the other: do you want better flexibility when it comes to image styles and realistic generations with Krea 2, or better knowledge of anime styles and characters and booru-tag based tagging with Anima.
Things You Need Before You Start
- Krea 2 Raw. You can get the model from its official HuggingFace repository here. DaSiWa TrainFlow can download the files you need automatically if you don’t already have them.
- The Qwen3-VL text encoder and the Qwen Image VAE. DaSiWa’s Models Tool downloads qwen3vl_4b_bf16.safetensors from the Comfy-Org Qwen3-VL repository and qwen_image_vae.safetensors from the Comfy-Org Krea 2 repository. If you already use Krea 2 in ComfyUI, you probably have both of them already.
- DaSiWa TrainFlow. A free, portable trainer for Windows and Linux, which runs Musubi Tuner for its Krea 2 profile with a neat GUI.
- A reasonably strong GPU and plenty of system RAM. The Musubi Tuner Krea 2 docs recommend 12GB of VRAM or more and 64GB of main system RAM. For this guide I trained my LoRA on an RTX 3090 with 24GB of VRAM and 32GB of main system RAM.
- 20-50 images of your style or character. I used 41 images total here. The general dataset rules are the same as for any other model, and you’ll find them in my main LoRA training guide.
Setting Up DaSiWa TrainFlow For Krea 2 LoRA Training
Download DaSiWa TrainFlow from GitHub and unpack it. Run its Runtime Tool, use Verify Runtime and Install Requirements to set up the embedded Python environment, and then start TrainFlow.exe. The Models Tool can download the Krea 2 runtime models for you if you don’t have them yet. The whole setup is really simple.
Once it’s running, switch to the Krea 2 profile with the tab at the top, and point the three model paths to Krea 2 Raw (the regular BF16 file is fine, as the trainer converts it to FP8 on the fly), the Qwen3-VL text encoder and the Qwen Image VAE. Then set your project name, your dataset folder and the folder your LoRA files should be saved to.
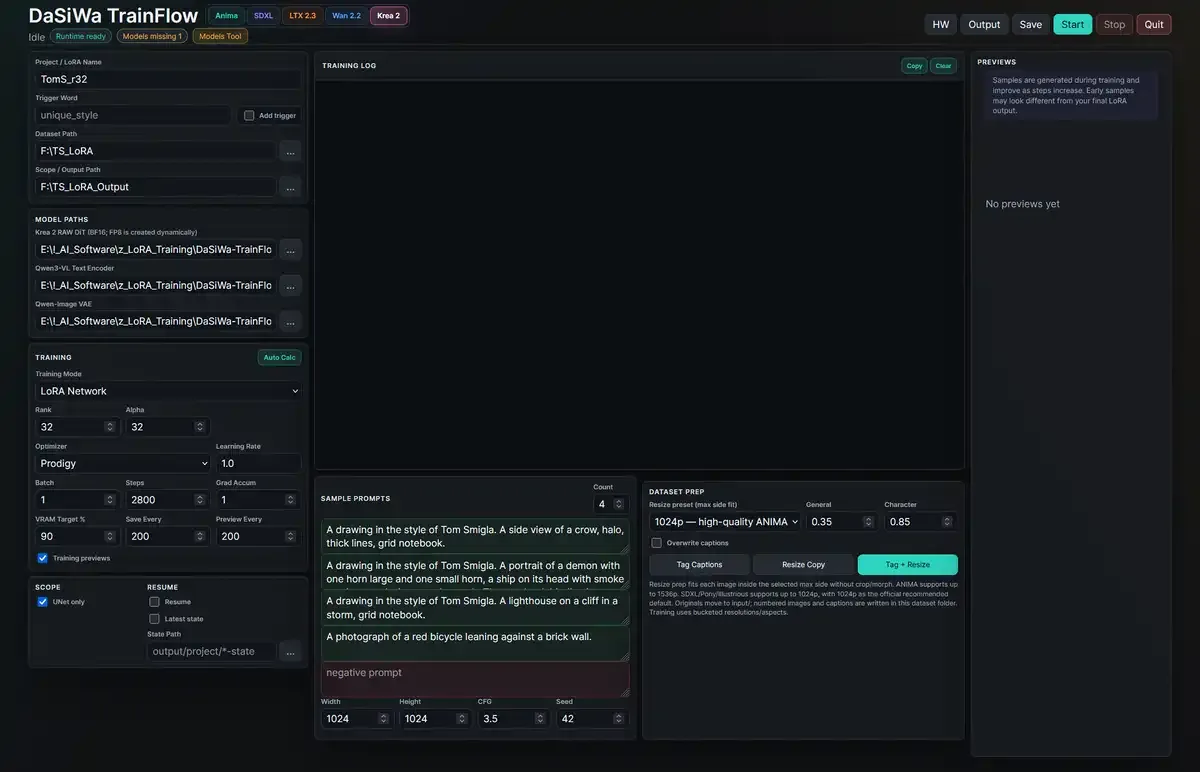
A small warning here. Twice during my run, the Rank and Alpha fields switched back to 16 by themselves, once before I started the training and once after it finished. The very same happened when I trained my Anima LoRAs with DaSiWa. The training log confirmed that the run itself used rank 32, but it’s worth double-checking these two fields every time right before you hit Start.
Always check the training log in the middle when inspecting your settings as your training run starts. It can save you a lot of time and trouble.
Preparing the Dataset
My dataset consisted of 41 scans and photos of my drawings, many of them on grid notebook paper, some of them on plain white paper backgrounds. DaSiWa expects each image to have a text file with the same name next to it, holding its caption that is going to be used for training.
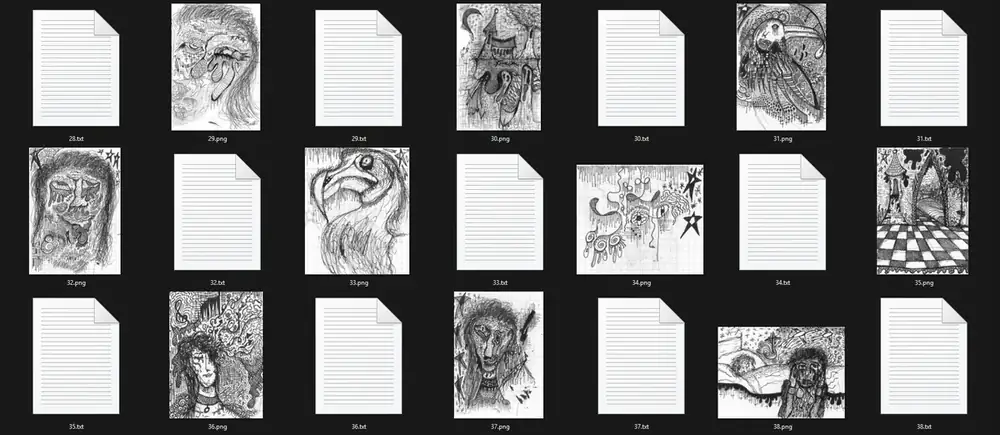
You need to run automatic image bucketing before you start the training process, if your images are high-res. Otherwise, you’ll be faced with the “Pre-flight failed: X images are ≥ 2048px. Run smart bucketing first” message. Many of my scans were simply too large.
The Resize Copy button in the Dataset Prep panel, once pressed, will automatically prepare the image buckets for you. With the 1024p preset (which is meant for Anima, but will also work great for Krea 2) it scales every image to fit inside 1024 pixels on its longer side, without cropping, and safely moves the originals into a separate input folder.

Turning Tags Into Sentences – Captioning For Krea 2
This is the biggest difference compared to training for SDXL or Anima. Krea 2 uses a vision language model as its text encoder, so it works best with captions written as plain sentences, the same way you’d prompt it. A list of comma-separated tags, although it sometimes can work, isn’t what it expects by default.
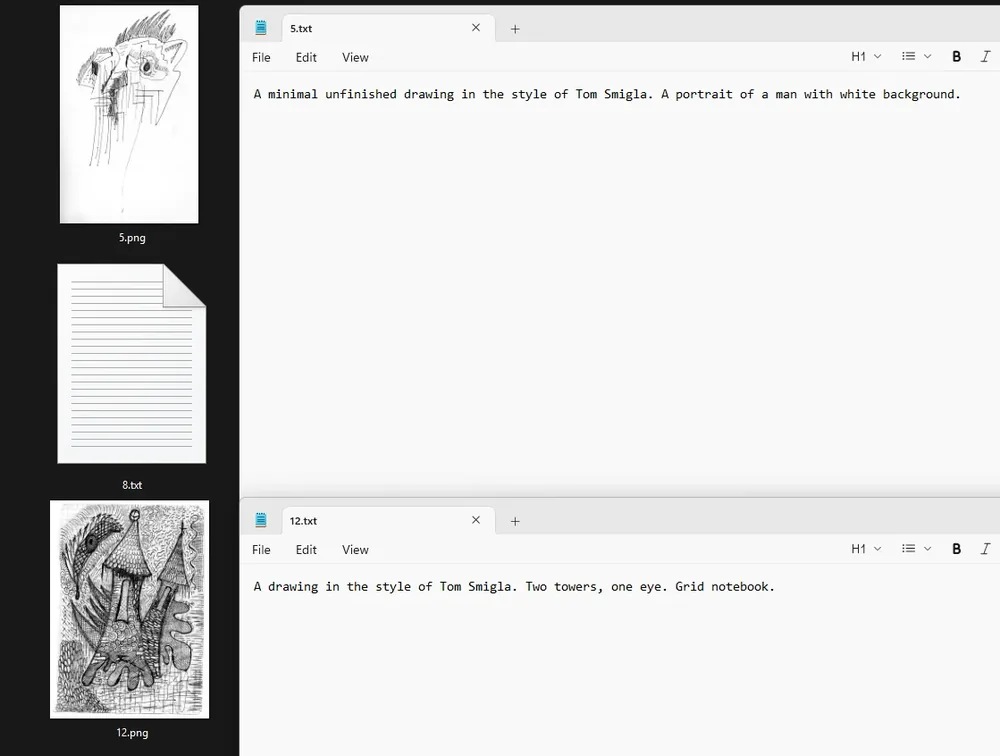
I wrote every caption myself and kept them all very short, as you can see in the image below. Each one names my style, in most of them with the exact same opening: “A drawing in the style of Tom Smigla”. After that comes a sentence or two about what’s actually in the picture, and the paper or background when it matters. Because the style phrase is already part of every caption, I left the trigger word field in DaSiWa empty.
DaSiWa’s built-in tagger is an option you could use if you don’t want to tag your images by hand. It outputs plain tags, which is great for SDXL and Anima, but on its own it won’t give you the kind of captions Krea 2 likes. If you want to save some time you can potentially use its output as a starting point, and rewrite the results into sentences. For more on what to caption and what to leave out, see the captioning section of my LoRA training guide.
The Settings I Used
So, in short, here is everything I changed from the defaults of the Krea 2 profile:
- Rank 32, alpha 32. Plenty for a single drawing style, and the final checkpoint files weigh about 229MB each.
- Prodigy with a learning rate of 1.0. Prodigy adjusts the actual learning rate by itself, so 1.0 is the value you want here.
- Batch size 1, gradient accumulation 1. More on why the accumulation should stay at 1 below.
- 2800 steps, saving and previewing every 200 steps. DaSiWa rounds the steps up to full epochs, so with 41 images I ended up with 69 epochs and 2829 steps in total. Note: if you don’t want to lose a lot of time on generating the previews, you can set them to generate every 400 steps instead.
- VRAM target 90% and UNet only. With the VRAM target set, the trainer decided on its own to swap 14 of the model’s 28 blocks to system RAM.
A very important note on the gradient accumulation setting in DaSiWa: Keep Grad Accum at 1. In the version of DaSiWa I used, a gradient accumulation of 2 doubled the number of training steps without actually being passed on to the trainer. My first attempt was set to 4200 steps and ended up scheduled for 8200, so I stopped it and started over. I’m not sure whether this behavior is caused by a bug in DaSiWa, but it’s important to mention regardless.
How Long It Took and How Much VRAM It Used
Without the previews, my RTX 3090 trained at about 10.8 seconds per step. With the previews turned on, the average went up to 12.8 seconds per step, and the whole run took 10 hours and 3 minutes to finish. As you will see below, usable checkpoints could also easily be grabbed at around the 6-7 hour mark.
As for the memory, the training used about 21GB of my 24GB of dedicated VRAM, which matches the 90% target, plus another 7.5GB of shared GPU memory. That shared part is the swapped blocks sitting in system RAM, and with block swapping it’s completely expected here.
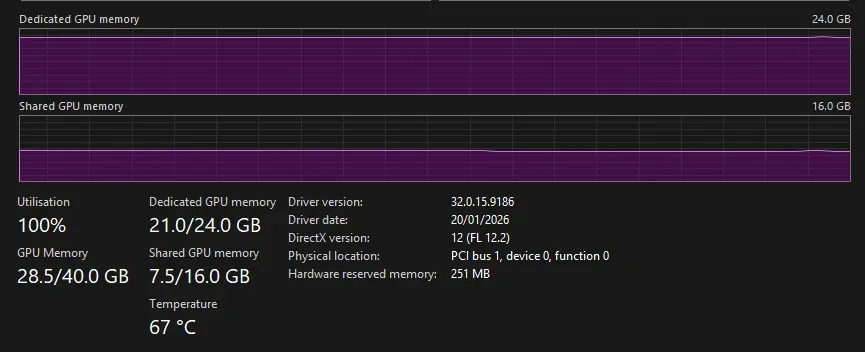
On 12GB and 16GB cards you can still train Krea 2 LoRAs, but expect the trainer to swap a lot more of the model to system RAM, which can certainly make everything slower, and makes the 64GB RAM recommendation a lot more important.
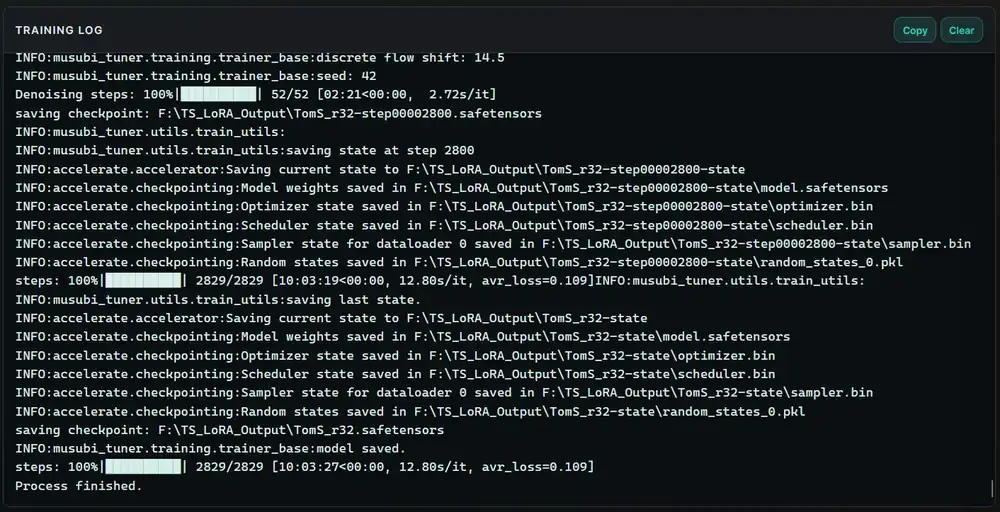
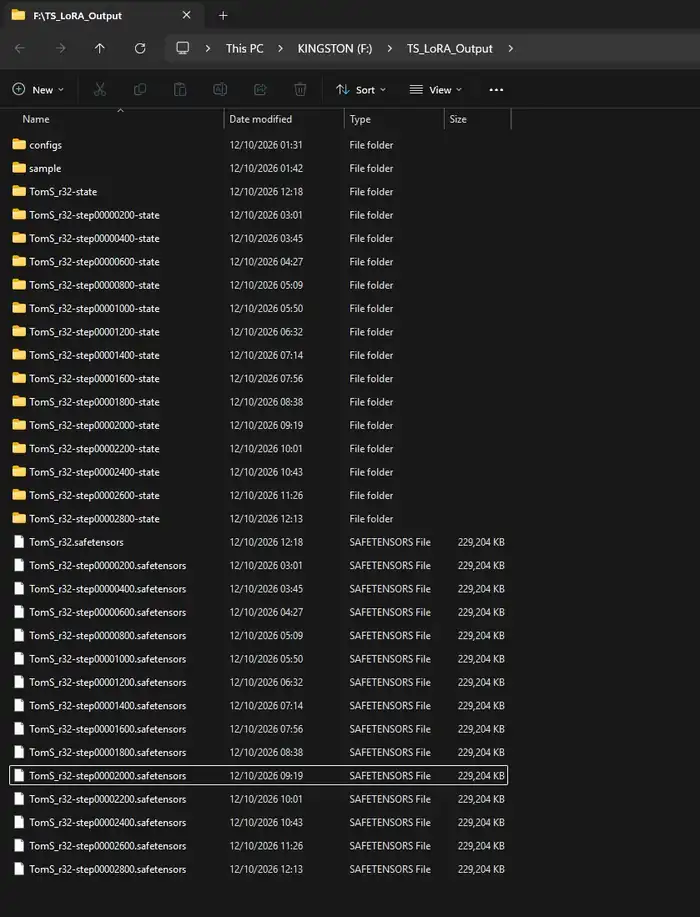
The output folder holds one LoRA file for every 200 steps, as per the settings we’ve input, plus the final one. The folders ending in “-state” are only needed if you want to resume the training later from a chosen checkpoint. You don’t need them in ComfyUI, and you can delete them once you’re happy with your LoRA in the very end.
A Short Comment on The Preview Images in DaSiWa
If your previews look much rougher and messier than you’d expect, don’t panic. In DaSiWa if you leave the negative prompt field empty (which is what I did in this run), the Krea 2 sampler used for the previews won’t turn on the CFG scaling at all. You can use a generic “blurry, low quality” negative prompt to prevent this.
Always remember that the preview images are only a quick progress indicator, and in many cases won’t be 100% representative of the final quality of your LoRA model.
Picking the Best Checkpoint
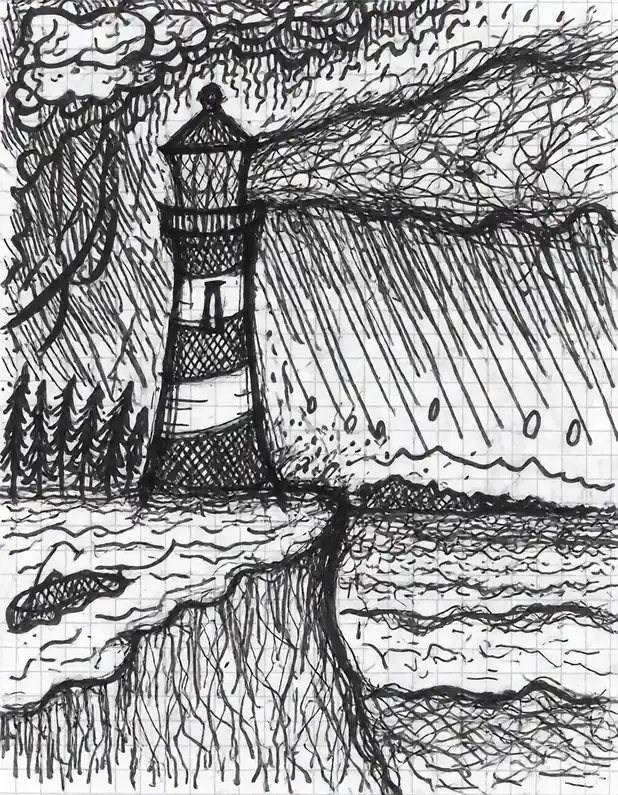
To compare the checkpoints, I’ve quickly put together a ComfyUI workflow that generates the same prompt with the same seed using no LoRA, steps 800, 1200, 1600, 2000 and 2400, and the final file, all at once. I queued it up with five prompts. Two of them (the crow and the demon prompts) describe my usual subjects repeating 1:1 chosen captions from the dataset, and two of them (the lighthouse and the cat prompts) describe things that weren’t present in the training set at all. The obligatory red bicycle generation included in the set was a quick check on whether the style leaks into prompts that don’t ask for it.
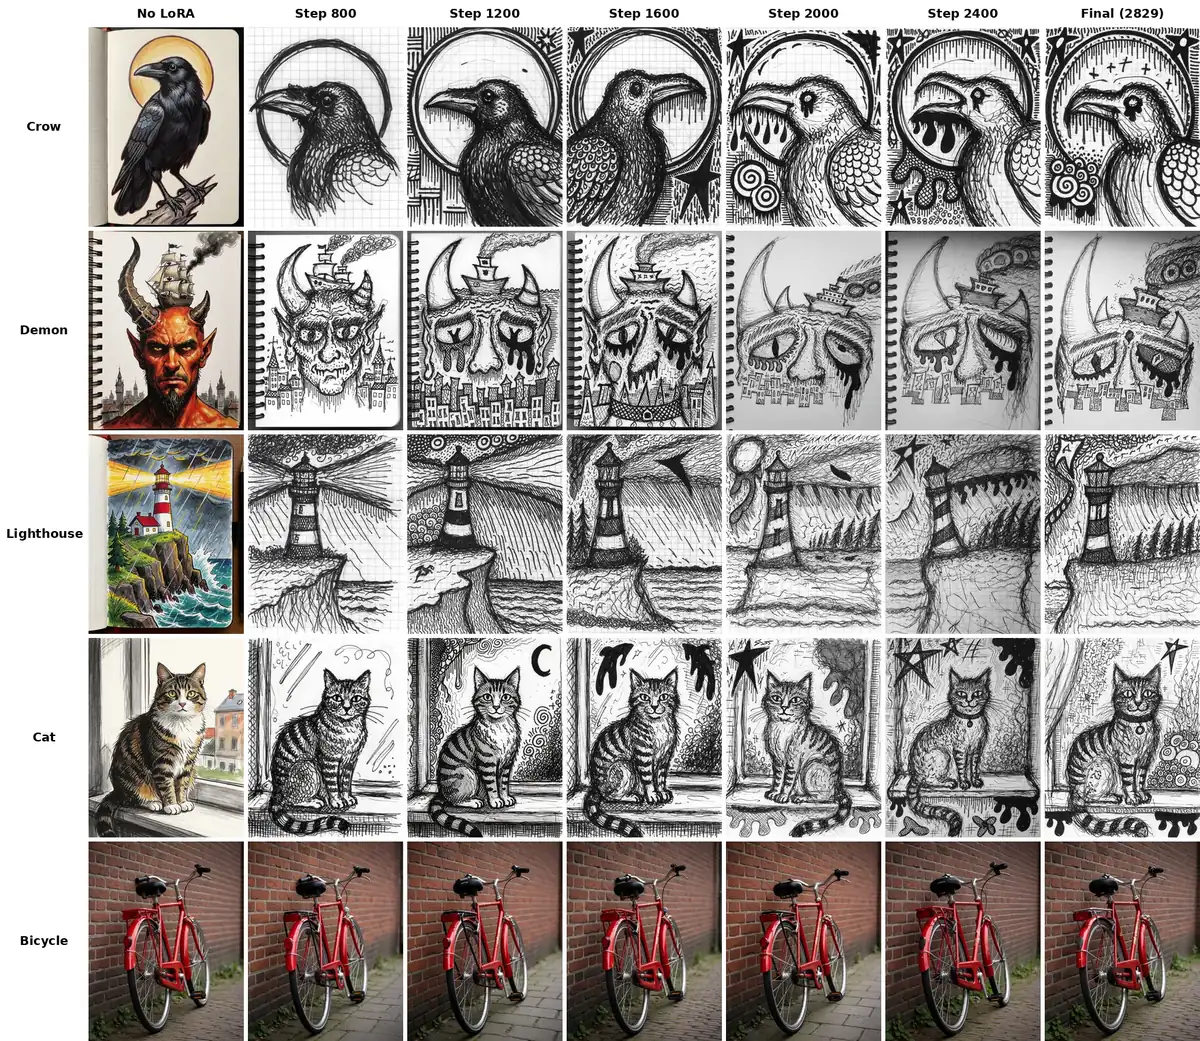
Here are a few things I’ve noticed after the first run:
- Step 800 already turns every image generated with the trigger phrase in the prompt into a pen drawing on grid paper, and I actually liked it for some test images like the lighthouse from our examples above. On the crow and the demon, though, it has far too little of my own way of drawing.
- Steps 1200 and 1600 have strong, tidy linework and follow the prompts closely, but still are quite “hermetic” when it comes to their styling compared to my hand.
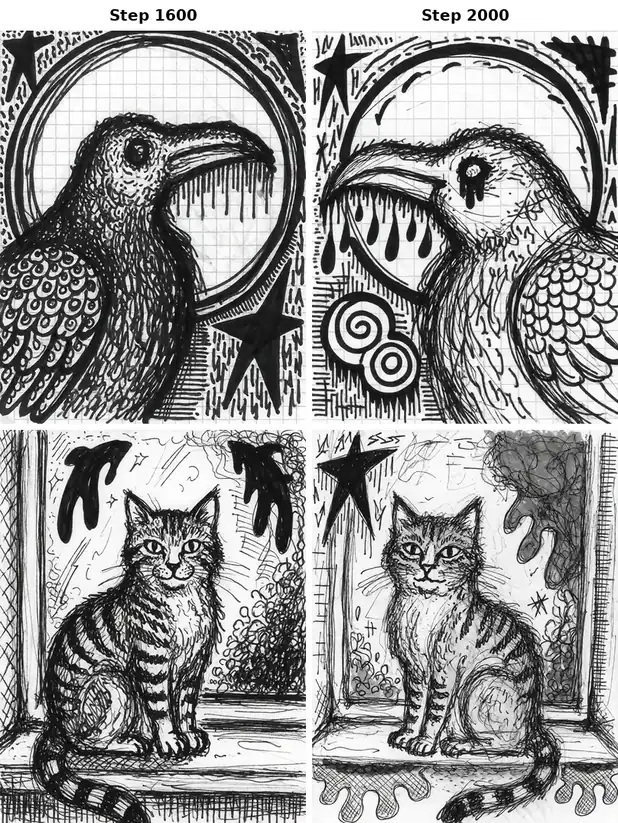
- Between 1600 and 2000 the jump is quite harsh. Suddenly the drips, stars, spirals and dripping eyes which are some of the easy-to-identify repetitive elements on my drawings start showing up. The ~1800 mark seems to be the place when the model resembles the key elements of the trained style the best, before starting to show the first slight signs of overtraining (generating images closely resembling the images present in the training set).
- The final checkpoint is the closest to my drawings, and while it doesn’t copy any of them pixel for pixel, it can come very close when prompted with the dataset captions. In technical terms, it can be considered overtrained, however, with other types of prompts it transfers my style to the newly described ideas in a very satisfying way, at least for me.
- The bicycle stays a clean photograph at every single checkpoint. There is no style leak at all, which is nice to see.
Hint: Lower the Strength Before You Reach For an Earlier Checkpoint
Instead of switching to an earlier checkpoint whenever the style feels too strong, try lowering the LoRA strength first. I tested my final checkpoint at strengths of 0.6, 0.8, 1.0 and 1.2, and the final file at 0.8 looks very close to step 2000 at full strength. Small strength tweaks like this during inference can often help you salvage a slightly under- or overtrained LoRA without the need to restart the whole training process.
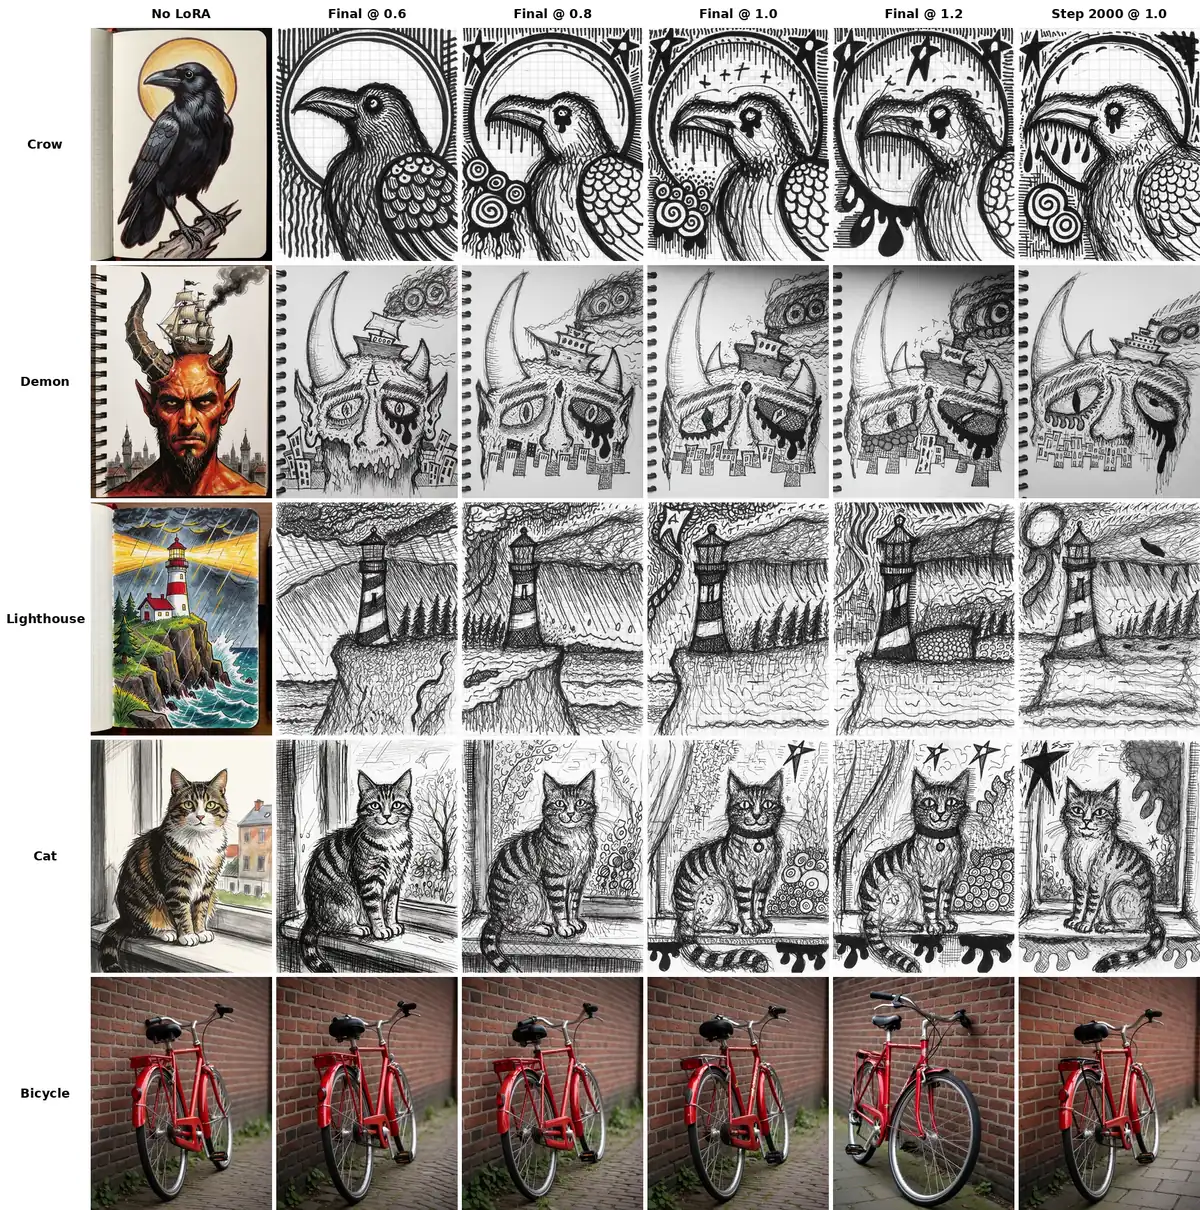
- 0.6-0.8 works great for scenes that are far from what’s in your dataset, like the lighthouse. At 0.6 the images start to jump into the “generic” Krea 2 style, losing many of the elements associated with the trained style.
- 0.8-1.0 is the range I’d probably use for most prompts.
- 1.2 brings in more “edge” and heavier lines, and it can still work. I wouldn’t call it “stable” at this point, but it’s fun to use and works reasonably well regardless.
The Results – My Drawings Next to the LoRA
Here is how the final LoRA compares to the drawings it learned from. The first example of a caption-based prompt clearly shows that the final checkpoint can easily be considered overtrained, as it can come really close to the originals included in the set. The second one with the crow however, which is also a caption-based prompt, is arguably reasonably different from the original image in the dataset.
The cat’s collar with a ring clearly inherits the choker present on a few portrait images in the training set, and the stars, drips and spirals around the crow come from a few of my grid notebook pages. Overall, for a first run, I’m very satisfied with the results.
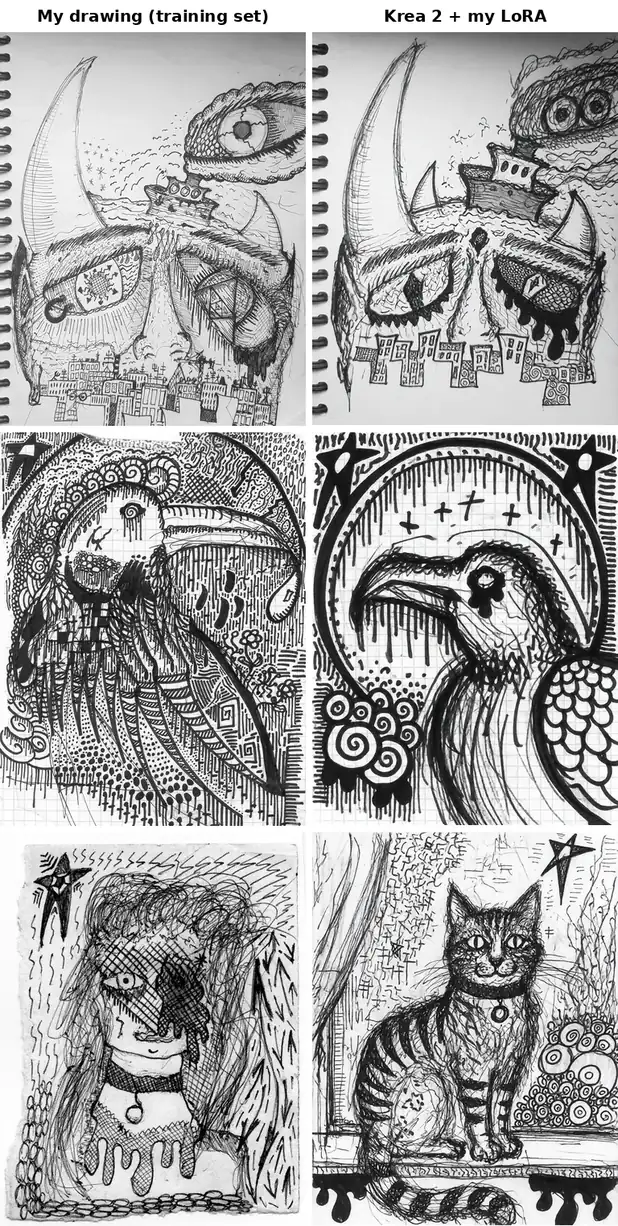
The cat was especially interesting to see, as I rarely draw animals like this. The style is clearly there, even though these subjects never appeared in the dataset, and the linework is in places different from what I would have drawn when naturally filling out the empty space.
Krea 2 vs. Anima, Trained On the Same Drawings
I trained an Anima LoRA on the very same drawings before this one. The two were captioned differently, with tags for Anima and sentences for Krea 2, so putting them side by side wouldn’t be a fair test, and I won’t pretend it is. I find my Krea 2 LoRA to be a little bit better for some specific prompts, but without taking latent upscaling into account (which I’m not going to get into detail in here), the style reproduction is comparable and has been very satisfying on both. Anima is a lot lighter to train and to run, though.
You can see my Anima results (trained on the very same dataset but with tag-based captions) here: How To Train Anima LoRAs – The Easiest Way (Anima TrainFlow).
Using Your Krea 2 LoRA in ComfyUI
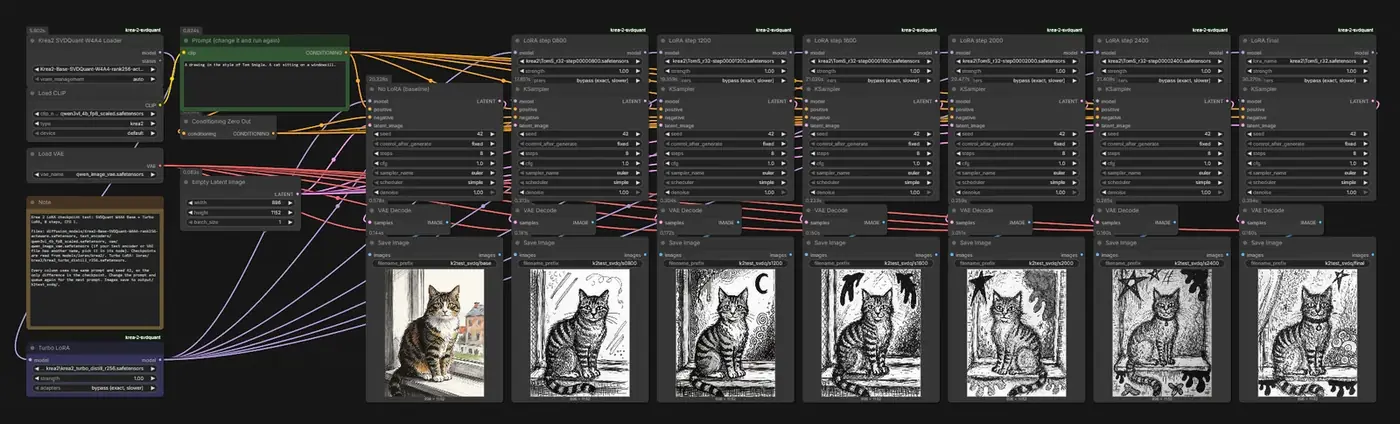
Copy the LoRA file (without the -state folder) into your ComfyUI models/loras folder. LoRAs trained on Krea 2 Raw are meant to be used with Krea 2 Turbo, and the Krea 2 Raw model card itself doesn’t recommend Raw for generating images. Here are the default settings that should work for you well:
- Krea 2 Turbo: 8 steps, CFG 1.0, euler sampler with the simple scheduler.
- Or: Krea 2 Raw with a Turbo LoRA: the same 8 steps at CFG 1.0. This is what I used for all of my tests, with the rank 256 version of this Turbo distill LoRA. Other Krea 2 Turbo LoRAs should work here just as well.
- LoRA strength: 0.8-1.0 to start with, as explained above.
- Negative prompts: at CFG 1.0 a negative prompt does nothing, which is why you’ll often read that Krea 2 has no negative prompt. Only Krea 2 Raw at its full 52 steps and CFG 3.5 actually uses one, so I didn’t use one in these tests.
I ran all of my tests on a 4-bit SVDQuant version of Krea 2 Raw, loading both the Turbo LoRA and my own LoRA with the Krea2 SVDQuant LoRA Loader node in its exact “bypass” mode. Each 896×1152 image took about 15-20 seconds on my RTX 3090. If you’d like to run Krea 2 this way too, here is how: Krea 2 SVDQuant in ComfyUI – How to Quantize Raw Finetunes to W4A4.
What I’d Change in The Next Iteration
- Type in a negative prompt for the previews. Without one, the Krea 2 previews are generated without CFG and tell you very little about your LoRA.
- Preview less often. Generating four previews at 52 steps every 200 steps cost me about 2 of the 10 hours, which is truly a huge amount of time. Previewing every 400 steps, or using fewer preview prompts, would save a lot of time here.
- Perhaps try a higher rank like 64. With the amount of fine details in the training dataset it could yield some interesting results.
- Prune some lower-quality scans from the dataset and replace them with newer, better drawing scans. The later checkpoints naturally learn the flaws of the images too, including the softer lines of a few weaker scans included in my dataset.
So, Is Training a Krea 2 LoRA Worth It?
For me, yes. It did take a strong GPU and an overnight run, but the LoRA picked up my drawing style surprisingly well, kept it on subjects I never draw, and left regular photo prompts completely untouched. It was a really fun short project, and I’m very satisfied with the results!
Write your captions as sentences, test a few checkpoints at a few strength levels, don’t trust the previews too much, and you too can train a LoRA like this overnight.
Thanks for reading, and see you next time!
You might also like: How To Train Your Own Stable Diffusion LoRA Models – Full Tutorial; How To Train Anima LoRAs – The Easiest Way (Anima TrainFlow)