
One of the quickest and easiest ways to run DeepSeek V4.1 inside VS Code is using Cline as a harness and OpenRouter as the LLM service provider. This way you can code using the DeepSeek models without having a powerful GPU in your system and without having to settle for any kind of monthly subscription.
Doing it like this you can also easily keep track of the money you spend on the tokens, as setting limits is very straightforward in OpenRouter. Not only can you top-up the exact amount of money you want to spend, but you can also put a hard dollar cap on the API key designated for your VS Code Cline instance itself.
In other words, it’s probably one of the safest ways to throw in a quick $5-$10 as a quick experiment to see what DeepSeek is really capable of. And, what’s best, once you’re done, you can try out all the other models that OpenRouter has to offer too!
Here is how to do this in three short steps.
The quick version: Install Cline in VS Code, create a new OpenRouter API key with a custom limit, then, select deepseek/deepseek-v4.1-flash option from the model list after inputting your new API key in the Cline extension. After that you’ll be able to start using DeepSeek directly inside Cline.
How Does This Work and Why It Can Be Better Than Direct DeepSeek API Access
DeepSeek V4.1 Flash is a cloud model in this setup. Cline sends requests to OpenRouter, OpenRouter then routes them to an inference provider serving DeepSeek V4.1 Flash, and the result comes back to VS Code. Your local GPU does not run the model.
So, in other words: OpenRouter handles inference in the cloud, and Cline handles file reads, edits, terminal commands, and the agent loops inside VS Code.
This means that any machine that runs your project and VS Code comfortably will be enough here, as you’re not bound by the hardware you have. Which is, after all, one of the main points of taking your models to the cloud.
A great perk here, and actually one of the main reasons why I prefer doing things this way, is that OpenRouter sits between you and the inference provider handling your model requests. This means that you don’t have to connect to the official DeepSeek API directly.
OpenRouter handles the provider connection, so you don’t need a separate DeepSeek API account or DeepSeek API key. Still, the exact logging and data-retention policy depends on the provider OpenRouter routes your request through, and any sensitive data included in the request still reaches that provider.
Step 1 – Install Cline in VS Code
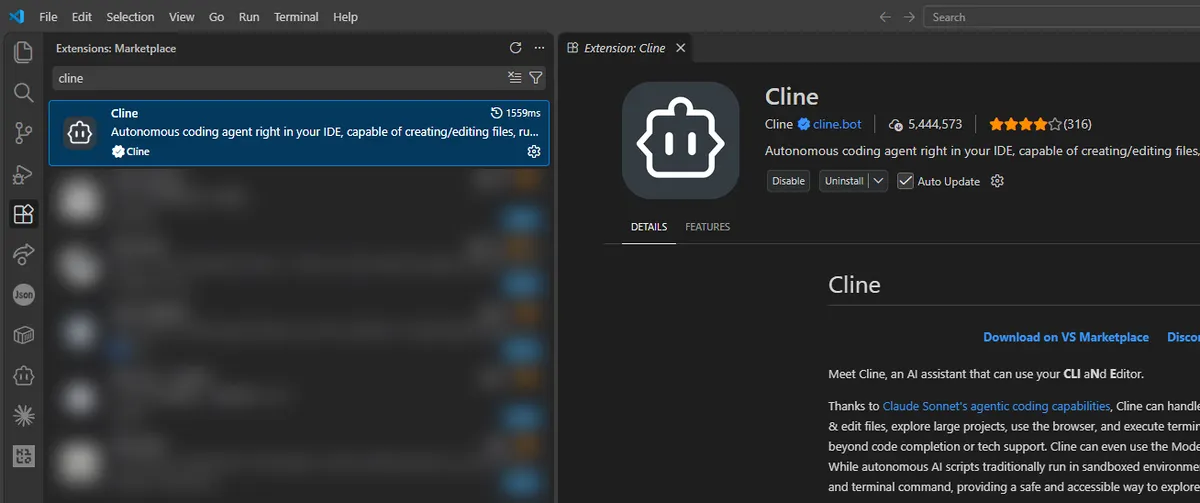
The first thing you need to do is to open the Extensions menu in VS Code (the four boxes icon on the left sidebar), and install the official Cline extension as shown in the image below.
Next, inside VS Code open the project folder you want the agent to work on. You can point the IDE to any empty directory you want.
Normally I would recommend preparing a clean Git branch before you first start your tests, but it’s not necessary if you’re just experimenting.
Step 2 – Create an OpenRouter Key and Set a Spend Limit
Go to OpenRouter’s API Keys page and create a key that will be used only by Cline. Give it any name you want (for instance VS_Code_OpenRouter), set an expiration date, and lastly, a total credit limit. If you’re just experimenting $5 or $10 is a reasonable amount to start with (although with DeepSeek you’ll most probably use up way less in your first few prompts).
While technically OpenRouter won’t ever use up more money than you have topped up if you don’t have automatic top-up set up, setting proper per-key limits is always a good practice.
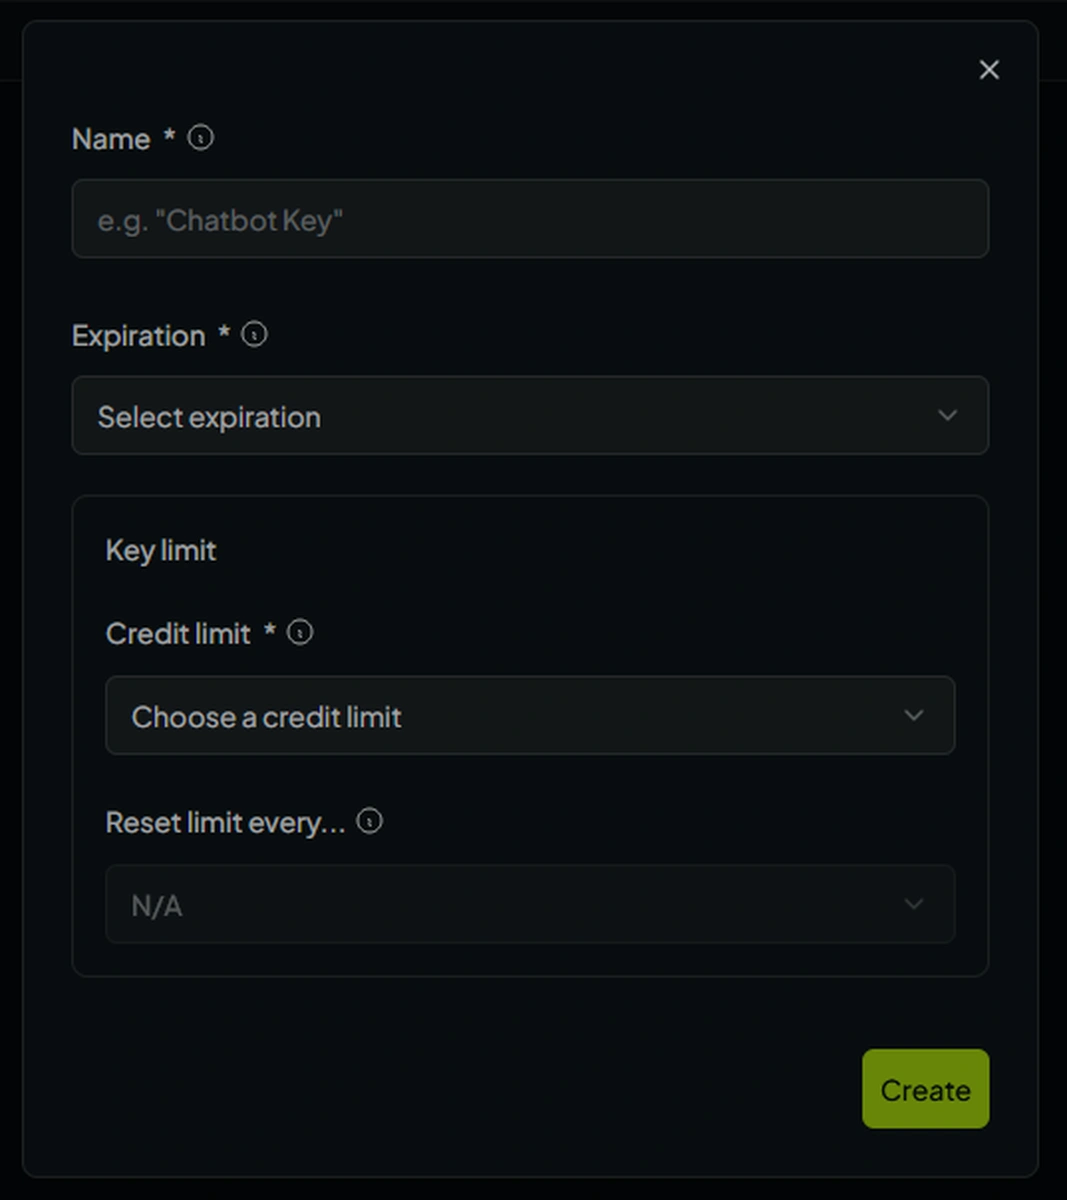
A dedicated key makes spend and revocation easy to track, and the limit is good for peace of mind. Your agent won’t be able to spend more than you set during the creation of the key. If you ever decide you need more, you can simply raise the limit or create another dedicated key.
Once you’ve created the key, copy it and temporarily store it someplace safe. You will need it in the next step.
Make sure that you don’t share your API key with anyone, or you don’t put it in any place where it can be accessed by other people. Anyone who has this key can tap into the budget you’ve designated for the key (or your OpenRouter account budget if you haven’t set the per-key limits). You should never make your key publicly visible anywhere.
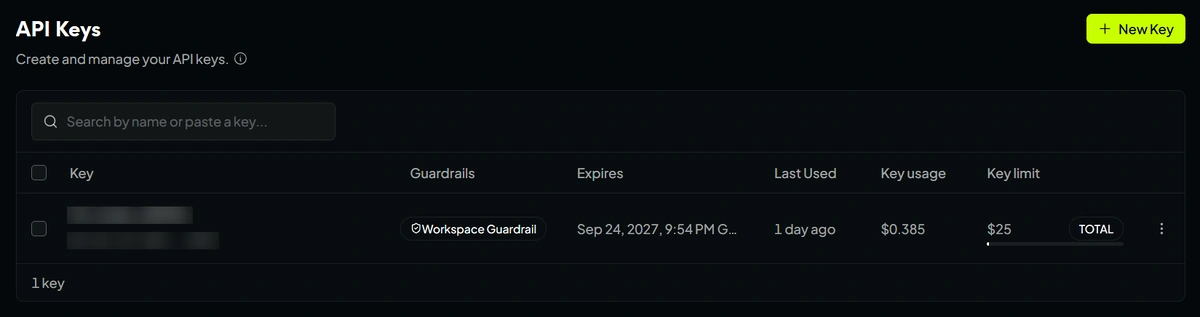
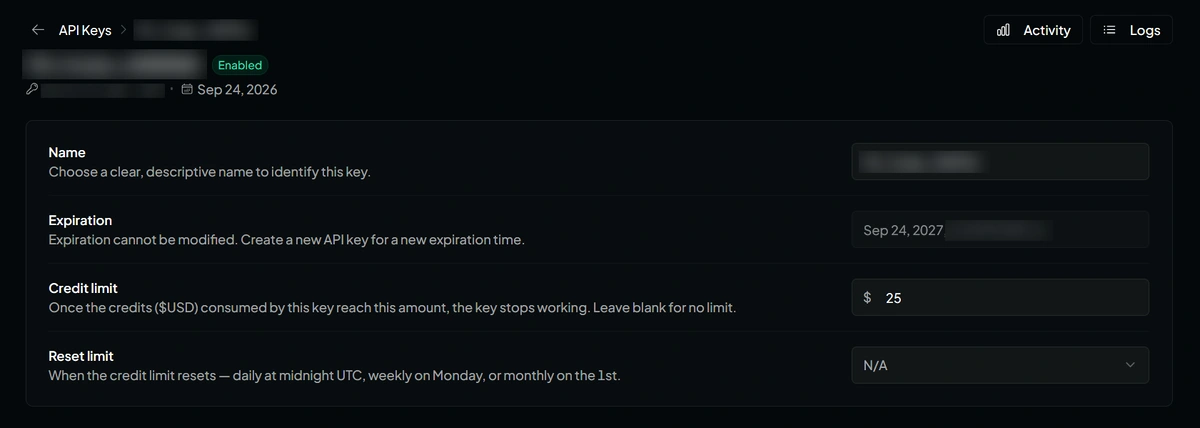
OpenRouter not only lets the key have its own limit, but also a reset schedule. For this guide however, we won’t be setting any scheduled limit resets.
Optional: Set OpenRouter Guardrails
This is most useful when you’re handling a larger number of keys at once, and you want to set limits for an entire workspace. A key limit protects just one key. A workspace guardrail can give you a second budget ceiling that OpenRouter won’t let you hit.
OpenRouter guardrails can set additional daily, weekly, or monthly budget caps. They can restrict models and providers, require Zero Data Retention, block prompt-injection patterns, and detect sensitive data.
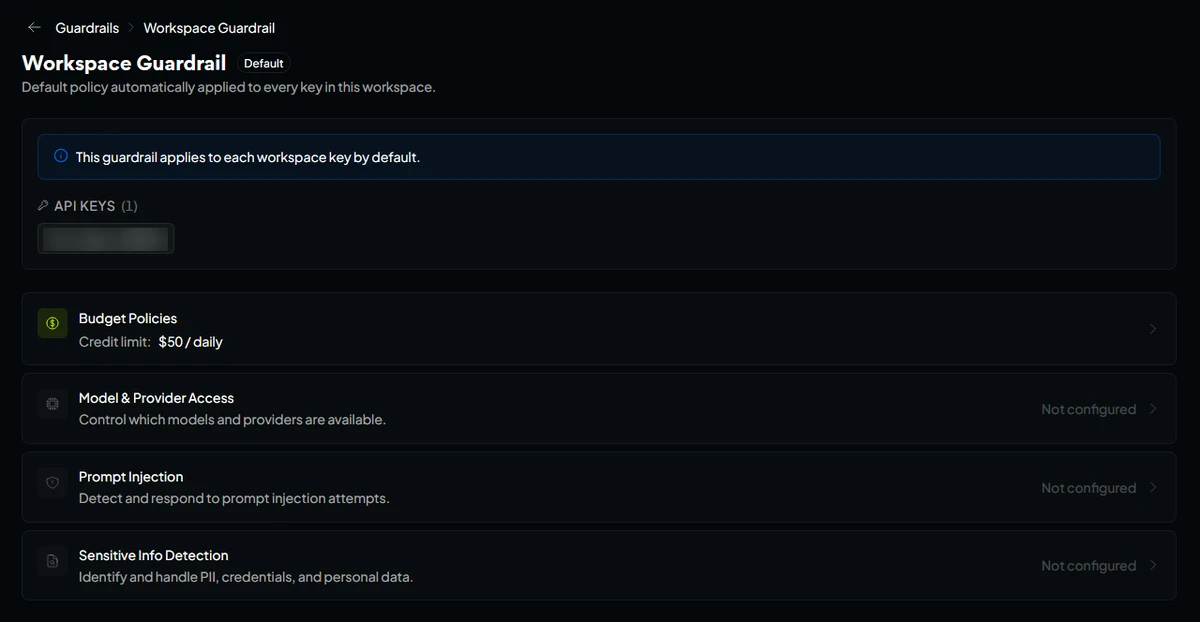
If you want to further “bulletproof” your setup a bit more, you can also add a model allowlist containing only the model you plan to use. Prompt-injection and sensitive-info controls are useful, but of course they do not replace basic repo hygiene and best security practices, and are technically not needed for simple tests like the one we’re doing here. So just be mindful of that.
Step 3 – Connect OpenRouter to Cline and Pick DeepSeek V4.1 Flash
In VS Code, go to Cline Settings -> API Configuration. Pick OpenRouter. Paste the key you’ve just created and saved in the OpenRouter API Key field. Below, in the Model dropdown, search for deepseek/deepseek-v4.1-flash and select it.
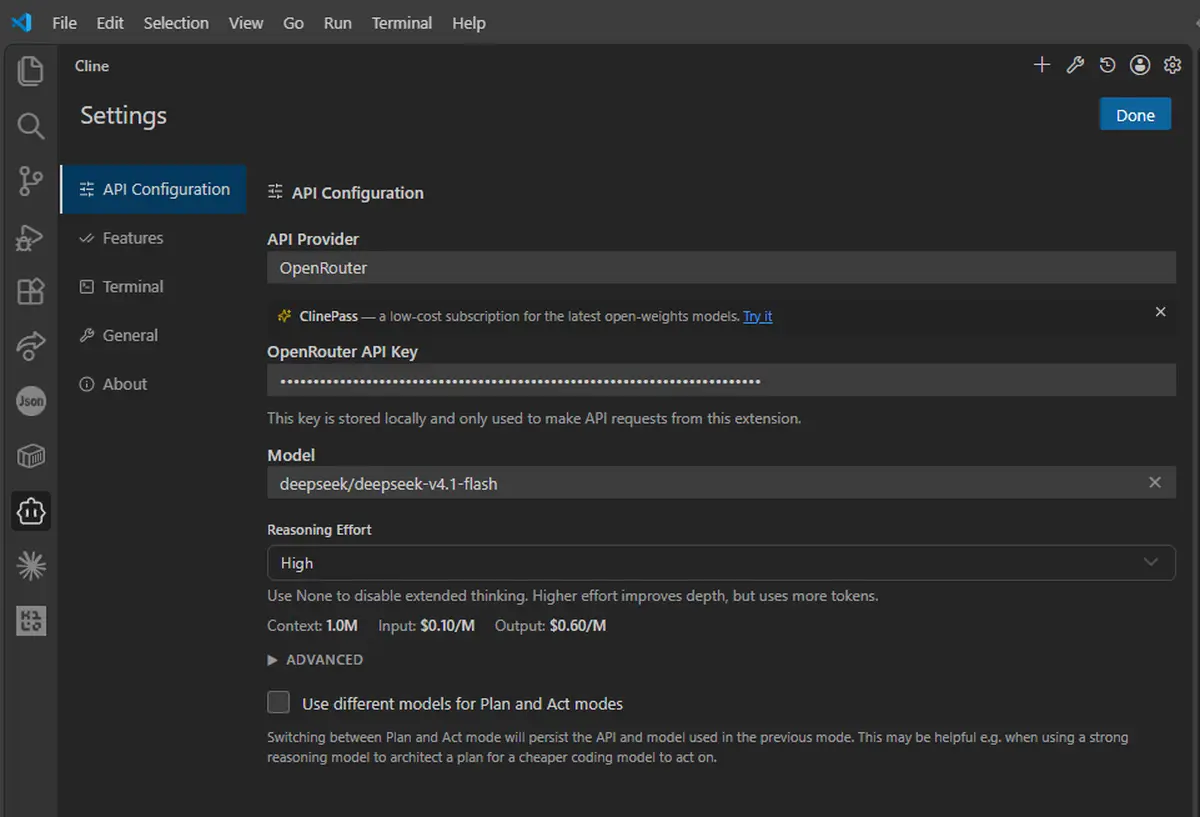
With DeepSeek, and many other models, you’ll also have to select the Reasoning Effort level. Use High reasoning for normal agent work and drop to Low for obvious edits. This, of course, is a general rule of thumb, as across many models, the behavior and token efficiency of the effort levels will be slightly different. Higher reasoning effort can produce more reasoning output and can raise your total costs.
And, just like that, you’re ready to go. Once you click on Done, you will be able to start the conversation with your chosen model from within the Cline extension. The agent will have access to your currently open local repository.
There is one naming trap here. Cline has a separate DeepSeek provider. DeepSeek’s direct API model name is deepseek-flash, which now serves V4.1 Flash. The deepseek/deepseek-v4.1-flash slug belongs to OpenRouter.
Start unfamiliar work in Plan. Cline can read files, search the repo, and discuss a plan there, but it cannot edit files or run terminal commands. Switch to Act after the target files and change are clear. For tiny fixes, Act mode is fine from the start.
Keep edits, terminal commands, browser access, and MCP approvals manual during your first sessions. Do not auto-approve everything on a real repo. I highly recommend using Git or Cline checkpoints before any major file edits.
What Eats Up the Most Tokens
Cline is an agent harness, not a simple model chat environment you might know from, for instance, the main interface of ChatGPT. One task can trigger many subsequent model calls, and the model can often work for long minutes before stopping.
A regular loop on the workspace contents often looks like this: read a file, ask the model, edit the file, run a command, feed the result back, and then query the model again.
Each of these kinds of turns can carry system instructions, tool schemas, conversation history, file contents, and command output. The sent and received (input and output) tokens have different pricing, and the more tokens your environment sends/receives, the higher your overall run costs.
Cache Hits: Why 12.3M Tokens Cost About $0.38
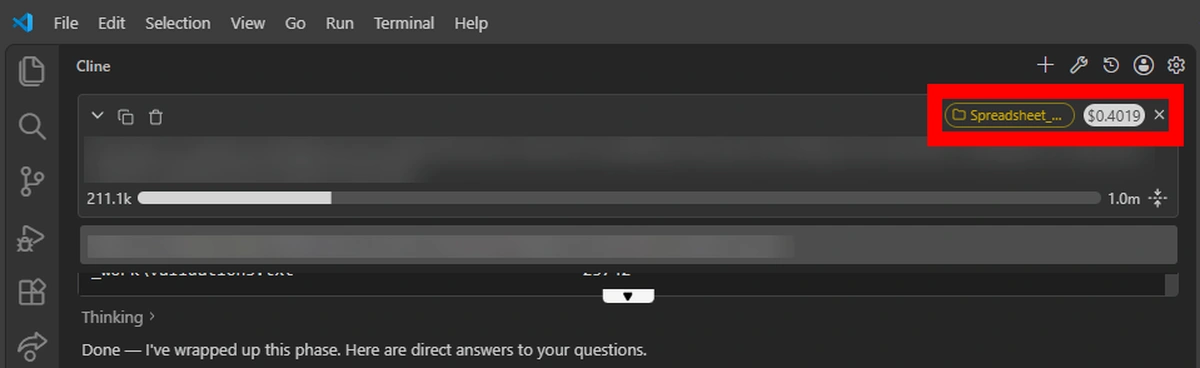
As you can see above, at the end of my reasonably complex test task here, Cline showed about 211.1K tokens in context, and an estimated ~$0.4019 task cost. Cline treats this number as an estimate based on provider pricing, so it will differ a bit from the actual price of the tokens used.
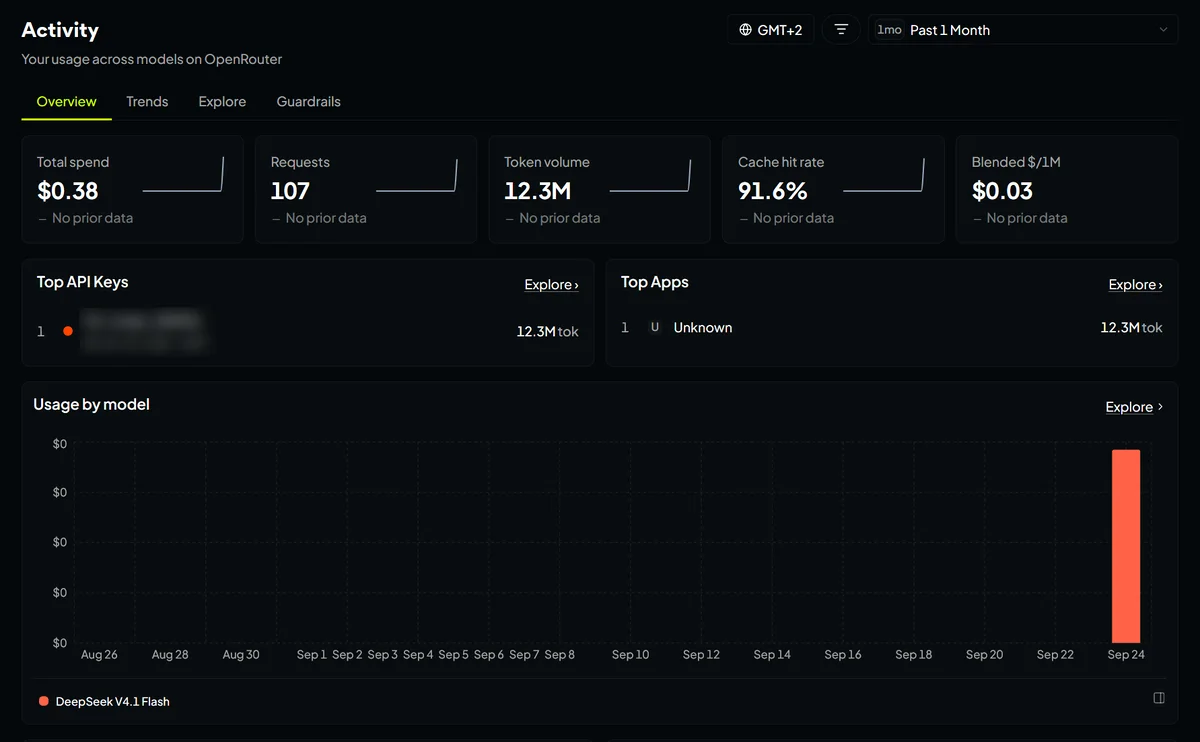
In our case, the difference was just about 2 cents. The 211.1K figure is the context shown by Cline at that point in the task, while OpenRouter’s 12.3M figure below is the cumulative token volume across all 107 requests.
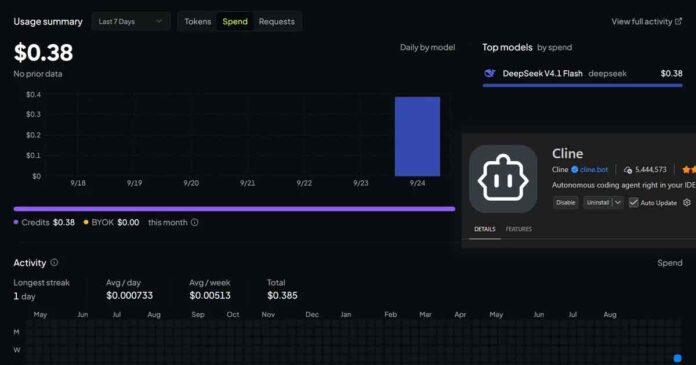
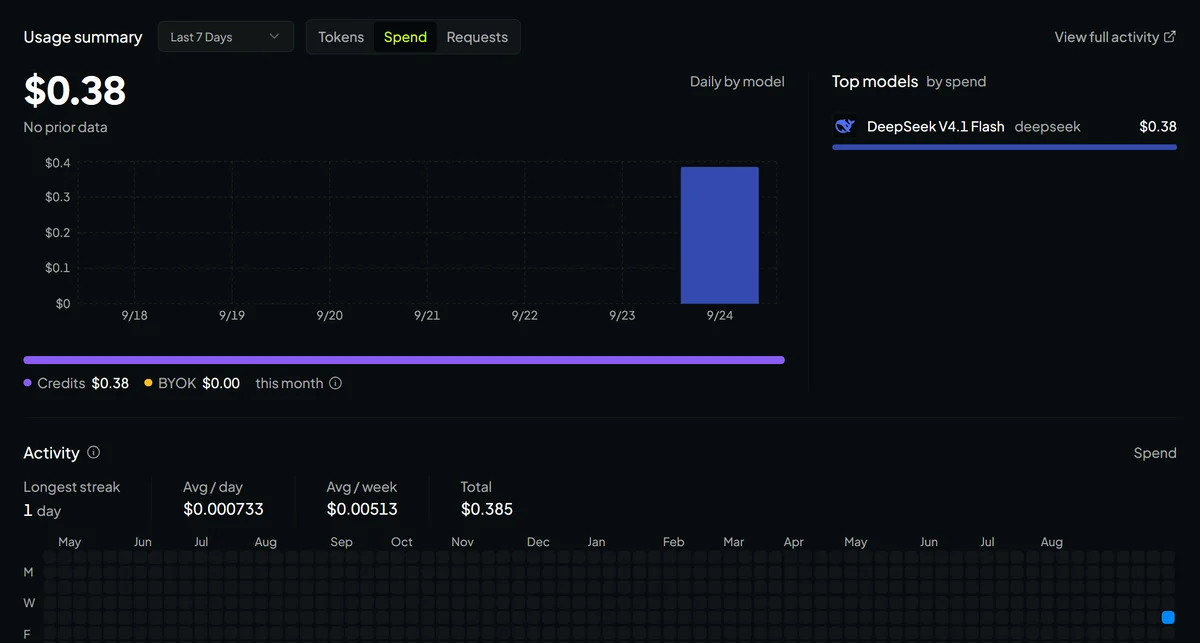
After checking the OpenRouter side, we can see that the same run was billed at $0.38 for 107 requests and 12.3M tokens. The cache-hit rate was 91.6%, with a blended cost of about $0.03 per million tokens.
The account view showed the same $0.38 total spend for DeepSeek V4.1 Flash that day.
So what does the cache that I brought up a few times already have to do with this? A cache hit, in the context of Cline, means that the provider recognized a repeated prompt prefix and reused some cached work so that the same repeated prompt prefix didn’t have to be processed from scratch again. Cline can repeat a lot of context across different agent turns, so this has a huge effect on cost.
In Cline DeepSeek context caching runs automatically without you having to pre-configure anything. OpenRouter uses sticky routing for supported prompt caching and tries to keep a conversation on the same provider after a cached request (however it is not guaranteed that this will happen). Cache hits can still fall after a changed prompt prefix, an expired cache, or a route change.
Keep in mind that after you leave your project for some time, your next message in the same conversation with the agent might not be able to use the cached info anymore, and the next request can therefore cost more.
As you can see in the image above, from the 12.3M tokens used, more than 91% have hit cache in this test, which is a reasonably good score.
My test account had $8 loaded and Auto Top-Up disabled. After my first longer session with the model, $7.62 remained.
What You Can Do for Free – Cline & OpenRouter Free Model Options
Cline itself is free to install. It also rotates limited-time free model promotions for signed-in users. Look for the FREE tag, and you will find a few models there that you can use to test things out without even needing to touch OpenRouter in the first place.
One level higher in our hierarchy, OpenRouter’s free plan currently lists 25+ free models capped at 50 requests per day. Adding at least $10 in credits will, at the time of writing this article, raise the free-model daily ceiling to 1,000. The free plan however, does not include budget controls or prompt caching.
Free models are fine for learning Cline’s permission flow or the general OpenRouter-Cline workflows, but you shouldn’t assume Zero Data Retention when using them, and their request caps are pretty harsh. I would say that for a real DeepSeek V4.1 test, a small capped balance gives you much cleaner cost data and little to no limits, so it’s almost always better to start with that.
Cline or Something Else? – My Best Alternatives
Cline is a good fit, but so are many other agent harness extensions that you can use with VS Code. Here are a few I think are the most interesting ones, if you want to try them out.
Roo Code is a close alternative if you want custom modes and task orchestration. Continue exposes separate chat, edit, agent, and autocomplete model roles. GitHub Copilot fits a subscription-first workflow with less API setup.
Finally, Cursor is a whole separate agent-focused IDE you can try, so you can consider switching to it if you don’t want to rely on VS Code extensions in your work. And that’s pretty much it!