

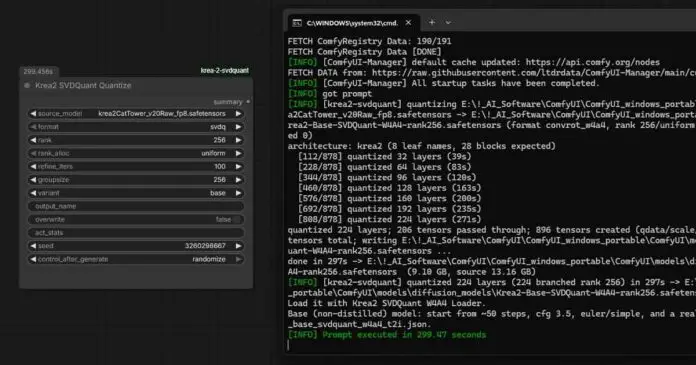
If you found a Krea 2 Raw finetune you like, but it only comes in BF16 or FP8 and you need it to take up less VRAM or run faster on GPUs that do not have native FP8 Tensor Core acceleration but do have fast INT4 paths, you can convert the diffusion model to SVDQuant W4A4 from inside ComfyUI. This gives you a much smaller checkpoint and can make Krea 2 far faster on the right hardware.
This is especially useful on RTX 30-series Ampere GPUs such as the RTX 3090, but the node pack runs on newer Ada (4xxx) and Blackwell (5xxx) cards too. Ampere has fast INT8 and INT4 Tensor Core paths, but no native FP8 Tensor Core path. The Krea 2 SVDQuant node pack uses ComfyUI’s W4A4 backend and adds a BF16 low-rank correction branch to recover part of the quality lost by plain 4-bit quantization.
So, after converting your Krea 2 checkpoint to SVDQuant W4A4, you can benefit from:
- Less VRAM required to run the model overall.
- Much faster inference (image generation) on NVIDIA Ampere GPUs like the 3090.
All this with practically little to no perceivable loss in the quality of your outputs.
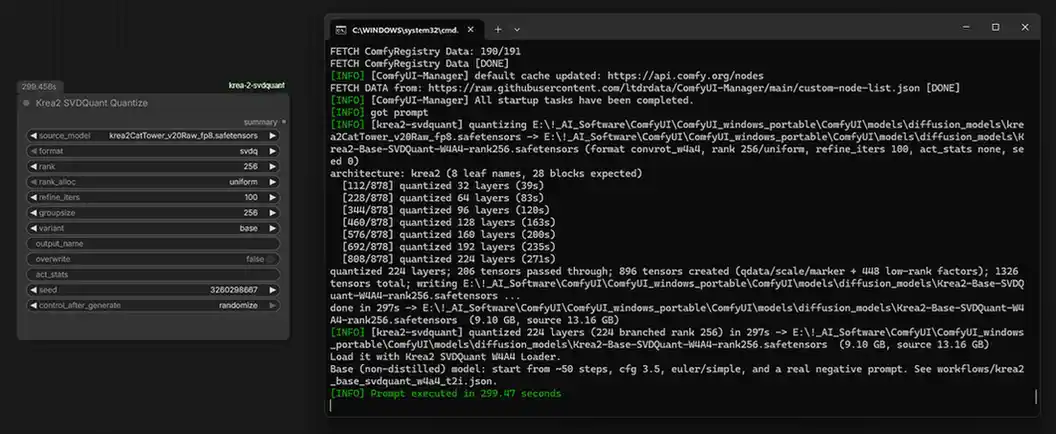
In the example below, just to show you how it works, I converted the Cat Tower v2.0 Raw FP8 finetune to a rank-256 SVDQuant checkpoint. The source file was 13.16GB, the finished file was 9.10GB, and the full conversion took about 5 minutes on an RTX 3090 with 100 refinements. You could also aim for even smaller quantizations, if you decide to select a lower rank setting.
You might also like: Best GPUs for Local AI Image Generation – My Top List
TL;DR – If You Already Know What You’re Doing
- Put the source model you want to quantize in
models/diffusion_models - Install the Krea 2 SVDQuant node pack
- Import the Krea2 SVDQuant Quantize node into an empty ComfyUI workspace.
- Select the
svdqformat, keep refinement at 100, pick rank 64 or 256, and queue the standalone quantizer node. - You end up with a fully quantized model.
Which GPUs Benefit From Krea 2 SVDQuant?
NVIDIA Ampere cards like the RTX 3090 don’t have native FP8 Tensor Core acceleration. This means that if you’re running inference using an FP8 checkpoint, the values have to be upcast to FP16/BF16 before they can be processed by the card’s Tensor Cores. The W4A4 format can use lower-precision integer hardware that Ampere already has, but the complex scaling overhead means it requires specialized, custom kernels to actually make inference faster. And that’s the whole story.
The node pack measured a warm 8-step Turbo run at 18.80 seconds in BF16 and 7.77 seconds with rank-256 SVDQuant on its RTX 3090. That is the source of the roughly 2.4x figure. Against its INT8 build, rank-256 SVDQuant was only 1.18x faster per sampling step. These are of course Turbo benchmarks, not guaranteed Raw-finetune results.
And before you ask, yes, according to my quick tests the difference is pretty much the same when using a converted SVDQuant Raw model with a Turbo LoRA.
And a quick summary if you’re wondering whether it’s worth it to use SVDQuant on non-Ampere GPUs:
| GPU family | What to expect |
|---|---|
| RTX 30-series, Ampere | W4A4 and INT8 use hardware paths that the Ampere architecture natively supports, and the SVDQuant checkpoint is far smaller than BF16. |
| RTX 20-series, Turing | The checkpoint is smaller so you can benefit from less VRAM usage, but the current INT4 kernel path brings much less speed gain than on Ampere. |
| RTX 40-series, Ada | Ada has native FP8 support. SVDQuant still cuts the checkpoint size, but FP8 is still a stronger option here than it is on a 3090. |
| RTX 50-series, Blackwell | Blackwell introduces new native FP4 paths that these specific INT4/W4A4 kernels don’t fully exploit yet, so a native FP8/FP4 implementation may still yield better performance here. |
| AMD, Intel, Apple Silicon | This particular Krea 2 node pack targets NVIDIA CUDA. AMD, Intel, and Apple Silicon are not supported by this implementation. |
SVDQuant is not the only useful format here. The same project also supports INT8 and plain W4A4. INT8 keeps more fidelity and uses more VRAM. Plain W4A4 is smaller and faster but drops the low-rank correction branch, which is one of the best quality-preserving features of SVDQuant. Still, these are the other options to pick if you’re up for some experimentation.
What You Need Before You Start
- A current ComfyUI install with a PyTorch build based on CUDA 13 or newer. The fast
comfy_kitchenCUDA backend is disabled on older CUDA builds. Use theKrea2 SVDQuant Env Checknode after installing the pack – it can tell you whether your environment is fully ready for the quantization process. - Krea-2-SVDQuant-ComfyUI installed in
ComfyUI/custom_nodes/. You can install the node pack via a Git clone or a traditional ZIP install. Restart ComfyUI after copying it in. - Your chosen Krea 2 finetune in
ComfyUI/models/diffusion_models/. BF16 is the best source for maximum fidelity but you can use FP8 versions too. Keep in mind that the converter will expand FP8 weights to BF16 for the conversion math, but of course it cannot restore information that was already lost in the FP8 source. - Enough free disk space for another 8 to 10GB checkpoint. Rank 64 is about 7.9GB and rank 256 is about 9.1GB in the project tests, so make sure you have enough space on your disk for the converted checkpoint to be saved.
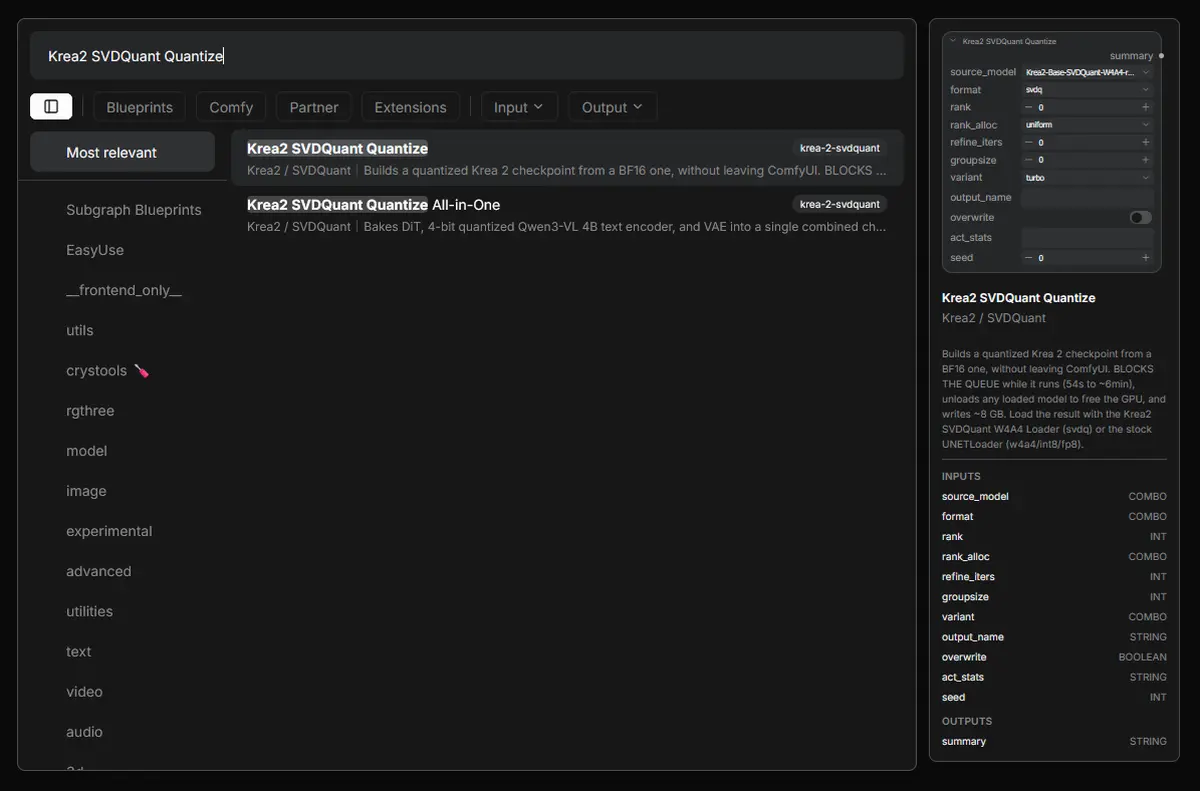
How To Quantize a Krea 2 Raw Finetune
The conversion node works standalone, so you do not need to connect the quantizer to any generation graph for the basic conversion. Add the Krea2 SVDQuant Quantize node to an empty workflow, select your finetune, set the fields, then queue the workflow just as if you were generating a new image.
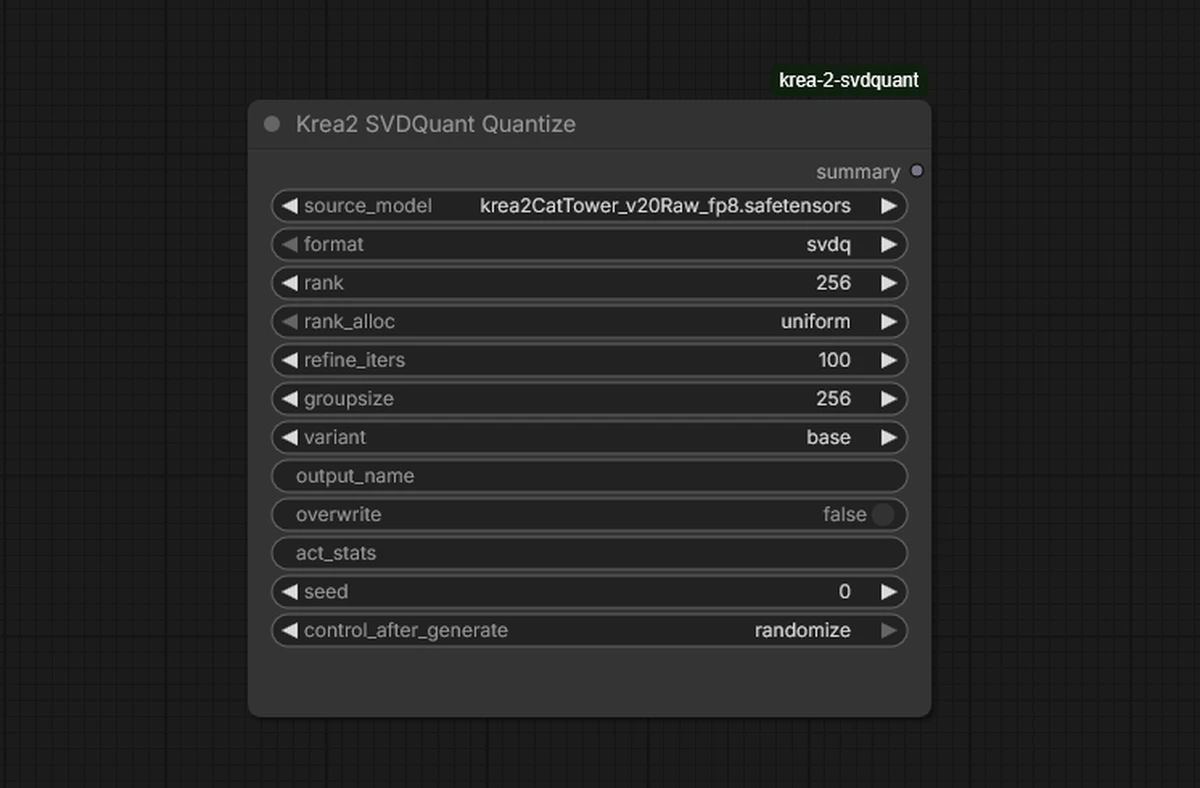
| Node setting | Value to start with | What it does |
|---|---|---|
source_model | Your Raw finetune | Select the BF16 or FP8 diffusion model file you want to convert. |
format | svdq | Creates W4A4 weights and activations with the BF16 low-rank correction branch. |
rank | 256 for LoRAs, 64 for a smaller file | Rank 256 holds up better in the node pack’s LoRA tests. Rank 64 is a good smaller choice if you never load LoRAs on top. |
rank_alloc | uniform | The default allocation. The experimental GQA allocation generally did not show a clear quality gain in the published tests. |
refine_iters | 100 | Refines the low-rank branch against quantization error. Setting this to 0 makes conversion much faster, but higher ranks lose most of their point without refinement. |
groupsize | 256 | The default ConvRot group size used by the pack. |
variant | base | Use this for a Raw mode finetune, and you can change it for other types. This setting changes naming and metadata, not the quantization math itself. |
output_name | A custom name for the output | This is optional. A blank field makes the node derive a filename automatically. |
overwrite | false | Leave this off. This way the node will refuse to replace an existing file with the same name. |
act_stats | Blank for the simple pass | Leave it empty for the basic conversion shown here. A finetune-specific activation capture can improve fidelity, covered below. |
seed | 0 | Keeps the randomized SVD reproducible on the same device. |
For my example I used rank 256, 100 refinement iterations, group size 256, uniform rank allocation, and the base variant, leaving act_stats empty.
The pack’s own tests that you can find in the repository found little difference between rank 64 and rank 256 without a LoRA. Rank 256 becomes more useful once LoRAs are added on top of the quantized checkpoint. Thus, I would advise you to leave it at 256 if you have enough memory/disk space on hand, as you will probably end up using additional LoRAs with your checkpoint anyway.
Start the Conversion
Click the Queue Prompt button just as if you were generating a new image. The node unloads models that are already sitting in VRAM, takes over the GPU for the conversion, and blocks the queue until your new checkpoint is written.

krea2 architecture.The console then will slowly report the transformer layers as they are processed. The current converter works by quantizing the 224 transformer-block linear layers and leaving smaller or more sensitive parts of the model at higher precision.
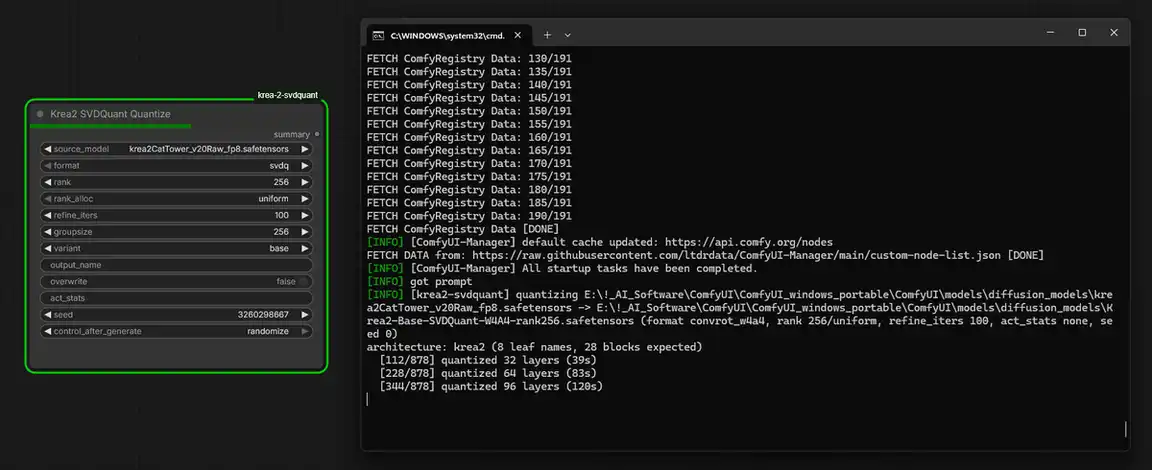
On my RTX 3090, the example run took just under five minutes. The node pack itself quotes anything from under a minute for a quick split to roughly six minutes for a refined build on the same class of GPU.
Load the New SVDQuant Checkpoint
After the conversion is done, refresh ComfyUI’s model list. You can do this by pressing the “R” key.
Load your newly made svdq checkpoint with the Krea2 SVDQuant W4A4 Loader node. You can keep using the regular Krea 2 text encoder and VAE from your standard workflow.
If you add LoRAs on top, use the Krea2 SVDQuant LoRA Loader from the same node pack. The stock ComfyUI LoRA loader can patch current quantized Krea 2 weights, but it rewrites and requantizes the weight delta, which is rather inefficient. The dedicated loader keeps the 4-bit weight untouched and applies compatible LoRAs through a parallel branch.
Raw and Turbo Need Different Sampling Settings
Quantization quite understandably won’t turn a Raw finetune into a Turbo model. It only changes how the weights are stored and processed. The variant dropdown does not distill the model either.
Krea’s official starting point for Krea 2 Raw is 52 steps and CFG 3.5 at around 1024px. Krea 2 Turbo is the distilled model and runs at 8 steps with guidance disabled in the official code. The SVDQuant pack’s own Turbo workflow uses CFG 1.0 in ComfyUI.
Follow the recommended settings for your chosen workflow just as if you’d be using the regular, non-converted models.
SVDQuant does not require Euler, UniPC, Simple, Normal, or any other sampler and scheduler pair. If you want to experiment a bit, you can try different pairs, but be advised that not every standard pair will work here, and you can end up with solid black outputs at times.
For Better Fidelity, Capture Activation Stats From the Finetune
The simple conversion above works with an empty act_stats field. The node pack, however, has a better quality path for users who want to spend a little more time on the conversion.
Use the Krea2 SVDQuant Capture Start and Capture Save nodes with the same finetune you are converting. This calibration path loads the BF16 source, runs representative prompts, saves the activation statistics, then feeds that file into the quantizer’s act_stats input.
The activation-aware branch has the same size and runtime cost as the plain SVDQuant branch, so the extra work happens only during the build.
Quick Troubleshooting
Two basic problems are very common with this setup. One is a quantized Krea 2 build running slower than expected. The other is fuzzy or broken output on some SageAttention setups. The checks below cover both cases.
| Problem | What to check |
|---|---|
| SVDQuant is slower than FP8 or BF16 | Run Krea2 SVDQuant Env Check. A PyTorch build below CUDA 13 drops the W4A4 path to a slow fallback. The Check node will tell you whether your current ComfyUI setup can make full use of the quantized model. |
| No real speed gain on RTX 20-series | This is expected with the current Turing kernels. Keep the format for memory savings, but don’t expect the Ampere-class speed-up shown in the project’s RTX 3090 benchmarks. |
| Black, fuzzy, or broken Krea 2 output | Update ComfyUI and the SVDQuant pack, then test once with SageAttention disabled. Users have reproduced fuzzy or broken Krea 2 output on some SageAttention paths, but it is not the only possible cause. Another common cause for this is using the SVDQuant loaded models with uncensor LoRAs with their weights set too high. |
| Out of memory on an 8GB card | Try rank 64, lower the image resolution, close other GPU-heavy programs and apps, and let ComfyUI offload parts of the model. |
Pin error. appears on Windows | This comes from ComfyUI’s pinned-memory handling. The node pack documents it as harmless, with a small load or offload speed cost. In most cases you can safely ignore it. |
You might also like: Anima In ComfyUI – Quick Starter Guide