
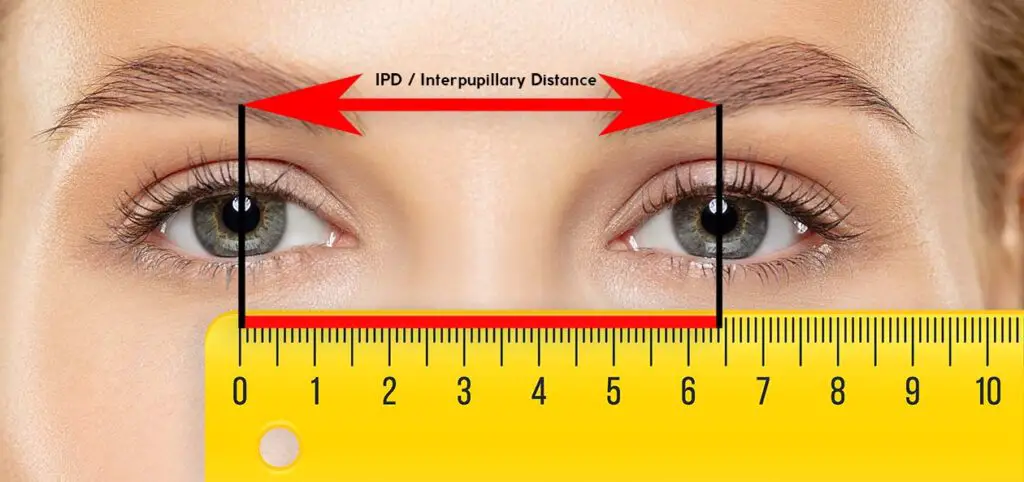
Measuring your interpupillary distance (IPD) is crucial for figuring out the right lens spacing settings for your VR headset for quite a few reasons, and I’m about to show you how to quickly and accurately measure your IPD at home and why you really should do it. Read on!
Check out also: Pico Neo 3 VR Headset Hands-On Review! – Is It Worth It?
This web portal is reader-supported, and is a part of the Amazon Services LLC Associates Program and the eBay Partner Network. When you buy using links on our site, we may earn an affiliate commission!
Why Is Knowing Your IPD Important For VR?
Knowing your exact IPD (or PD, these are the same thing), so the distance between the center of your pupils, lets you figure out the perfect IPD settings for the best image quality and sharpness when using your VR headset. Here is how that works.
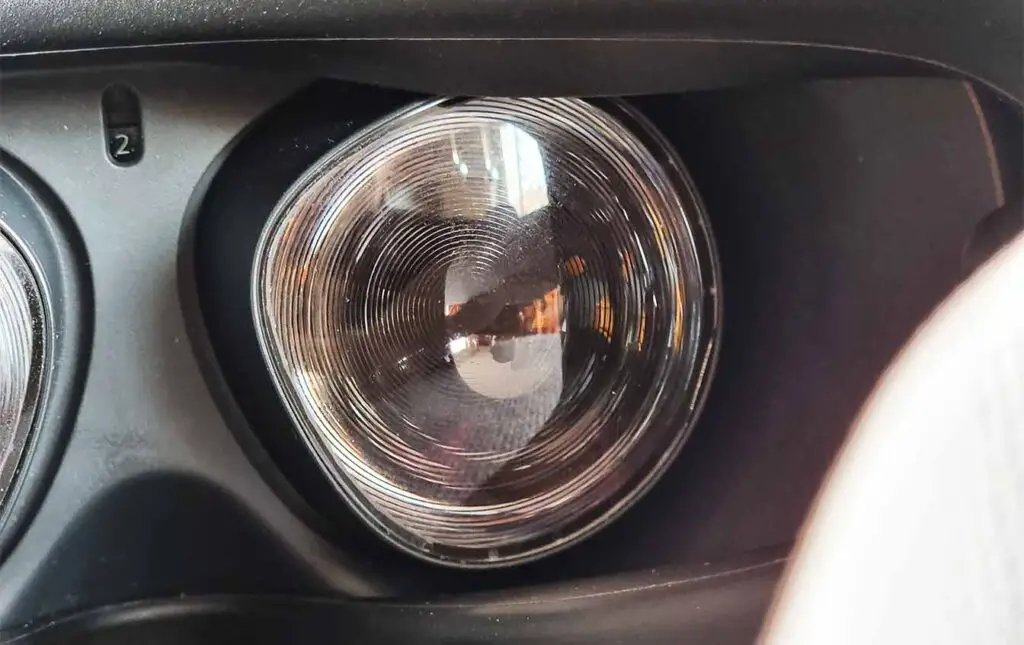
Most lenses used in modern VR headsets – that is, in around 90% of the current hardware either Fresnel lenses or Pancake lenses, have a so-called “sweet-spot” you might have already heard about. The sweet-spot of a lens is visible in its middle part, where the image seen through said lens is the sharpest and has the least visible distortion. The larger this spot is, the higher the general perceived image quality, although of course this is only one of the factors at play in the world of VR.
Why isn’t the whole lens a huge nice sweet-spot? Well, this is just how physics work! Good news is that a relatively new technology – the Pancake lenses that I’ve already mentioned, by design do have a better and larger sweet-spot than the widespread Fresnel lenses could ever provide. You can read much more about that here.
When using a virtual reality headset you can as a little experiment, turn your eyes from the middle of the display to its edges, or simply a few centimeters from its center, and you will notice right away a visible deterioration of the image quality. However, as you may already suspect, there are a few things that you can do to make the most out of the sweet spot of your lenses by adjusting your headset’s IPD settings. How? Let me explain even further.
How Does Your IPD Impact Your VR Experience?
In an ideal situation you want the lenses on your VR headset to be placed exactly in front of your eyes, so that the middle of your eye when you’re looking straight forward will match the middle of the lens that that very eye is looking at.
This way, the middle part of your eyeballs so to speak, where your sight is the sharpest and you’re able to see the most details, will be able to exactly match the “sweet-spot” of the headset’s lenses, and provide you the sharpest and least distorted image.
Besides that, a very large mismatch between your actual measured interpupillary distance and your headset’s IPD setting can in some cases cause troubles with focusing your eyes on the middle part of the image, and during longer VR gaming sessions, unpleasant eye-strain.
Another thing is that there is a slight difference in the perceivable FOV that comes with the change of the IPD settings on your HMD. In general, the wider your IPD setting is, the larger your field of view should be, although in many cases the difference is rather small.
While in theory it’s simple, in practice on many headsets with pre-set IPD adjustments, precise IPD settings won’t be available, and you’ll have to settle for the closest setting there is (I will explain different types of IPD adjustment mechanisms in just a bit). This is why it’s so important to know your interpupillary distance before deciding to buy your very first VR headset.
While your interpupillary distance cannot be “wrong” per se, it could be in rare cases a little bit above or below the average human IPD which means that you’ll have to do your best to adjust your headset in such a way that its lens settings will match your measured IPD, or get as close as possible to your actual measured IPD value.
Can You Change The IPD Settings On a VR Headset? – How?
Currently, there are just 3 main kinds of VR headset IPD adjustment mechanisms which are used on most commercial virtual reality HMD’s:
- Manual step-based IPD presets – This is the most common type of IPD adjustment mechanism which is used for instance on the Meta Quest 2, or the Pico Neo 3 VR headsets, and was widely used in the smartphone-based VR goggles era. It relies on providing the user with a set of usually 3 different IPD settings that can be changed by physically moving the lenses either closer together or farther apart using your hands. With this method the lenses will move together and snap in place once they reach one of the IPD presets, and unfortunately in many cases there is no simple way of locking the lenses on any value in-between the pre-set ones.
- Manual smooth IPD adjustment – This is a solution used for instance on the new Meta Quest 3 VR headset. It utilizes a simple turning wheel dial placed on the headset, which can be used to move the lenses and customize your IPD settings without taking the device off your head, with much greater accuracy. In case of the Quest 3, the current IPD value is shown on the headset’s main display while changing the settings.
- Motorized exact IPD settings – These kind of headsets actually use little motors to move the lenses. They let you set your IPD with accuracy up to a few millimeters (for instance 5 mm on the Pico 4), which is much easier than having to rely on a few forced pre-set IPD settings. This may sound like the future, but the technology is already there and it’s actually not that expensive!
So now, let’s finally move to the 2-minute IPD measurement method so that you can learn what your pupillary distance is right away!
How To Measure Your IPD At Home In 3 Short Steps
Follow these steps and after less than 2 minutes you’ll have your interpupillary distance measured with an accuracy extremely close to the measurements done by a professional!
Step 1: Grab a Ruler
As the average human interpupillary distance is around 63 mm (2.48 in) and it hardly ever exceeds 72 mm (2.80 in), you won’t need a long ruler for this quick measurement. Any non-flexible ruler with millimeter marks on it will do.
Step 2: Stand In Front Of a Mirror
Stand in front of a mirror, close your right eye, and hold the ruler up to your eyes so that the “0” mark is positioned in such a way that it’s aligned with the center of your left pupil. Be sure that your facing the mirror straight on and not at an angle, and that the ruler is positioned correctly.
Step 3: Read The Measurement!
Hold the ruler still, open your right eye, and close your left eye that is behind the “0” mark. Then simply read the value that is in the middle of your right pupil – this is your IPD, or interpupillary distance in millimeters! Mine is exactly 62 mm!
This method, while being really simple and not requiring any professional equipment, when executed correctly can be very accurate!
What Is The Average IPD For Humans?
Now that you’ve ended your professional measurement session you must surely be eager to enter the competition and check how your IPD value compares to other fellow humans.
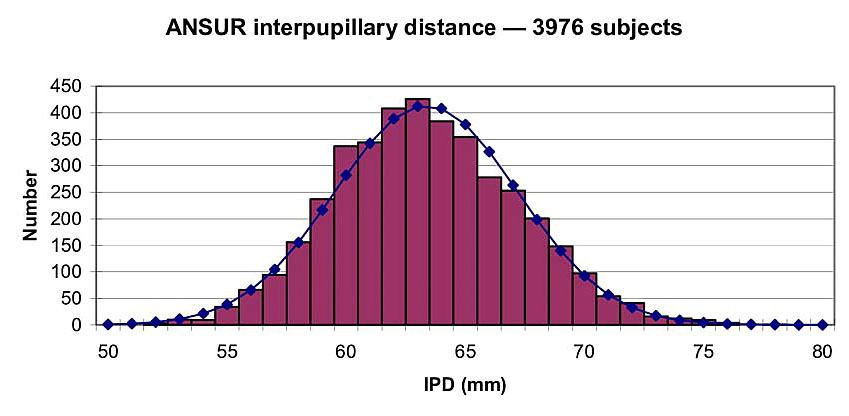
Here you can see a normal curve representing values of interpupillary distance measured by professionals in a population sample of almost 4000 young adults. The measured IPD values can be seen on the X-axis (below), and the number of measurements across the population sample on the Y-axis (on the left).
As you can probably deduce from the image, the average interpupillary distance falls somewhere between 62-65 mm, while the most common IPD value is around 63 mm.
The picture and the data are sourced from the Variation and extrema of human interpupillary distance research paper by Prof. Neil Anthony Dodgson
IPD Settings & Presets Available On Popular VR Headsets
For good measure (pun intended), here are some of the IPD setting presets and ranges (range is shown when semi-smooth IPD settings are available), on a few of the most popular modern VR headsets on the market:
- Meta Quest 3 – 58-71 mm, adjustment using a tuning dial.
- Meta Quest 2 – 58/63/68 mm presets, 3-step manual adjustment.
- Pico 4 – 58-72 mm, motorized adjustment.
- Pico Neo 3 / Pico Neo 3 Link – 58/63.5/69 mm presets, 3-step manual adjustment.
Tip: Click the links above to see the mentioned headsets on Amazon!
Also, be sure to check out my review of the Pico Neo 3 Link here!
Other Ways To Measure Your IPD
Actually, there is one more thing. If you’re curious about other ways you can deal with the task of measuring your IPD, there are a few more options:
- Having a professional IPD measurement done at the optometrist – an optometrist can, as you might have expected, measure your IPD distance during a procedure. If you need to know your IPD value only for virtual reality headset setup purposes, there is no real advantage of having it measured by a professional.
- Using a mobile app – apps like GlassesOn, or EyeMeasure can help you easily measure your IPD using your phone’s front facing camera.
- Having a friend help you out – the exact process shown in this tutorial can be made even easier when someone takes the measurement for you, although some may argue that locating the center part of your pupils is easier when you’re the one holding the ruler.
In this article we used images by: macrovector, master1305