SillyTavern & KoboldCpp on Windows 10 and 11 – the full guide. If you want to get started with local LLMs for local roleplay, writing assistance or coding in less than 5 minutes total, you’ve come to the right place. Did you know that using KoboldCpp with SillyTavern is one of the most popular private local alternatives to services like Character.AI or Chub.AI? Let me show you how to set up the SillyTavern WebUI with the KoboldCpp backend in exactly 6 short steps.
Check out also: Beginner’s Guide To Local LLMs – How To Get Started
If you’re interested in other pieces of software which can be used for this exact same purpose, check out my full list of the most popular local LLM software for this year. You can find 10 more alternatives for online AI character chat services there! Now let’s get to the tutorial.
Brief Explanation of the Process
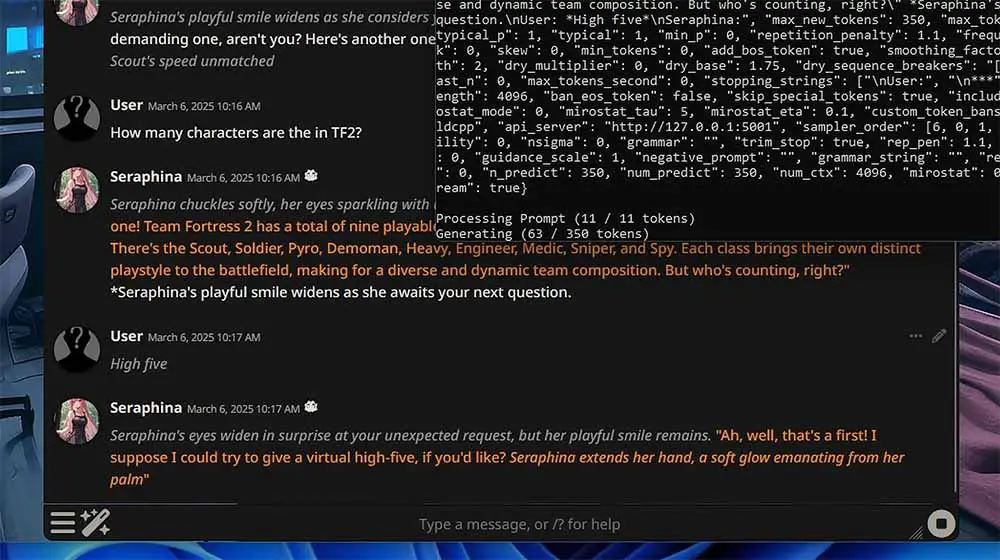
To chat with your local private AI assistant (and with your custom characters) in this software configuration, besides the minimal amount of 6GB of VRAM on your GPU, you’ll also need:
- SillyTavern (ST) – the frontend – the user interface you’ll be using as a proxy to send your prompts to the large language models and receive and view the model outputs sent from the backend in a neat and highly customizable graphical environment. ST can only work paired with a chosen backend (like KoboldCpp or the Oobabooga WebUI) which will host and run your chosen local large language model for local conversations. Without a software backend properly configured, ST doesn’t have any real functionality on its own.
- KoboldCpp – the backend – the program which will actually host and run the large language model. SillyTavern can work with many different backends other than Kobold (for example with the aforementioned OobaBooga Text Generation WebUI).
While KoboldCpp also features its own user interface and can be easily used without SillyTavern, ST offers much more roleplay-friendly features and easy character management system.
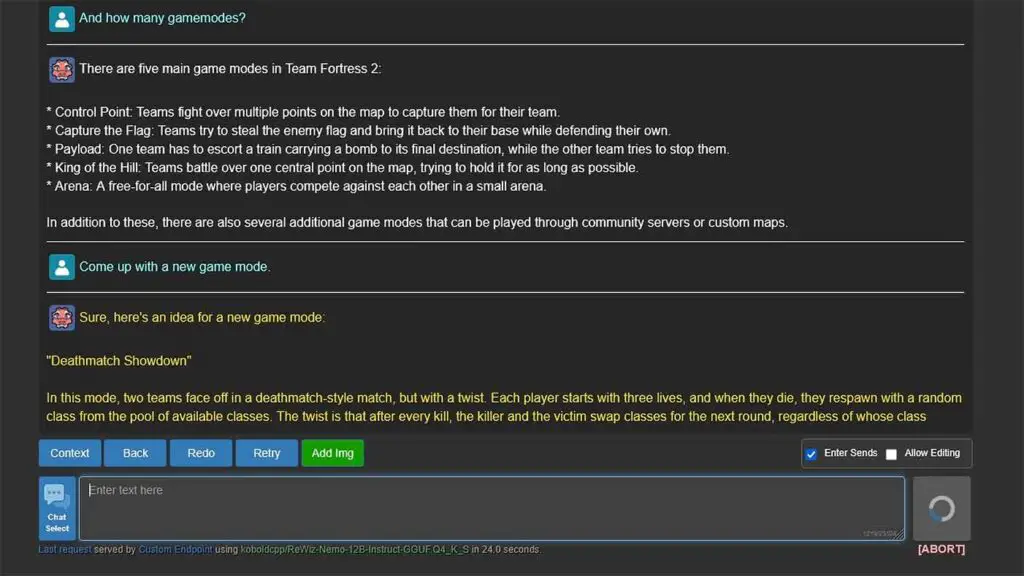
If you’re lazy enough, you can load up your chosen downloaded LLM right after installing KoboldCpp and start chatting with the model right away, as the software does feature a simple user interface for exactly that. This way however, you’ll be missing out on quite a few important features you can use for better quality and much more convenient RP experience.
With that said, let’s get to the setup of the KoboldCpp backend and SillyTavern UI explained step-by-step.
If you’d prefer to watch this tutorial in video form, you’re in luck! I’ve prepared a short 8-minute setup video just for you, you can watch it here over on my TechAntics YouTube channel.
SillyTavern & KoboldCpp Quick Setup Guide – In 6 Steps
Step 1 – Install The KoboldCpp Backend
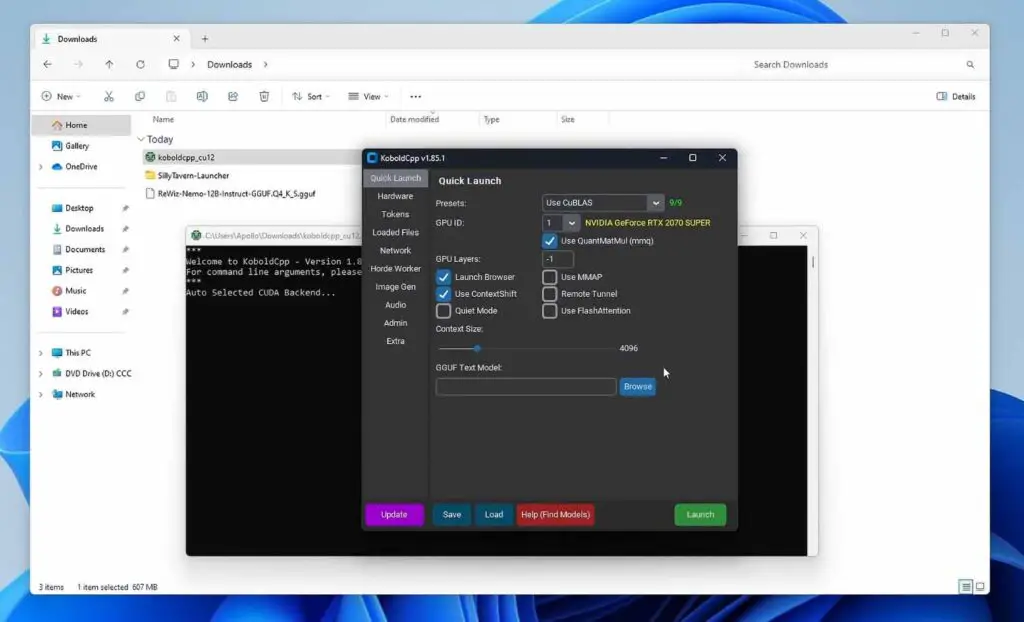
Go to the official KoboldCpp GitHub repository here, and head over to the Releases tab which you can find on the right.
There, you need to select an appropriate KoboldCpp version to download. For Windows systems with recent NVIDIA GPUs (1xxx and up), the version will be “koboldcpp_cu12.exe” – if you’re on Windows 10 or 11 and you’re not sure which one to pick, and you don’t have an AMD GPU on your system, pick this one. Versions for Mac and Linux are also appropriately described.
If you have an older GPU model which doesn’t have CUDA capabilities, you can download the “nocuda” version, which is a little bit smaller. In some rare cases, if you’re using an older CPU which isn’t supported by the main version of KoboldCpp, you can use the “oldcpu” version to make it work.
Once the file is downloaded, simply double click it to run it, and wait until it launches. That’s it!
Now you can close the KoboldCpp windows that should open automatically after a successful install, and move on to installing SillyTavern.
Step 3 – Install Git (If You Don’t Have it Already)
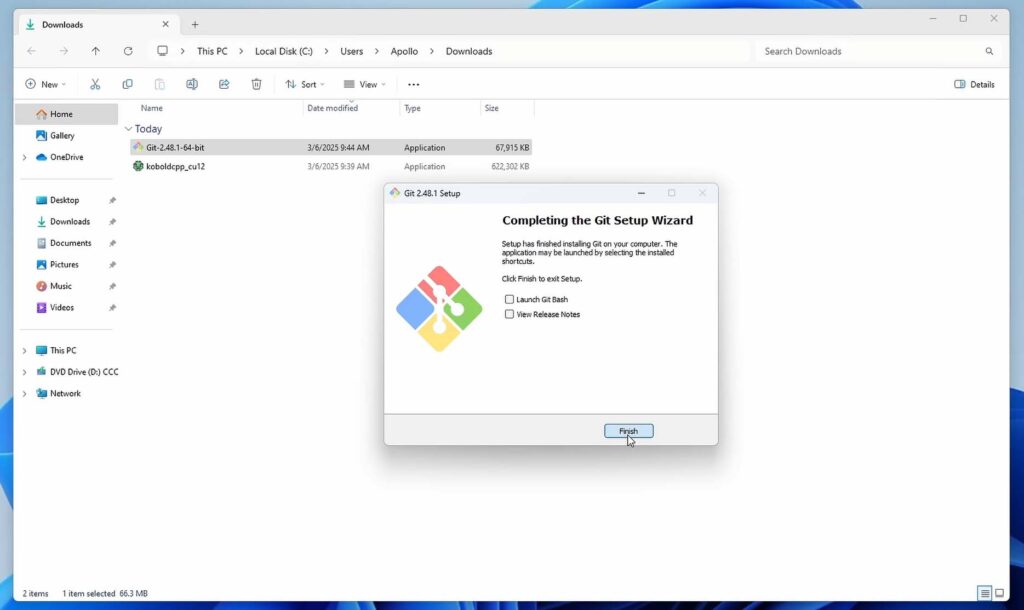
To install SillyTavern, you’ll first need to install Git, to be able to clone the SillyTavern repository onto your PC and later on, update it. Don’t worry, it’s really simple.
Go to the official Git website here, pick the Windows version of the software (32 or 64 bit depending on your system), run the installer and click through all of the default options to begin the installation process. Once it finishes, you can uncheck the “Show release notes” checkbox, and close the installer.
Step 4 – Install The SillyTavern UI
Now, navigate to the folder you want to install SillyTavern in. There, click on the file address/path bar (the one showing which directory you’re currently in, type in “cmd” and press enter. A new CMD window should open right in that directory.
There, simply type in the following command (sourced from the official SillyTavern GitHub repository):
git clone https://github.com/SillyTavern/SillyTavern-Launcher.git && cd SillyTavern-Launcher && start installer.batThe first part of this command (up until “&&”) will download all of the ST files from the GitHub repository to the folder you’ve opened the CMD terminal in. The second part will move to the “SillyTavern-Launcher” directory, and start the “installer.bat” file to initiate the software installation process.
First things first, the SillyTavern requirements installation process should begin automatically. There will be a few places here where you’ll be asked for user confirmation here.
First, you’ll be prompted to type in “Y” and press enter to agree with the msstore software TOS while the installation script is preparing to install Node.js on your system if you didn’t have it already. Then, as the installer continues its work, you will be asked to click “Yes” on a second user access control window.
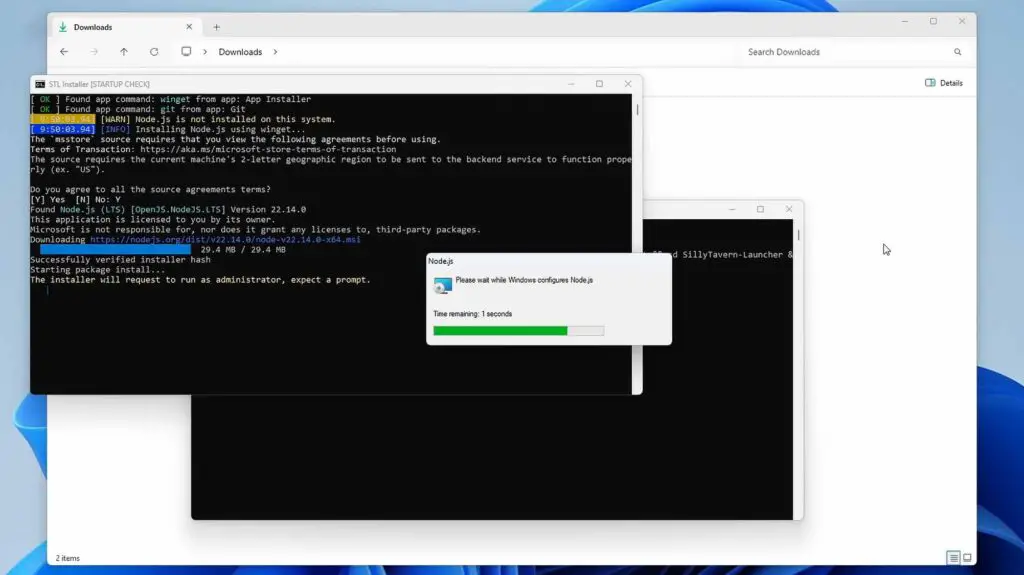
Towards the very end, the only thing that will be left for you to do is to type in “Y” in the terminal window to create desktop shortcuts for the program. In the very end, you will be prompted to start the SillyTavern software right away. This is where a very common issue can come up.
If you get the “Node.js is not installed or not found in the system PATH” error, it’s most likely because the PATH values didn’t get updated in the local terminal environment if the installation has finished and the console window hasn’t been reopened. Close the SillyTavern terminal window and run the launcher.bat file once again, and you should be good to go.
Note: If you still have problems starting up SillyTavern getting either the “Failed to start server” or the Node.js error mentioned above, check out this guide here for more possible fixes.
Once the SillyTavern launcher starts and opens up in a new terminal window, you can type in “1” and press enter to update and start the software. After a short while, the SillyTavern window should open automatically.
Now let’s move on to loading our first local LLM, and the first chat with our local AI assistant/character.
Step 5 – Download Your First Model & Load It Up Into KoboldCpp
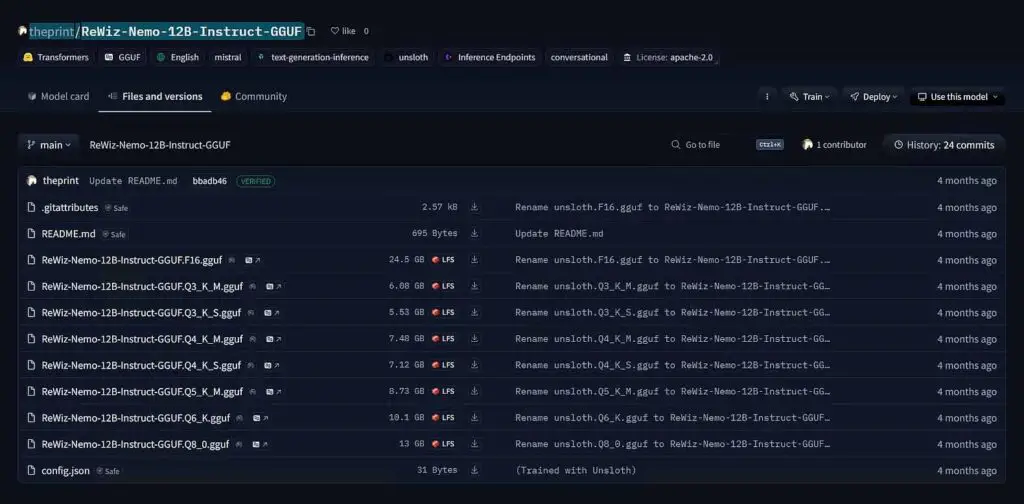
To begin chatting with the AI, unsurprisingly we will need to download a chosen open-source large language model (LLM) and then load it using the KoboldCpp backend.
A word of warning for beginners: not all models you find online will work well on your particular graphics card, and some may not work at all, depending on your current hardware/software setup.
If you’re just starting out, it’s best to use models that are likely to run smoothly on your system without additional setup or optimization. A quick rule of thumb is to choose models that are smaller than your available GPU VRAM, accounting for about a 20–25% memory overhead.
For example, if your GPU has 8GB of VRAM, aim for models where the total memory usage—including model weights, intermediate activations, and overhead—stays within about 6–6.5GB. This usually means choosing model files in the 4–5GB range, depending on the architecture and framework. While actual memory usage can vary based on factors like batch size, model architecture, and backend, this simplified rule should help you get started safely and with reasonable performance.
Note: Want to know which LLMs you can run on your system at full attainable inference speed—and why?
Check out my other short guide similar to this one, here:
👉 LLMs & Their Size In VRAM Explained – Quantizations, Context, KV-Cache 👈
In this short article, you’ll also learn about model quantization, LLM naming conventions, and much more to help you quickly make the best choice for your setup!
To make things easier, for this tutorial I’ve decided to go with a model that should work on most 8GB VRAM GPUs provided no other processes are hogging the video memory. It’s the 4-bit quantized “ReWiz-Nemo-12B-Instruct” model, and you can download it from its official HuggingFace repository here.
I’ve also made a list of the best open-source 7B models that I’ve personally tested to quickly get you started. You can pick and download any one of these in 4-bit quantization option, and you’ll be good to go.
For 8GB VRAM systems, select the option ending with “Q4_K_S.gguf”, which is a 4-bit quantization of the 12B parameter version of the model. If you have more VRAM to spare, follow the simple rule I’ve outlined above.
Check out also: 8 Best LLM VRAM Calculators To Estimate Model Memory Usage
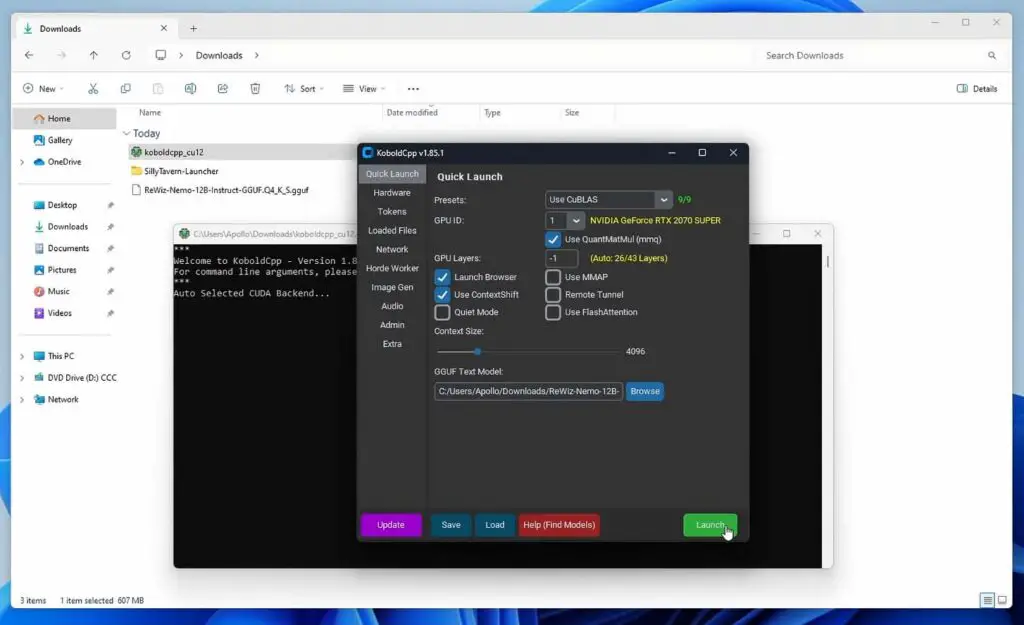
KoboldCpp should support most model files in GGUF and GGML formats. To load up the model we’ve just downloaded, simply start up KoboldCpp and click on the “Browse” button in the “Quick Launch” section, select your downloaded model, and click on the “Launch” button.
Loading a model for the first time can take pretty long, depending on your system specs. Be prepared to wait up to a few minutes here (although in most cases it will be much less).
Once your model is loaded, do not exit out from KoboldCpp. We’ll now fire up SillyTavern and let it connect to the KoboldCpp backend we’ve just configured and started up.
Step 6 – Start Up SillyTavern & Connect It With the KoboldCpp API
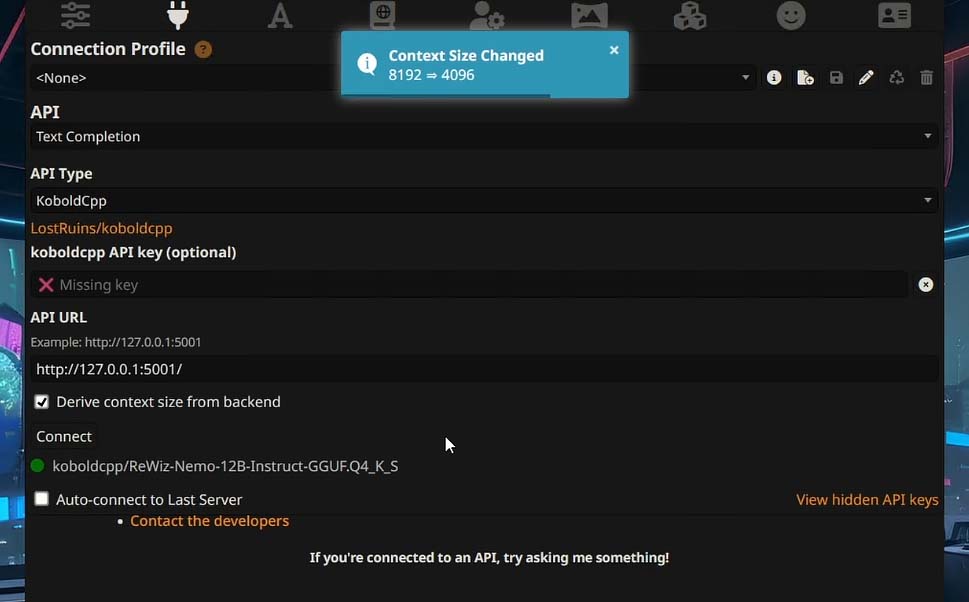
Once you get the KoboldCpp software running, it’s time to launch SillyTavern and connect the two pieces of software together. While it’s quite obvious, remember that both programs have to be running at the same time for this to work.
To do this, enter the “API Connection” menu in SillyTavern while the KoboldCpp backend is running in the background, and select the following options:
- API: Text Completion
- API Type: KoboldCpp
- KoboldCpp API key: <can be left empty>
- API URL: <the URL to your KoboldCpp instance (see below)>
While in the case of a fresh KoboldCpp install the address you need to enter in the last field will most likely be exactly the same as you can see on the image above (http://127.0.0.1:5001), if you’re installing the software in a different environment, or you have any other software hosted on the default port that KoboldCpp tries to start its server on, it might differ.
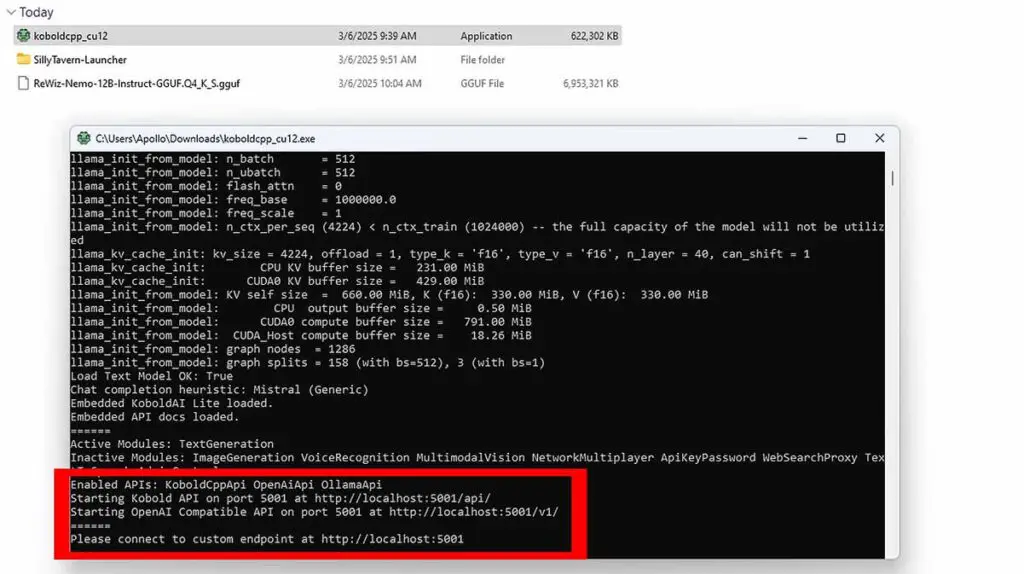
Make sure that you’ve entered the correct address of the KoboldCpp server here. Otherwise, the SillyTavern UI won’t be able to connect to the LLM hosted by the Kobold backend. If you don’t know what the correct port and address are, you can find them in the KoboldCpp console as well as in the UI itself (they are displayed right when the program starts up).
Now, check the little “Derive context size from backend” checkbox, and once you’ve done that, you can finally click the “Connect” button. The green connection indicator dot should light up green, and your loaded model name should display next to it. This means that you have successfully connected to the KoboldCpp API.
After you’ve done that, you’ve successfully configured SillyTavern with the KoboldCpp backend! Click on the “Character Select” tab on the top right of the SillyTavern interface and select the default example character.
This should load up the default ST character “Seraphina”. After that’s done, you can type in and send your first message in the conversation window. After the inference process finishes, you should see the reply from the character.
This process however can be improved, and you can make your messages display token-by-token in the so-called streaming mode (like in ChatGPT or DeepSeek), instead of waiting for the entire response to be generated before it appears.
Enabling Continuous Token Streaming In SillyTavern (Displaying messages token-by-token)
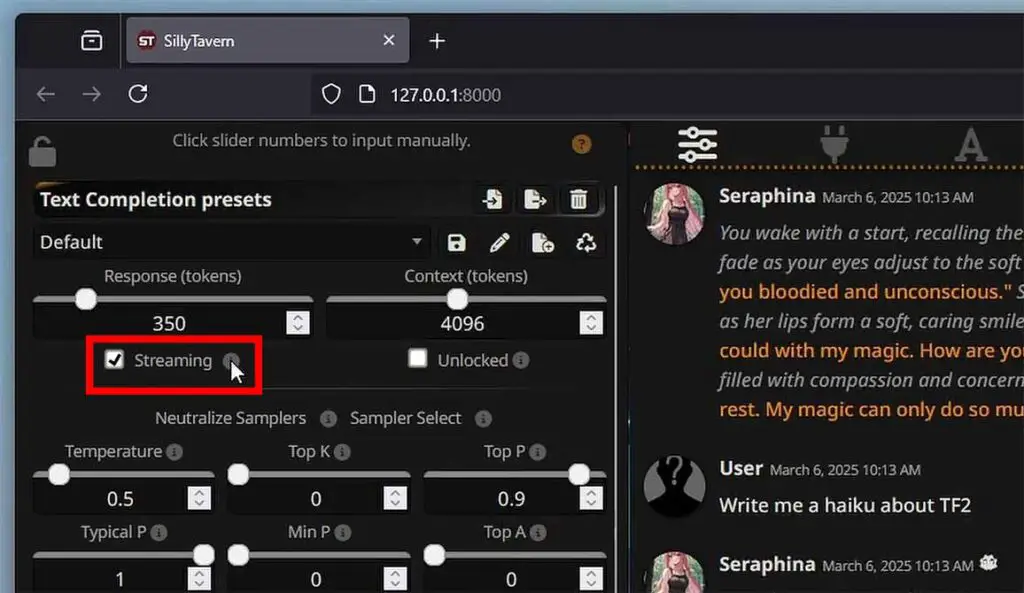
By default, in SillyTavern, you won’t see your output displayed token-by-token or word-by-word as it generates (like in many popular LLM hosting front-ends). Instead, you’ll see the entire output all at once only after it has fully generated.
If you want to see the tokens or words appear as they are generated live, go to the “Options” tab and check the “Streaming” checkbox as shown on the image above.
And if you would like to see how fast different tokens-per-second generation speeds look in software like SillyTavern, check out our simulator here: LLM Tokens-per-Second (t/s) Generation Speed Simulator Tool
Adding Custom Characters to SillyTavern
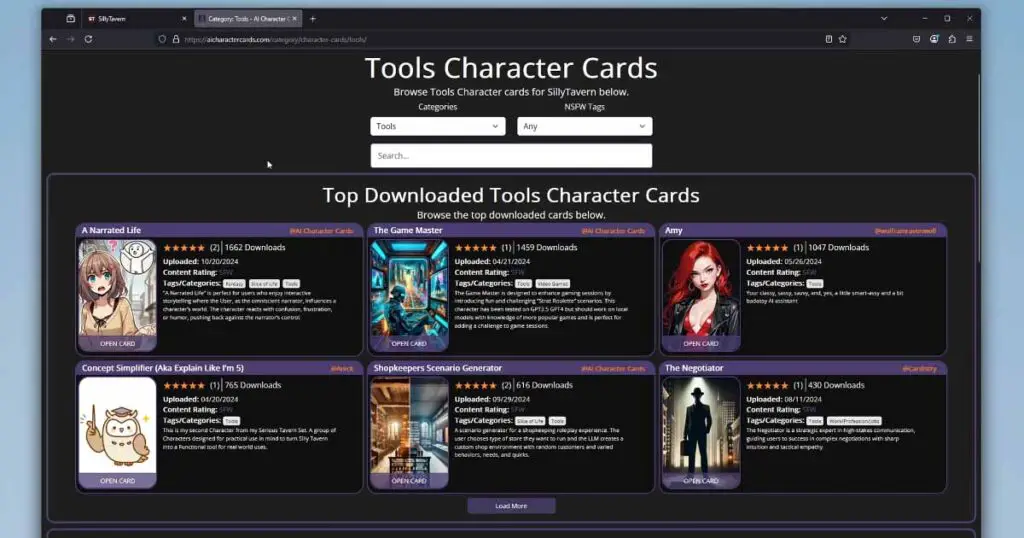
And now, arguably the most important thing. Here is how to add and import custom characters to your SillyTavern instance regardless of which backend software you’re using.
Luckily, ST makes importing characters really easy, and there even exists a dedicated unofficial website made specifically for collecting character cards which can be imported straight into the SillyTavern UI.
Go to the site linked above (aicharactercards.com), use the character browser to find a character you like and then copy the “ST Card ID” value from your chosen character’s card page.
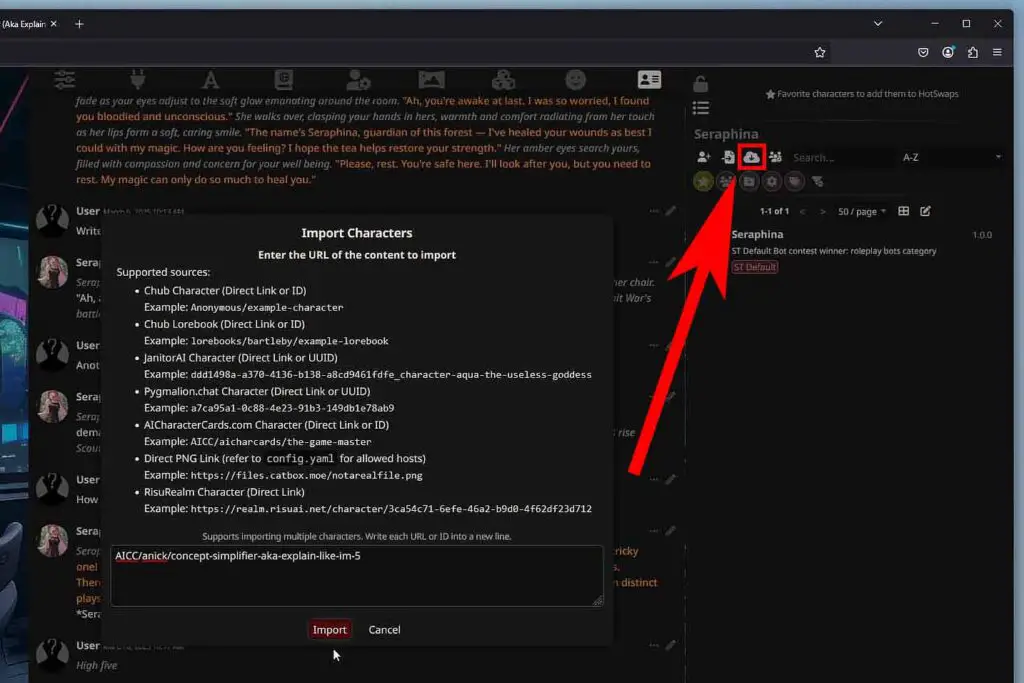
Once you’ve done that, head back to SillyTavern, go to the characters tab (which is the first tab from the right), and click the character import button with the cloud icon (shown on the image above).
There, paste the character card ID that you’ve just copied and click the “Import” button. After a short while, your new character should appear on the characters list on the right.
Of course you can also freely edit the characters you’ve imported, and create your own new character personas just like in character.ai. Once you get the gist of how the character cards are formatted after looking at a few different ones, you’ll be able to do that without any trouble.
All Ready – Still, There Is More!
That’s it! It’s not a surprise that the KoboldCpp x SillyTavern combo is among one of the most popular private solutions for local LLM inference, and as already mentioned is commonly used as a direct alternative to websites like character.ai, chub.ai and many others offering similar services.
If you’re looking for a way to get into local AI roleplay, using a personal private AI assistant for writing or coding, or other similar activities, and you have a GPU with 6GB of VRAM or more, this is frankly one of the best ways to go about it.
If you want to try out even more convenient software for hosting large language models locally, check out my full list of the most popular local LLM software compatible with both AMD & NVIDIA GPUs for this year! Containing programs like LM Studio, Gpt4All and the OobaBooga Text Generation WebUI it can give you much more options to consider.
Thanks for reading and see you next time!
