
Whether you want to do some retro gaming, software testing, or are simply in for a quick nostalgia trip, we’re about to show you how to quickly set up a Microsoft Windows XP virtual machine in VirtualBox software – with ease and in around 10 minutes total! So, let’s dive into this short, simple and straight to the point step by step Win XP VM setup tutorial, and let us guide you to get your virtual machine working as fast as possible.
- Windows XP Virtualization – What Do You Need
- Where To Get The Windows XP ISO Image?
- Do I Need a Windows XP Product Key For a Virtual Machine?
- Are There Any Other Ways You Can Enjoy Windows XP These Days?
- Installing The VirtualBox Software
- Windows XP in VirtualBox – Step-by-step Tutorial
- And There It Is! – Fully Functional Virtualized Windows XP Instance
Windows XP Virtualization – What Do You Need
The only three things you’ll need for this tutorial are:
- Windows XP ISO – a single ISO image file of the Windows XP installation media disc, you can obtain it in various places online or source it from an actual original Win XP install disc. More on that in a short while.
- Oracle VM VirtualBox Software (free) – freeware hypervisor software that we’re going to use for virtualizing the Windows XP OS. It can be downloaded here.
- A popular alternative to this piece of software is VMware – this one is also available for free, albeit for personal use only. We will be using VirtualBox in this tutorial.
- A PC (or rather motherboard) with virtualization capabilities – most modern motherboards do support virtualization by default. If it’s not, the option to enable it will be hidden somewhere in your BIOS. Search for options labeled: Virtualization, VT-x, AMD-V, or SVM, depending on your hardware.
- If virtualization is not enabled in your BIOS, the hypervisor software won’t be able to work properly, and you won’t be able to use your virtual machines.
Where To Get The Windows XP ISO Image?

This is the question that’s asked the most when it comes to anything virtual machine related. The quick answer is simple: do a quick Google search and you’ll be presented with more than a few sources for various operating system installation media ISO images.
The longer and more appropriate answer is: many sites including ours aren’t really keen on providing the ISO images of older commercial operating systems (especially those developed by Microsoft), simply because while these systems are long discontinued, Microsoft themselves still haven’t officially released clean installation media sources for most of their recalled OS products.
This makes the process of ripping a physical Windows installation disk (this is how you make an .iso file that’s used to install the system in a VM), somewhat a grey-area endeavor. The same goes with making these kind of files available for free online.
With that said, it’s true that there are still many Windows XP ISO images floating around online, but we cannot take the responsibility of checking if the one you find and pick will be safe to use and will not contain malware. This is something you should do on your own.
Do I Need a Windows XP Product Key For a Virtual Machine?
Yes, a Windows XP product key is needed during the OS installation process in the virtual machine environment, but then again, there are lots of working keys available all over the internet that you can use here.
As Windows XP is recalled and new licenses are no longer sold, you might have to resort to activating the system in your VM by using already existing keys – this is done in the very beginning during the OS installation process in the virtual machine.
Once again, currently the only way to really use Windows XP in a virtual machine “legally” is to find an old, preferably sealed Windows XP installation disk packed with a dedicated product key and then use these to install the OS in your virtual machine hypervisor software.
That’s just how it is: keep in mind that Microsoft doesn’t provide official downloads for any of the Windows XP installation media .iso images, and they do not endorse using previously used unoriginal product keys for activating copies of Windows XP in a virtualization environment.
This is why virtualizing older Microsoft Windows operating systems may be considered a “grey-hat” activity by some. In reality, as there currently is no real way of purchasing these older operating system licenses, the only way to actually make use of their feature sets is either through virtualization, or on original hardware having an original activated copy of such system installed.
Are There Any Other Ways You Can Enjoy Windows XP These Days?

In general, as we already mentioned, there are 2 main ways you can get the full Windows XP OS experience on your PC today. Here they are.
- Virtualization – the best way, enabling you to make use of full feature set of the virtualized OS while staying safe from malicious software.
- OS Install On An Old PC – whether you find an old Windows XP PC, or you decide to install it on an unused computer, this is one of the more elaborate ways to enjoy the system on actual hardware, without emulation or virtualization involved.
These are pretty much the only ways you can get into a part of the original Windows XP experience these days. From all of these methods, virtualization is the most efficient and safest one if done correctly.
Installing The VirtualBox Software
The very first thing you’ll need to do is to install the free VirtualBox hypervisor software which you can download right here.
The hypervisor software will allow us to create our Windows XP virtual machine, tweak some initial settings, import our .iso image and then proceed with the actual OS installation on our newly created VM. Let’s get started then!
Windows XP in VirtualBox – Step-by-step Tutorial
Here is how to get Windows XP to work in VirtualBox in a few simple steps. First, simply open the VirtualBox software.
After you’ve opened VirtualBox, select the “New” button which you can find in the middle of the top bar. This will initiate the process of creating a new Virtual machine.
Don’t worry about the .iso image yet, but keep in mind that we will need it later after we finish setting up our virtual machine.
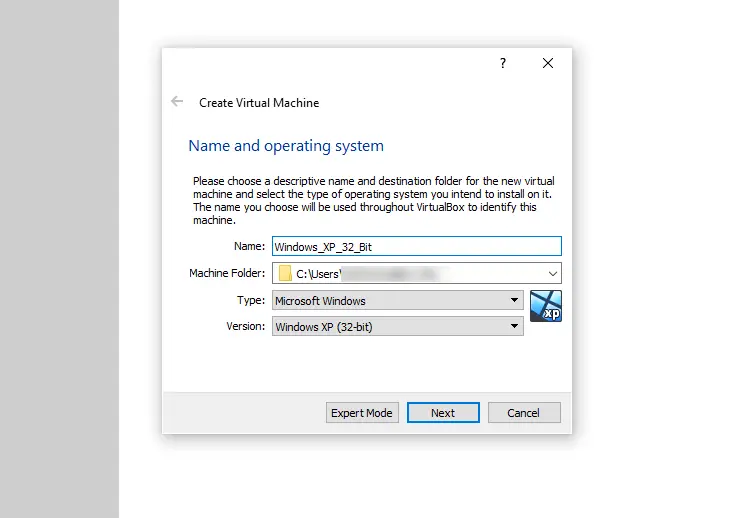
Pick a name for your virtual machine. The best thing to do here is to name it after the operating system it will be hosting – and that’s just what we did here.
After you’ve done that, select the following options: Type: Microsoft Windows and Version: Windows XP (32/64-bit) – pick the appropriate version depending on which .iso image you have. Then, press “Next”.
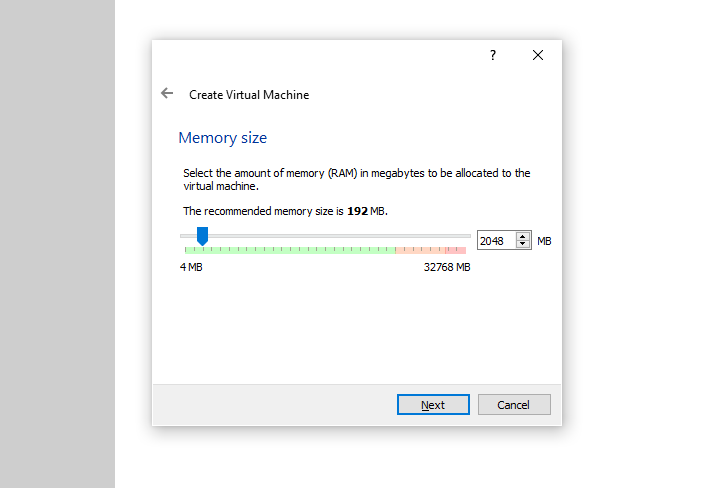
Now, pick an appropriate amount of RAM for your virtual machine. This will depend on the actual way you’ll be using your VM in the end, and on the overall amount of RAM available on your host machine.
We recommend picking 2048 MB (2 GB) here, although you can just as well go with as little as the software recommended 192 MB if you don’t have much host memory to spare.
Generally, we don’t recommend assigning less than 512 MB (0.5 GB) and more than 8192 MB (8 GB) for Windows XP on VirtualBox. For light retro gaming and commercial software tests you should be fine with 2-4 GB in most cases.
Remember that this can always be changed later, after shutting down your virtual machine. When you’re finished, click “Next”.
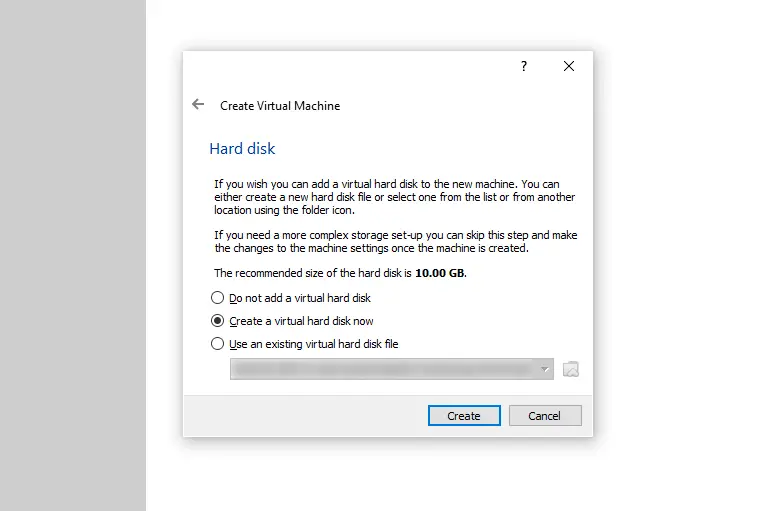
Now it’s time to create a new virtual hard disk – this will be the disk space that will be available to you once you boot your virtual Windows XP PC.
Select the “Create a virtual hard disk now” option, and press the “Create” button.
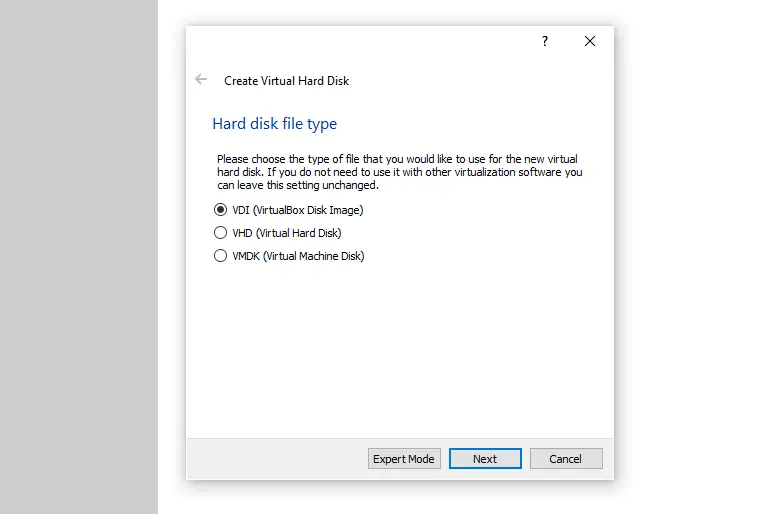
Select the type of the virtual disk – as we won’t be using this particular virtual disk file with any other software than VirtualBox, we can safely create the default “VDI (VirtualBox Disk Image)” file type and click “Next”.
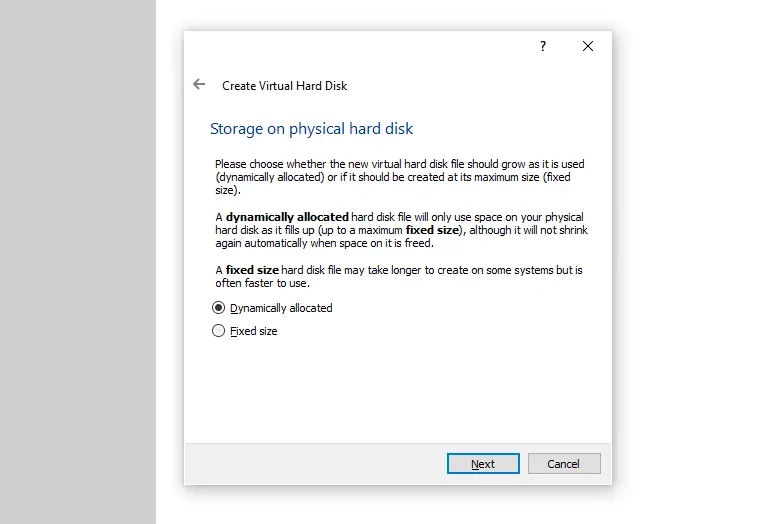
Now you’re faced with two options: you can either create a “Dynamically allocated”, or “Fixed size” virtual hard drive.
The first one will only use your physical host disk space as it gradually fills up with data, and the second one will take up all the set space from the beginning.
While the dynamic storage allocation can be slower than utilizing a fixed-size virtual drive, dynamic storage allocation is more beneficial when you use lots of smaller virtual machines for testing purposes and don’t have that much disk space to spare on your host system.
Select “Dynamically allocated” and press “Next”.
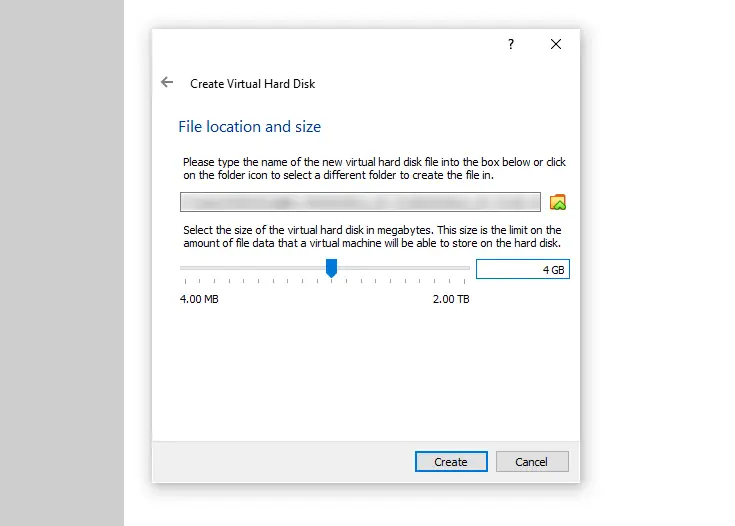
As Windows XP has an install size of around 1.5 GB, we won’t be needing more than 4GB on our virtual hard drive.
Choose a directory for your virtual hard drive file (or leave it as default), and set your virtual hard disk size to 4 GB. Then, click “Next”.
Now, your new “empty” Windows XP virtual machine has been created successfully, but it still needs two things. First, settings tweaking, second, importing the Windows XP ISO image. We’re going to do all this right now.
Click on the orange settings cog on the main VirtualBox screen with your new VM selected to enter the settings menu of your newly created virtual machine.
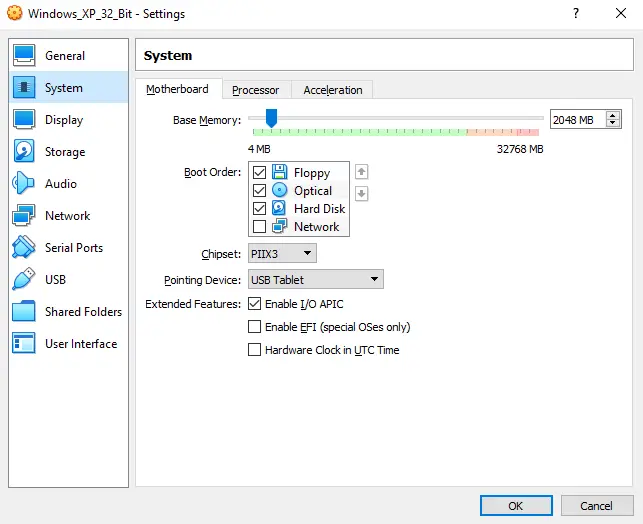
Head over to the “System” submenu on the left, and select the first “Motherboard” tab.
In here, you can see the amount of memory you’ve assigned to your virtual machine. You can change this anytime you want if your VM is not running.
If you want your virtual machine to utilize more than one CPU core (and we do want that), check the “Enable I/O APIC” checkbox in this window.
After that, head over to the “Processor” tab.

Now, in the “Processor” tab, drag the “Processor(s)” slider to your desired amount of CPU cores that you want your virtual machine to utilize. Let’s set this slider to “2”. Leave other settings in this tab as is.
If you don’t enable the “Enable I/O APIC” feature in the “Motherboard” tab, you won’t be able to support more than one virtual processor, so make sure that it is on.
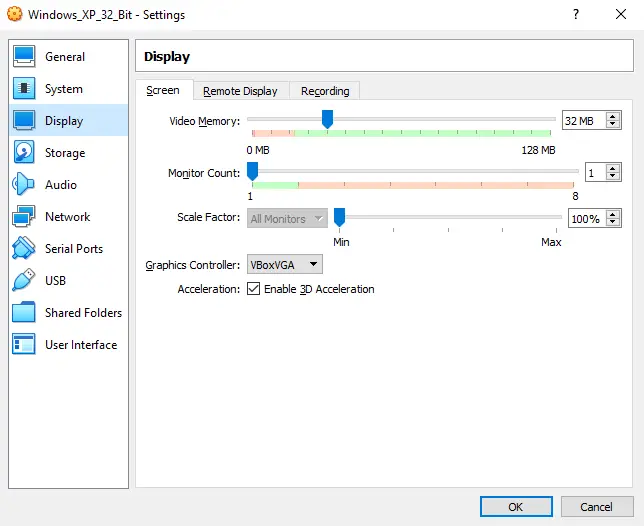
Go over to the “Display” submenu and the “Screen” tab. In there, you will be able to set the amount of memory you want to assign to your virtualized graphic card. Set the “Video Memory” slider to 32 MB.
After you’ve done that, check the “Enable 3D Acceleration” box. Now you can head over to the “Network” submenu.
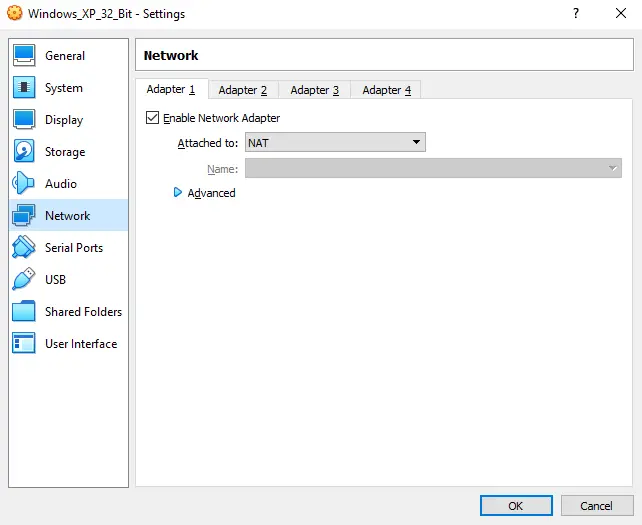
In the “Network” tab, check if the “Adapter 1” is enabled and set to “Attached To: NAT”.
This way you’ll be able to access the internet through your virtual machine – neat!
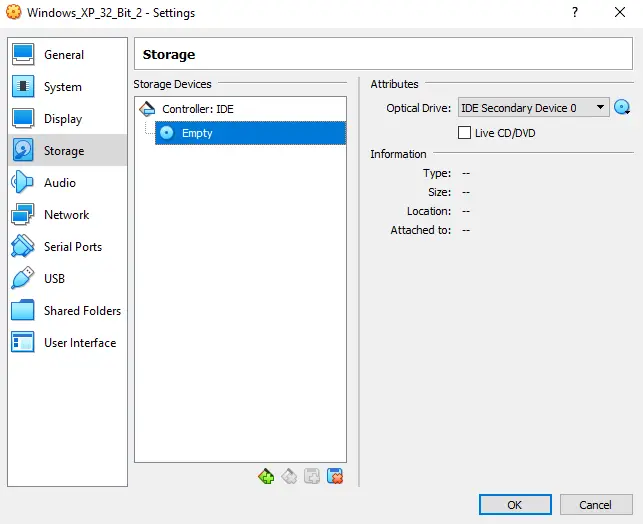
Now the most important part yet – importing our ISO image. Head over to the “Storage” submenu and locate the virtual optical disc drive (highlighted blue on the image above). Then press the little blue disc on the top left of the window.

Here, select the “Choose a disk file…” option. Now you will be prompted to select your OS installation disc ISO image file (if you don’t know what that is, go back to the beginning of this article).
After you select the file, it will get imported into the virtual optical disc drive. It’s the direct equivalent of putting the OS installation CD into an actual physical disc drive on a real computer – just virtualized!
Now, it’s finally time to close the settings window and start up your virtual machine by pressing the “Start” button in the main VirtualBox window with your newly created VM selected.
We’re halfway there!
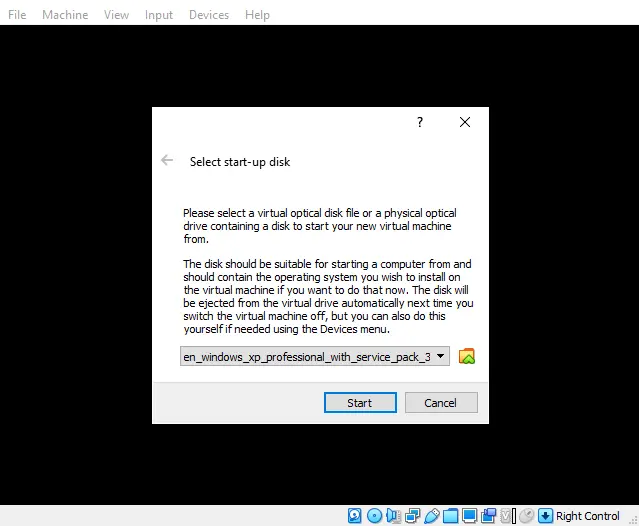
After booting up your new virtual machine, you will be prompted to select the start-up disk / ISO image to use – select the one you’ve just imported in the previous step!
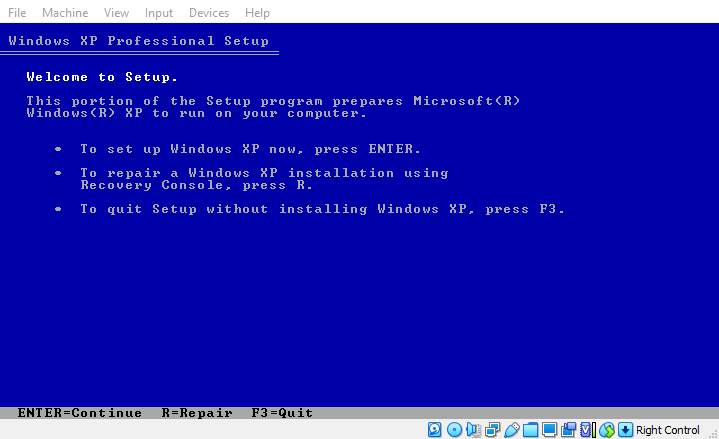
Now, the actual installation process of Windows XP will begin on your VM.
This is the exact same install setup that you would face when installing Windows XP from “real” physical installation media on an actual hardware.
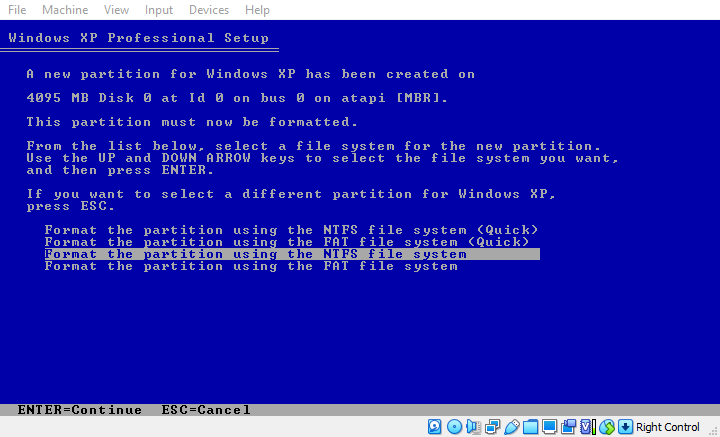
The only step that might be non-obvious here is one of the first ones where you have to select the “Format the partition using the NTFS file system” option (shown on the image above). Click the enter key to confirm your choice.
Now the only thing you have to do is to finish the regular Windows XP installation process.
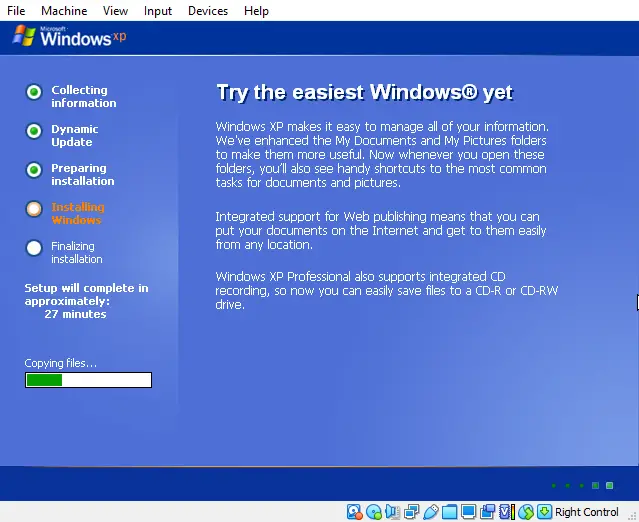
We won’t be going through all the steps here, as these are pretty self-explanatory – all the things you have to do are stated explicitly on-screen in the installer GUI. This was the “easiest Windows version” after all, as proclaimed by the installation wizard itself!
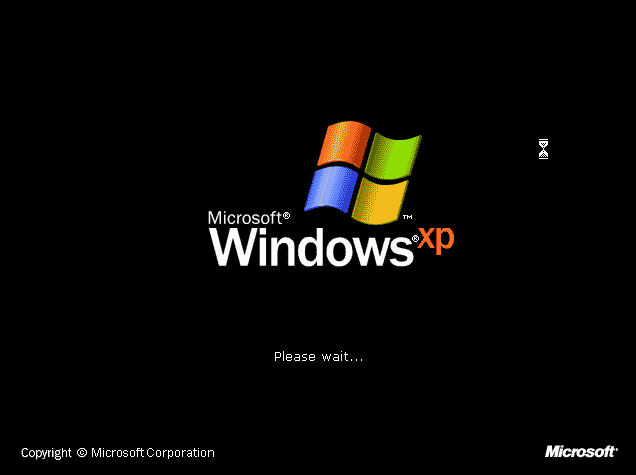
After the installation process is complete you will be faced with the well-known Windows XP loading screen. This is the end of the road – you now have a fully functional copy of Windows XP running in your virtual machine!
And There It Is! – Fully Functional Virtualized Windows XP Instance
And that’s it! You’ve successfully installed Windows XP on your virtual machine and now can use all the features of the system virtualized locally on your host machine. All that with internet access!
Remember that Windows XP is a discontinued and largely outdated OS which should not be used for any work involving critical user data, especially when connected to the internet.