
This is the updated version of the “Stable Diffusion WebUI Settings Explained – Beginners Guide” I made a while back. It goes over all of the most important settings and parameters you can tweak in the Automatic1111 software, and is a perfect place for you to get started with local AI image generation, even without any prior experience!
You might also like: Top 11 Stable Diffusion WebUIs – Fooocus, Automatic1111, ComfyUI & More!
Installing and Running the Stable Diffusion WebUI
The easiest method for installing the A1111 WebUI on Windows systems with NVIDIA graphics involves downloading the main software release sd.webui.zip package from the official repository here, and then running the update.bat file contained within.
After doing that, you can double-click the run.bat file, and the latest version of the WebUI should start automatically.
While running the software is possible with AMD GPUs, it involves using a fork project made and maintained by lshqqytiger. You can learn more about that here.
Models/Checkpoints and LoRAs
Models/Checkpoints
The main things you’ll need to generate images using the Automatic1111 WebUI are the Stable Diffusion models, also known as checkpoint files. These files contain all the model data used in the image generation process.
The terms “model,” referring to the mathematical model contained within the file, and “checkpoint,” which refers to a saved state of the model during a certain stage in the training process, are often used interchangeably and in the context of all Stable Diffusion WebUI software mean the exact same thing.
Without a loaded model, your chosen WebUI is simply a raw graphical interface without much real functionality. Only after you fully load the model into your graphics card’s memory can you begin generating images. That’s why having a sufficient amount of video memory (VRAM) on your GPU is crucial for generating images using diffusion models locally.
While offloading a model to your system RAM partially or fully if you don’t have enough video memory to spare is possible, it’s not recommended. Your GPU will always spend significantly more time accessing data from RAM rather than from its internal memory, and the image generation process will be much, much slower this way.
Depending on your system settings, when you run out of video memory at any point when using the software (for example when trying to generate a high resolution image), it will either automatically offload the data to your main system RAM as mentioned above and slow down the image generation process considerably, or stop working completely throwing a an out of memory error. You can monitor your current VRAM usage using the Windows task manager.
With all that said, if you want to know more about the VRAM requirements for local Stable Diffusion image generation software and you’re not sure what kind of GPU is best for running SD and SDXL models locally, I’ve got a neat resource just for you right here: Best GPUs for Stable Diffusion, SDXL & FLUX Local AI Image Generation – Plus Software Requirements
The base Stable Diffusion models released by Stability AI, are only the tip of the iceberg. While the models officially released to the open source community are in order: Stable Diffusion 1.5, 2 and SDXL 1.0 and 1.5, currently there exist a lot of different fine-tunes of these models available online.
If you’d like an even easier way to get into Stable Diffusion (including running high quality SDXL models on GPUs with less than 6GB of VRAM), you might also be interested in this guide I’ve written quite recently: How To Run SDXL Models on 6GB VRAM – Fooocus WebUI Guide [Part 1]
Where To Find Different Stable Diffusion Checkpoints?
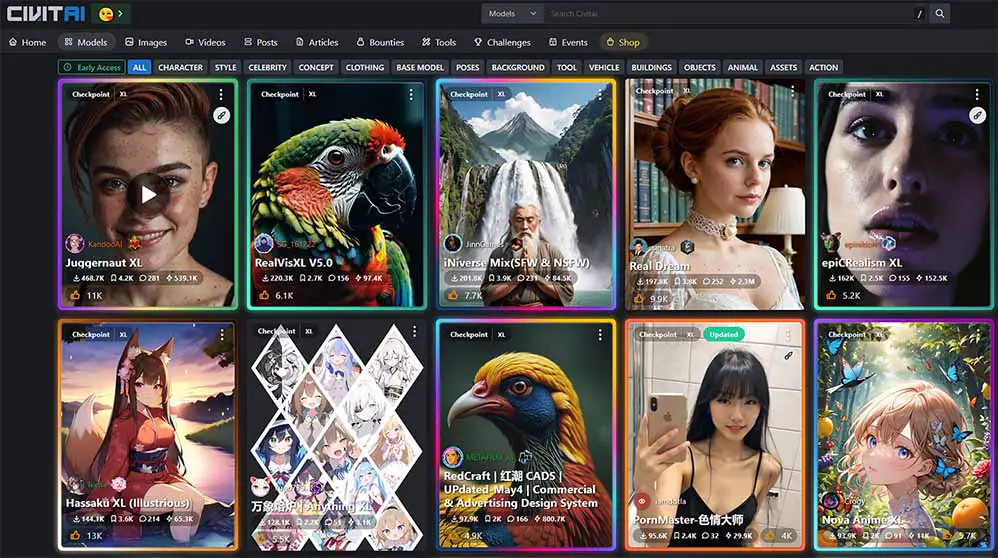
You can find lots of different Stable Diffusion checkpoints in many places online, but the most notable ones with the most content available are:
- CivitAI – currently the most popular model-sharing website with hundreds of different Stable Diffusion models and fine-tunes.
- Huggingface – pretty much the standard place for sharing open-source model repositories, be it diffusion models used for image generation, large language models, RVC voice models, and so on.
How To Import New Models In Automatic1111
To use your downloaded models with the Automatic1111 WebUI, you simply need to place them in the designated model folder: \sd.webui\webui\models\Stable-diffusion, restart the WebUI or refresh the model list using the small refresh button next to the model list on the top left of the UI, and load the model by clicking on its name.
Keep in mind that the model loading process can take quite some time, especially if you’re storing your models on an HDD drive. Expect anywhere from a dozen of seconds to (in some more extreme cases) a few minutes until the model fully loads.
LoRAs – What They Are & How To Use Them
The LoRA files are one of the most popular methods of “fine-tuning” the model output. Fine-tuning is simply steering the models output towards a certain outcome, often in a way that would not be possible using simple prompt manipulation.
There are multiple means of fine-tuning Stable Diffusion checkpoints such as utilizing textual inversion or hypernetworks, however using the aforementioned LoRA models is currently one of the most efficient way of introducing new elements to your creations that were previously unknown to the model, at a relatively low computational cost.
TL;DR: LoRA models are smaller model files that you can use to introduce certain new styles or objects into your generated images – primarily used for concepts that your chosen base model cannot really represent accurately.
Importing LoRAs in Automatic1111
After you download a LoRA you like, you can use it by dropping it in the designated LoRA folder: \sd.webui\webui\models\Lora and refreshing the model list inside the WebUI.
Once you’ve done that, you’ll be able to invoke the LoRA models in your prompts to make them affect your generations (you’ll learn how to do that once we get to the LoRA model section below).
Positive and Negative Prompts
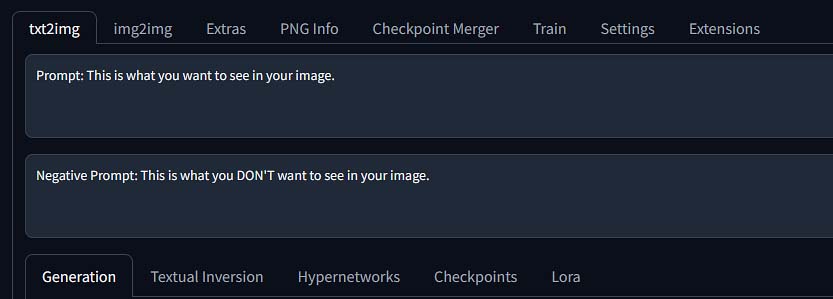
Positive Prompts
This part is going to be easy, as there’s a good chance you already know some of it.
In the positive prompt window you want to describe your desired image. Any sentence that contains the elements you want to see in your generation is fine here.
Prompts should be as descriptive as possible, and can consist both of natural language key phrases and keywords. The keyword prompting style is more popular with anime style generations and digital art styles, while natural language descriptions can be more effective for real-life scenes, but that’s not a rule set in stone. Feel free to try either one. Here are a few examples:
Natural language description prompt: A close-up portrait of a beautiful girl with blonde hair wearing dark sunglasses, blurry urban background.
Keyword-based prompt: One person, beach, summertime, harsh sunlight, side-view portrait.
The same rules apply to negative prompts. Be sure to experiment a lot, as there is no real “correct way” of composing your prompts. Whatever works with your chosen checkpoint, is the way to go!
Negative Prompts
Negative prompts work in the exact same way, but they are used to describe the things you don’t want to see in your image.
This is very important, as oftentimes you’ll find things that you haven’t included in your positive prompt showing up in your generations when you didn’t want them there. That’s where the negative prompts come in.
If you include the unwanted objects or concepts in your negative prompt in the form of a keyword list or describe them in a full sentence, you can decrease the chance of them showing up again.
The negative prompts can oftentimes be pretty abstract and still be highly effective. Short words, keywords and concepts such as “ugly”, “deformed”, “low quality”, “low resolution” or “jpg compression” used in the negative prompt window with most models can really up the quality of your generations.
Take a look at the negative prompts used in some of the most popular SD creations over on civit.ai and you’ll get exactly what works best here.
Prompt Weights
Each of the parts of your prompts (either positive or negative) can have different weights assigned to it. These “parts” can be both individual words/keywords, and whole phrases.
The more “weight” will be assigned to the part of your prompt, the more likely will the described element be to show up in your newly generated image.
In Automatic1111 there are a few ways you can assign weights to selected parts of your prompts. The most commonly used are:
- Adding brackets to make a certain word or phrase more prominent in the output. Here is an example: “A golden egg on ((plain white background))”. Each set of brackets you add will increase the weight of the encapsulated words by the factor of 1.1. Square brackets work in the exact same way, but they decrease the weight of the chosen words like so: “A girl in a bright red dress standing on a [[dark]] empty street”.
- Specifying a weight for a given phrase or word directly as a numerical value. Here is how it works: “A (marble:1.5) statue of an ancient Greek sportsman”. The attention given to the phrase in brackets will be multiplied by the specified factor.
This is how you can customize your prompts even further. Now buckle up, because we’re getting into even more interesting things!
Sampling Methods & Schedulers
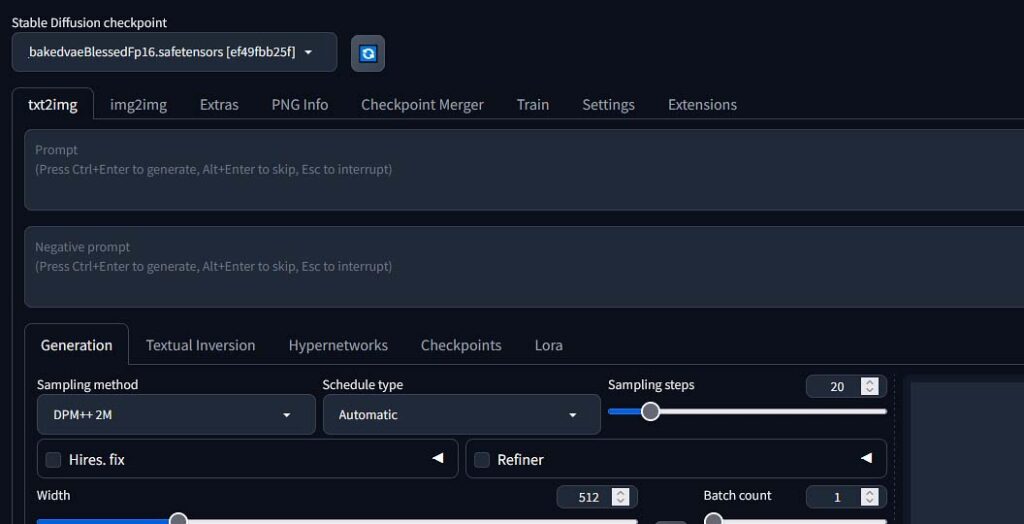
Samplers / Sampling Methods
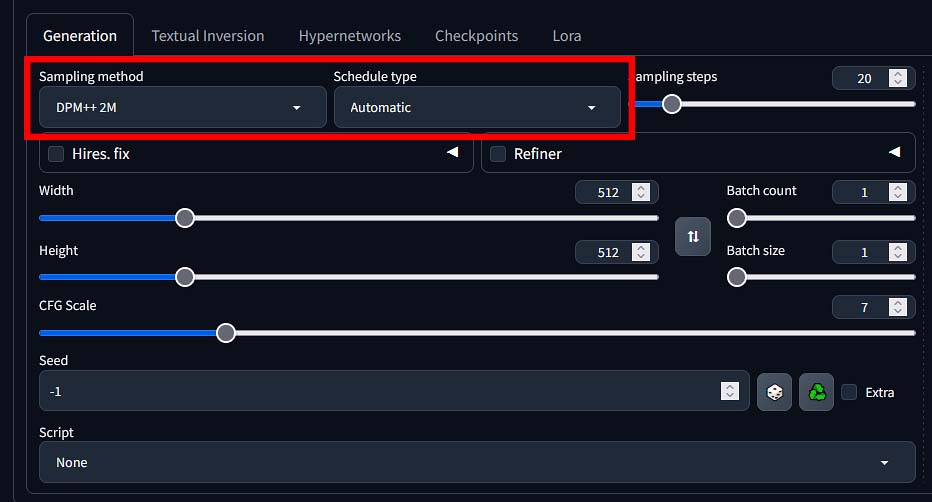
The next important part of the user interface are the sampling method, and the scheduler type selection drop-down menus. Here is what you need to know about these two.
With diffusion models used for image generation, after you press the “Generate” button in your chosen software, the image starts as random noise bitmap. The samplers or sampling methods are essentially different algorithms or mathematical methods of getting from pure noise to your desired image, using different types of calculations to achieve the same goal.
While using some samplers can give you vastly different results with the same starting prompt, same settings and image seed value, other two samplers you pick might converge in a very similar way giving you essentially pretty much the same output image (or rather very close to it).
Different samplers will also take different amounts of sampling steps to generate a quality image, and that is perhaps the most important takeaway here, as with some samplers you’ll be able to finish generating your images quicker than with others.
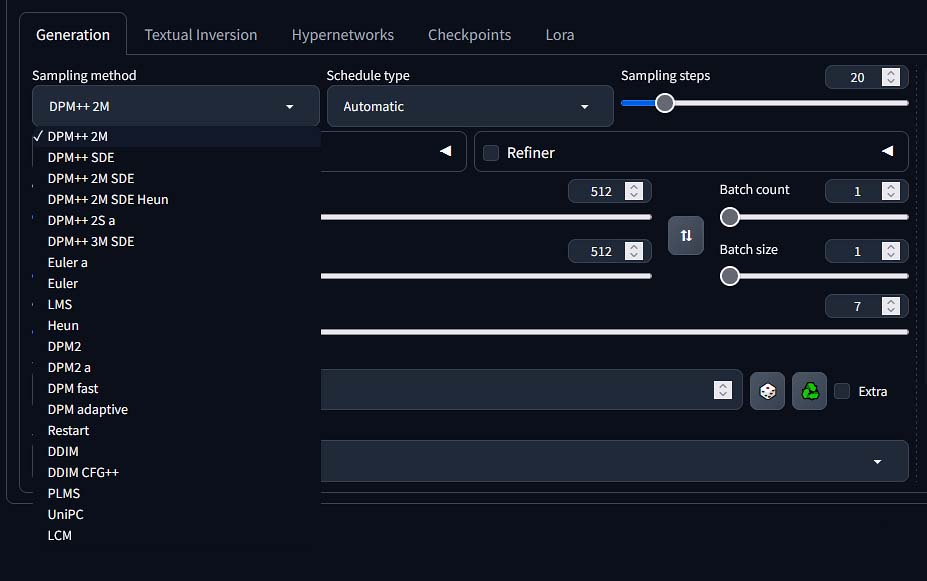
Start with the sampler selected by default in Automatic1111, and once you feel comfortable you can start experimenting with different ones. If you want to know much more about these, check out this article here going into much more detail.
Schedulers
Schedulers are the algorithms that control the image denoising process of the initial random noise bitmap which is the base for each of your new images.
After choosing your sampling method, there’s another related drop-down right next to it, which allows you to choose the scheduler. While samplers determine how the image is constructed from the noise, schedulers decide when and how much noise gets removed at each sampling step.
Each scheduler uses a different noise schedule and weighting logic during the image generation process. Some are better for shorter generations with fewer steps, while others perform better over longer runs.
In Automatic1111, the scheduler drop-down is usually pre-selected for you with each sampling method having a corresponding scheduler algorithm which fits it best, and in most cases, you can just leave it as-is.
There’s no single “best” scheduler. Some might work better with SD 1.5-based models, while others shine with SDXL. The best way to figure out what works best for your workflow is simply to try them out, especially in combination with your favorite samplers.
Hires. fix and Refiner Modules
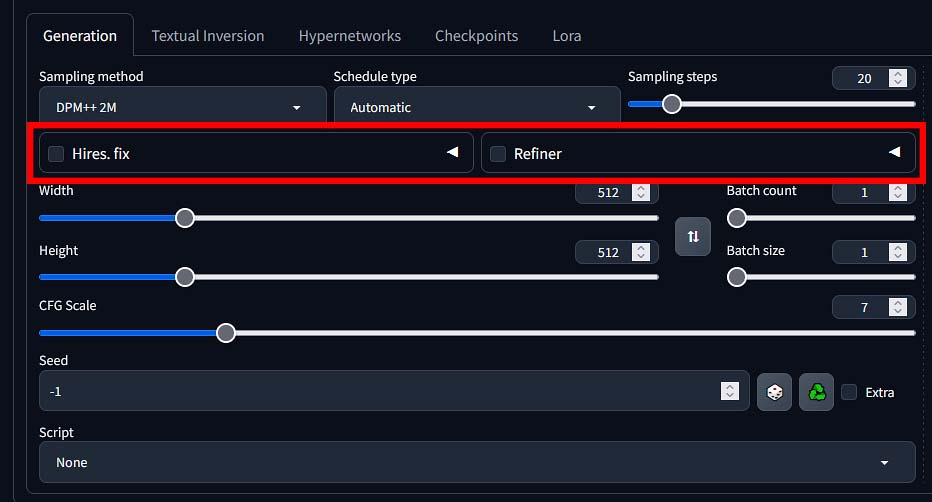
Another two elements visible right below the sampling method & scheduler type selection drop-downs are the “Hires. fix” and “Refiner” checkboxes, alongside with their respective advanced setting menus.
The first one, being short for “high resolution fix” is an option which enables you to generate larger outputs without inconsistencies, weird composition choices or other artifacts that have to do with the model not being able to correctly handle larger image resolutions in the image generation pipeline.
As you might now, diffusion models used for image generation are trained on fixed size images. For instance, the Stable Diffusion 1.5 and 2 models were trained solely on 512×512 px images, while the newer and higher quality Stable Diffusion XL (SDXL) models used 1024×1024 px images in their training set.
Images with the resolution closest to the original size of the model’s training set images tend to look the best and contain least amount of artifacts.
The Hires. fix module lets you generate larger images by dividing the generation process into a few different parts. This way you can get pretty interesting results without deformations or artifacts while generating images in higher resolutions without resorting to image upscaling post-generation.
The Refiner
Right next to the Hires. fix option, you’ll see the checkbox for the Refiner module, which is especially useful when working with SDXL-based models.
Here is how it works: The original SDXL image generation pipeline was designed with the base model handling the overall image composition, while the refiner model adding some extra detail and polish to the final image.
The Refiner module in Automatic1111 allows you automatically switch from the base SDXL model to the refiner model at one point during the image generation process to enhance the details in your image output.
When enabled, the WebUI will first use your chosen base SDXL model to generate the initial image, and then pass it over to the refiner model to clean up any rough areas, add fine details, and improve textures or lighting effects, depending on the prompt and the models used.
You can set the exact moment when the refiner model will take over in the refiner settings menu.
To use it, just make sure you’ve got a compatible SDXL refiner checkpoint in your models folder, enable the Refiner checkbox, select the refiner file, and set the switch percentage (usually something between 0.5 and 0.8 works best). That percentage tells the WebUI at what point in the denoising process it should switch from the base SDXL model to the refiner.
And to answer a very common question: no, you don’t need to use a refiner model at all, it’s fully optional. Not only that, but you can get pretty high quality results without using one. Just try it yourself.
Remember that as the refiner is another large model file that needs to be handled during the image generation process and the base SDXL models are reasonably large files already, if you don’t have enough VRAM on your GPU you might face slowdowns mid-generation, when your PC will have to swap the base and refiner models in your GPU video memory.
Image Width & Height, and Why It Matters
The larger your image, the more time it will take to generate, and the more GPU video memory (VRAM) it will use during the generation process.
On graphics cards with less than 8GB of VRAM you might sometimes struggle to generate larger resolution images and you’ll find yourself having to create smaller outputs and then using the upscaling module that we’re going to talk about in a bit (which you would typically do in most cases anyway).
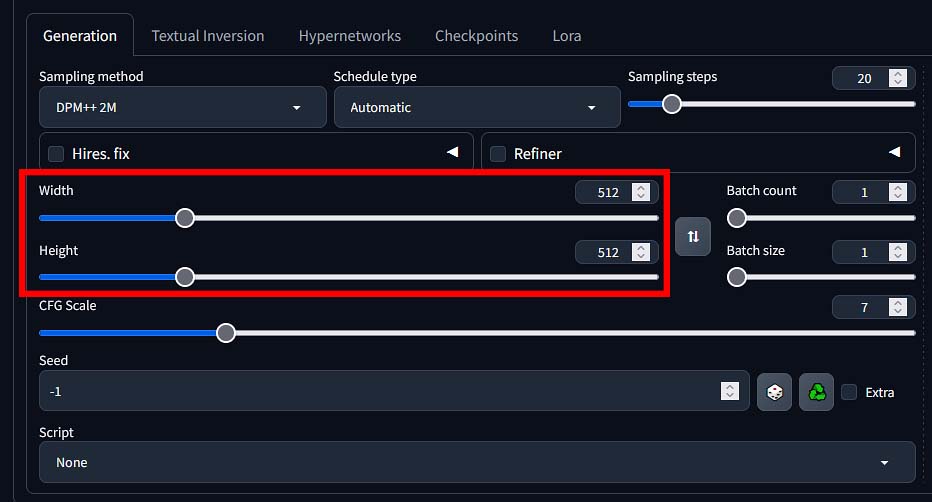
You can specify both the width and height of your generated image in pixels using the sliders and the value input windows and switch the numbers around.
Just remember: if you’re not using the high resolution fix module, you want to keep your image size close to the original model training image sizes (512×512 px for SD 1.5, and 1024×1024 for SDXL) for the best output quality.
Close sizes like 512×768 for SD 1.5, or other sizes which retain at least one original dimension of the training set images are also perfectly fine here and will grant you good results in most cases.
Batch Count vs. Batch Size
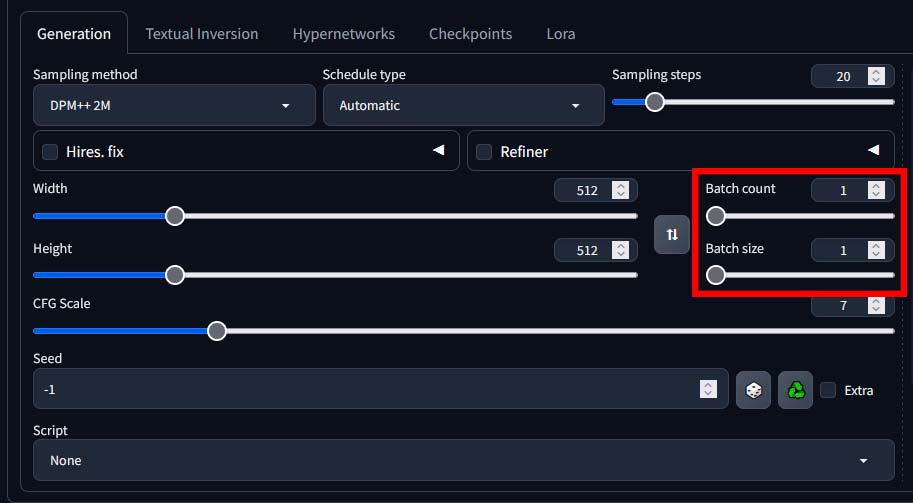
Batch size is the amount of images you want to generate in one go. Batch count is the amount of batches you want to generate after you click the “Generate” button.
So, if you use the batch size of 2, and the batch count of 4, you will generate 8 images in total – 4 batches, each one consisting of 2 images.
In general, generating more images in one batch will be faster than generating them separately. Still, remember – larger batch sizes will require more VRAM from your GPU. If you exceed the amount of image data that can fit within your graphics cards video memory, you will face out-of-memory errors, and you won’t be able to finish the image generation process successfully.
If you’re not trying to generate large amounts of images at one time, you will regulate the number of images you’re creating using the batch size parameter.
You can learn much more about these two settings here: Batch Size vs. Batch Count In Stable Diffusion – All You Need To Know
CFG Scale – Classifier-Free Guidance Scale Setting
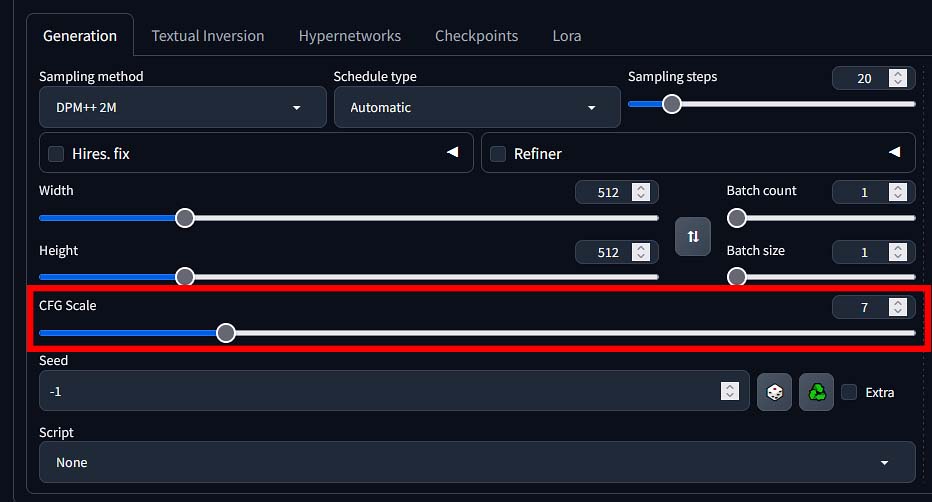
The CFG scale value regulates how much your newly generated image will adhere to your textual prompt. In practice, the higher the CFG scale value is set, the more detailed and vibrant your creations will be, and the more prominent the effect of your prompt will become.
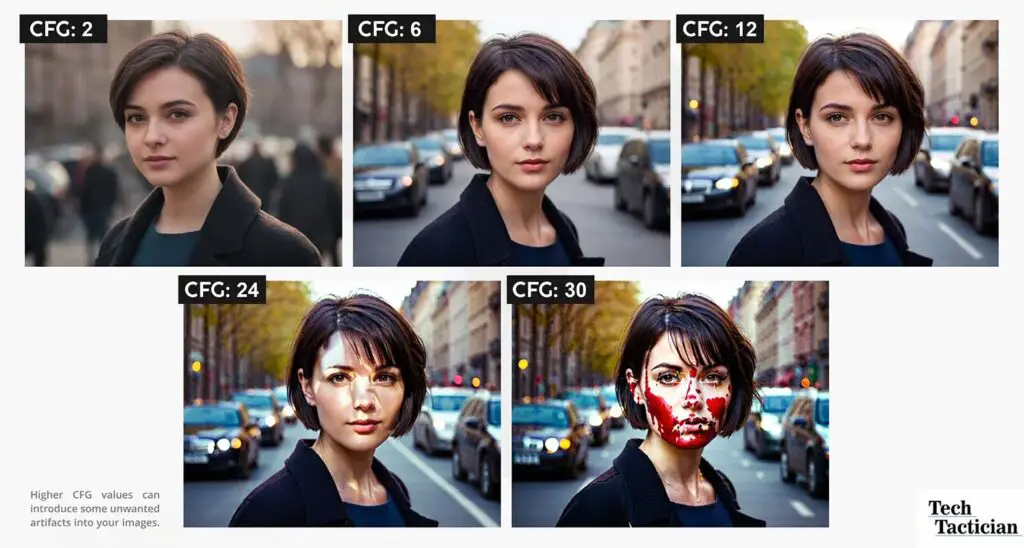
As you can see on the image above (taken from my full Stable Diffusion Fooocus WebUI guide here), in some contexts the effects of the higher CFG values can introduce unwanted artifacts into your images.
Once again, for your first few generations, it’s best to leave this setting as is. Then, you can experiment with different values, starting with ones close to the default one (7).
Random and Fixed Seed Values
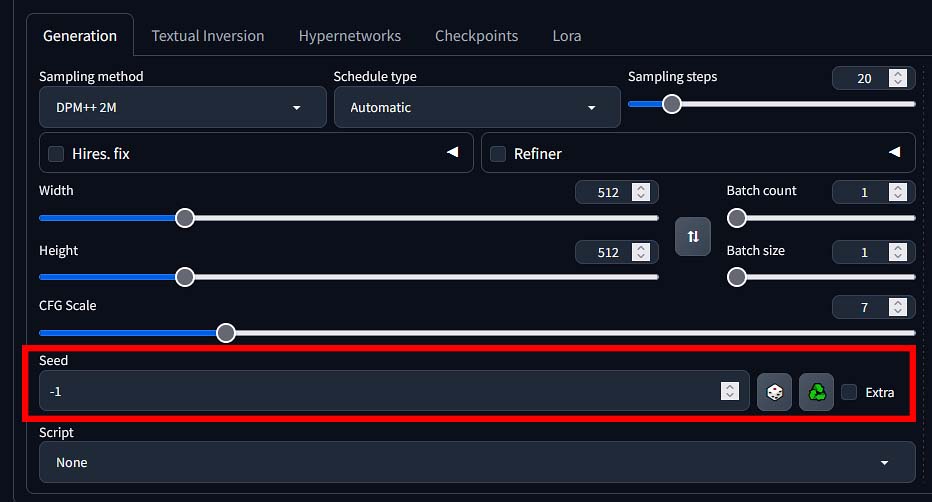
Image seed is a number used to initialize each image generation process. By default, the seed is set to “-1”, which in Automatic1111 means that it’s randomized every time the image generator starts.
Once you set a chosen static seed value and restart the image generation process with the very same prompt and the very same settings, you will get the exact same image every time. If you start the process with a randomized seed (which again, is the default setting), your output image will be different every time.
This is perfect if you want to experiment with some generation settings (such as the experiment with the CFG scale values I’ve shown you above), or you need to tweak some settings on your nearly perfect creation. This is where setting a static seed value really comes in handy.
Scripts – A Lot of Them Actually
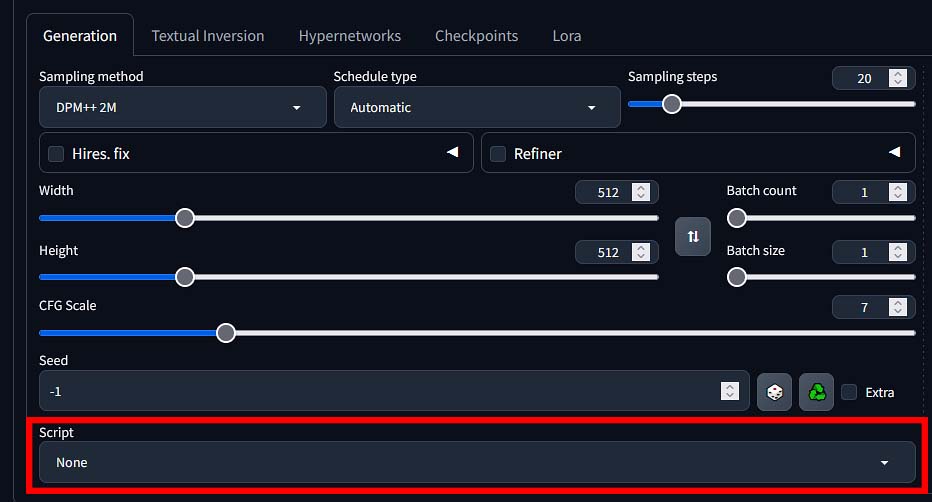
In the scripts menu you can choose from many different types of prepared presets which you can utilize to achieve many unique outputs.
Scripts in A1111 are essentially mini-plugins or pre-configured templates that let you automate or enhance parts of your workflow. Many of them come bundled with the WebUI by default, while others can be added later when you install extensions or additional Python scripts.
Here are a few of the most commonly used ones you can experiment with:
- X/Y Plot – lets you generate a grid of images by varying two parameters (for example, CFG scale vs. sampling steps). Very useful for testing how different values impact your output.
- Prompt Matrix – great for testing multiple prompts in a single generation session. It automatically mixes and matches your inputs and shows you how each variation looks.
- Img2Img Alternative Test – handy when working with image-to-image settings and needing more control over the variations. We’ll talk more about the img2img section later on.
- Prompts from File or Textbox – useful for batch generating images from a list of prompts. Great if you want to create a bunch of images in one go without typing everything manually.
If you’re just starting out, you probably won’t need most of these right away. But once you start diving deeper into batch generation, parameter tuning or testing different prompt variations, this section can be really useful.
Fine-Tuning, and What You Can Do With It
Fine-tuning in Stable Diffusion refers to various techniques you can use to guide and modify the output of your images beyond just changing your prompts.
While you can “train”, or more accurately, fine-tune selected Stable Diffusion checkpoints or models by further training them on your own image datasets, this process is computationally expensive, fairly complex, and requires both capable hardware and significant time spent adjusting the settings to achieve your desired results.
Here is where all of the other Stable Diffusion fine-tuning methods come in, with the use of LoRA models that we’ve already mentioned being the most popular and commonly used one – for a good reason.
LoRA Models – And How To Use Them

LoRA models, as we’ve already established are relatively small files, which can help you introduce brand new concepts and characters to your generations – including elements that weren’t present in the original Stable Diffusion training set at all. We’re going to get into some more detail here.
Practical uses of LoRA models include introducing chosen characters or image styles into your generated images, getting your own face on the photos you create, or simply creating images in a certain style which would otherwise be hard to consistently reproduce using prompting alone.
LoRAs are not only reasonably sized in comparison to the regular Stable Diffusion model files and extremely easy to use, but also very effective. Not only that, but you can train your very own ones, even on GPUs with 8GB of VRAM (as shown in my tutorial for training SD LoRAs on an RTX 2070 Super).
Check out also: How To Train Own Stable Diffusion LoRA Models – Full Tutorial
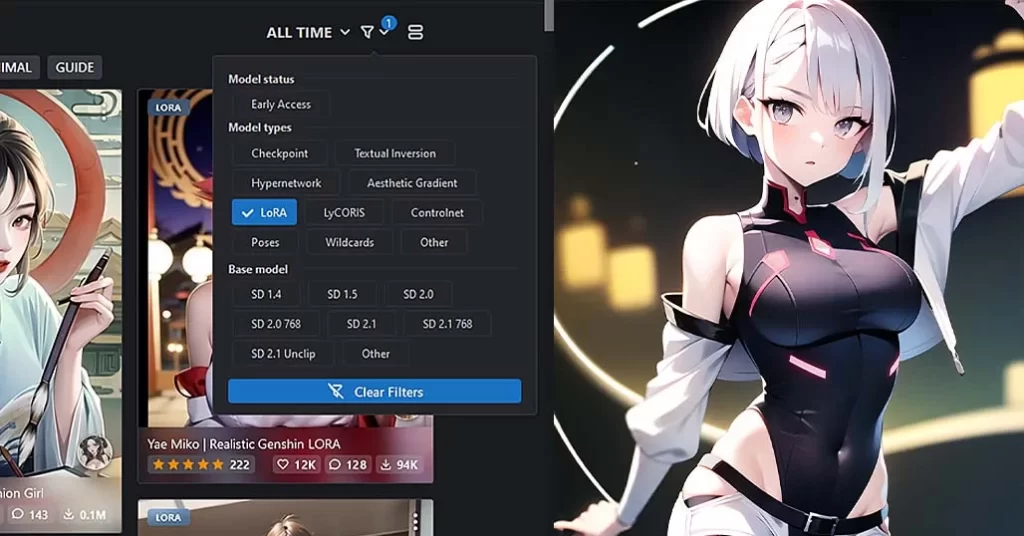
You can download various different style LoRAs for instance from Civit.ai or HuggingFace. To apply your selected LoRA models to your generations in A1111 you can simply move your LoRA model file into the LoRA model folder in the main software directory, refresh the WebUI interface or restart the program.
To make the LoRA actually affect your newly generated image you need to trigger it in your positive prompt like this: <loramodelname:1.1>, where “1.1” is an example weight of the applied style and loramodelname is the name of your selected LoRA. Weights between 0.7 and 1.2 tend to work best with most LoRA models.
If you don’t want to type the LoRA trigger prompts by hand, you can simply go into the LoRA menu shown on the image above, and click on your chosen model.
Important note: Many LoRA models have so-called “trigger words” which are used to introduce certain elements of the concept which the particular LoRA was meant to represent. You can usually find these on the pages you download your LoRAs from. Some style-introducing LoRA models will work without the trigger phrases invoked, but most will need them to be present in your positive prompts as keywords to work correctly.
If you’d like to learn much more about using LoRA models in your generations, I have a whole article about that here: How to Use LoRA Models with Stable Diffusion WebUI – Quick Tutorial
Other methods of fine-tuning such as using textual inversion or hypernetworks are still viable, but much less commonly used nowadays. They are triggered in your positive prompts in a very similar way to LoRA models.
You can download both LoRA models and text. inversion and hypernetwork files both from civit.ai and from huggingface. There is a lot of content to experiment with there!
You can also take a look at: Using Hypernetworks Tutorial Stable Diffusion WebUI – How To
Img2Img Section – How it Works & How To Use It
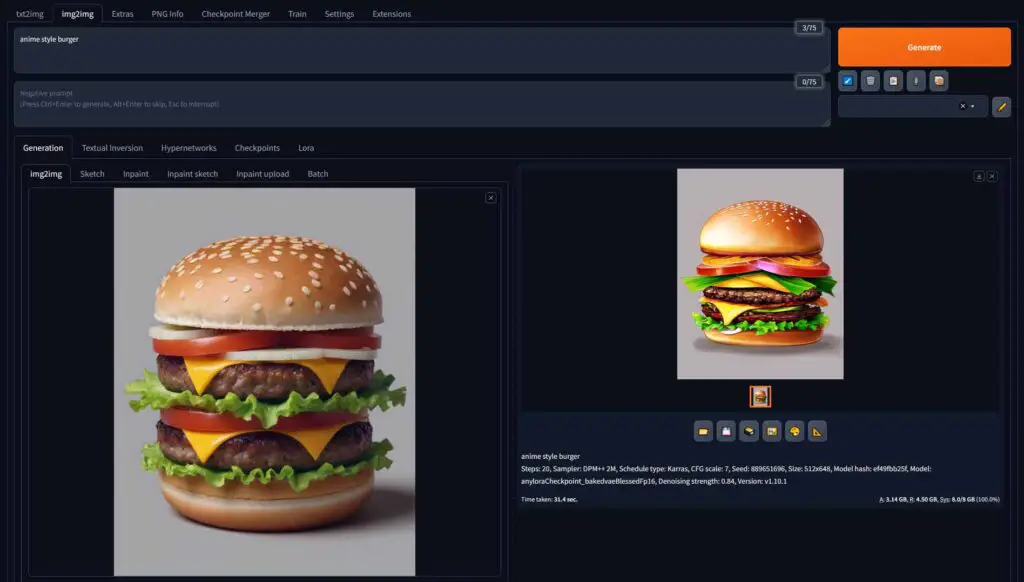
The img2img (image-to-image) module works like this: you upload your custom image to the WebUI, and then use a selected Stable Diffusion checkpoint to modify it in various ways.
With img2img you can do inpainting (edit in various new elements into your image), outpainting (expand the area of your image), or transform your sketches into images and edit your photos using AI, as well as create brand new images based on the contents of the imported material.
The settings in the img2img section are almost exactly the same as in the main image generation section, aside from the denoising strength slider which tells the WebUI how much to adhere to the original input image structure when creating a new image, and optional masking settings which let you paint over your imported image so that the generation affects only the selected parts.
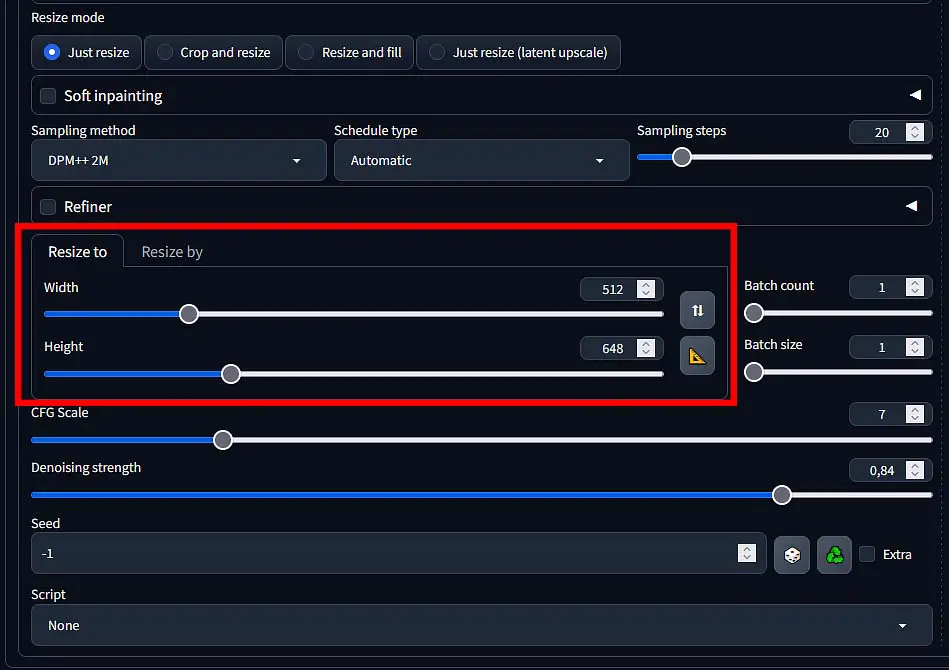
The image size setting it pretty important here. Ideally, your new image size should match the input aspect ratio, but you can also experiment with different configurations. Once you start dragging the size sliders with an image already imported, you will see red border moving on the source image, indicating how much of the input content material will be used/referenced in your image output.
The lower the denoising strength value is, the less the image generation process will change in the input image. When it’s set to 0, nothing will change and only the original image will be returned. If it’s set to 1, the program will generate a new image without taking the input into account.
Most commonly used denoising strength values are either 0.50 – which retains most of the original image structure while letting the model change minor structural details, 0.64-0.75 – which is great for major image edits, and 0.90-0.95 – which in most cases will let you create a new image loosely inspired by the input material (mostly when it comes to its main contents and color scheme).
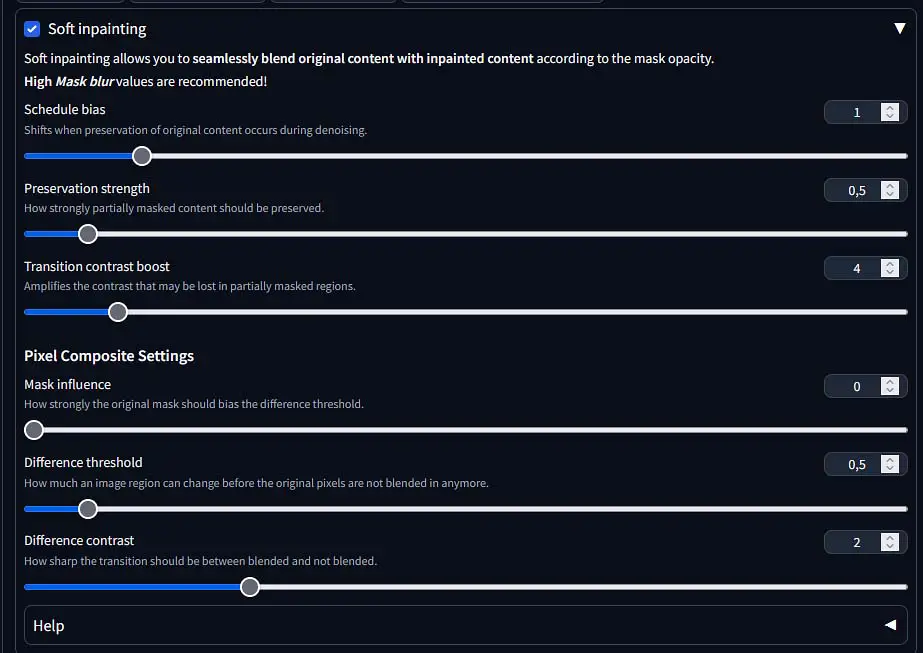
In the image inpainting menu you can also enable the advanced “Soft inpainting” mode which allows you to modify the masking settings to smooth out the borders between your newly generated image elements and the original image content.
All of the mentioned settings and their use could easily be a topic on an entirely different article. If you need more information about them, they are described with appropriate labels in the software interface (as shown on the image above), as well as accompanied by an explainer which you can access in a drop-down menu inside the soft inpainting section.
The Extras Tab and the Upscaling Module
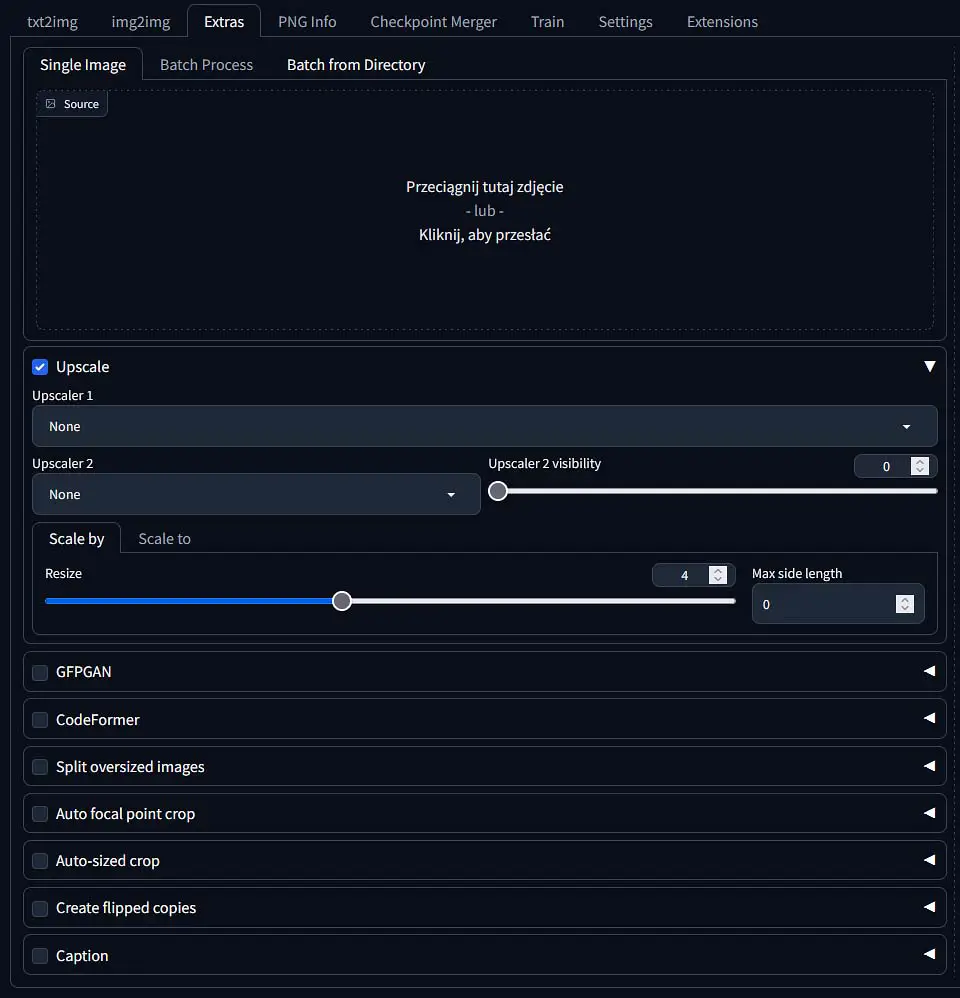
In the “Extras” tab, you gain access to a few interesting tools, the most useful of them being the image upscaler, which lets you enlarge your image creations by upping their resolution while simultaneously adding more details to them. This is the setting we’re going to talk about here.
This module doesn’t work without a chosen upscaler model downloaded and put into the upscalers folder in the main Stable Diffusion software directory. You can find many different upscaling models for SD online, but one of the better places to search for them is the Open Model Database which features a large amount of models alongside with their usage examples.
The upscaler module is extremely easy to use. Just import the image you want to enlarge or enhance, select the upscaling model and the resize factor. To avoid out of memory errors, start with smaller resize values such as 2 or 3.
You can modify a few different settings here:
- Upscaler 1 – The first, main upscaling model that will be used every time you use the upscaler module.
- Upscaler 2 – The secondary, optional model which will come into effect after an additional upscaler is selected in this second field, and the upscaler 2 visibility value is set.
- Upscaler 2 visibility – The higher you set this value, the more prominent will the effect of the second upscaler be on the output image. The effects of the upscaler 1 and 2 should blend together in the output.
- Scale by (resize) – The factor by which you want to enlarge the base image (ex. an original 512×512 px image enlarge by the factor of 2, will output a 1024×1024 px image, and so on).
- Scale to (resize) – Here you can set the specific dimensions of your output upscale image, rather than just a size change factor.
- Max side length – The maximum image side length in pixels.
Different upscaling models will grant you vastly different results on the same input material. Some upscaler models are meant to work well with realistic images, while others are made to be used with anime/cartoon style input only. Make sure to try a few different ones before selecting the best one for your needs.
Upscaling your images is even easier with the Fooocus WebUI. Check out how it works here! – Upscaling, Outpainting & Image Prompts – Fooocus WebUI Guide [Part 3]
PNG Info Tab for Image Prompt & Settings Retrieval
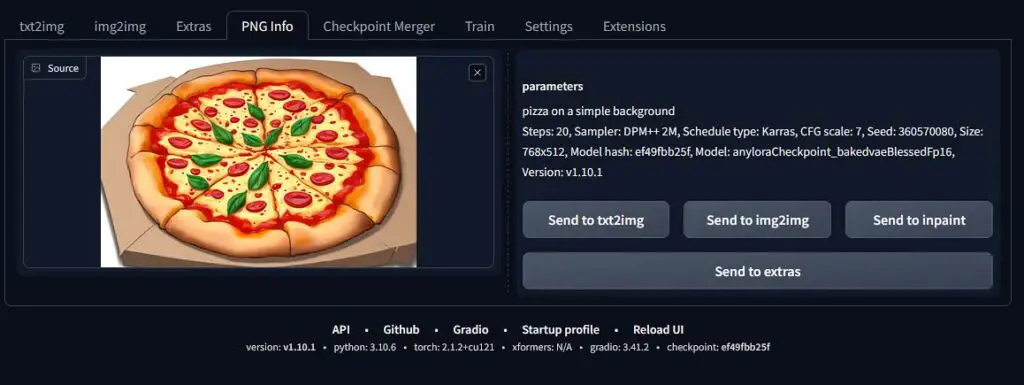
This one is very useful. The “PNG info” tab lets you import an image that was generated with the Automatic1111 WebUI, and see exactly what kind of prompt, model and settings were used to create it.
This will work only given that your imported image was not stripped of its metadata (for instance when getting sent through some online messaging apps). When the appropriate metadata is there though, it can work even for various A1111-generated images downloaded off the internet.
The model file name will be obscured in the PNG info tab output under the “Model hash” value. If you want to know which exact model was used to generate your imported image, it’s best to copy this value over to a search engine like Google, and find out which model does the hash correspond to.
Note: If you don’t want other people to know either your generation settings or your prompts, make sure that you use a third party tool like this one to strip the image from all of its metadata before sharing it online.
What’s Next? – There Is a Lot of Software Like This!
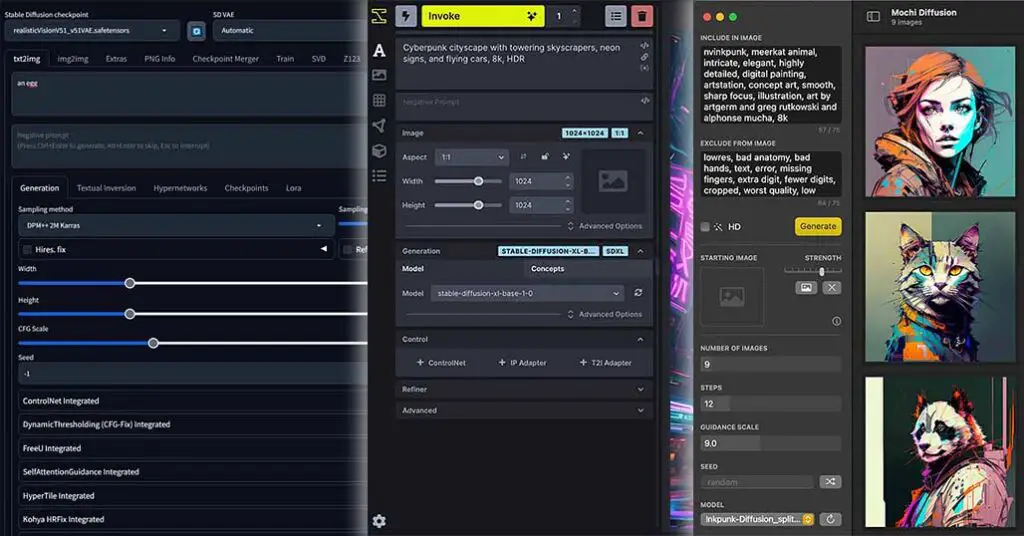
If you have seen my definitive list of local Stable Diffusion client software, you know that there are actually many different WebUI’s you can use, many of them being much more straightforward than Automatic1111, and many of them giving you a lot more customization options.
If you want something easier to set up and use but still giving you awesome results with both base SD and SDXL models, you might want to look into the Fooocus WebUI – I have a full free 3-part guide for it available here.
If on the other hand you need access to even more setting tweaks, a node-based user interface with easily reproducible workflows and a real powerhouse when it comes to local image generation with Stable Diffusion, you should definitely check out the ComfyUI. It’s a project that is one of the most polished and regularly updated ones from all of the available ones, and you can learn more about it on their official website here.
That’s pretty much it when it comes to the Automatic1111 WebUI and all of its basic settings. Hope that this guide was helpful to you and see you another time!
Check out also: Top 11 Stable Diffusion WebUIs – Fooocus, Automatic1111, ComfyUI & More!