
We’ll quickly show you how to install the VB-Audio VAC software on your Windows 10/11 PC and use it with Discord, OBS, FL Studio and more! The installation and initial routing setup process is really simple and blazing fast so let’s get straight into the instructions!
How Do Virtual Audio Cables Work?
Virtual audio cables are used for providing you with virtualized connections sending sound between two or more pieces of software. So what does this really mean?
Basically, if you want to route audio from one program/app to another, you will need to somehow set up a virtual connection between the two. In real life, you would do this using actual physical audio cables (for example when connecting a guitar to a guitar amp). In the digital world however, these connections are purely digital, so in other words – virtual.
The virtual audio cable software works by creating a virtualized logical connection between two apps (think of it as an audio cable connecting two programs), which you can utilize to send audio from one app to another.
The virtualized audio cable once created is visible in your system as a pair of input and output audio devices. In Windows these are categorized as Playback/Recording sound devices.
VB-Audio Cable Use Example
A good example of how this works in practice is when you have two apps you want to connect, say a voice changer app, and an VoIP application such as Discord. If you want to route your voice through the voice changing software into Discord, and you have a virtual audio cable software already installed, you have to do two simple things.
First, in the voice changer app set the audio input as your physical microphone device you’re speaking into. Then, in the very same app, set the audio output as the input of the virtual audio cable.
The next thing you need to do is to start up your chosen VoIP app like Discord, and set the output of the virtual audio cable as your microphone input. All done! The audio should now be routed like this: Voice Changer -> Virtual Audio Cable -> Discord.
We’ve underlined the “beginning” and the “end” of our virtual audio cable which now simply connects the two apps together. Once you’ve finished the setup, the sound is being routed in real time and you’re all set!
Let’s now see how exactly to install and use the VB-Audio Virtual Audio Cable. You can do this in even less than 5 minutes!
Things You Need First
Before we begin, there are just two things that you need to do first. For the installation process you’ll have to prepare the following:
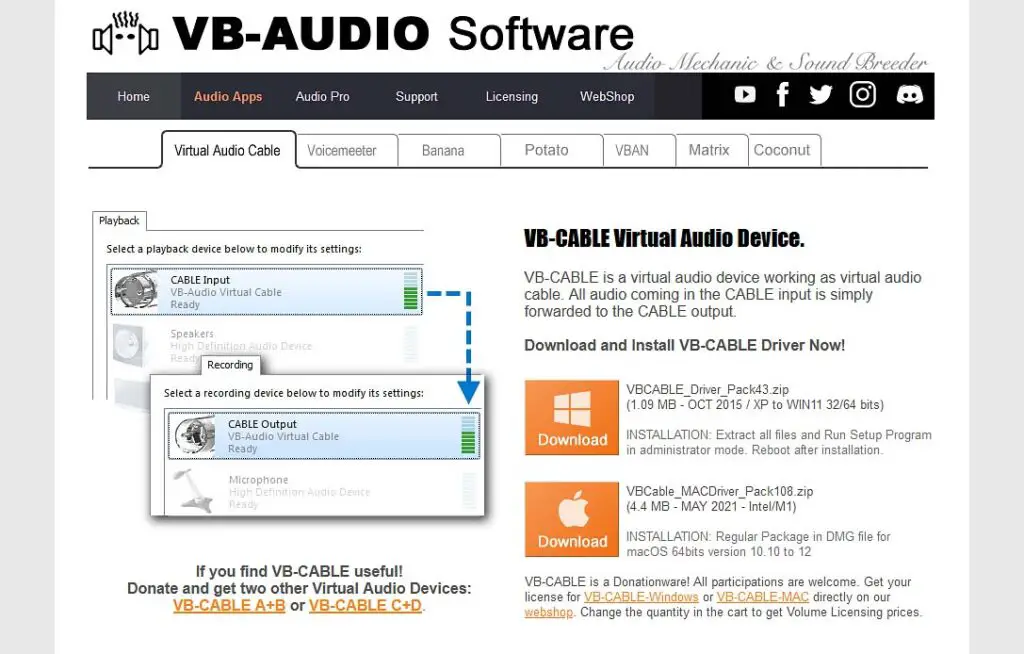
- The freeware Virtual Audio Cable app by VB-Audio.
- A Windows PC.
The Virtual Audio Cable software supports both Windows and Mac OS (this guide however deals only with the Windows installation process).
How to setup VB cable? – The Installation Process
The installation process is extremely simple, and here are the exact steps (which are mentioned on the official website too by the way):
- Step 1: Download the software package for Windows from the official site here. It will be packaged in a .zip archive.
- Step 2: Unpack the .zip file and run the setup file as an Administrator to install the software.
- Step 3: Restart your PC. The Virtual Audio Cable should now be visible in your Windows system audio devices manager (Settings -> System -> Sound).
To verify whether or not the virtual audio cable is correctly installed on your computer, check if it shows up as an audio device in your system settings. If it doesn’t, you need to reboot your PC.

Note: On Windows 11, you will also be able to see the cable input and output in the “System -> Sound” menu, albeit the interface will look a little bit different.
How Can I Hear The Audio From My VB Cable?
If you want to hear the audio that’s coming from the end of the virtual audio cable to test if it’s working correctly, you have to do the following:
- First: Set the Virtual Audio Cable Input device as an audio output in your chosen software that is able to send out sound data.
- Second: Set the Virtual Audio Cable Output device as an audio input in an audio recording software of your choice (we recommend Audacity, as it’s available for free).
- Last: Make sure that the sound is coming from the first app, and record it in the second one. If the audio is coming through, it should be audible on the recording.
Once the sound is produced in the first app, the second one should be able to receive it. After recording the sound output you’ll be able to verify that your connection is working properly and the virtual audio cable is setup in a correct way.
VB-Cable With Discord
Using the VB-audio cable software with Discord is rather simple. To do this you just have to set the virtual audio cable output as your Discord audio input.
Here is how to do this. First, go to the software which will be the source of your audio. This can be any kind of voice changing software (such as Okada RVC Live Voice Changer), or any other audio filter that your want to put in between your microphone input and Discord. Set the virtual audio cable input device as the output of the audio source that you want to be heard through Discord.
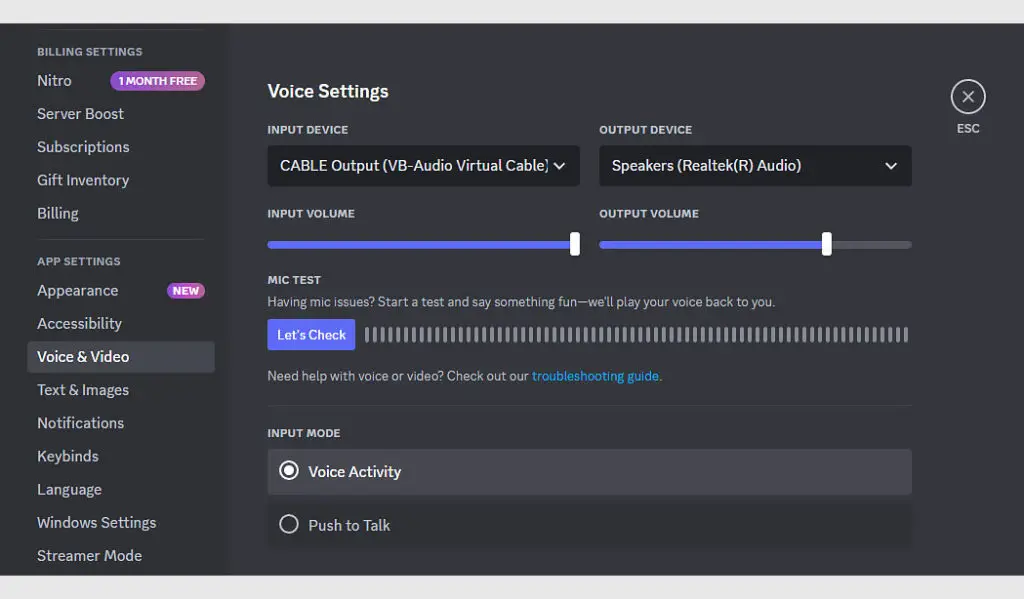
Then, go into Discord and set the virtual audio cable output device as your Discord audio input device. So, simply pick the VB-audio cable out device and replace your default audio input such as your microphone with it. On the image above you can see where you can find the audio settings in the Discord app.
Once your audio source app is connected with Discord and the audio is coming through you’re all done!
Integration With Different Software

Using an virtual audio cable you can route audio into any chosen software or app that accepts audio input such as Microsoft Teams, Skype, Zoom, OBS and more!
It all comes down to setting the virtual cable’s input as the audio output in the first audio source app, and then setting the virtual cable’s output as the audio input in the app you want the sound to be routed to. It’s this simple.
Above is an example of the virtual audio cable output set as a microphone input in OBS software.
What If You Need More Connections?
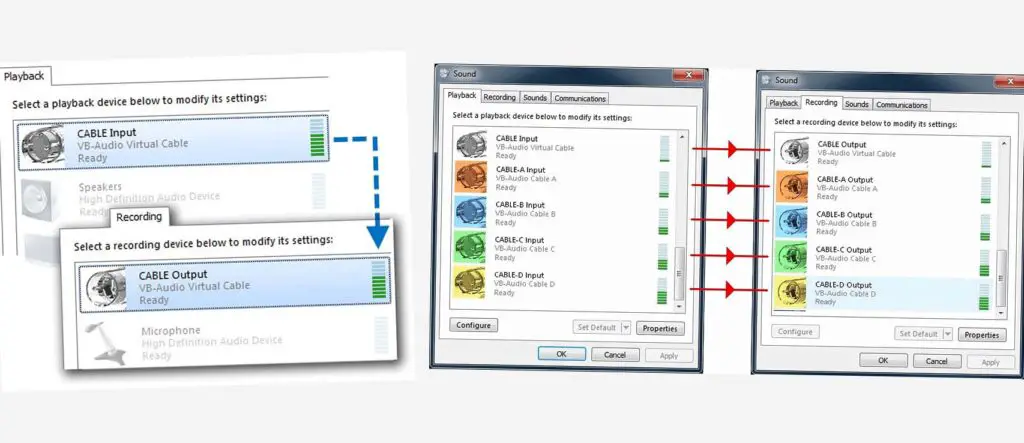
If you’re in need of more than one virtual audio cable connection, then you’ll have to upgrade the VB-Audio VAC software. The good thing is that adding more audio connections in your system works on the exact same principle as adding the very first one.
Another thing however, is that at least with the VB-Audio VAC app, you need to pay for the software if you need more than one connection (only one virtual connection is available for free).
If you want to support the developer you can purchase the “Audio Cable A+B” and/or “Audio Cable C+D” for up to 3 virtualized audio connections including the free version of the app. It’s distributed as donationware, so you can choose your own price!
You might also like: How To Use Okada Live Voice Changer Client RVC With Discord – Quick Tutorial