
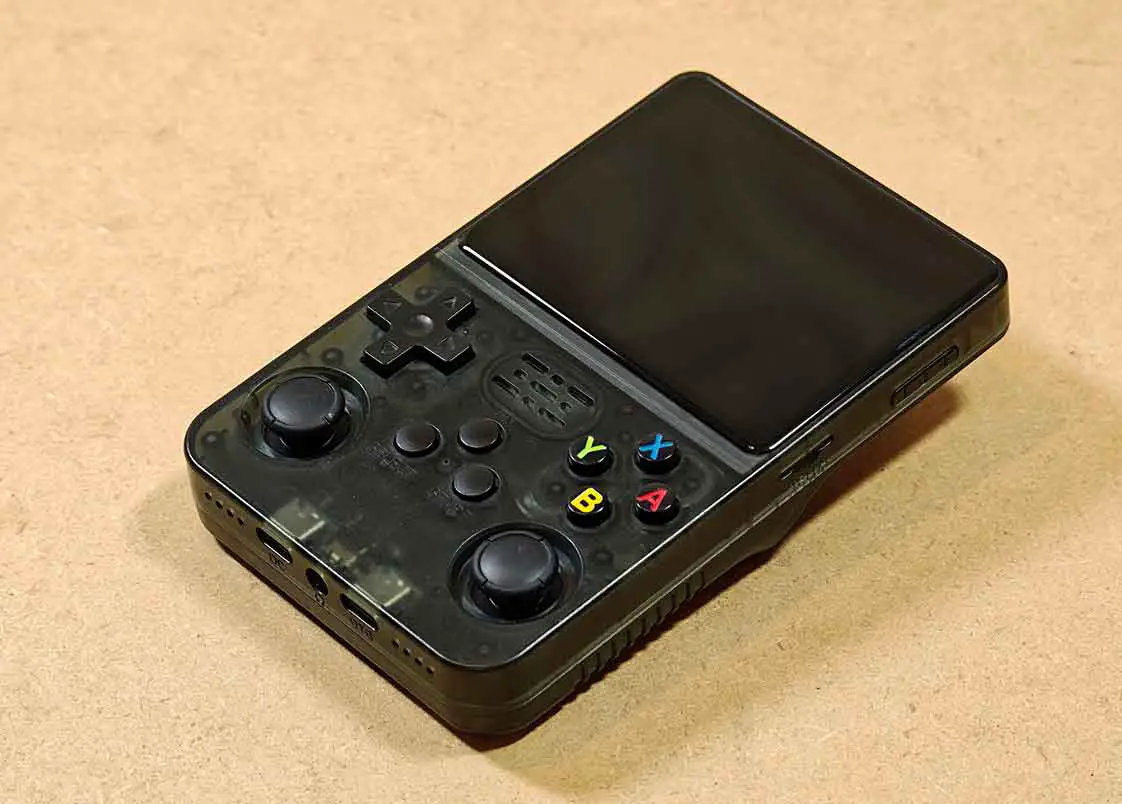
This R36S setup guide will walk you through the most important first steps with the handheld. It goes over checking whether your device is genuine or a clone, backing up and replacing the stock microSD cards, choosing the right firmware path, setting up dArkOSRE (updating/flashing the OS), fixing common charging and EASYROMS partition issues, and getting the handheld ready for use with a few neat tricks along the way. Let’s get to it!
If you haven’t decided on getting yourself a brand new R36S yet, and you’ve still somehow made it here, you can check out my full review of this device here: R36S Handheld Game Console Hands-On Review
Important updates:
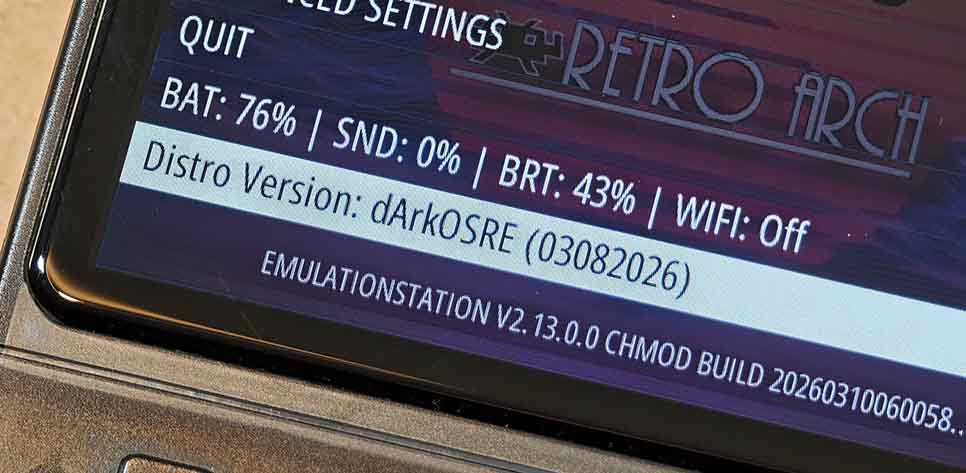
– March 25, 2026 – The ArkOS-R3XS project, which used to be the main go-to custom firmware for the R36S has been archived on March 24, 2026, and is no longer being maintained. The official ArkOS wiki now points readers to dArkOS as the successor project, and the archived R3XS repository points R36S users toward dArkOSRE-R36 and ArkOS4Clone for current development. This guide is based around the currently recommended dArkOSRE build for the R36S.
This website is reader-supported and is a part of the AliExpress Partner Program, Amazon Services LLC Associates Program and the eBay Partner Network. When you buy using links on our site, we may earn an affiliate commission.
Do These 4 Things First
- Check if your unit is genuine or a clone – the R36S is notorious for coming in multiple hardware versions, and even a handheld clearly labeled R36S can still be a clone. That does not automatically mean it is worse, but it does mean you need to be more careful with things like firmware, updates, and compatibility. There are also several devices based on the original R36S, such as the R36S Plus and R36 Max.
- Use it stock for a few minutes before you do anything else – boot it, test the buttons, test sound, check both SD slots, launch a game, and shut it down properly. If something is already wrong, you want to know before you start changing software.
- Charge the handheld through the USB-C port labeled DC – while the console should be shipped to you charged to about 50-60%, you are going to want a full charge for the software update that we’re going to do in a short while.
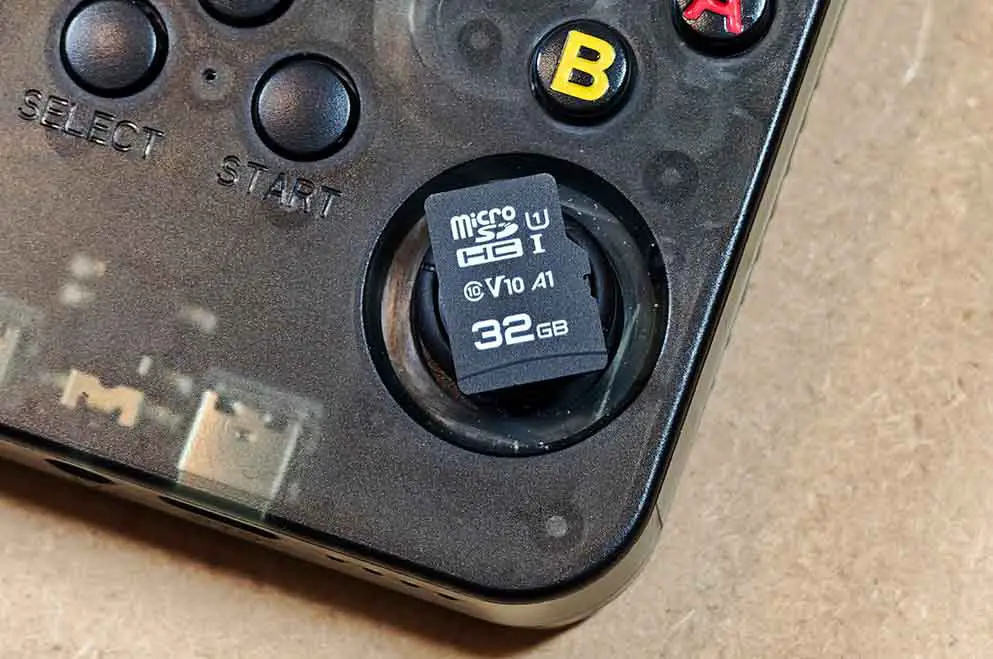
- Backup and replace the stock microSD card with one from a trusted brand – this is one of the most common points of failure on these devices, as they tend to ship with the absolute cheapest and worst quality microSD cards, purely because of cost cutting.
We’ll quickly go through all of these below, step-by-step.
How to Check if Your R36S Is Genuine or a Clone
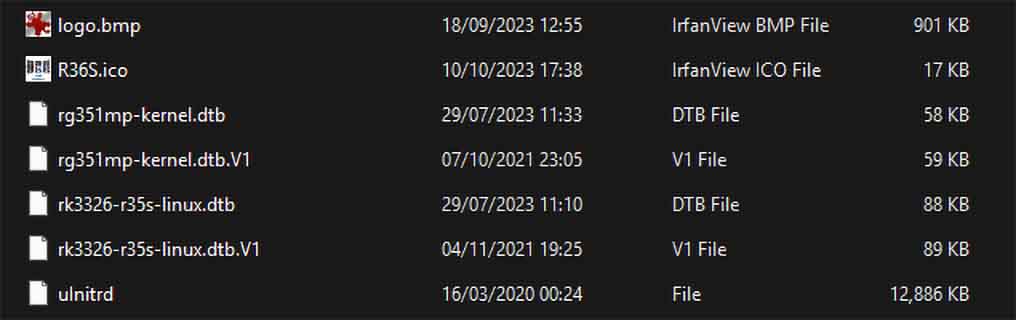
The quickest check is the DTB file on the BOOT partition of the OS card. Put the TF1 card containing the OS files into your computer and look at the files and partitions. If you see files called specifically rk3326-evb-lp3-v12-linux.dtb, rf3536k4ka.dtb, or rf3536k3ka.dtb on the card, or if there are no .dtb files in there at all, that is a strong sign you have an EmuELEC clone, not a standard R36S (still perfectly serviceable, just with more limited firmware support). Keep in mind that there also exist clones that have no custom firmware support.
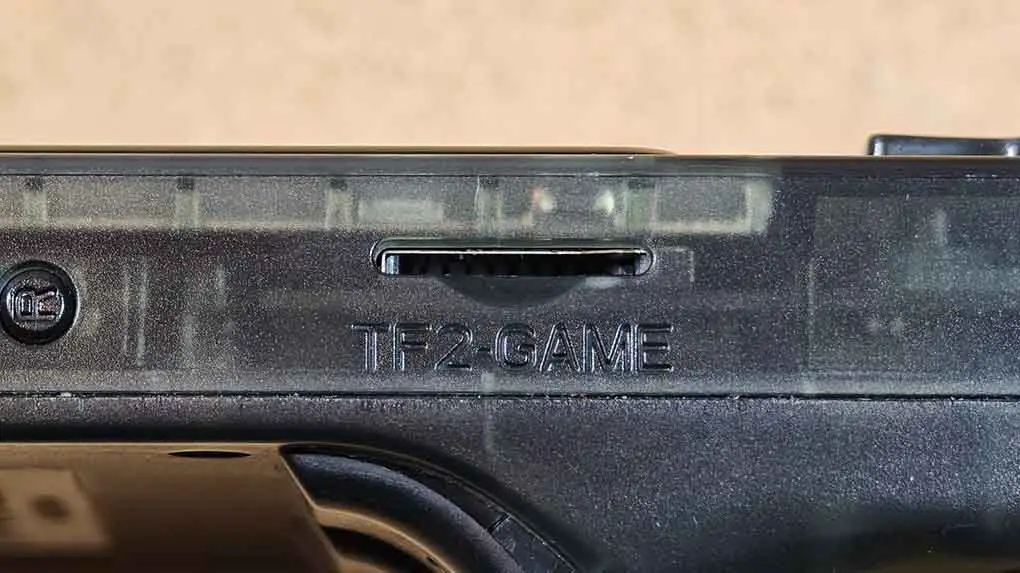
Another easy clue is the ROM (game) partition name. An original R36S setup usually gives you one labeled EASYROMS. Some clones will show EMUELEC or EEROMS instead. Other common clone signs are a missing “ArkOS 2.0…” boot message, no Wi-Fi option, or the handheld trying to boot even without an SD card inserted.
There are many such signs, a full list of which you can find over on handhelds.wiki, and they are different for each of the clones that we know of at this time. If you want to be absolutely sure that your device is not a clone, definitely give the list linked above a quick read.
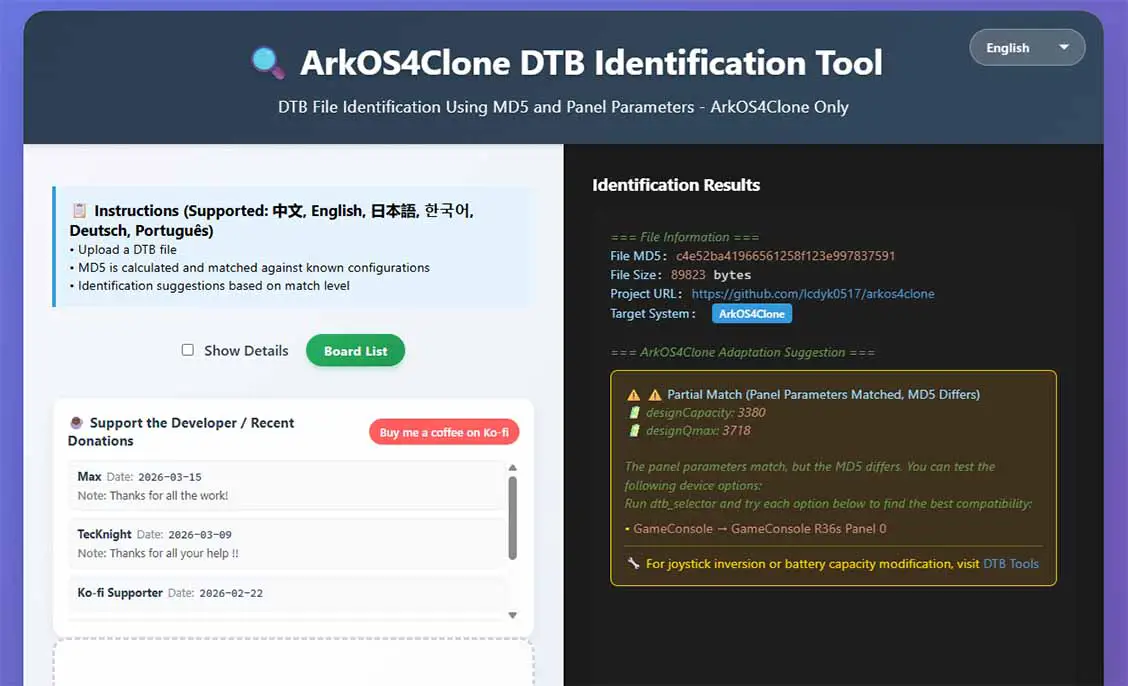
Two extremely useful tools that can come in handy when identifying R36S clones (and as you will learn below, their display panel types) are the ArkOS4Clone DTB Identification Tool, and the older Which Screen Do I Have?. Simply upload your .dtb files to either of these, and take note of the results.
What are the real downsides of owning an R36S clone? Well, it depends on the clone itself, as there are a lot of them out there. While some clones differ mostly when it comes to compatible software, there are also some that come with less capable hardware, like the RK3128 or Allwinner A33 chipset instead of the RK3326, or 512MB of RAM instead of 1GB.
The real problem is model-specific compatibility. Some clones still use different chipsets, panels, audio paths, controls, storage layouts, or DTB files, which means you cannot safely assume that every R36S-shaped handheld takes the same firmware image.
The good news is that active projects now support many clones as well as genuine units, but support is still board-by-board and panel-by-panel. dArkOSRE-R36 is maintained for a large selection of R36S devices and clones, while ArkOS4Clone continues adding support for unofficial devices and uses a DTB analysis/selection workflow for that reason. If your exact board or DTB is not listed, do not guess.
Do not rely on the shell, product name, or back label alone. A handheld sold as “R36S” may still be a clone or a different board revision entirely. The safer way to think about these devices is: first identify whether you have a genuine-style R36S or a clone, then identify the specific board/panel/DTB before you choose firmware. The old one-image-fits-all assumption is exactly what causes most boot, sound, and control problems.
One of the recommended AliExpress stores that has good reputation when it comes to selling genuine R36S handhelds is the BOYHOM store.
Different Display Panel Versions
Not every genuine R36S uses the exact same display panel. This will mainly matter to you when you reflash ArkOS. Choosing the wrong panel version when configuring your ArkOS install can result in the console not displaying anything but a black screen after a fresh install.
The recommended dArkOS-based build for supported R36S devices and clones, the dArkOSRE-R36, is prepared in such a way that after flashing the OS image to your microSD card, you’ll have to select the device/clone version that you have. This is why before doing anything with your handheld’s firmware, you should check the .dtb file on the main BOOT partition. This file will point you towards the R36S version you actually have on hand.
Take out the OS microSD card from your R36S and connect it to your PC using a card reader. Open the BOOT partition in your file explorer and locate the file with the .dtb extension. As mentioned earlier, use the DTB Identification Tools linked above to confirm your panel type before flashing. These will help you figure out whether or not your device is likely a clone, and let you correctly identify what kind of display panel you have, preventing you from guessing when updating or flashing ArkOS on your new microSD card.
Replace the Stock SD Cards and Back Up the Originals
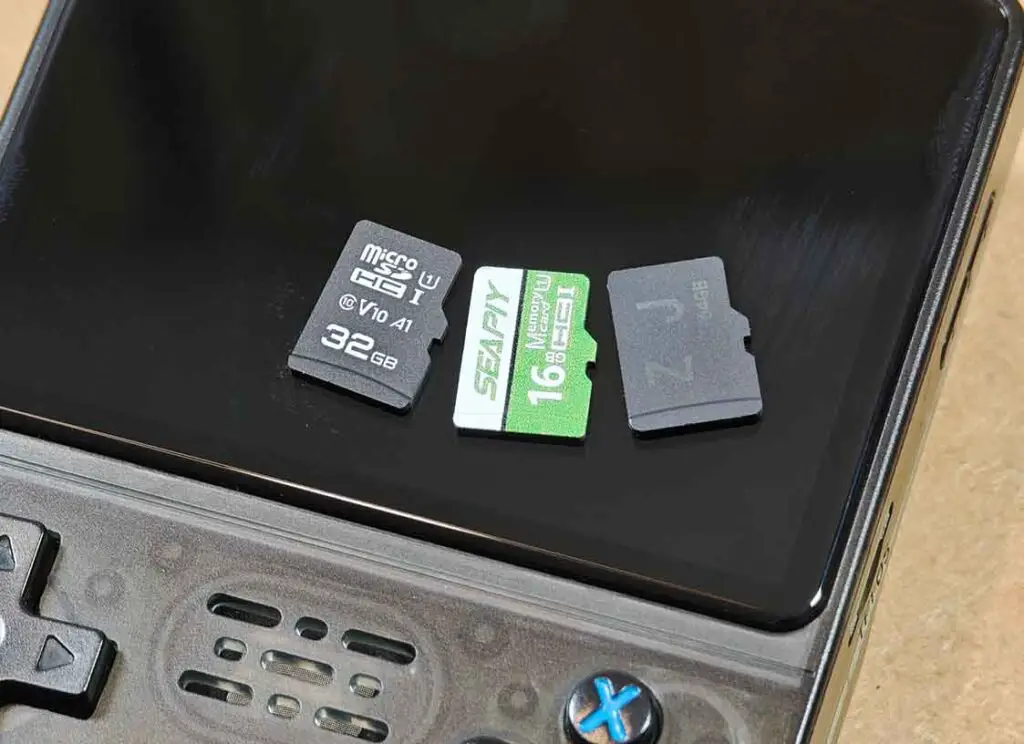
The stock microSD cards are one of the most common points of failure on the R36S. That applies to both the TF1 card, which holds the operating system, and the TF2 card, which usually holds your games. They may work for a while, but they are also one of the main reasons these handhelds suddenly stop booting, lose save files, corrupt data, or feel unusually slow.
One of the best options is the Samsung Evo Plus cards that are proven to work with most if not all R36S models.
If both original cards still work, back up both of them before you replace anything. The same of course applies if your R36S came with only one card. Do not just copy the visible files and call it done. The safest option is a full image backup of each card, because that also preserves the hidden partitions, boot data, and original setup exactly as it came. Once you have the images, you can restore them to new cards later if needed. Here is a very good guide on the whole process using a free piece of software called Rufus. Here is a second one, on the official Handhelds wiki.
After the backup, replace the stock cards with ones from a trusted brand. The TF1 OS card does not need to be large, but it does need to be reliable (for example from any common brand like SanDisk or Samsung). The TF2 games card is where extra space matters more, especially if you plan to add your own ROMs later.
What happens if you keep the stock microSD cards? Well, in many cases, nothing goes wrong immediately. You might face slower game load times, or randomly lose your save files or get corrupted system files after a few weeks of use. Or, this might never happen. For me though, it’s better to be safe than sorry, especially if we’re dealing with game save files later on.
One more thing: if Windows asks you to format a partition as soon as you insert either card, do not do it. Cancel the prompt and continue with the backup first.
You might also like: 12 Best Retro Handheld Emulator Consoles This Year – My Personal Picks
Choose Your Setup: One Card or Two Cards?
A one-card setup keeps both the system and your games on the TF1 card. It is the simpler option, and it is fine if you just want the handheld to work and do not plan to change firmware often. The downside is that if the OS card ever gets corrupted, or if you plan to tinker a lot and something goes wrong, you can lose access to both the system and your game library at the same time.
A two-card setup uses TF1 for the operating system and TF2 for games, saves, and BIOS files. This is the setup I recommend. It makes the R36S easier to recover, easier to update, and much easier to reflash later without touching your games. It’s also quite honestly equally simple to set up as the one-card option.
If you decide to use a two-card setup, you’ll have to prepare the TF2 card first and then switch ROM storage in the firmware after the initial setup is complete. I cover the exact prep steps later in this guide in the section on configuring the second SD card for ROMs.
How to Add Games and Access the EASYROMS Partition
If you are using a one-card setup, all your games will go onto the EASYROMS partition on the TF1 card. If you are using a two-card setup, they all go onto the second card in TF2 after you switch ROM storage in ArkOS. In both cases, the folder structure is created automatically by the system.
To add games, open the card on your computer, enter the folder for the system you want, and copy the ROM files there. For example, Game Boy Advance games go into the gba folder, PlayStation 1 games go into psx, and so on. Keep the files in the correct folders, otherwise they will not show up where you expect them to.
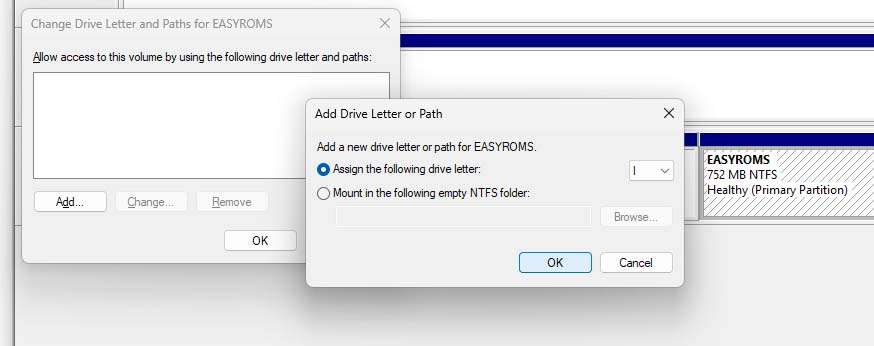
If EASYROMS does not appear in Windows, the most common cause is simply that Windows did not assign that partition a drive letter. Open Disk Management, find the card, right-click the EASYROMS partition, and select the “Change Drive Letter and Paths” option. Then, pick a drive letter to assign. In many cases the partition is right there on the microSD, just hidden from File Explorer because of it not having a drive letter assigned.
Charging and Battery Care, Plus Replacement
The R36S is charged through the USB-C port labeled DC. The other USB-C port, labeled OTG, is for both accessories like a Wi-Fi dongle and file transfer. For the least trouble and safe charging, use a simple USB-A to USB-C cable with a basic 5V 1-2A charger.
Because the base R36S lacks CC (Configuration Channel) resistors required by the USB-C specification to tell a USB-C to USB-C charger to provide power, many USB-C to USB-C chargers will fail to provide any power at all, making a standard USB-A to USB-C cable and a 5V/1-2A brick the most reliable way to ensure a consistent charge.
In the worst case, if none of the chargers you have work for your R36S, you can always safely connect it to your PC for charging. Just make sure you’re using the DC port, rather than the OTG one for that.
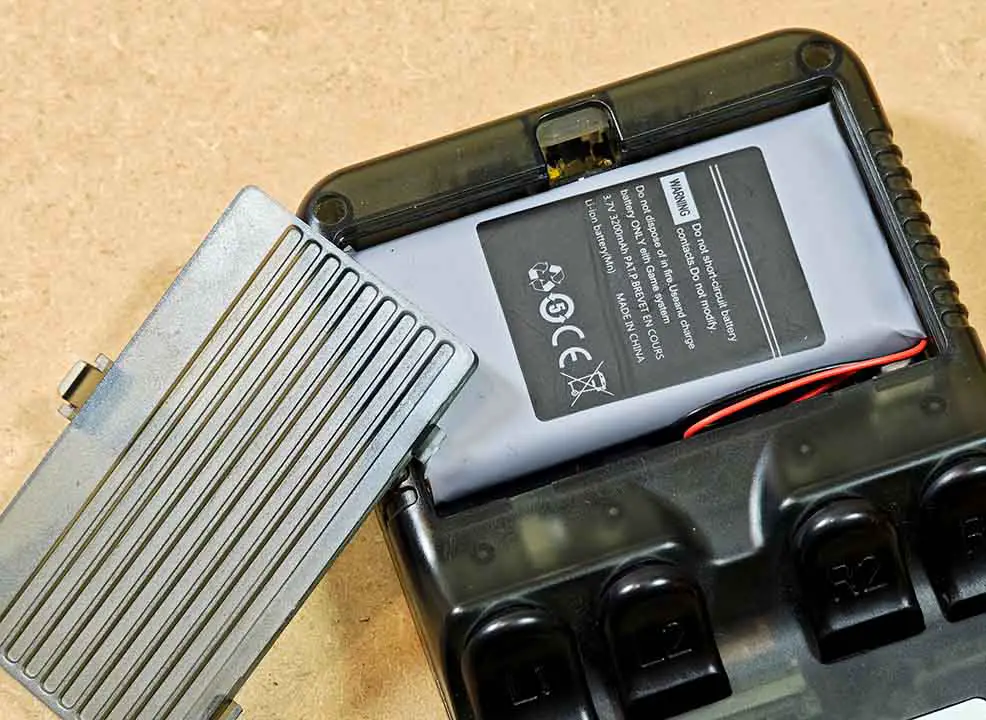
Battery care for the R36S is the same as for any other device with a Li-Ion cell in it. Just try to keep the handheld between 20 and 80% charge when possible, and you will be alright. Charging from a power bank is also fine. The stock battery is usually usable, but these cheaper cells are not known for great long-term lifespan, so battery wear over time is not unusual.
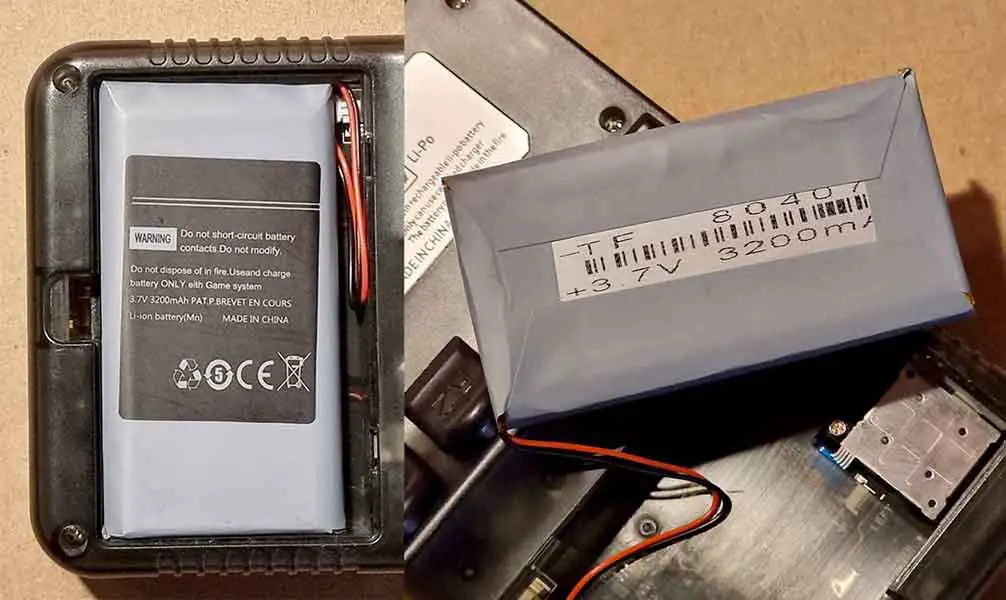
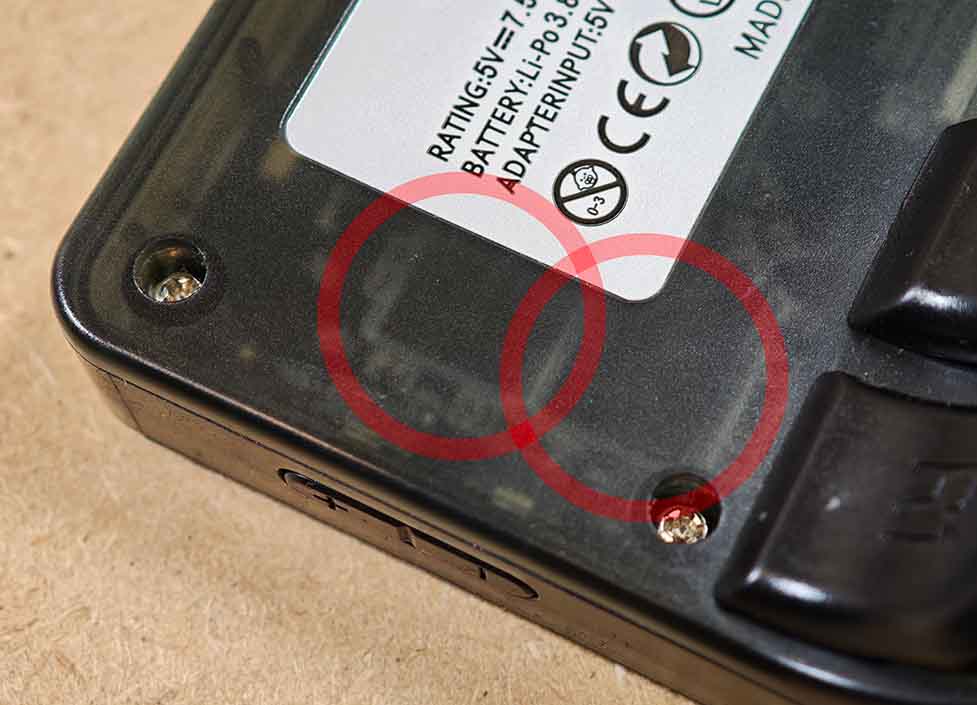
Luckily, these batteries are also extremely easy to replace. The device utilizes a standard 804066 3.7 V 3000/3200 mAh Li-ion cell with a JST connector, which can be removed and exchanged for a new one in just a few minutes. You can buy replacements with the JST lead already attached for about 6-9 USD, depending on the store.
If the console does not seem to charge, check the obvious things first: make sure the cable is in the DC port and not in the OTG one, try a different cable and a different charger.
Also, contrary to popular belief, while older/non-standard chargers that can “fry” your R36S do exist, they are not the norm. Most modern fast chargers are unlikely to force unsafe voltage into the device, but many USB-C-to-USB-C chargers will not charge the R36S at all because the handheld does not properly signal for power over USB-C missing the required CC pull-down resistors. A simple USB-A-to-USB-C cable and a basic 5V charger remain the most reliable option
Using this nifty USB power tester dongle and a generic smartphone charger I measured the console taking about 4.2-4.7W of power when turned off, and around 5.5-5.7W when in use.
You can check out my full guide on replacing the battery in your R36S here: R36S Handheld Battery Replacement & Common Issues
R36S Compatible Wi-Fi Dongles & MicroSD Cards
The original R36S doesn’t feature an inbuilt Wi-Fi module, and has to rely on external adapters instead. Some newer revisions of the console come with space for a Wi-Fi module on the board, however installing it does require soldering skills. Different models such as the R36S Plus and the R36XX do have Wi-Fi support out of the box.
One of the dongles that should work with the original R36S out of the box is the TP-Link Nano AC600 – the one based on the RTL8811AU chipset (versions can vary by region).
Most dongles that make use of the following chipsets should also work with the R36S: RTL8812AU, RTL8188EUS, RTL8723BU, RTL8192cu, RTL8188cus, RT2501, RT2573, MediaTek RT3070, Mediatek Ralink RT5370N, Atheros AR9002U.
If your dongle doesn’t work, and you believe that it should be compatible with the handheld, try using another OTG adapter.
The full compatibility list for all of the R36S accessories can be found here, on the community-maintained wiki.
You might also like: Miyoo Mini Plus Handheld Emulator Console Hands-On Review
R36S OS / Custom Firmware Options You Have
The firmware situation changed in March 2026. The old community ArkOS-R3XS image was archived on March 24, 2026, so it should now be treated as a legacy but still useful option rather than the main actively maintained path. The official ArkOS wiki now points readers to dArkOS as the successor project, and the archived R3XS repo itself points R36S users toward dArkOSRE-R36 and ArkOS4Clone moving forward.
What should you actually use today? If your handheld already came with ArkOS-R3XS and it works, there is nothing wrong with backing it up, learning how to use it, and even reinstalling that archived image on a better card. But if you are choosing a more forward-looking firmware path with potential updates in times to come, look first at dArkOSRE-R36 for supported R36S boards and many clones, and at ArkOS4Clone if you have a clone or unofficial device that needs the newer DTB-based compatibility workflow.
There are of course, a few other worthwhile and up-to-date custom firmware (CFW) options both for the original R36S handhelds, and for the clones with different front panels. Here are the main firmware options worth knowing about.
| Firmware | What it is | Latest Release Link |
|---|---|---|
| dArkOSRE | Main current pick for most R36S units and clones. |

|
| ArkOS4Clone | Another choice that works with many unofficial boards/clones. |

|
| ArkOS R3XS | Archived legacy option, not updated anymore. |

|
| P4ELEC | Fan-made build for Panel 4 units. |

|
| AmberELEC prerelease | Alternate route for AmberELEC clones. |

|
| ROCKNIX | Another community-maintained CFW option. |

|
A quick practical note: For most people, dArkOSRE-R36 is the first place to look. If you have a strange clone or an unofficial board revision, ArkOS4Clone is usually the next one to check. The rest are more niche, legacy, or advanced paths.
For some more obscure and less frequently updated custom firmware options for the R36S, you can visit the community wiki page here.
Updating ArkOS – Options You Have
Once you receive your genuine R36S already running ArkOS, there is a high chance that it will come with an older version of the OS installed. If you proceed to use the device with the older version of ArkOS, you can miss out on new quality-of-life features, bugfixes or performance fixes for no good reason. This is why an update or a flash of a new OS version is one of the first things you should be thinking about after changing your stock microSD card for a new one.
If you are using a one-card setup, both the OS and your games will live on the TF1 card, so reflashing or replacing it affects everything at once. If you are using a two-card setup, only the OS lives on TF1, while your games and BIOS files stay on the TF2 card. This is exactly why the two-card setup is the safer long-term option, especially if you plan to update or reflash the OS more than once.
You have three update options:
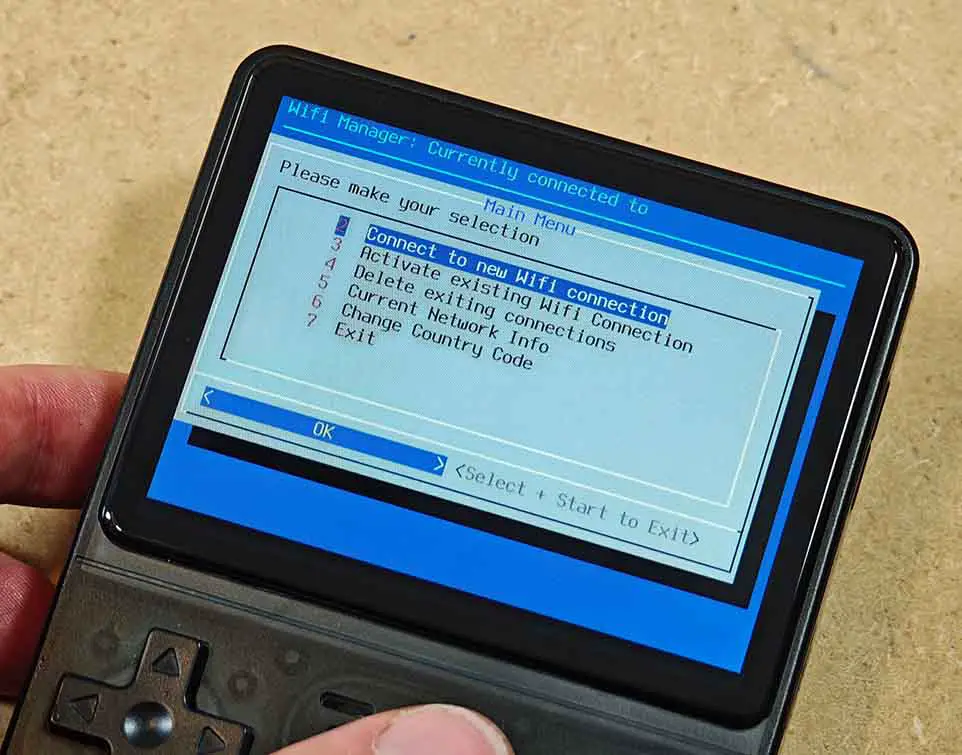
- Do an OTA update over the internet using a compatible Wi-Fi dongle connected to the OTG port via a USB-C to USB-A adapter.
- Update it through USB tethering from your phone without using a dongle or taking the microSD card out.
- Do a fresh flash of a newer OS image directly onto the TF1 OS card.
Out of the three methods above, a fresh flash is the safest and cleanest option. It takes a bit more time, but it also avoids carrying over old files, settings, or problems from a previous install. We will get to it in the very next step.
There have been reports of OTA updates breaking/deleting some emulator save files with single-card setups on certain versions of ArkOS, so always remember to back up your files before you update.
Important note: Don’t be afraid of the word “flashing”. The process is really simple regardless of whether you’re updating ArkOS or installing it on a brand new microSD card, and if done correctly there is actually very little chance that you will irreversibly brick your device.
How to Flash dArkOSRE-R36 on a New TF1 Card
Before flashing a new TF1 card, it is still a good idea to copy the files from the original BOOT partition to your PC as a quick reference, especially the .dtb file. This is not a substitute for a full image backup of the stock card. It’s simply a convenient way to keep the model/DTB information on hand while you prepare the new card.
Here is how to flash a new microSD with the current go-to ArkOS fork for the R36S (dArkOSRE-R36) and quickly get started with your new handheld:
- Grab your new microSD card, and take out the OS microSD from your R36S’s TF1 slot.
- Connect your old R36S OS card to your computer using a card reader like this, and back up all of the files that reside on its BOOT partition. Store them safely somewhere on your PC.
- If your R36S is currently using a one-card setup, the TF1 card will usually contain both the BOOT and EASYROMS partitions. That means that it holds both the operating system and your games, so back up both of them if you want to preserve everything. If you have a two-card setup situation going on, your ROM files are on the separate TF2 card, so reflashing the OS on the TF1 microSD will not remove them.
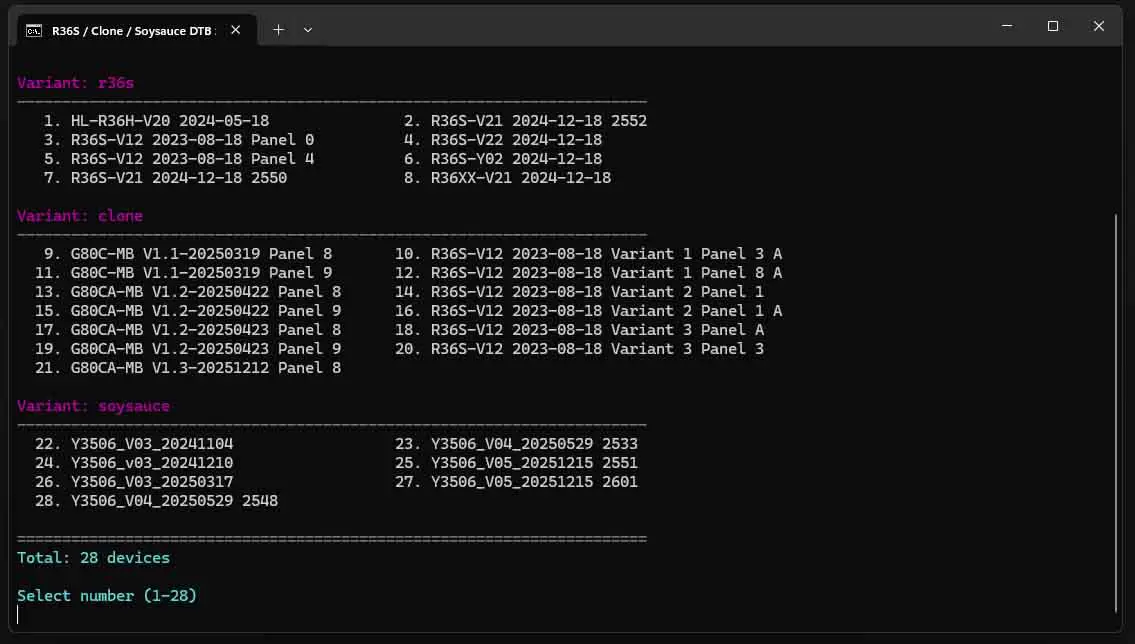
- Check whether your device is a clone, or not. Once again, for that, refer to the information way above. Get the file with the .dtb extension from the original BOOT partition on your OS microSD card, and use the Which Screen Do I Have?, or the ArkOS4Clone DTB Identification Tool (more recent one) to identify what kind of R36S you actually have on hand. Take note of the results.
- Download the latest dArkOSRE-R36 image for the R36S from the community-maintained repository. Extract the .img file from the archive.
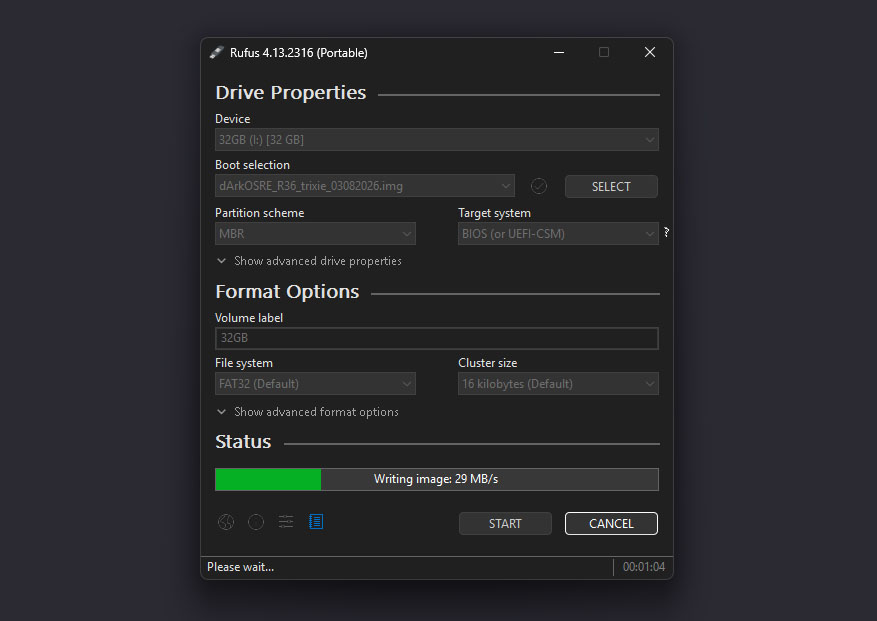
- Download Rufus on your PC. This is the software that you will use for the one-click flashing process.
- Grab your new microSD card, and connect it to your computer.
- Open Rufus, select the correct microSD card, then select the ArkOS image file you downloaded. Make extra sure that you’ve selected the right device here – that is your new empty microSD card. If any data is present on the card, it will be erased in the process.
- Click Start, double-check that you chose the correct card, and wait for the write process to finish.
- When the write process finishes, you can exit out of Rufus, and use the file explorer to navigate to the BOOT partition on your new microSD card. There, locate the SELECT MODEL.bat file, and double-click on it.
- Here, you will be prompted to select the device version you have. Use the info you got from step 3 to select the device/panel version, and finish up the initial setup process.
- When you’ve done all this, safely eject the card from your computer.
Before you proceed: If you have it, remove the second SD card from your R36S until installation is complete. Do NOT have the charger plugged in during your first boot.
Now, put the flashed card into the TF1 slot on the R36S, and make sure that the handheld is fully or at least 80% charged. Then, power it on. On first boot, ArkOS will prepare the EASYROMS partition for you, and finish its initial setup. This can take a while, so let it complete before assuming something is wrong. If the screen stays blank, wait 2-3 minutes before assuming that you’ve done something wrong.
If The Screen Goes Black and Nothing Happens
If the system boots but the screen is either black or displays visual artifacts, the most common reason for that is that you’ve selected a wrong console version in the SELECT MODEL.bat file.
If that’s the case for you, repeat step 3, and upload your original .dtb file to the ArkOS4Clone DTB Identification Tool, and take note of your device version to select the right one this time.
If for any reason you’ve forgotten to back up your original .dtb file, or you don’t have it on hand anymore, your best bet is to identify the clone visually (the handhelds.wiki, as well as the DTB Identification Tool have visual cues available for some of the clones, and some of these can be spotted without a teardown). Another way you can go about this is some trial-and-error with different device versions in the SELECT MODEL.bat file, starting with the most popular R36S versions.
That was the whole flashing process. It really does sound more technical than it really is. The only part that actually matters is choosing the right image, flashing it to the right card (TF1), and selecting the right device version/model before booting up the handheld. That’s it!
Configuring the Second (TF2) MicroSD card for ROMs with ArkOS
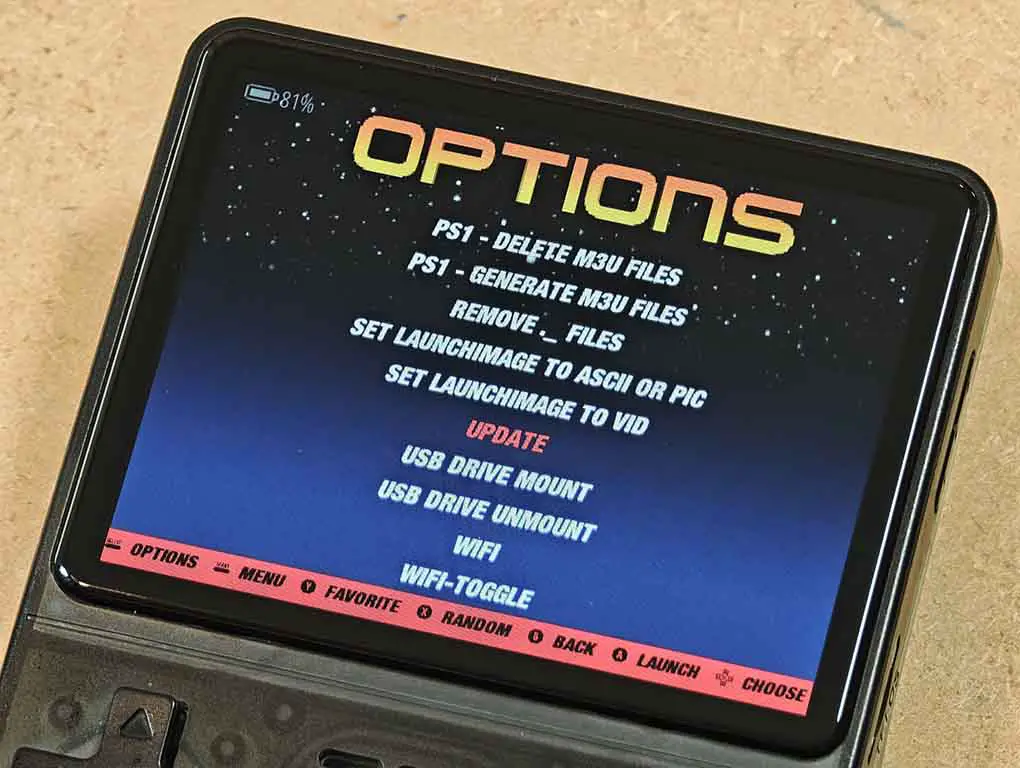
If you want to store ROMs on the TF2 card, first format the second microSD card as exFAT and set its volume label to ROMS. Then insert it into the TF2 slot, boot the handheld, and use “Options -> Advanced -> Switch to Second SD for ROMS”. The system will then prepare the card for ROM storage. After that, copy your ROMs, BIOS files, and saves to the appropriate folders on TF2.
On current dArkOSRE-based setups, SD2 preparation is more reliable when the card is formatted correctly before you switch storage, rather than inserted as an unprepared blank card.
If you already had a second microSD with game files on it, then it should be automatically recognized after putting it inside the R36S, provided it sees the recognizable ArkOS ROM folder structure on it.
If Your EASYROMS Partition Is Too Small
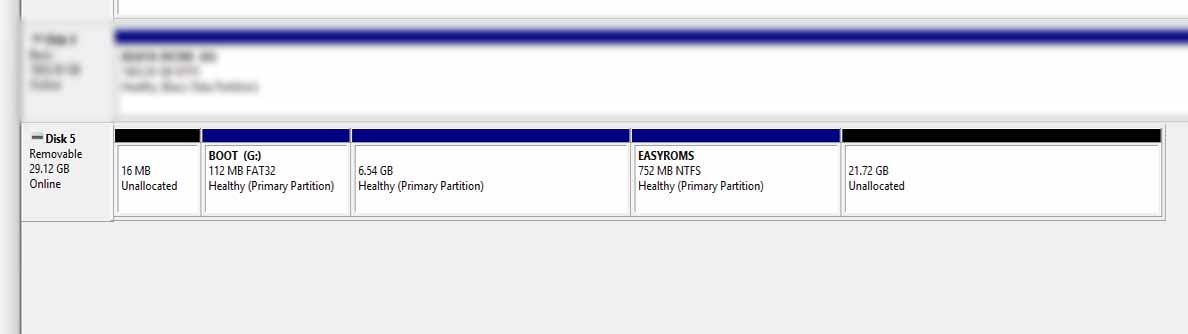
First things first, the most important thing: both ArkOS-R3XS and dArkOSRE-R36 should be able to automatically expand your EASYROMS partition on first boot if its size is smaller than the available space on the microSD.
If however, the automatic partition expansion doesn’t work for you for one reason or another, you can also do this manually using nothing but tools available in Windows, even when the Disk Management tool shows the Extend Volume option as greyed out. Here is how to do it.
- In Windows Disk Management tool assign a drive letter to the EASYROMS partition by right-clicking it and going through the Change Drive Letter and Paths menu with the default settings. Don’t close the Disk Management tool just yet.
- Once you’ve done that, the partition should be accessible from your file explorer. Copy all of the files and folders from EASYROMS and back them up into a safe temporary location.
- Go back to the Disk Management tool, right-click on the EASYROMS partition and select Delete Volume. Make extra sure that you’ve selected the EASYROMS partition and not anything else.
- Right-click on the black Unallocated space on your microSD card in the Disk Management tool and select New Simple Volume. Proceed with all the default settings, except for the volume label name that you want to set to EASYROMS. Create the partition, this can take a few seconds.
- Note: If there are any partitions other than BOOT on your microSD, you can also delete them and thus make them automatically join the unallocated space that you will use for the new EASYROMS game storage.
- Locate the EASYROMS partition in the This PC view, right-click on it, and select the Format option. Once again, make sure that you’re clicking on the correct volume – EASYROMS. In the formatting menu, change the File system setting to exFAT, and leave the volume label as EASYROMS. Once you’re sure that everything is in order, you can click on Start, and wait until the formatting process finishes.
- Copy all of the files you’ve backed up in step 2 back onto your new EASYROMS partition.
After that, everything should work as expected, with your EASYROMS partition now filling the entire space besides the BOOT partition on the microSD card volume.
Basic ArkOS R36S Hotkeys List (Updated)
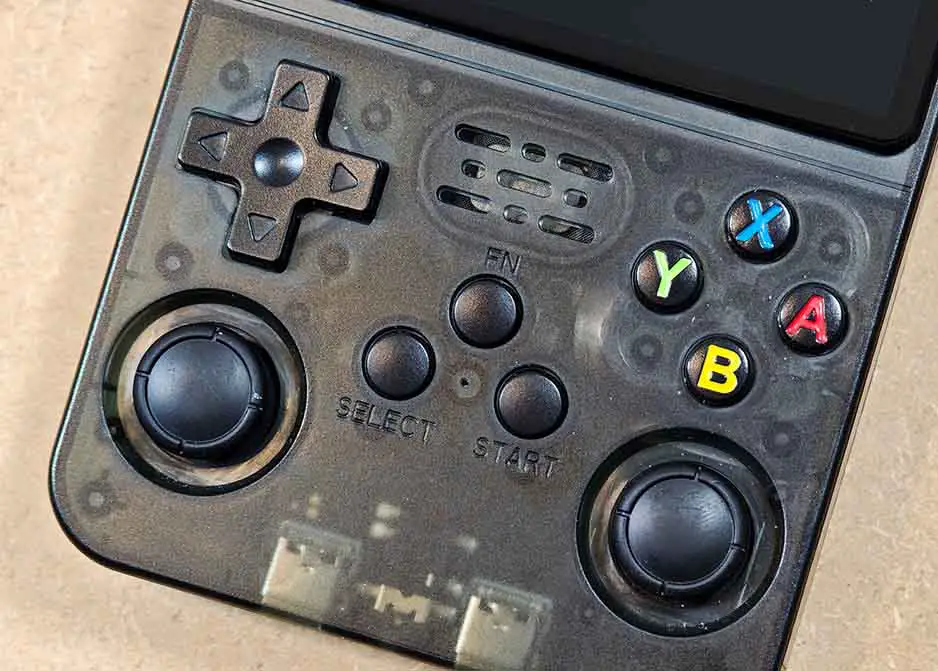
Once you’ve got your R36S with a new microSD card and updated ArkOS up and running, you should know about a few key shortcuts and settings.
On newer/community ArkOS builds, the FN button is the main RetroArch hotkey button. On other builds, some of the same shortcuts may still use Select instead, and if the FN button does not work at all, your firmware is probably outdated. Also keep in mind that these shortcuts mainly apply to RetroArch-based emulators. Standalone emulators like PPSSPP and DraStic can use different controls and menu hotkeys.
All of the button shortcuts listed below were updated and tested by me, and match the hotkeys working on the dArkOSRE-R36 (03082026) build, and the now legacy ArkOS-R3XS 2.0 (11072025) (AeUX). Mind that both mainline ArkOS builds and different firmware like AmberELEC, as well as specific emulators can make use of other key combinations for accessing the very same features.
Among the most useful dArkOSRE-R36 hotkeys that you need to be aware of on the R36S are:
On dArkOSRE-R36:
- Open quick menu:
FN + X / SELECT + X - Quit game:
SELECT + START (Pressed Once) - Save state:
SELECT + B - Load state:
SELECT + A - Save state slot up:
SELECT + X - Save state slot down:
SELECT + Y - Fast-forward (toggle):
SELECT + D-Pad Right - Rewind (toggle):
SELECT + D-Pad Left - Pause:
SELECT + FN - Frame advance:
SELECT + D-Pad Up - Take screenshot:
SELECT + L3 [Left Analog Press] - Reset the game:
SELECT + R2 - Brightness up/down:
R3 [Right Analog Press] + D-Pad Up/Down
On ArkOS-R3XS (legacy):
- Open Quick Menu:
FN / SELECT + X - Quit game:
SELECT + START (Pressed Twice) - Save state:
SELECT + R1 - Load state:
SELECT + L1 - Change save slot:
SELECT + D-Pad Up - Fast-forward (hold):
SELECT + FN (hold) - Fast-forward (toggle):
SELECT + L3 [Left Analog Press] - Pause:
SELECT + A - Take screenshot:
SELECT + Y - Reset the game:
SELECT + B - Brightness up/down:
FN + Vol. Up/Down(in RetroArch doubles with emulator menu but still works)
Depending on your device model, the hotkeys can work with either the FN, or the SELECT button as shown above. You can find more emulator-specific ArkOS-R3XS hotkeys on its archived repository wiki pages.
The placement of the two main settings/options menus on different ArkOS builds for the R36S often can confuse new users (it did confuse me at first). Newer ArkOS builds like the dArkOSRE let you access both the ArkOS settings and the EmulationStation frontend settings from the menu that appears once you press the START button in the console select view. On different, older ArkOS forks/versions, the EmulationStation settings are often accessible from the game console selection carousel, rather than the START menu. The position of those setting menus can also depend on the theme that you’re using.
If you want to know even more, you’re in luck. I have another full resource about all the neat things you can do on your R36S right here: 10 R36S Handheld ArkOS Hotkeys, Shortcuts & Extra Tricks
EmulationStation Themes For The R36S
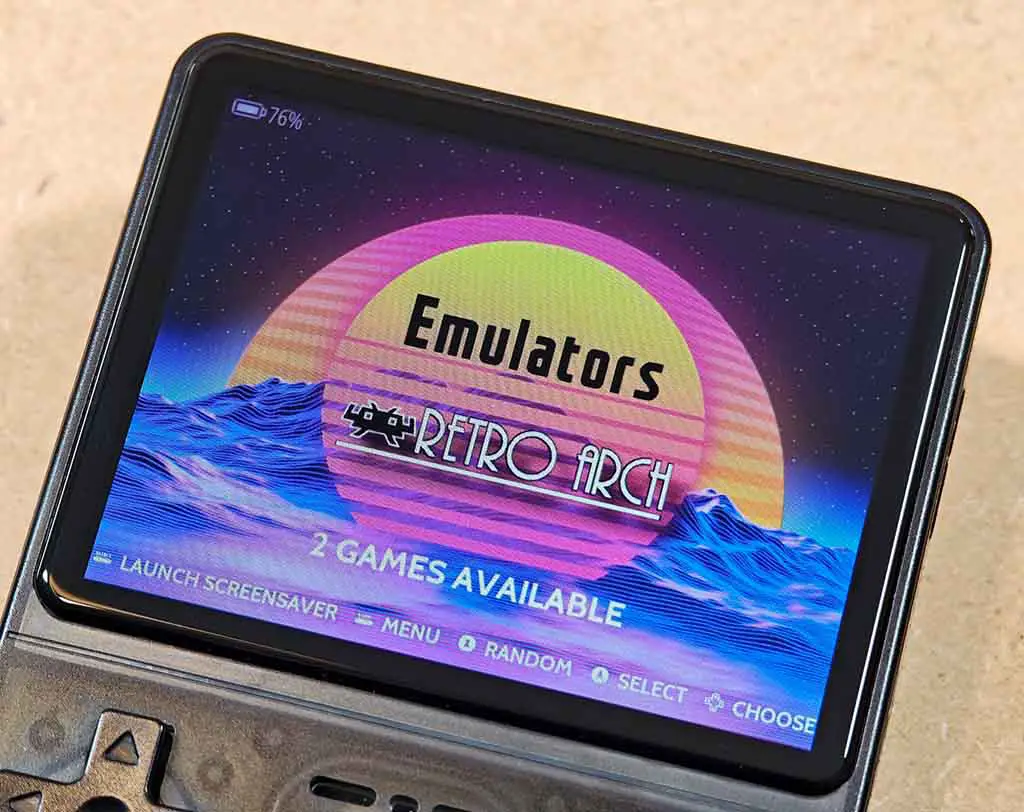
If you want to change the looks of the main R36S ArkOS interface, you can rather easily switch between different EmulationStation themes. EmulationStation is the frontend that ArkOS-based devices use to display your game lists and setting menus, and there are many community themes that can help you personalize your handheld.
On ArkOS-based systems, themes are added by copying the theme’s root folder into the “/roms/themes” folder on your card, then booting the handheld and going to “START -> UI Settings -> Theme” to select it. Most ArkOS versions come with several themes preinstalled, so you will already have a few options to choose from out of the box without downloading anything extra.
Most themes also have their own customization settings accessible from the “START -> UI Settings -> Theme Configuration” menu.
Enabling the Quick Mode and Quick Shutdown Mode
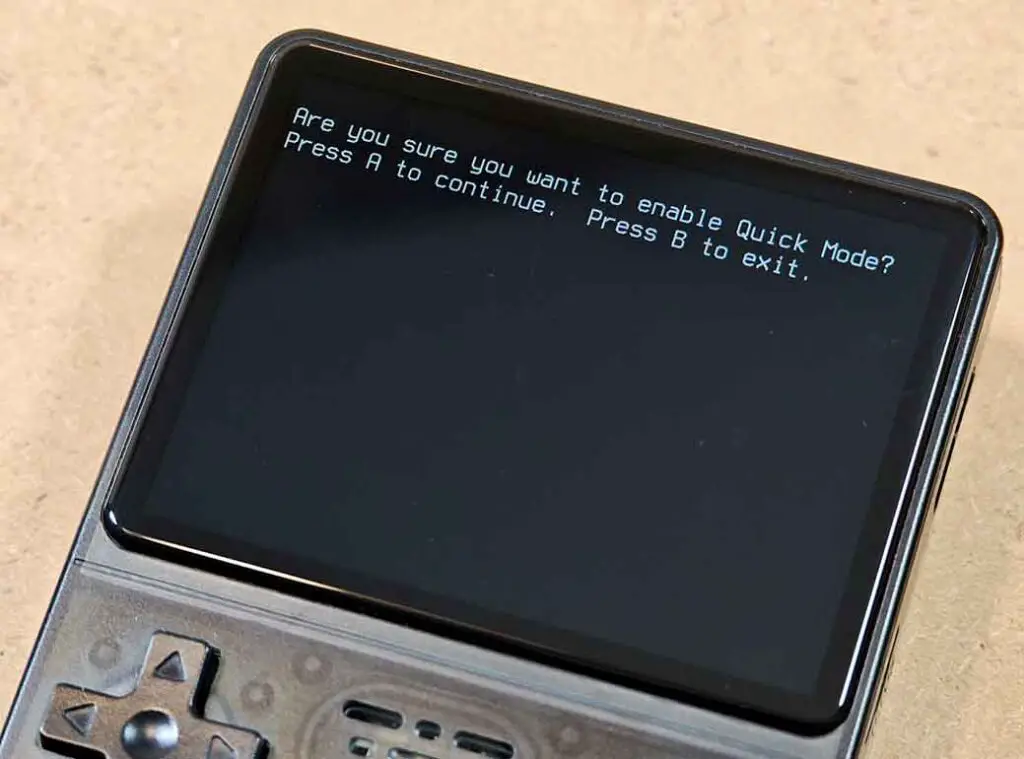
One of the neatest QOL tweaks on the R36S is pairing Quick Mode with the regular power-button shutdown behavior. First, go to “START -> Advanced Settings -> Switch Power Button Tap to Off” so that a single press of the power button fully shuts the handheld down instead of just putting it to sleep.
Then go to “Options -> Advanced -> Enable Quick Mode” and turn it on. Then, press the “A” button to confirm the settings change.
With both settings enabled, you can tap the power button once while in-game, and the next time you boot the console, it will jump straight back into your last session from the latest save state. This enables you to jump in and out of your games relatively quickly, without relying on the sleep mode which can drain your battery rather fast.
Where to Go From Here?
Well, upload your game ROM backups onto your microSD, and enjoy your new device! The R36S alongside the Miyoo Mini Plus is still one of the most popular retro emulator handhelds out there, being sufficiently powerful to run most games from systems up to PS1.
If you’re looking for other great options to get this year, you can check out my updated lineup of best retro handhelds here. If you want something a little bit more powerful, you’ll also find a few Android-based consoles there that can emulate games even from systems such as the PS2 or Nintendo Switch.
You might also like: 10 R36S Handheld ArkOS Hotkeys, Shortcuts, Extra Tricks