If you made it this far, congratulations! Here is the third and the last part of the Stable Diffusion Fooocus WebUI guide, in which you will quickly learn, among other things, how to easily introduce slight variations to your images, upscale your creations to high resolutions, use the outpainting functionality, use your own imported images as prompts, and finally utilize one of the most powerful features of Fooocus – the image enhancement module. Let’s begin!
If you’ve found your way here but you haven’t seen the first two parts of this guide, you can find them here:
- How To Run SDXL Models on 6GB VRAM – Fooocus WebUI Guide [Part 1]
- Advanced Settings & Image Generation – Fooocus WebUI Guide [Part 2]
Make sure that you have all the basics before we start!
Features We’re Going To Cover – “Input Image” & “Enhance” Sections

Here is a list of all the Fooocus modules that we’re going to cover. Each of these modules is centered around the idea of importing your own images into the WebUI for further refinement or using them as a starting point for your new generations.
- Image upscaler – lets you upscale your images to very high resolutions while simultaneously making them more detailed.
- Variation – can help you create slightly different versions of your selected image.
- Image Prompts – import up to four images of your choice, optionally accompanied by a single text prompt. This will allow you to guide the image generator toward the style of your input content (you may already recognize this feature from Midjourney).
- Inpainting/Outpainting module – introduce new elements to your images in selected places using custom drawn image masks, or extend the area of your generations as many times as you want.
- Describe utility – import an image and let the program describe it for you in natural language.
- Enhance module – lets you further improve your own imported images or fresh generations, for example replacing and re-generating certain details such as person’s eyes, hands, fingers, hairstyle or a piece of clothing.
Let’s start with the image upscaler, which will probably be the most important module for most of you out there.
Upscaling Your Images
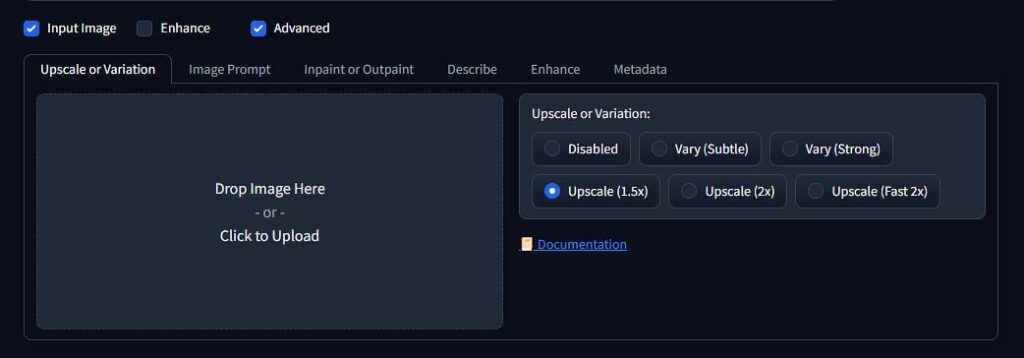
The upscaler, which you can access from the “Upscale or Variation” tab which becomes visible after checking the “Input Image” box below the main prompt input field, can enlarge your imported image’s resolution while simultaneously generating additional details. This ensures that the image retains its quality, unlike traditional upscaling methods that do not involve generative AI.
You have three options here, one of them being an 1.5x upscale, the second one – a 2x upscale, and the third one, a fast 2x upscale. While the first two are pretty self explanatory – they enlarge your image by 1.5x and 2x respectively, the third one is the one you want to use if you want to sacrifice some quality for a faster 2x upscale.
You can upscale your images as many times you want to reach pretty high resolutions with a surprising amount of added detail. Keep in mind that the upscaling process can always introduce some minor artifacts into the input material, so remember to check your creations from up close to see if their final quality is up to your standards.
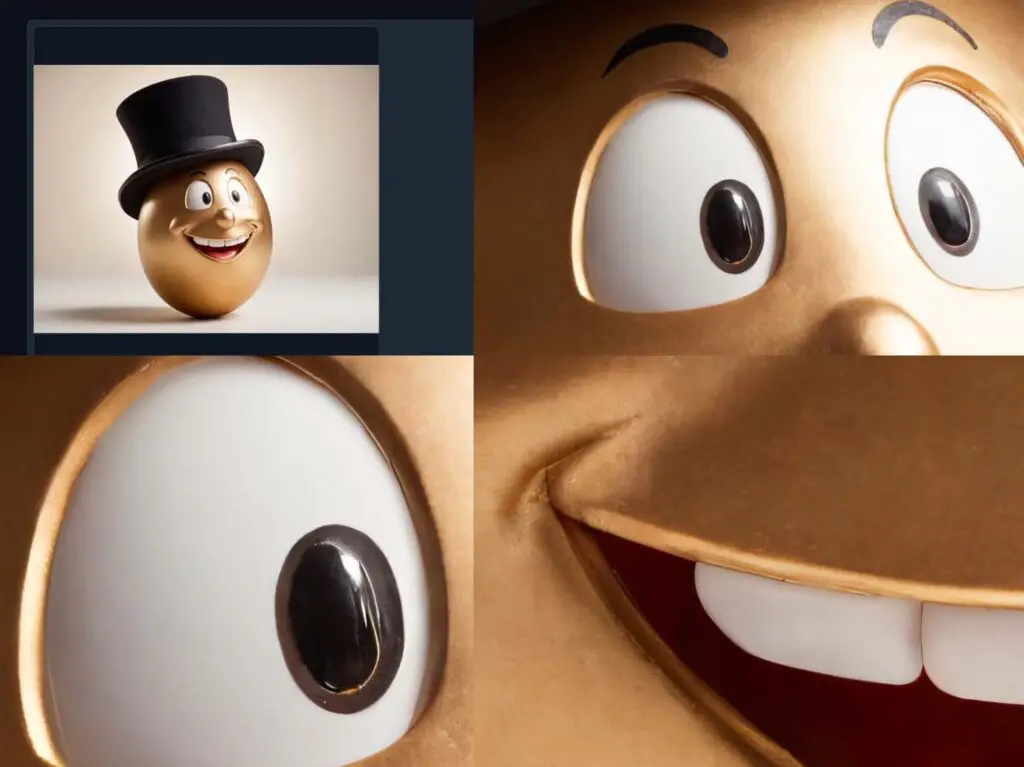
If you want to see the original file from the image above in full resolution (9216x7168px, 54.8 MB, after an 8x upscale), as well as a two different examples (2x and 4x upscale of the very same image), I uploaded all of these files to Google Drive for you, so you can see the amount of details in the final outputs, as well as the minor artifacts which the upscaler introduced into the images.
It’s a good place to remind you that you can use all the modules we’re going to go through here either with the images you’ve generated using the Fooocus WebUI, or with your own images imported from your drive. To import an image to any of the modules mentioned, you simply need to drag and drop your chosen file onto the image input field in your selected module.
Generating Different Variations of a Single Image
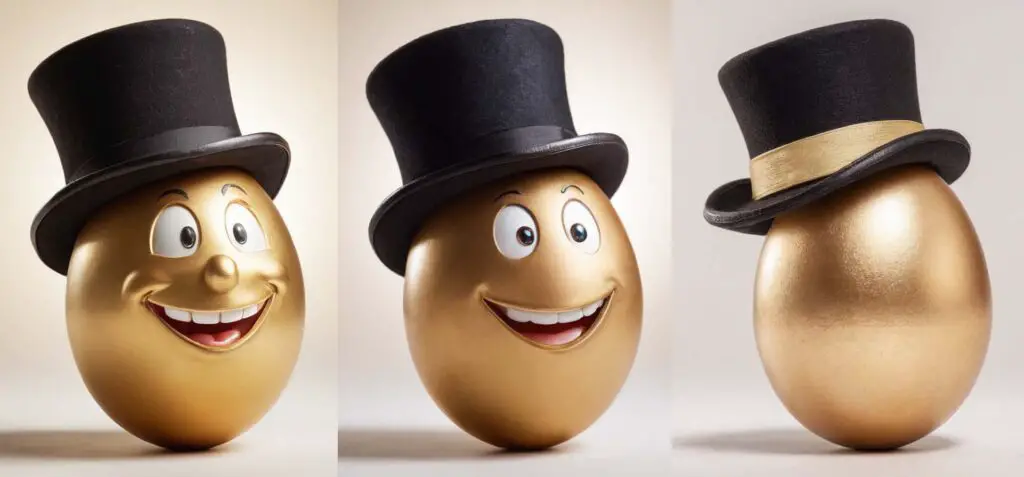
In the very same “Upscale or Variation” tab, you can also find the “Vary (Subtle)” and “Vary (Strong)” options. These can be used to create slightly different versions of your images.
This feature sometimes works in pretty unexpected ways, and in general is meant to be used when you almost got the output you wanted, but you want to see another options close to your generated original.
In situations like these, you can save your image, import it into the “Upscale or Variation” module (or, as you will see in a short while, skip one step of this process by utilizing the “Enhance” module), and use the “Vary” feature with or without an extra text prompt to receive a similar image with randomly changed details.
While the “Vary (Subtle)” option almost always introduces very minute changes, “Vary (Strong)” can oftentimes change your image completely without being of much use. In general though, these options aren’t really viable for more serious use cases, simply because the severe lack of control of the process while using them. Still, it’s a fun way to quickly go through different variants of the same generated scene with one single click.
Inpainting and Outpainting
The “Inpaint or Outpaint” section is one of the more interesting and useful sections in the Fooocus WebUI. It gives you access to two different mechanisms, one of them being inpainting – which allows you to insert selected objects in a chosen part of the input image, and the second being outpainting – which lets you extend the image area in the chosen direction. Let’s start with inpainting.
Inpainting
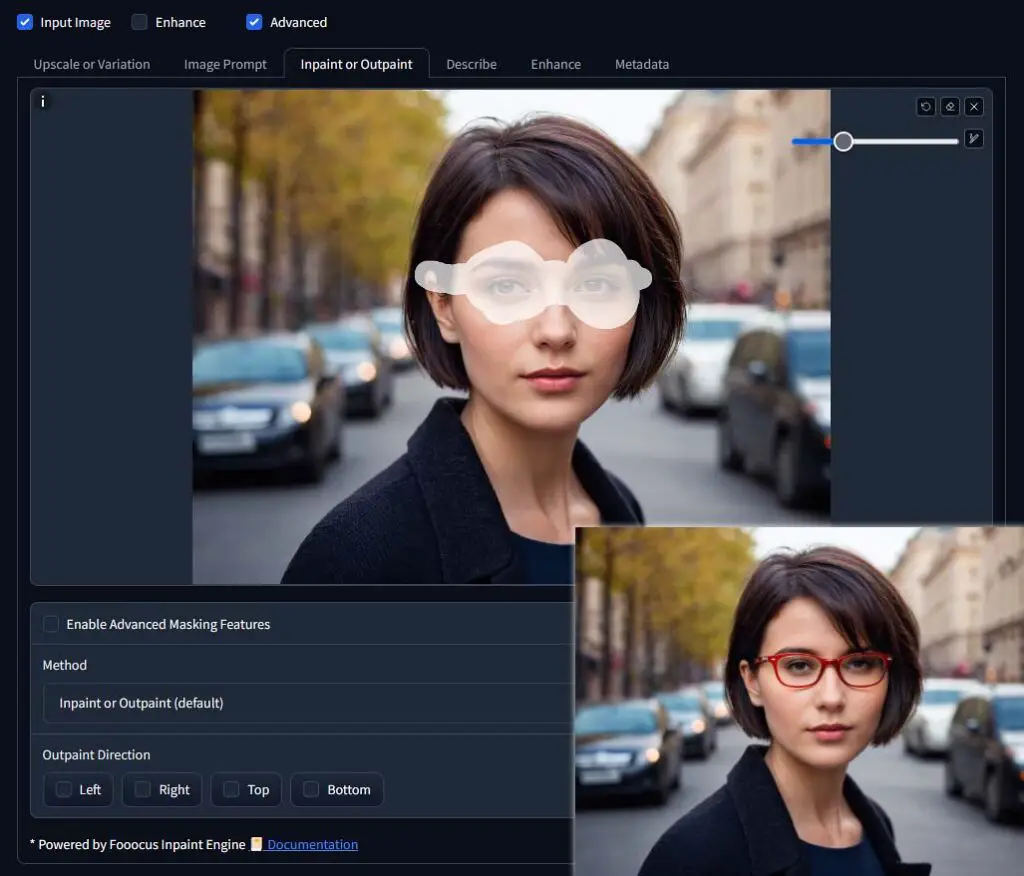
Drag and drop an image of your choice into the “Inpaint or Outpaint” image import area. Next, draw over the area of the image in which you want to generate a new object. You can adjust the size of the brush with the “Ctrl+Mouse Wheel” key combo, as well as use other keyboard shortcuts such as “Shift+Mouse Wheel” to zoom in or out, “Ctrl+Z” to redo your last action, and “S” to enter the fullscreen edit mode in which you can move the canvas by pressing the “F” key.
When you’ve finished creating your mask area, the only thing left for you to do is think of an object you’d like to appear in the selected masked area you’ve just drawn and input its description into the main text prompt box above. In our case, we will simply use “red glasses” as our inpainting prompt. Once you’re done with that, click on the “Generate” button and watch your desired object slowly appear in the image. That’s it!
In general, the more accurate you are with drawing the mask, the better results you’ll get. If you’d like to have even more control over the inpainting process, you can check the “Enable Advanced Masking Features” box and access more advanced image masking settings. There, you’ll have the ability to import a custom mask, or automatically create a mask from the image using one of the mask generation models supported by Fooocus.
Outpainting
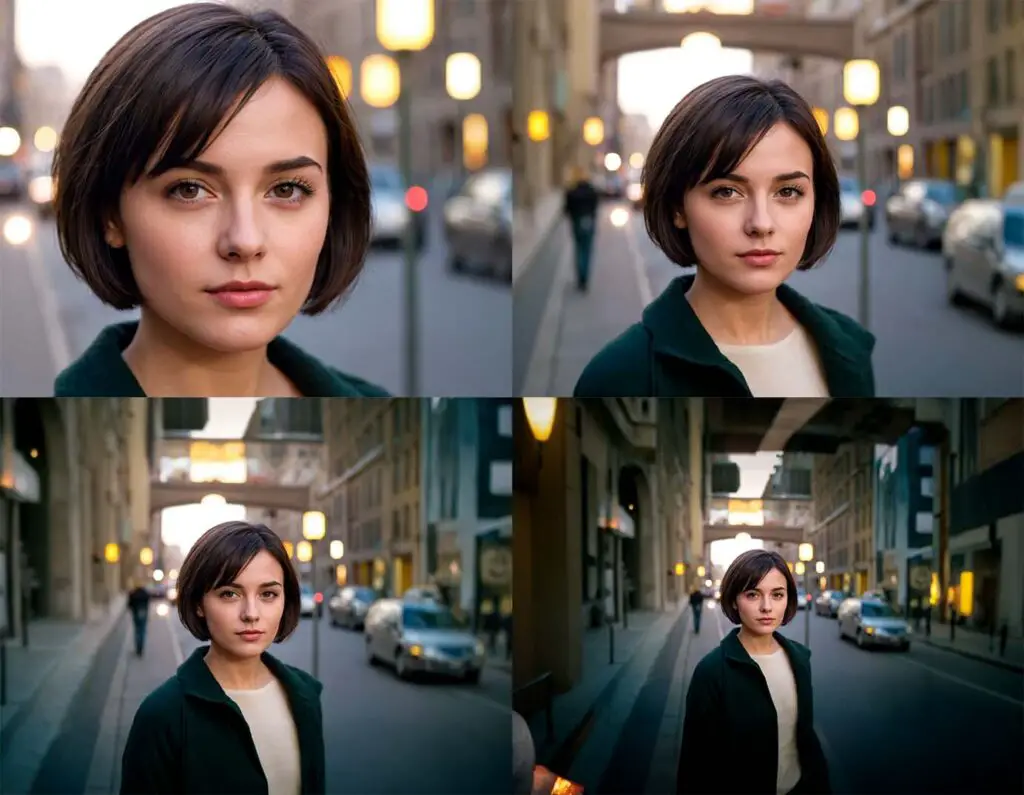
Import an image and see beyond it, that’s the general idea of outpainting. After getting an image into the “Inpaint or Outpaint” module, simply select a direction in which you’d like the outpainting algorithm to extend your image. In the example you can see above, having imported the first image I selected all 4 directions: top, bottom, left and right and repeated the process 3 times.
This feature is pretty straightforward and what’s best, you can use it many times in a row to get pretty interesting results. To do this, simply import an already extended image back to the outpainting section and repeat the process. Try it with some real photos and you’ll see how believable the extended views can get with simpler backgrounds and scenes. As this is one of the most straightforward features in the WebUI, there really is nothing more to be said here.
The Image Prompt Module
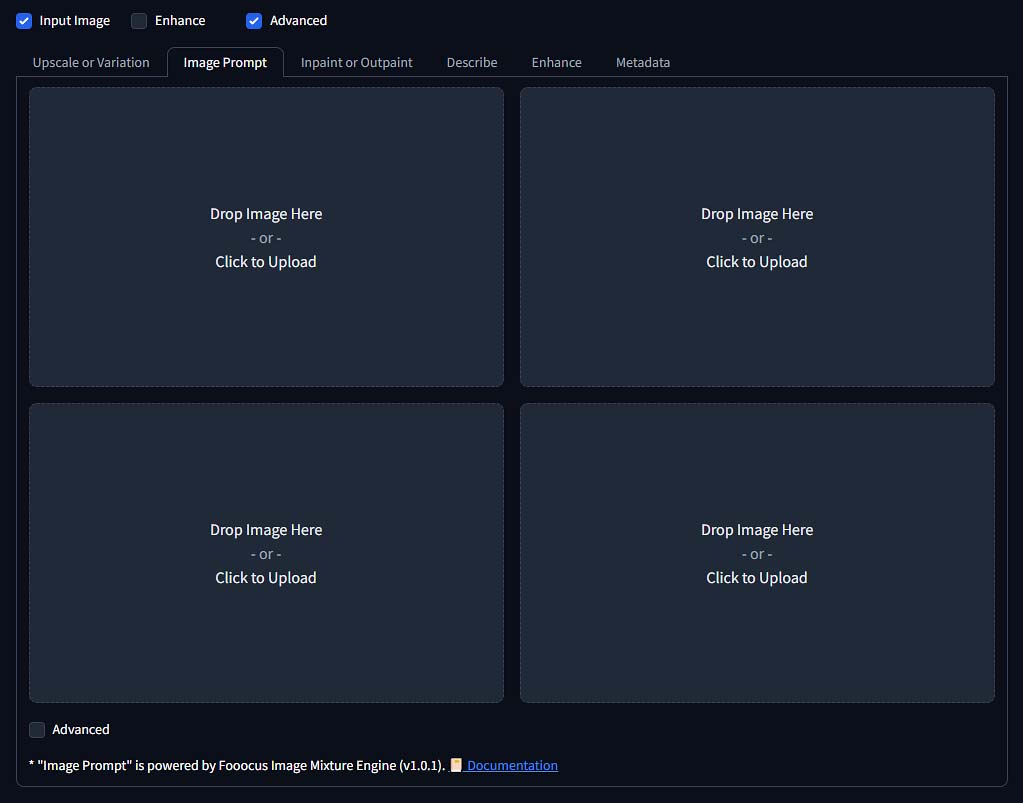
The image prompt module lets you use up to 4 selected images to guide the image generation process in a chosen direction. In other words, simplifying things a bit, it lets you use your custom imported images as part of your main generation prompt. The idea for this feature was inspired by Midjourney, which features the exact same functionality in its paid subscription plan.
Upon checking the “Advanced” checkbox, you can also select the weight for each of the imported images (how much each of the images will affect the generation), and a “Stop at” point (a point at which each of the images will stop affecting the process).
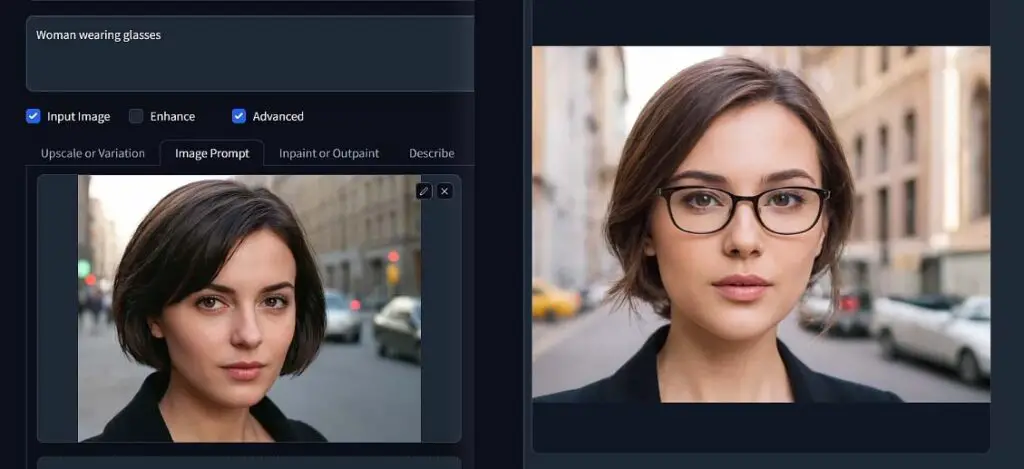
If you want to generate your outputs in the style of a specific image or with a general composition similar to an existing photo, the image prompts section will be particularly helpful. It works surprisingly well, even with very simple text prompt guidance.
In the example above, you can see it being used to generate a portrait of a woman wearing glasses in an urban environment standing on the street, with a blurred background. None of the described features are specified in the text prompt, except for the glasses; all the remaining characteristics of the image are introduced solely by the single image imported in the “Image Prompt” section (on the left) before starting the generation. Pretty cool, right?
Image Description Feature
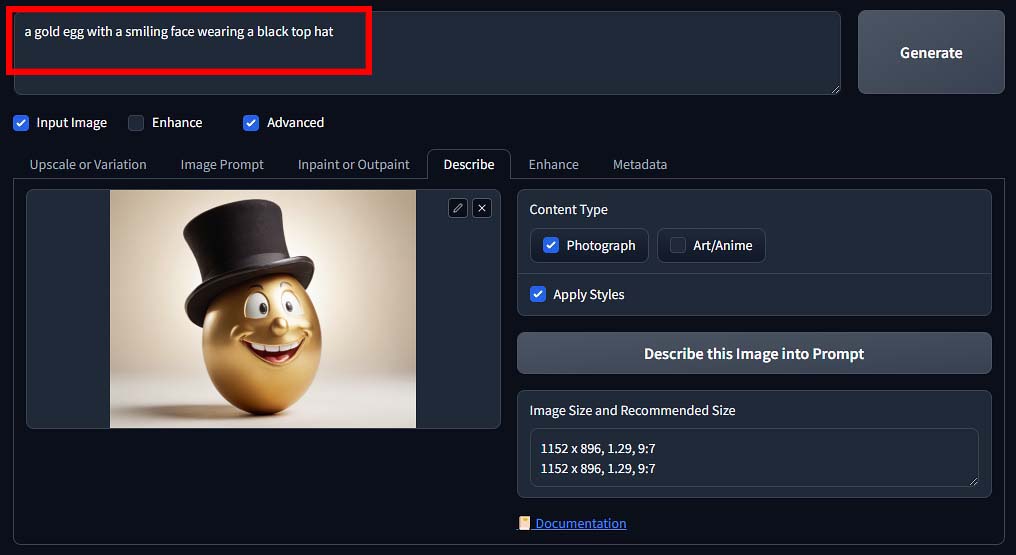
This one is pretty simple. Import an image, click the “Describe this Image into Prompt” button, and in the main prompt box above you will get a detailed description of the image’s contents, which you can then use as the base of your next generation prompt.
Remember that, as with all modules here, you can use this feature to describe any image you like, including real-life photos imported from your drive. This can be very helpful when generating new prompt ideas.
According to the official Fooocus GitHub repository, this feature is supposed to work much better than the CLIP Interrogator module present in many different open-source software like Automatic1111, with much more accuracy and less failures to include the main contents of the imported image. With that said, I can personally confirm that it is indeed one of the better local image description implementations I had the pleasure to use.
The Enhance Module
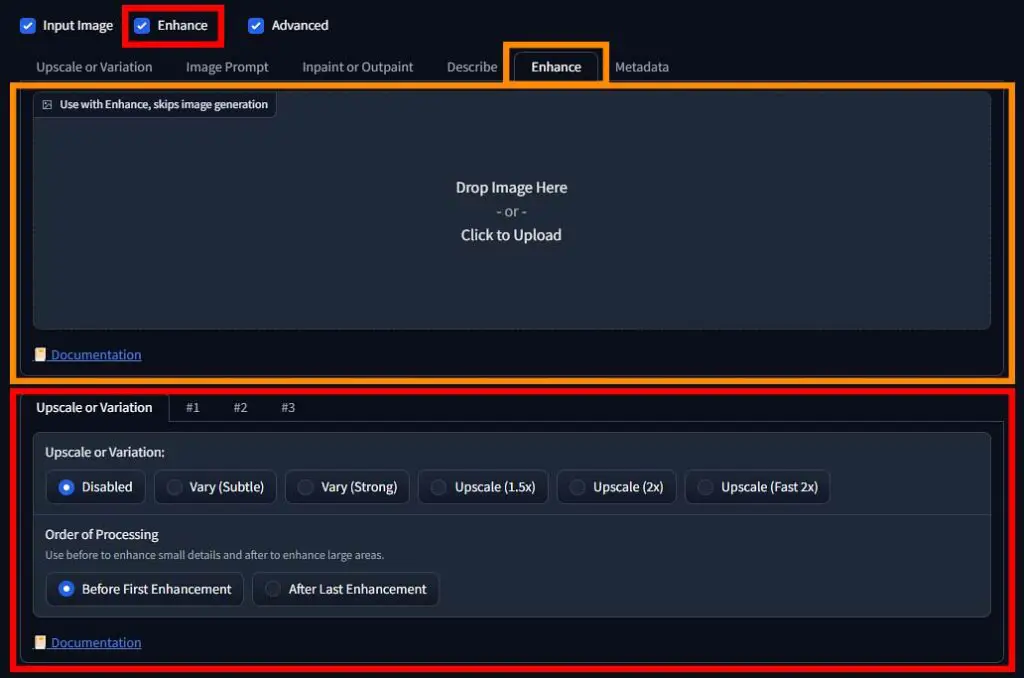
Finally, we’ve come to one of the most powerful features of the Fooocus WebUI – the enhance module. Oftentimes new users struggle with this one (as it seemingly consists of two different parts), missing out on the cool things it can do. So here is how it works.
The enhance module is used to introduce changes to your newly generated images to further refine them, and fix generation inconsistencies and errors such as low quality faces or hands. It allows you to improve your image’s details, change certain parts of the input image, as well as upscale the modified image before or after the whole process is finished.
You can use the enhance module on two different image sources:
- With the image you’ve just generated using the WebUI – in that case you will use only the enhance module enabled by ticking the box between the “Input Image” and “Advanced” checkboxes (marked red on the image above).
- Or with your own imported image – in that case you will have to input your image in the “Enhance” tab which you can find within the “Input Image” section (orange on the image above), and then use the regular enhance module to modify your image.
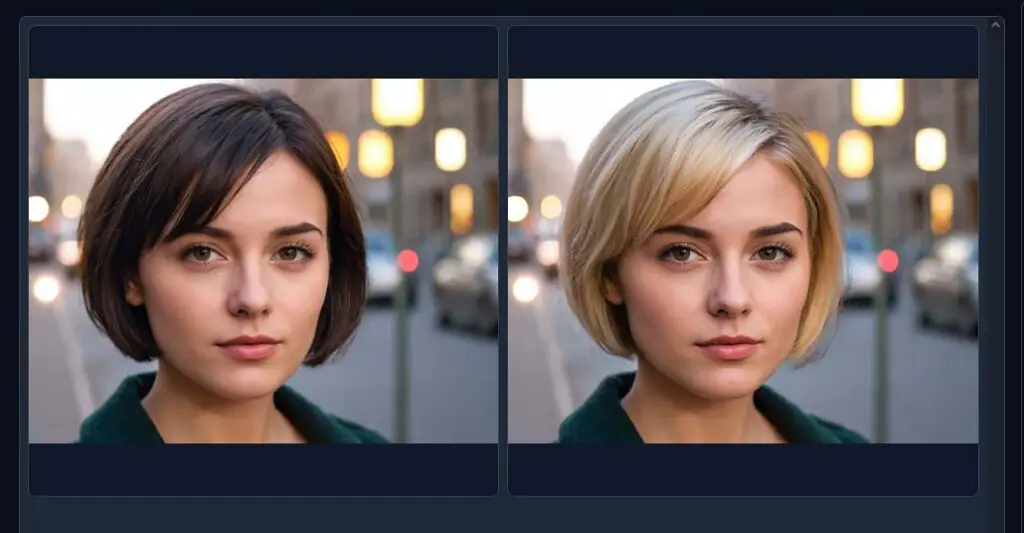
Here is an example of the enhance feature used to change the hair color of the person present in the photo without modifying other elements and parts of the image. Using the very same mechanism you can change many different elements of the imported images such as hairstyles, types of clothes, eye color, hand positions and gestures and much more. That’s what makes the enhance feature so powerful.
This module, as I’ve mentioned before, is also widely used to correct the elements of the images that are notoriously hard for the AI to generate correctly, such as hands and eyes. Adding details to these and quickly fixing them is extremely easy with the aid of this tool.
Here is how to use the enhance feature in Fooocus step-by-step, both in case of using a freshly generated image, and an image imported from your drive:
Using Enhance with a Freshly Generated Image:
- Generate an Image: Create your desired image using your preferred settings, and make sure that it’s visible in the main generation window above the main text prompt box.
- Prepare for Enhancement:
- Disable the random seed and input a custom static seed value to maintain consistency (optional).
- Move over to the Enhance tab and enable the features you want as explained below:
- Configure improvement conditions for details like faces, eyes, hands, etc. – you can do this in the three numbered tabs “#1”, “#2” and “#3”, and it’s done like this:
- Input a detection prompt specifying what element of the image you want to change in the “Detection prompt” box (singular nouns work best).
- Provide positive/negative prompts in the “Enhancement prompt” text input boxes below to describe how the detected elements should be modified. The enhancement prompt essentially tells the program what do you want your selected/detected elements to be changed into.
- Make sure that the “Enable” box is checked for your configured enhancement.
- Enable and configure either upscaling or variation action for the enhance process in the “Upscale or Variation” tab within the Enhance module (optional). One of these, if selected, can affect your image before or after your set enhancements are applied, depending on the setting you choose.
- Process the image with the chosen settings: You can do this by pressing the “Generate” button. Use the “Speed” or “Quality” generation speed presets when enhancing your images for optimal results.
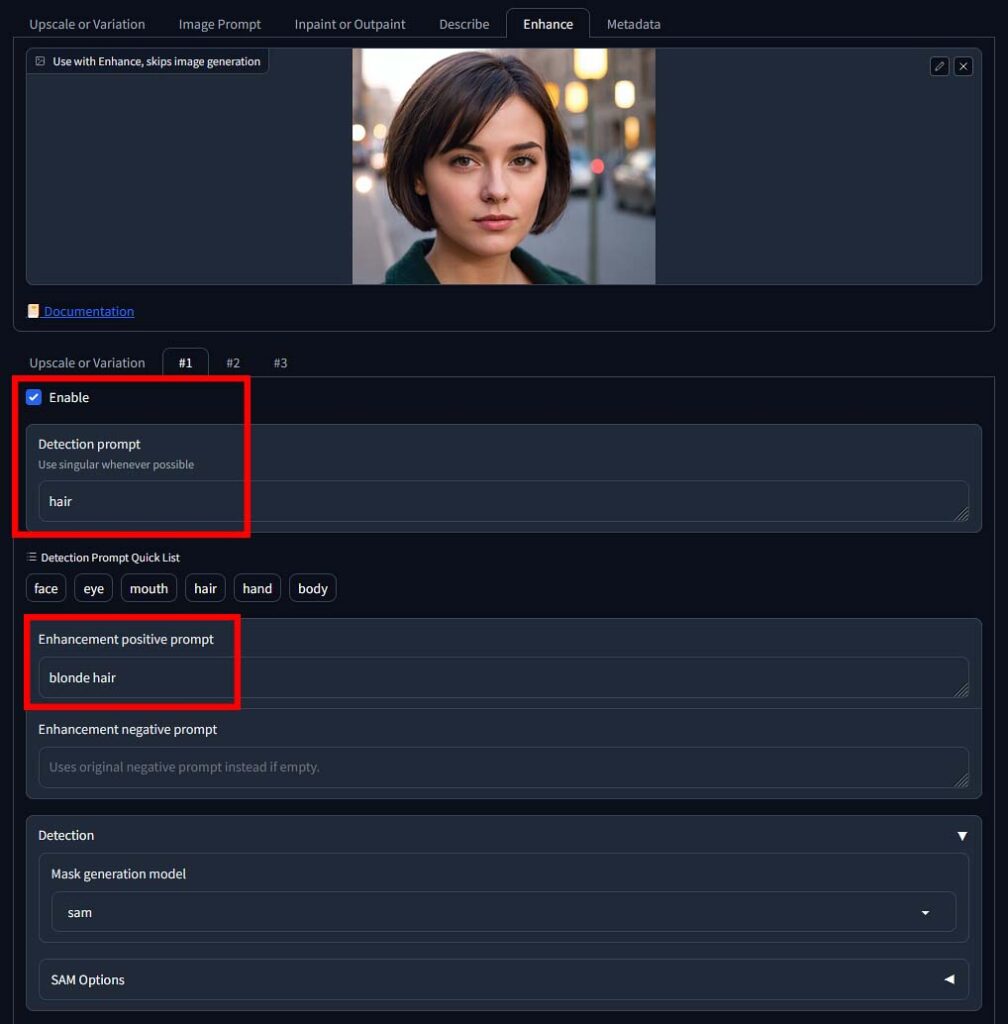
Some good examples of detection prompt/enhancement positive prompt pairs are:
- Detection prompt: blonde hair. Enhancement positive prompt: red hair. [for changing blonde hair to red hair]
- Detection prompt: eyes. Enhancement positive prompt: highly detailed eyes. [for enhancing general the quality of the eyes without affecting the rest of the image]
- Detection prompt: red jumper. Enhancement positive prompt: white t-shirt. [for changing the color and type of clothing present on the image]
- …and other pairs constructed in a similar fashion.
Using Enhance on an Existing Image:
- Import the Image: Drag and drop your image into the “Enhance” tab which is located in the “Image Input” section. This will let you skip the new image generation process altogether and do the enhancements only on your imported image.
- Configure Enhancements: Proceed with the enhancement steps exactly as described above using the enhance module shown upon selecting the “Enhance” checkbox.
You might have also noticed the additional “Variation and Upscale” tab within the main enhance menu. This one can be optionally used to apply the “Vary” and/or “Upscale” actions to the images either before, or after the enhancement process depending on which setting you’ll choose.
The enhance feature uses advanced object detection/mask generation models to recognize the objects you specify in the “Detection prompt” input box, and if you scroll a little bit down in the enhance tab, you will be able to try out different mask generation models and further refine their advanced settings should you need more control over the process. That’s pretty much it when it comes to the “Enhance” module basics!
So, What’s Next? – Automatic1111 WebUI
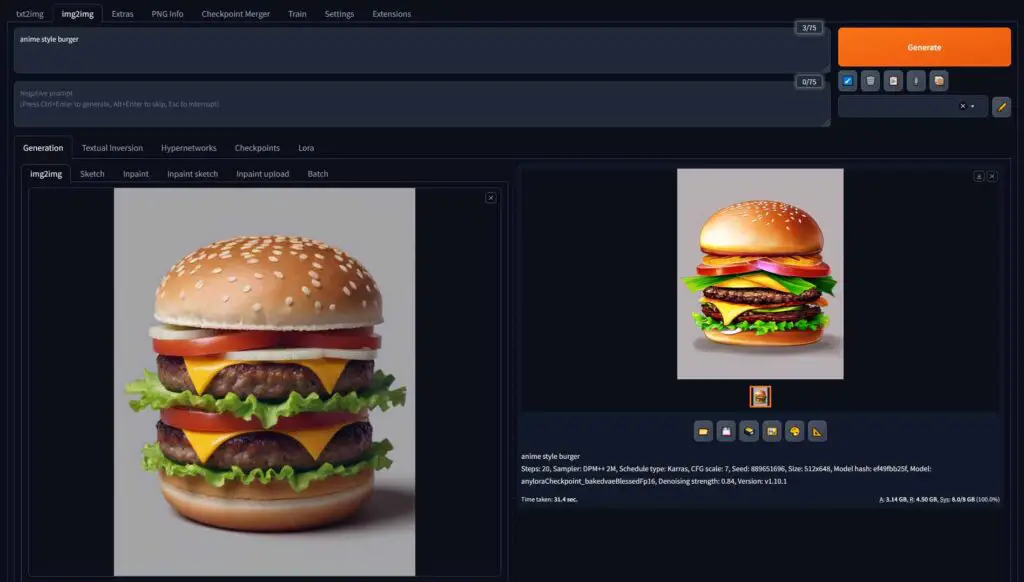
There are many ways you can go from here. One of them, if you want to get to more advanced AI image generation and editing techniques, is the Automatic1111 WebUI, which gives you access to much more advanced controls, has a wider feature set, and supports a lot of different community-made add-ons which can extend its functionality even further. It also lets you utilize base Stable Diffusion models, which the Fooocus WebUI does not support.
Don’t know where do go, or you’re just not feeling the Fooocus WebUI interface? Check out my list of all of the most popular free local open-source Stable Diffusion WebUI software. It features user interface screencaps accompanied with short descriptions of each program to help you decide which one is best for your use case scenarios!

![Upscaling, Outpainting & Image Prompts - Fooocus WebUI Guide [Part 3] Upscaling, Outpainting & Image Prompts - Fooocus WebUI Guide [Part 3]](https://techtactician.com/wp-content/uploads/2024/12/Upscaling-Outpainting-Image-Prompts-Fooocus-WebUI-Guide-Part-3-696x364.jpg)