Welcome to the second part of the Stable Diffusion Fooocus WebUI guide! Here, I’ll follow through with explaining all of the most important settings, modes and base features that you can find within the software, and show you quite a few tips & tricks you can utilize to generate any image you want in no time. It’s really worth going through, even if you already know a few things about Stable Diffusion already!
Don’t miss out on important info! Check out the first part of the guide here: How To Run SDXL Models on 6GB VRAM – Fooocus WebUI Guide [Part 1]
If you’re more of a visual learner, feel free to check out my full video on the Fooocus software, which you can find here, on my YouTube channel, if you haven’t already!
The Basic Settings & Your First Generated Image
If you already have the Stable Diffusion Fooocus WebUI installed and configured, you’re ready to start generating your AI images. If not, make sure to quickly go through the installation process explained in the first part of the guide here.
Generating your first image is a matter of typing in your image prompt (a sentence describing what you want to see in your image), and then hitting the “Generate” button.
After the image finishes generating, you can right click it and save it to your drive. All of the images you generate are also automatically saved to the “Output” folder in the main Fooocus directory. As Fooocus is working 100% locally, no images will ever leave your PC without your consent, and so, the generation process is fully private. That’s it!
We however, are a little bit more curious about how all this works, so we’ll already extend this process by a few short but important steps.
Expanding the “Advanced” Settings Menu
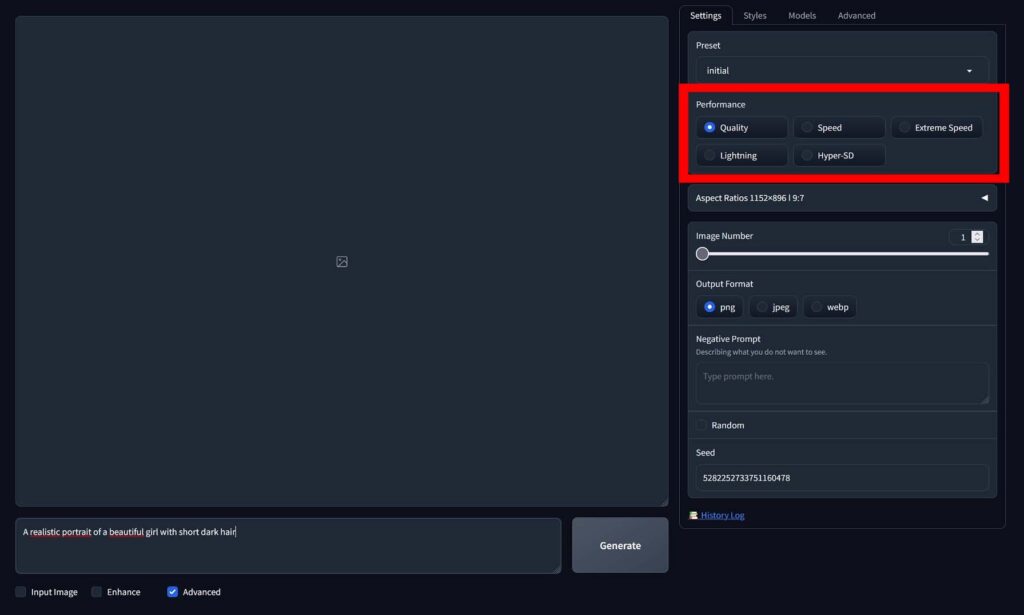
Scroll down and check the “Advanced” checkbox which can be found underneath the prompt input box, to reveal the available software settings, including the performance presets. We will explain all of these as we go along.
Choosing a Performance Preset
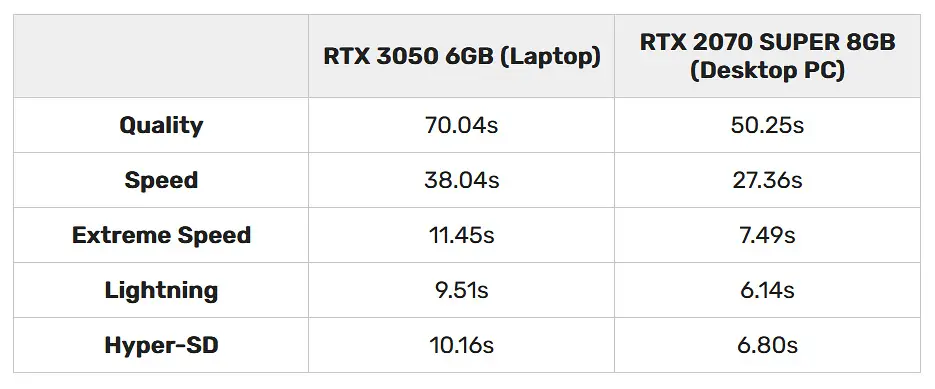
The performance presets simply control the amount of steps used in the image generation process, with the general rule being: more steps – better image quality up to around 50-60 steps when you start getting diminishing returns, less steps – faster image generation, but lower image output quality.
- Quality: This is the highest image quality preset in Fooocus, with the longest generation time. An image created using the quality preset takes 60 generation steps to generate.
- Speed / Extreme Speed / Lightning / Hyper SD: Each of these presets uses less image generation steps than the other, trading off some quality for faster output. In general though, even the images generated using the “Lightning” and “Hyper-SD” presets can reach photorealistic level of details in the right conditions.
For your first generation it’s best to start with the “Speed” preset, which generates an image in exactly 30 steps. On a system with a mid-range NVIDIA GPU, this should yield a result in around 30 seconds total.
Thinking of a Good Prompt
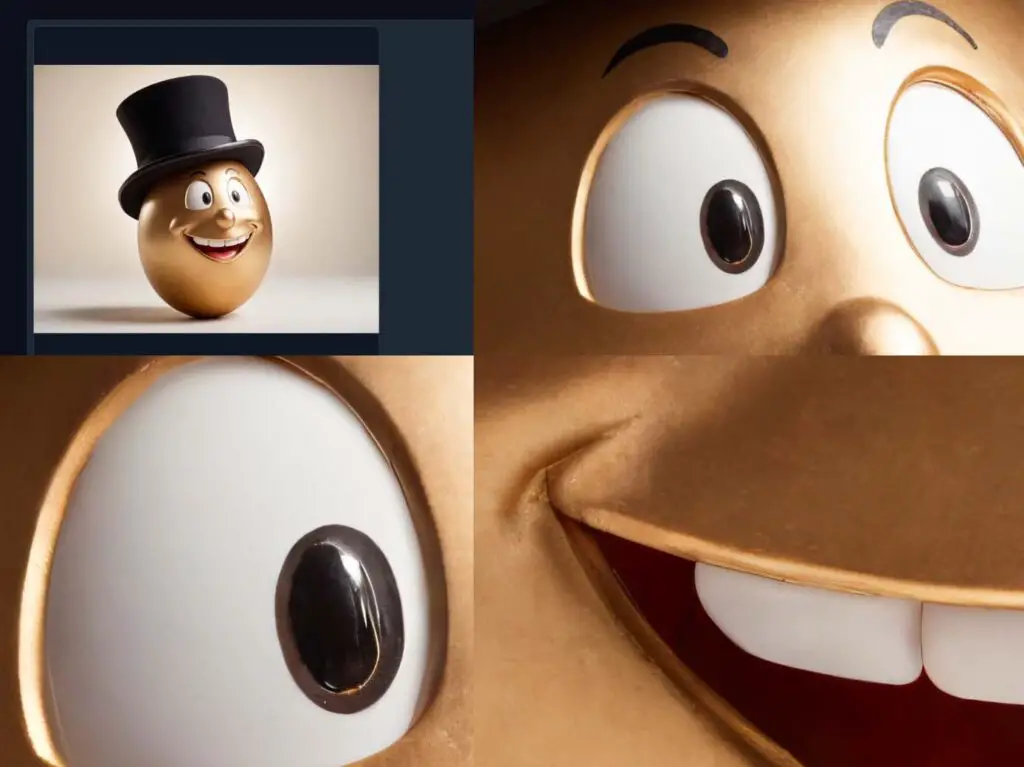
Type in your desired text prompt. It should be a simple sentence describing what exactly you want to see in the generated image. In your first creations, you can aim for clear, descriptive language, e.g., “A single golden egg isolated on white background, soft ambient lighting”. Don’t be afraid to experiment with some more complex scene descriptions later on.
A great tip for starting out is manually applying different styles to your image by simply adding some style keywords at the end of your prompt. Try adding things like “made out of gold”, “Van Gogh painting style”, “Baroque details” at the end of the prompt you came up with, and see how it changes. The possibilities are almost endless!
The Negative Prompt Box
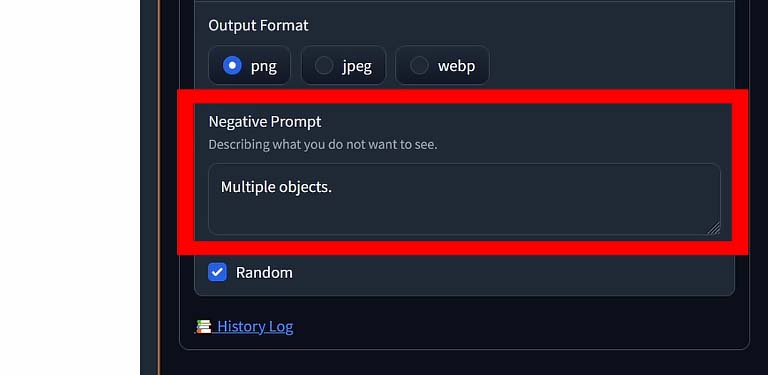
The negative prompt should simply contain all the things you don’t want to show up in your newly generated image. It can take a form of a simple, descriptive sentence, but you can also use single words here. A few examples of a negative prompt could be:
- “Multiple objects, a few items” – if you only want one object to show in your scene, but you’re getting multiple.
- “Cars, vehicles, buses, “ – for example when you’re generating a cityspace, but are getting vehicles in your image.
- “People” – if you don’t want people to be visible in the generated picture output.
You can experiment with different forms of negative prompts and see which ones work best with the model/checkpoint you’re using. Try using short and long variants, both plural and singular forms of the words you have in mind, and remember to always utilize synonyms for better effect.
The General Fooocus Presets
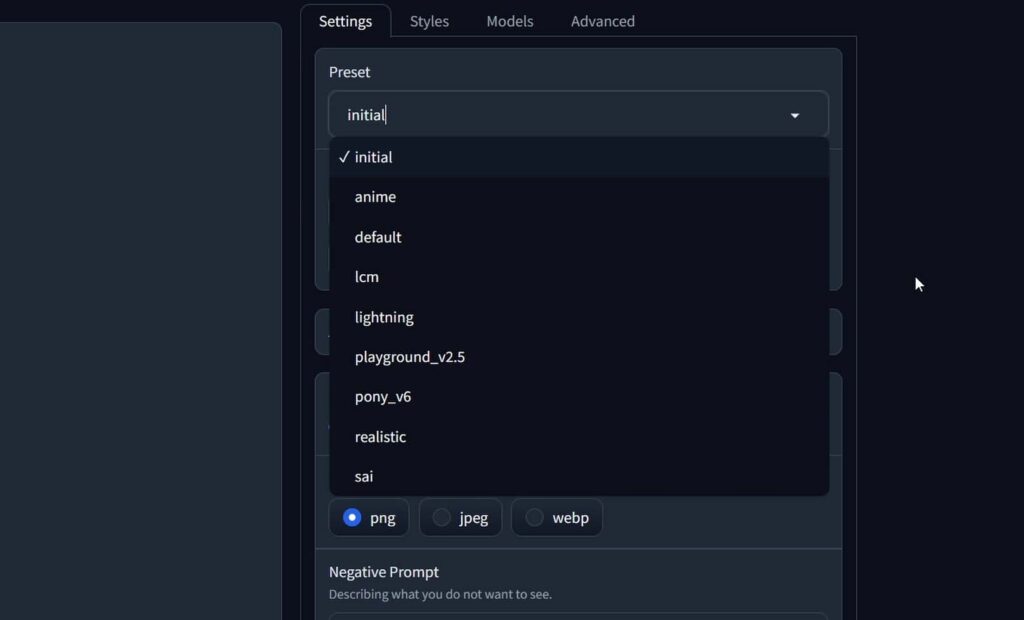
Alongside therun.bat file in the main Fooocus directory, you will notice two other executables: start_realistic.bat and start_anime.bat. These launch different generation environments or presets, each using different base models. The first time you run them, the corresponding models that the presets will utilize should start downloading automatically. I will explain how different models will affect your image generations in a very short while.
You can also switch between these presets from within the WebUI. On the right hand side in the “Presets” drop-down menu you can choose from different WebUI presets that include the “realistic” and “anime” presets, but also a few different ones, as shown on the image above. Selecting a preset can trigger an automatic model download if it hasn’t already been cached locally, so keep that in mind when trying them out.
Image Size / Aspect Ratio
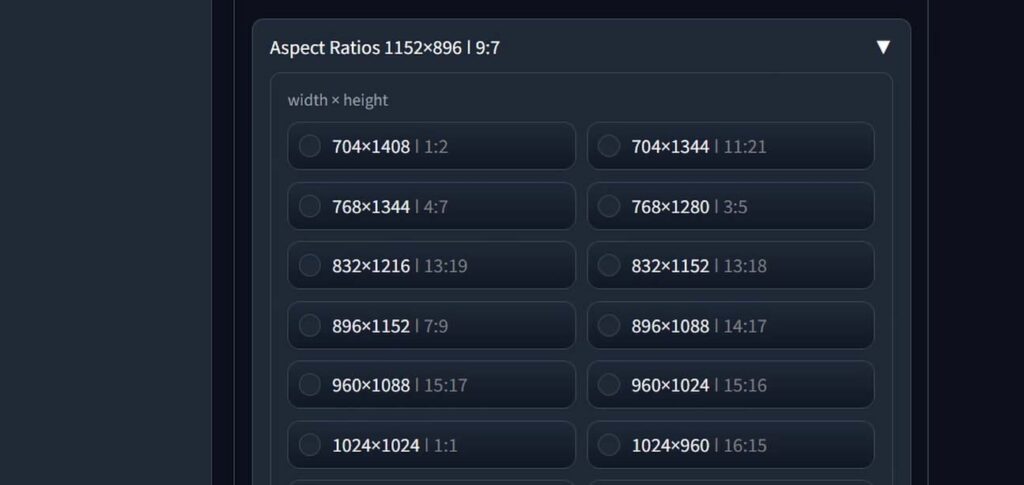
Upon entering the “Aspect Ratios” drop-down menu, you will see quite a few image size presets. Pick the aspect ratio that resembles the dimensions of the output picture you want, and that’s pretty much it.
Smaller images take less time to generate, larger images on the contrary take a little bit longer. This really isn’t of much concern to us, as pixel-wise, most of these options are relatively close to each other in terms of their final size.
Remember that as we will get into upscaling your images using the built-in Fooocus image upscaler utility in the third part of this guide, you don’t need to attempt to generate extremely large images to get a final high resolution output.
Image Number & Output Format

This one is pretty straightforward. Pick a number of images you want to generate, and the format you want them to be saved in, choosing between .png, .jpeg and .webp, the last one being the smallest size-wise, and the first one being the highest quality.
As mentioned before, all the images you generate will be automatically saved to the “Fooocus/Outputs” folder in the main Fooocus WebUI directory, so if you don’t want the other people using your computer to be able to gain access to your generations, you will have to clean this folder manually once you’re done using the program.
The Image “Seed” Setting
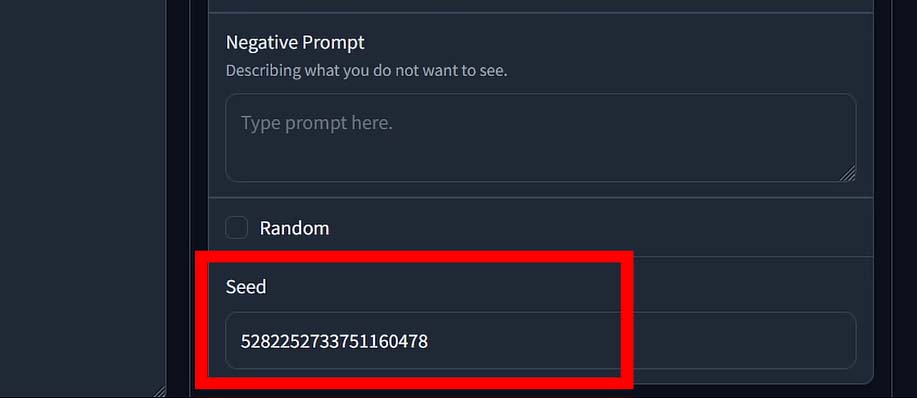
The “Seed” setting is oftentimes regarded as the most mysterious one, but it’s really dead simple. The image generator, after you click the “Generate” button begins the process of creating your image by randomly choosing a numerical value which serves as the base of the underlying mathematical processes that result in you getting your image output in the very end. This random numerical value is the so-called “Seed” value.
The default setting for the image generator seed is “Random”, as denoted by the box that in the case of a newly installed Fooocus WebUI should be checked. What this means is that every time you hit the “Generate” button, this value will be chosen at random.
You however, have the power to enter a fixed seed value to keep it the very same number regardless of how many times you restart the image generator. What does this do in practice? To put it simply, if you set a fixed generation seed, don’t change any of the image generation settings including the prompt and keep hitting the Generate button, you will end up with identical image each time the generation process finishes. This makes it possible to experiment with subtle changes to the image contents when modifying only one of the available generation settings. That’s it!
This makes it possible for me to show you how exactly the CFG scale setting value affects the generated image, in the paragraph below. Without setting a fixed seed value, I wouldn’t be able to retain the image contents between the consecutive generations used to show you the effect of moving the CFG slider without changing any of the other image generation settings. So let’s move on to that!
Guidance Scale & Image Sharpness Values
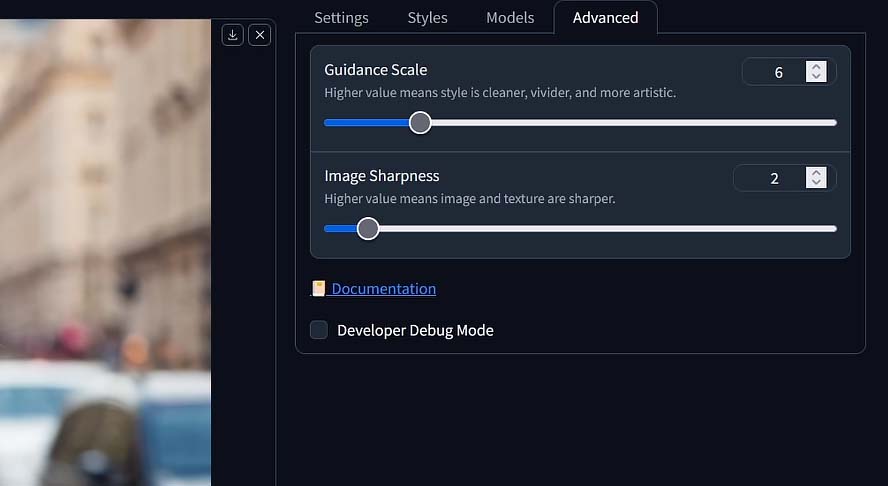
Upon clicking the “Advanced” tab, which is located right after the “Models” tab we will get to next, you will see two other settings that are important to mention. These settings are “Guidance Scale”, and “Image Sharpness”. Here is how they work.
Guidance Scale Value (CFG)
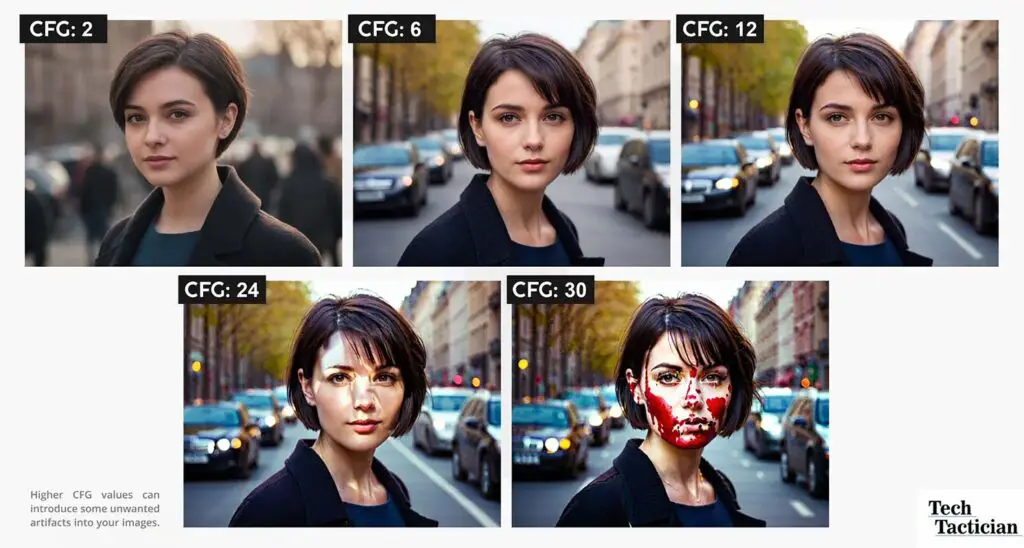
The “Guidance Scale Value”, sometimes also called “CFG Scale”, is a value that controls how closely the image generation process will follow your chosen prompt. Another, more abstract explanation is that it controls the model’s “creativity” when creating your image.
If you want to make sure that the objects you mentioned in your prompt are visible in the output, you can up this setting and see how it affects your generations, however in this situation in general it’s much better to revise your prompts, rather than up the CFG scale value which as you can see in the image above can affect your images in rather unexpected ways.
In practice, low guidance scale values will make your images look more washed out and bleak, while higher values will introduce more vivid colors and clear sharp details into the output. Extremely high CFG scale settings (usually 20 and up) will usually introduce quite a lot of unwanted artifacts into your generated images.
You can access the full resolution version of the image above here.
The Image Sharpness Slider
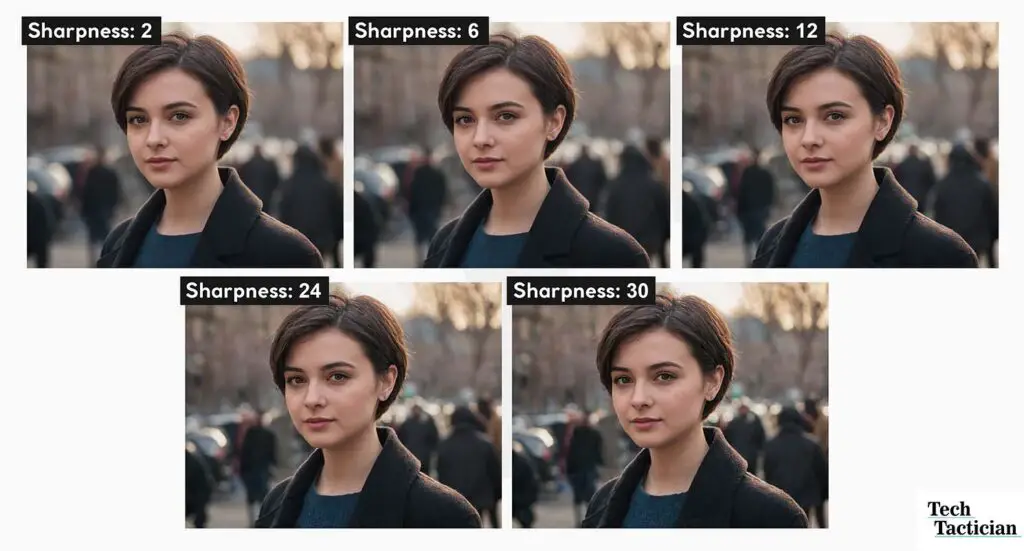
The second slider available in the “Advanced” tab, is the “Image Sharpness” slider. Its effect on the final image is rather minimal, and it’s almost unnoticeable in the small version of the included picture. You can view or download the full-res version here if you’d like.
The changes are visible mostly in the background, with the low sharpness value settings giving us a better “selective focus” effect, as if the image was shot using a camera with lens aperture wide open, and the higher sharpness values bringing out more detail from the blurred background.
This setting will have varying effect on images with different contents though, so feel free to experiment with it. Now let’s move on to the most important part of the Fooocus WebUI, which is the “Models” tab we’ve successfully avoided until now.
The Models/Checkpoints – What Are They?
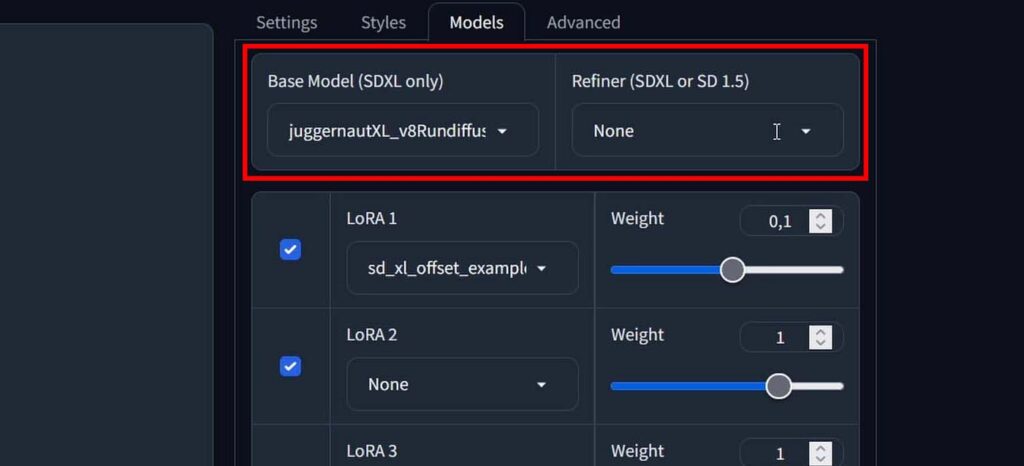
On the right hand side, aside from the “Settings” tab, we can find the “Models” menu. Here, lies probably the most important part of the Fooocus WebUI.
What is a model/checkpoint? These two words are often used interchangeably to describe the file which contains all the data achieved in the training process, which enables you to create images based on text prompts. You can find, freely download and use many of these models on websites such as Civit.ai or HuggingFace.
Essentially, a checkpoint acts kind of like a model’s “save point”, capturing the model’s parameters at a specific stage of training. This means that if the training is interrupted, you can resume from that point without starting over.
A checkpoint contains the model’s accumulated data, allowing it to generate images that align with the input text based on what it has learned up to that moment. Many people pick up the publicly available Stable Diffusion checkpoints and further train them to improve them or guide them towards specific image styles or concepts.
In the Fooocus WebUI software, we’re exclusively using the highest quality Stable Diffusion XL (SDXL) models. This is important, as later on, when you’ll be searching for custom models to import and play around with, you will have to seek for models that are based on SDXL rather than base Stable Diffusion 1.5 or 2 which Fooocus does not support.
At this point, there are hundreds of different variations on the base Stable Diffusion XL checkpoints. These are simply the base SDXL model which is further trained by some people on a large amount of high quality material, to make it easier to generate images in certain styles.
Good examples of popular checkpoints based on SDXL 1.0 are:
- epiCRealism – A model aiming to achieve photorealistic results with minimal additions to the main prompts.
- Nova Anime XL – Large checkpoint trained on anime images, letting you generate your own anime-style creations.
- [PVC Style Model] Movable figure model XL – Model created solely for generating images of PVC anime figurines, making it easy to apply this style to any object you want.
In a short while I will show you how you can use these very models (and hundreds of different checkpoints based on SDXL) in the Fooocus WebUI. A little spoiler: it will simply involve downloading the model files, and putting them in the right folder within the main Fooocus directory.
The Refiner – What Is It? – Is It Necessary?
The refiner is an optional auxiliary model that can work alongside the main SDXL model by enhancing the details and overall quality of the generated image. While the main model focuses on creating the general composition and structure of the image based on your text prompt, the refiner, if used, is usually set to kick in at a certain point of the image generation process to improve finer details, textures, lighting, and overall polish.
While using a refiner can certainly make your creations more detailed and therefore add to the overall realism of your generated images, in general consensus it is not necessary to create photorealistic images. Many people (including me) utilize SDXL models on low VRAM systems and skip using the refiner completely in most of their SDXL generations without noticeable downgrade in final generated image quality.
As the refiner is another large model that has to be loaded into your GPU VRAM during the image generation process, using it on a system with 8GB of video memory and less can slow down the whole ordeal quite a bit, as the models will oftentimes have to be “swapped” in the GPU memory at some point in the process, which can take a lot of time, even if you store them on a fast SSD drive.
LoRA – Low-Rank Adaptation Models
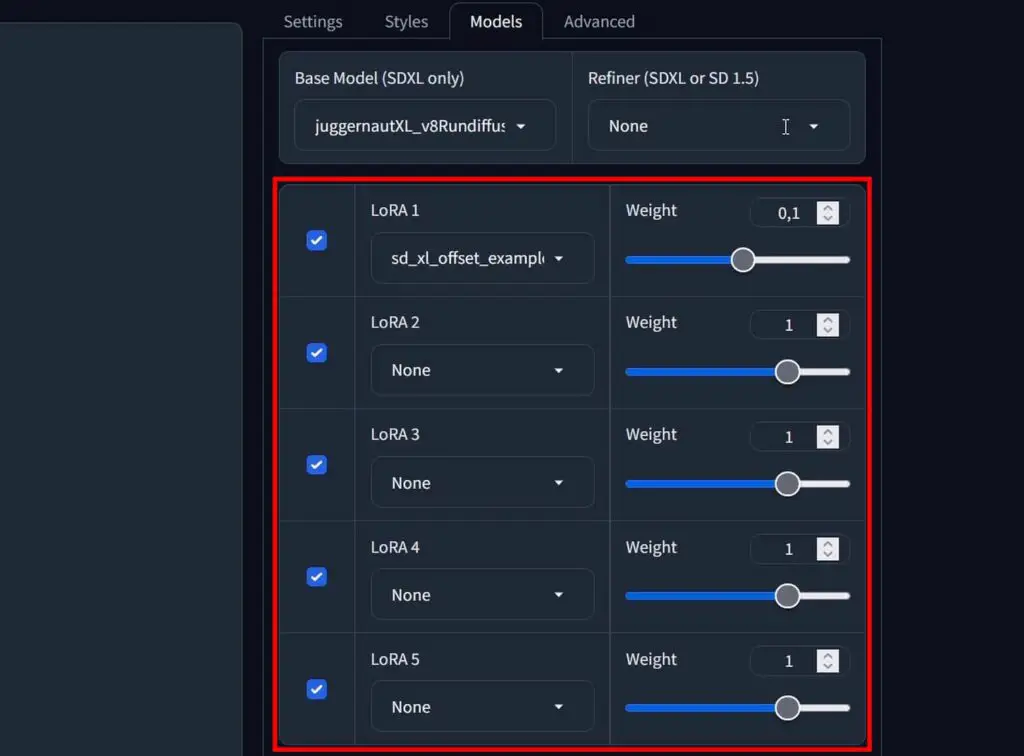
LoRA, short for Low-Rank Adaptation, is a technique used to fine-tune existing models, such as Stable Diffusion XL. Fine-tuning simply means adjusting the model to achieve a specific generation style or to produce particular image content, often those not represented in the original model’s data. You will oftentimes come across LoRA files also described as “LoRA models”. These two essentially are used to denote the very same thing.
Instead of retraining the entire model, which is computationally expensive and time-consuming, LoRA focuses on training only a small subset of parameters which are later used to influence the image generation process. Essentially, LoRA models “adapt” the base model to specialize in generating images of a particular style, concept, or theme.
You might ask, “Why would you need LoRA models if you can apply different styles to your images simply modifying your prompt in a certain way?”. Well, without using a LoRA you’re only able to influence the base model you’re using towards generating images depicting combinations of themes and objects that it was trained on. If you try to generate an image of a certain fictional character, or even better, your own face, you will quickly see that the model is incapable of doing that, regardless of the prompt you’ll use.
LoRAs allow for the introduction of new concepts, such as artistic styles or certain image elements, without the need for extensive resources or modifying the original model weights (or in other words as we’ve said before, in our case without further training a selected SDXL checkpoint).
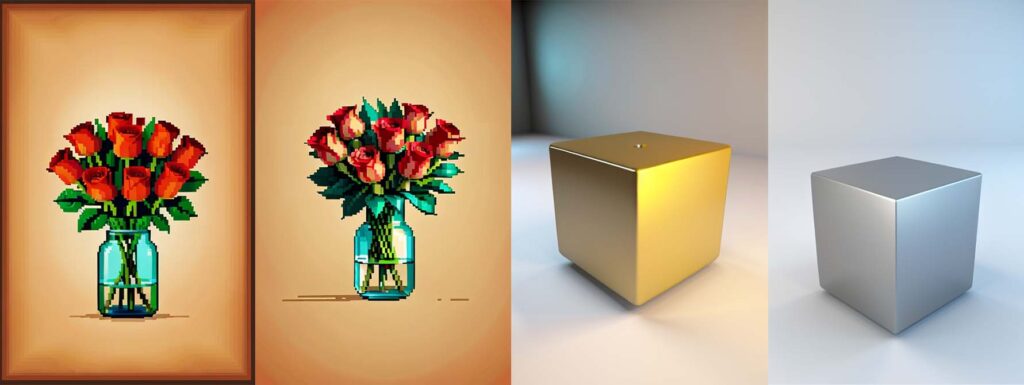
In other words, LoRA models can help you generate images of your favorite anime character, or images containing your own face which were not originally present in the base SDXL model training dataset, without you having to spend a lot of time and resources on training your own SDXL checkpoint.
LoRA models are smaller, easier to handle, faster and cheaper to train, and can influence your generations much more efficiently than simple prompt manipulation, additionally enabling you to introduce elements previously unknown to your main model to your generations. You can learn much more about LoRA models here if you’d like to.
Training your own LoRA models on your own images or photos is possible and it’s easier than you might think! I’ve already put together a tutorial on training LoRA models using the Kohya GUI which is another neat open-source project that you might be interested in. Feel free to check it out here: How To Train Own Stable Diffusion LoRA Models – Full Tutorial!
How To Import Your Own Custom Models?
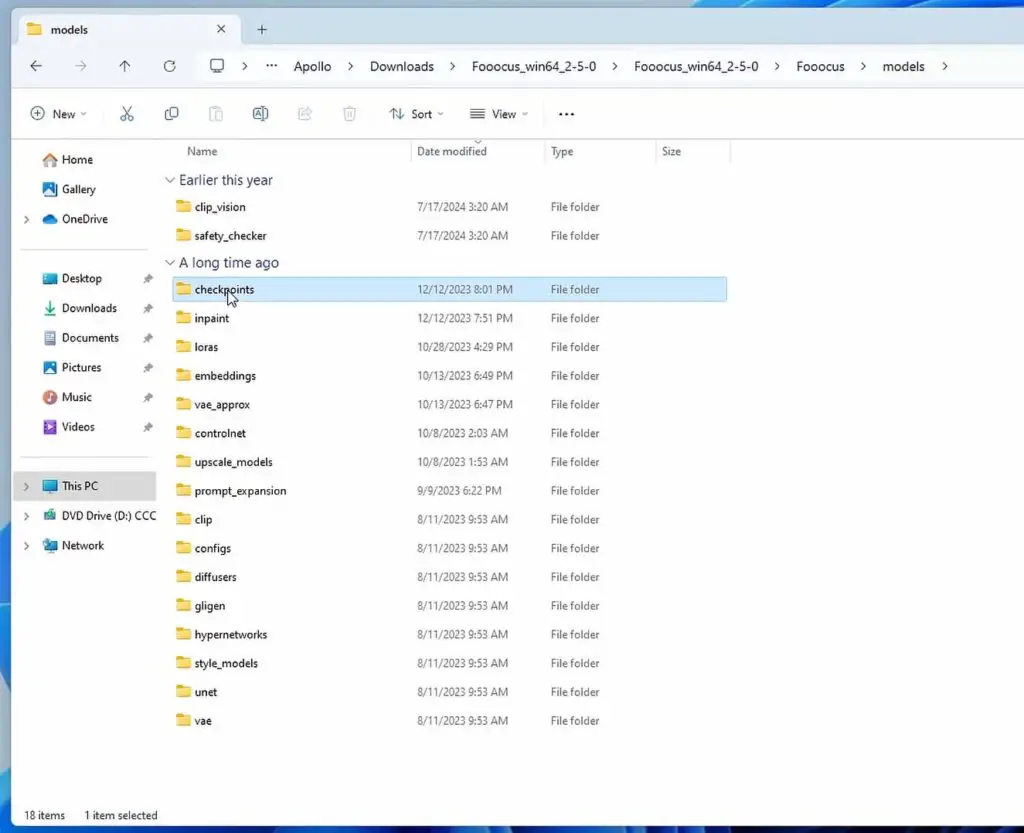
This is easier than you might have though. Simply put the models you’ve downloaded into the corresponding folder in the “Fooocus/models/” directory.
Main SDXL models/checkpoints go into the “checkpoints” folder. LoRA models we’ve already talked about, go into the “loras” folder. All of the other model types you might not know about yet such as upscaling models, clip models, controlnet models and so on also have their corresponding directories here.
After you’ve put your model files in the correct directories you might have to restart the WebUI to make them show in the “Models” tab. If you’ve done everything right, and the models you’ve downloaded are placed in the right directory and are of the correct type, you can now use them to generate new images.
Fooocus Image Generation Styles
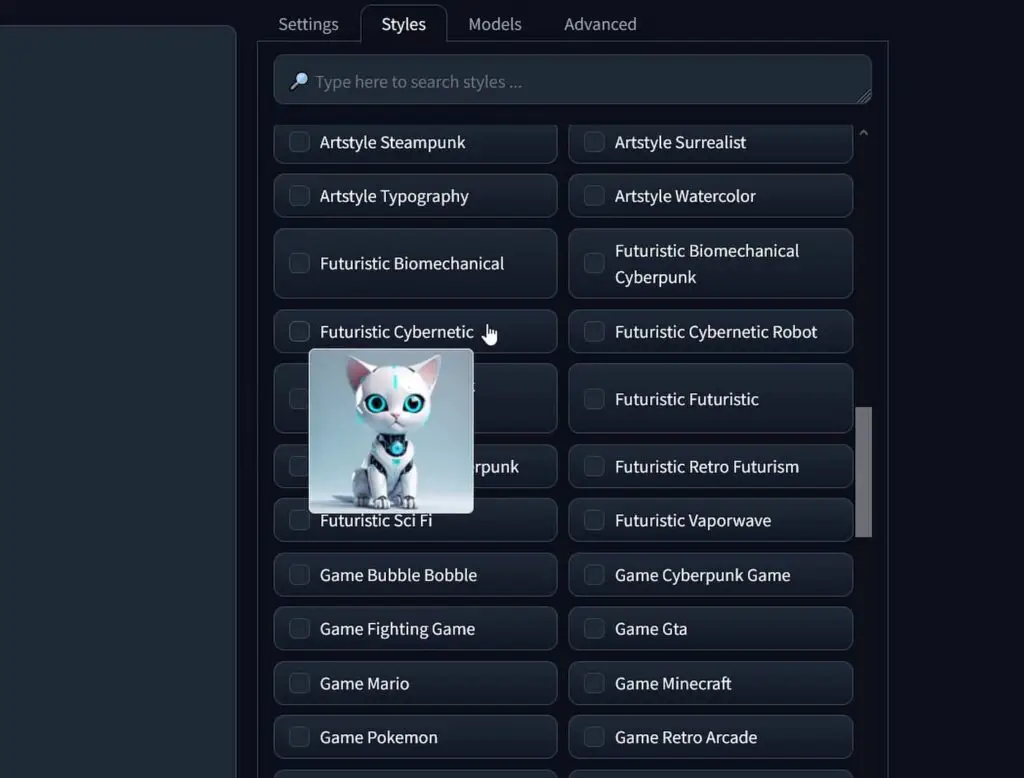
The Fooocus WebUI also has another neat beginner-friendly feature which I really enjoy using, even after switching to more complex image generation software such as Automatic1111, or ComfyUI.
This feature is accessible from the “Styles” tab. Here you can choose from a large set of different image style presets you can apply to your generated images by simply ticking a box next to your selected style name. You can mix styles together in any way you like, however note that the more styles you use, the less prominent each of them will be in the final output.
How do these work? Well, it’s quite simple and nowhere near as sophisticated as the LoRA models or other methods of fine-tuning I’ve mentioned before. The Fooocus styles simply append a pre-set list of keywords to your prompt after you press the “Generate” button to steer the generation process in a direction denoted by the name of the selected style.
You won’t see the appended keywords in the WebUI interface, however if you take a look at the terminal console when the image generation process starts, you will be able to notice which tags were added with the styles you picked. Pretty neat!
You’ve Got The Very Basics – But There Is Still More!
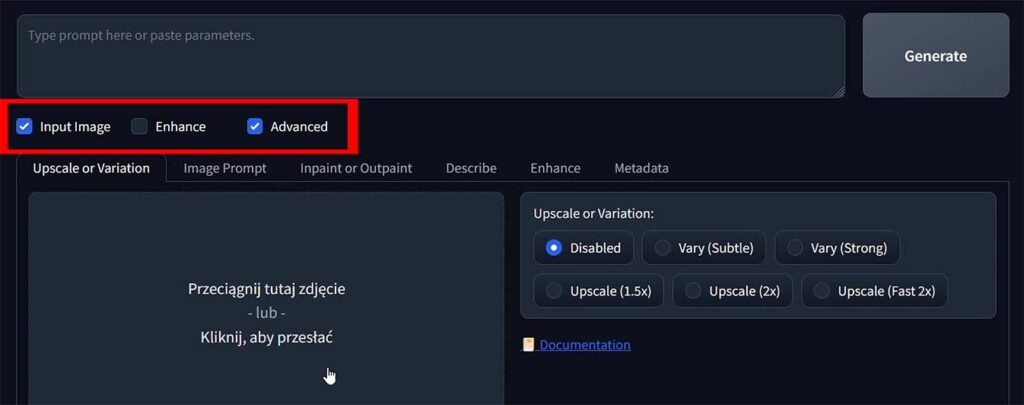
That’s it for the second part of the Fooocus WebUI guide! If you’re enjoying the ride so far, you can go straight to the third part, when we’ll get into high quality image upscaling, outpainting and much more. There are still a lot of things to be discovered here!
The third part of the Fooocus WebUI guide is now available here – Upscaling, Outpainting & Image Prompts – Fooocus WebUI Guide [Part 3]

![Settings, Modes & Image Generation - Fooocus WebUI Guide [Part 2] Settings, Modes & Image Generation - Fooocus WebUI Guide [Part 2]](https://techtactician.com/wp-content/uploads/2024/12/Settings-Modes-Image-Generation-Fooocus-WebUI-Guide-Part-2-696x364.jpg)