
There is an easy way to share the host GPU with one or more VMs in Hyper-V. Here is the exact guide on how to enable GPU sharing on your VM, which doesn’t involve using the RemoteFX vGPU feature, or unnecessarily complicated workarounds.
The idea is simple: you move all the necessary GPU driver files onto the virtual hard drive of your VM, and then set up the GPU link for the virtual machine using a simple PowerShell script. Here is how to do it in 4 short steps. This guide assumes that you are using a Windows 10 or 11 host machine.
Step 1: Turn off the Virtual Machine
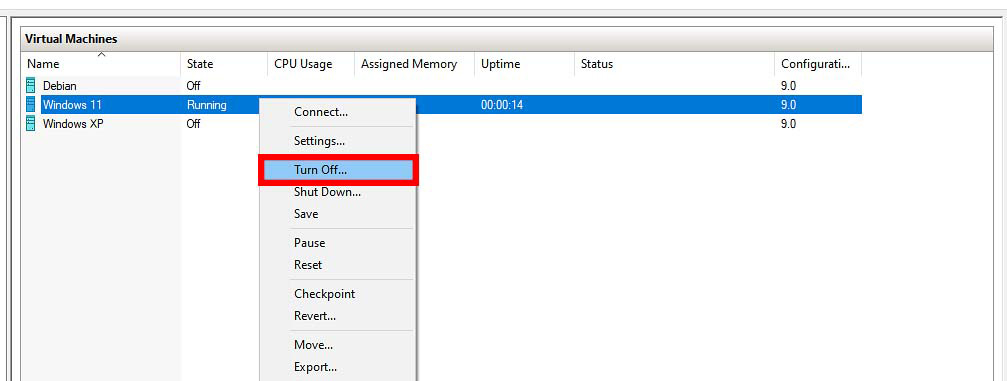
Turn off and shut down the VM you want to assign your graphics card to. Also, make sure that your chosen VM has no snapshots present, otherwise this method won’t work. Don’t worry, after linking your GPU, you will be able to use snapshots again without any trouble. Then, you can proceed with the following steps:
Step 2: Copy the GPU Driver Files from the Host Machine to your VM
- Locate the GPU Driver Files:
- On your host machine, browse to
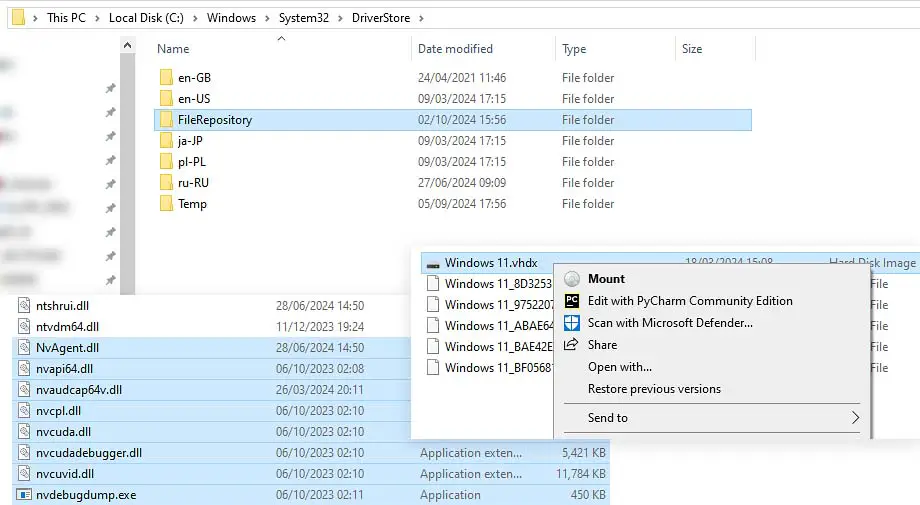
C:\Windows\System32\DriverStore\FileRepository. - Copy this whole folder to a temporary location such as your Desktop (make sure you do not remove or move the file permanently). If using an NVIDIA GPU, also copy all files which names start with “nv” from
C:\Windows\System32to that same temporary location of your choice.
- On your host machine, browse to
- Mount the VM’s Virtual Hard Drive:
- Locate your VM’s VHD/VHDX file, right-click, and select Mount. The virtual hard drive should now be accessible through your hosts file explorer.
- Transfer Files to the VM:
- On the mounted virtual hard drive, navigate to
C:\Windows\System32. - Create a folder called
HostDriverStoreand paste all the driver files from your chosen temporary location here.
- On the mounted virtual hard drive, navigate to
- Eject the Mounted Drive: After the files are successfully copied, unmount the drive by right clicking it in the file explorer, and selecting Unmount.
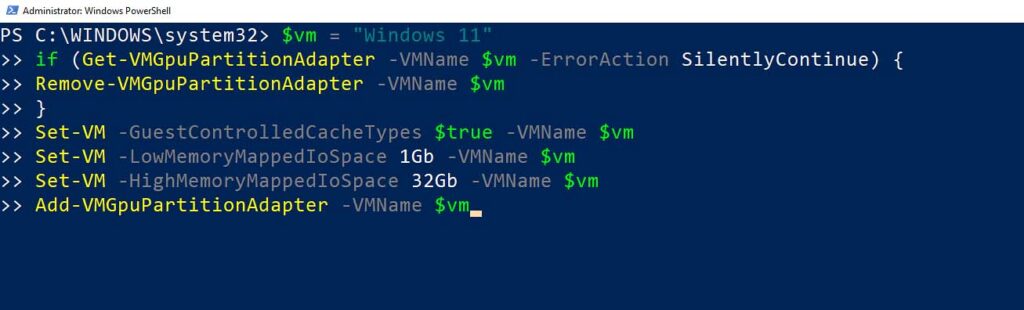
Step 3: Assign the GPU to the VM Using PowerShell
- Open a text editor of your choice and paste in the script supplied below.
- Replace
"The Name of Your VM"in the script with your actual VM name. - Open PowerShell as Administrator on the host machine.
- Copy the script over to the PowerShell window and execute it to assign the GPU to your VM.
$vm = "The Name of Your VM"
if (Get-VMGpuPartitionAdapter -VMName $vm -ErrorAction SilentlyContinue) {
Remove-VMGpuPartitionAdapter -VMName $vm
}
Set-VM -GuestControlledCacheTypes $true -VMName $vm
Set-VM -LowMemoryMappedIoSpace 1Gb -VMName $vm
Set-VM -HighMemoryMappedIoSpace 32Gb -VMName $vm
Add-VMGpuPartitionAdapter -VMName $vm
If the script finishes running without any errors, you should be all set!
Step 4: Verify the GPU Access in your Virtual Machine
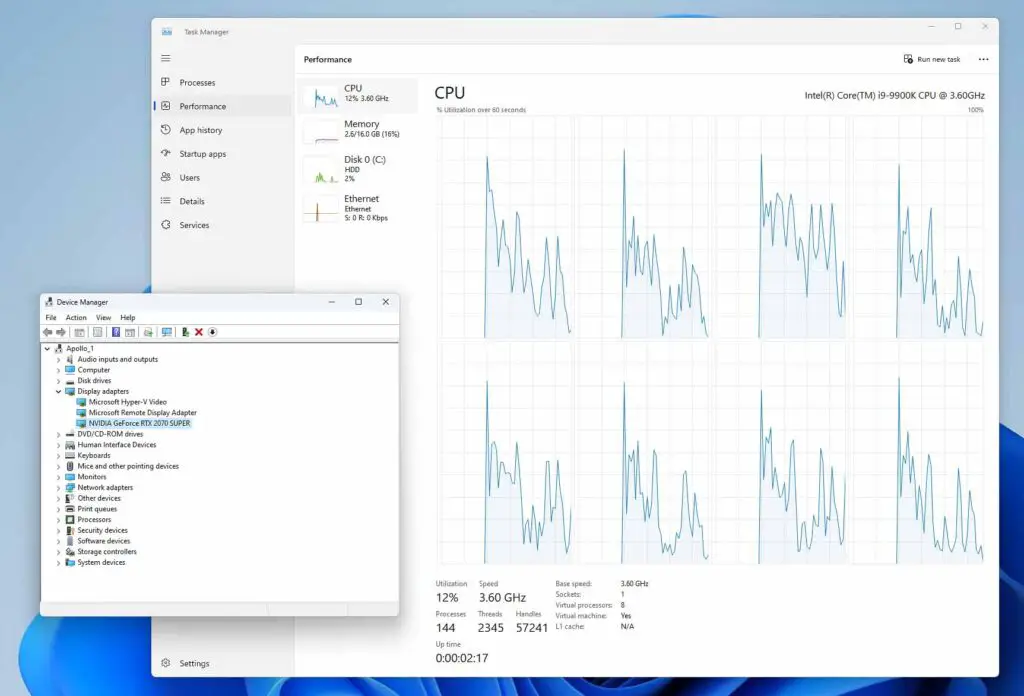
- Start the VM and open the Windows Device Manager.
- Check that the GPU appears in the Display Adapters section.
If your graphics card can be found there congrats, the process is finished. As a last test, you can try to use your chosen GPU accelerated software to test if everything is working as intended.
Very important note. The GPU, although visible in the device manger and working properly, won’t display in the Windows 11 task manager. If you want to monitor the graphics card usage using the task manager window, you need to do it directly on the host machine.
That’s It! – All Done
You have successfully assigned a GPU to your Hyper-V VM, allowing all the programs inside the virtual machine to make use of hardware acceleration using your graphics card. I use this method for all my VMs when recording YouTube videos about AI software for my YouTube channel! Of course it goes without saying that you can repeat this process for all the other VMs you have.
Important Note – Driver Updates
Remember that after each driver update for your GPU you have to repeat the file copying process to ensure that your GPU link will still be working and your drivers will stay up to date. Remember to do this, especially if you have your driver updates set to be done automatically.