
ACE-Step is an open-source music generation model that is considered one of the best free local alternatives to Suno & Udio out there. It features dedicated ComfyUI workflows, plus a full Gradio WebUI. This guide is focused on using the ACE-Step v1.5 inside Comfy. All instructions below are built around local usage (your GPU, your files), so the tracks you use and generate will never leave your PC without your consent. More recent GPUs such as the RTX 3090 and up will be able to generate tracks in under 10 seconds total. With that said, let’s begin!
Things You Need First
- A working ComfyUI install (desktop or portable) – If you’re new to ComfyUI in general, start with ComfyUI’s download + update docs first.
- At least 4GB of VRAM on your GPU (8GB recommended) – and more for longer song generations, or if you want to use versions of the model with larger LM component (which is used for automatic semantics and planning based on your input prompt), as well as for longer track durations and batching.
Links that you might need throughout this tutorial:
- The ACE-Step v1.5 model – https://huggingface.co/Comfy-Org/ace_step_1.5_ComfyUI_files/tree/main
- Optionally – The ACE-Step v1 (3.5B) model – https://huggingface.co/Comfy-Org/ACE-Step_ComfyUI_repackaged/tree/main/all_in_one
What works today (Ace-Step 1.5 vs v1)
ACE-Step 1.5 is natively supported in ComfyUI and ships with a set of workflow templates for text-to-audio tasks. ComfyUI’s own brief ACE-Step 1.5 guide explicitly lists some 1.5 features as “coming soon” in ComfyUI – things like cover/reinterpretation and repaint are model capabilities, but not yet part of the ComfyUI 1.5 workflow template set.
That means that for now:
- If your goal is text → music: use ACE-Step 1.5 native workflows (this guide’s main path).
- If your goal is music → music / repainting / segment editing inside ComfyUI right now, the older path available via templates is still the ACE-Step v1 (3.5B) workflows (temporary fallback until full 1.5 feature exposure lands in ComfyUI). Keep in mind that the previous version of the model is of much lower quality when it comes to audio fidelity and overall coherence.
If you want the full 1.5 feature set immediately (outside ComfyUI), you can use the official ACE-Step WebUI, which is also quite simple to install, or one of the community UIs mentioned later in this guide.
You can also utilize third-party nodes/workflows, such as the ones made for the cover/repaint audio-to-audio tasks. One of those was developed by RyanOnTheInside.
Quick Setup Guide – ACE-Step 1.5 in ComfyUI (text-to-audio)
Here is how to quickly get started with the simple ACE-Step 1.5 workflow in Comfy in 5 steps total.
Step 1 – Update your ComfyUI
Don’t skip this step. ComfyUI dedicated ACE-Step workflows are tied to specific node versions. If you don’t see ACE-Step 1.5 templates in the workflow library, you’re probably not on the supported build yet, and need to update your ComfyUI.
Step 2 – Choose your model packaging: AIO vs split files
You have two options when it comes to which version of the model you are going to use:
- All-in-One checkpoint (recommended): easiest to manage (one file).
- Split model files: larger total footprint, but modular; useful if you want explicit control over text encoder / diffusion model / VAE components. This is recommended for advanced users who need to swap specific components.
Option A (recommended): All-in-One checkpoint
This is the fastest way to get started, and it simply involves picking a premade workflow template in ComfyUI, and letting it download the required ACE-Step model automatically.
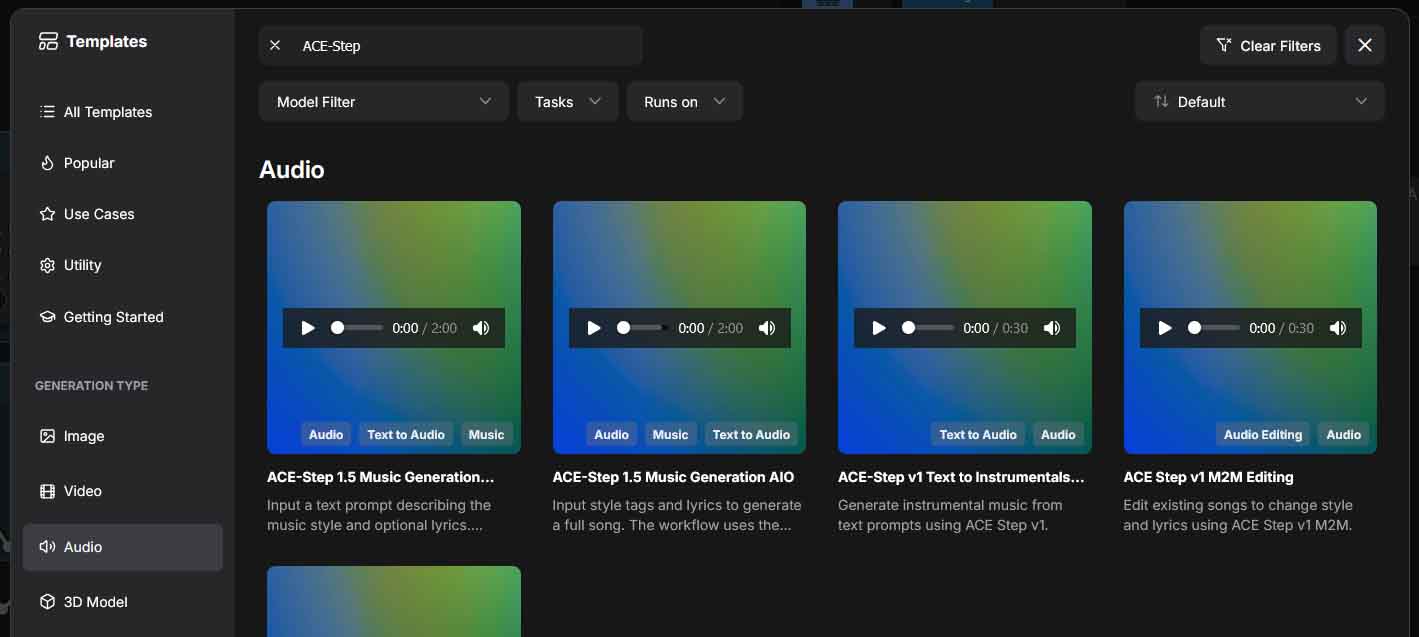
- Open ComfyUI’s Workflow Templates → Audio → “ACE-Step 1.5 Music Generation AIO” template.
- When prompted, let ComfyUI download the required model.
- If you prefer manual downloads, or the automatic download doesn’t work for you, you can get the models from the official Comfy-Org HuggingFace repository, and the model files into the ComfyUI checkpoints folder.
Option B: Split files: Separate text encoder + DiT model + VAE
Use this if you want to mirror the “split file” structure on Hugging Face.
- Select the Workflow Templates → Audio → “ACE-Step 1.5 Music Generation” workflow template.
- Let ComfyUI download the missing models.
- If you prefer manual download, get the split files from: Comfy-Org/ace_step_1.5_ComfyUI_files and place each component into the correct ComfyUI model subfolders (ComfyUI/models/text_encoders, ComfyUI/models/diffusion_models, and ComfyUI/models/vae).
Step 3 – Load template + download model(s) (text-to-audio)
ComfyUI provides basic ACE-Step 1.5 workflow templates. To use them, you simply need to go to the Templates menu, and search for the ACE-Step 1.5 Music Generation AIO template if you’re going with the all-in-one option A), or the ACE-Step 1.5 Music Generation Workflow template, if you’re going with option B) (the split-file workflow).
For now, only the text-to-audio (text → music) option is available, without an audio-to-audio (music → music) workflow available. It’s said to be released very soon, and once it does, it will also be readily available in the template browser menu.
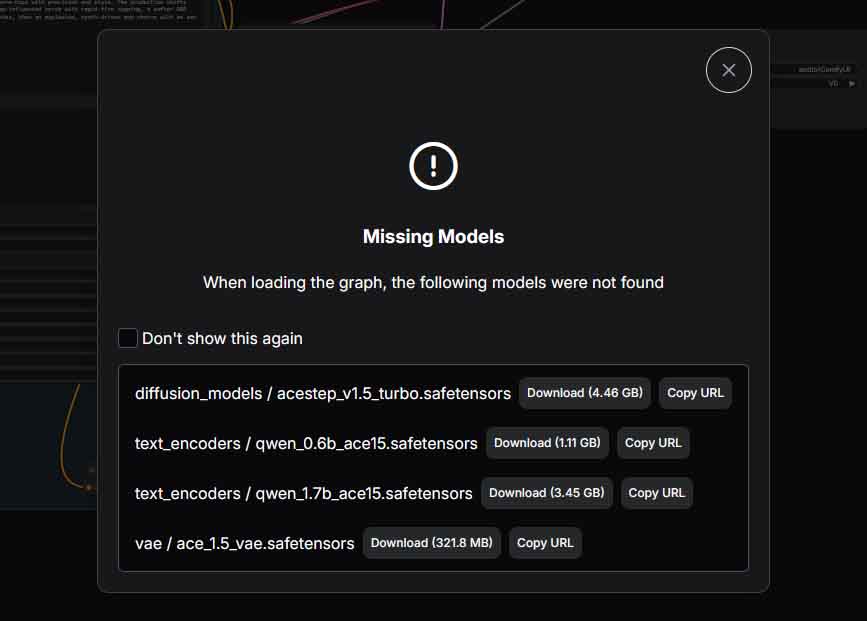
When you select your chosen workflow, (if you haven’t already installed the model/models) ComfyUI will prompt you to automatically download the missing files. You can do this by pressing the “Download” button next to each of the models, and your template should be loaded in.
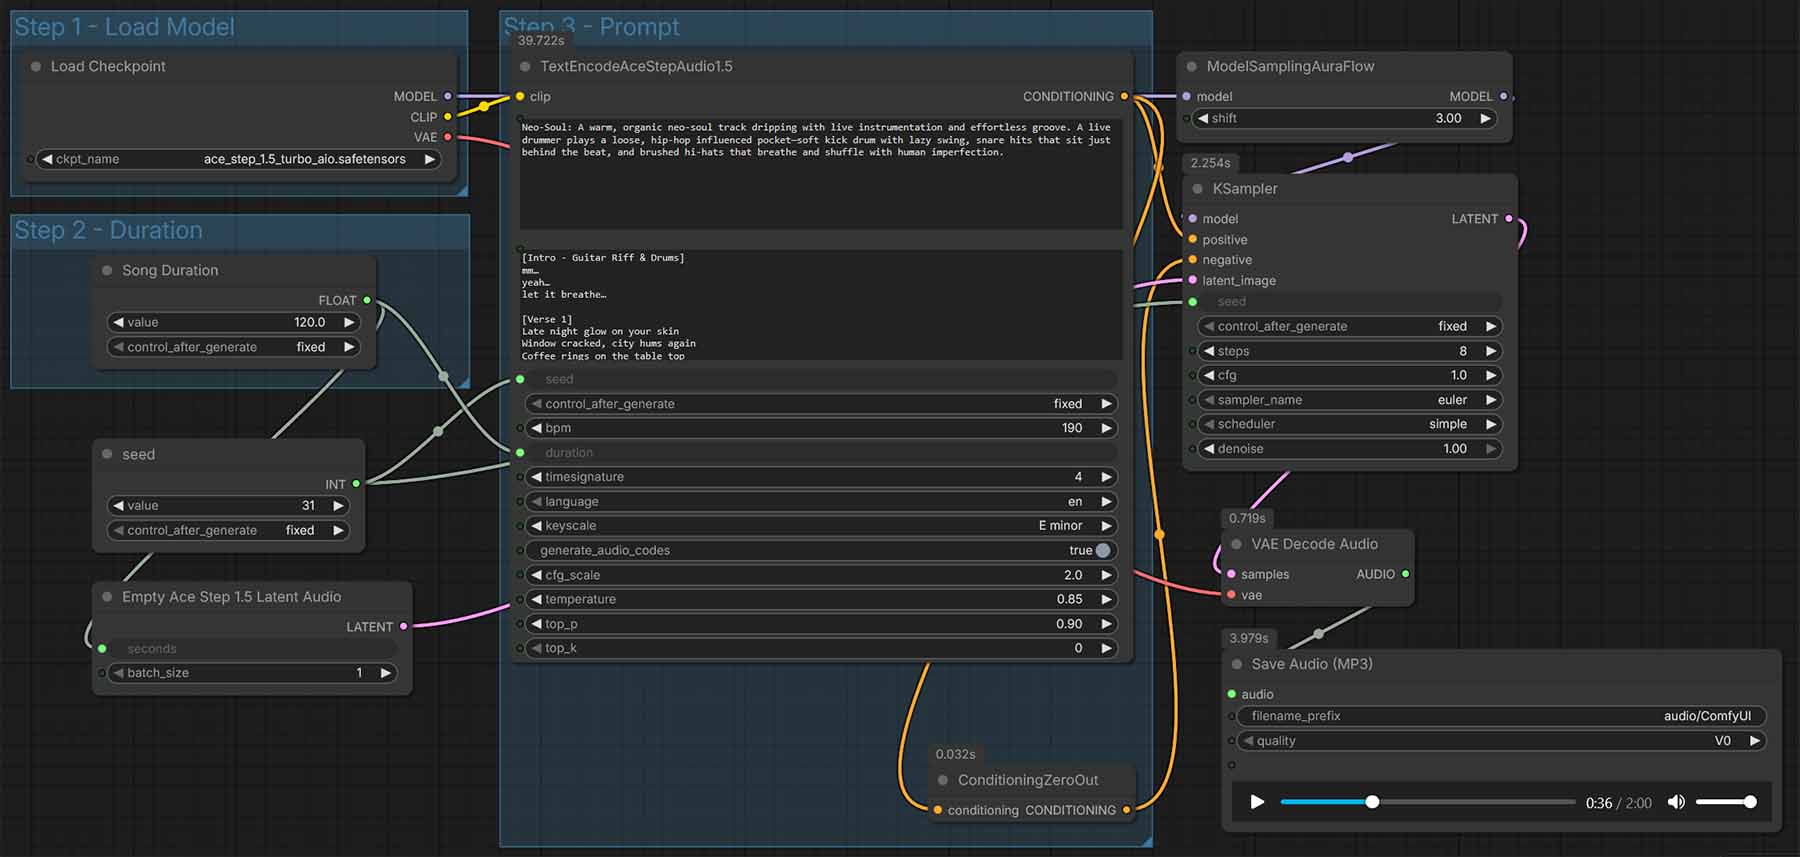
Once you do that, you should see a workflow like the one shown in the main image of this section appear in your ComfyUI interface. Make sure that you have selected the appropriate ACE-Step model in the “Load Model” node before you begin.
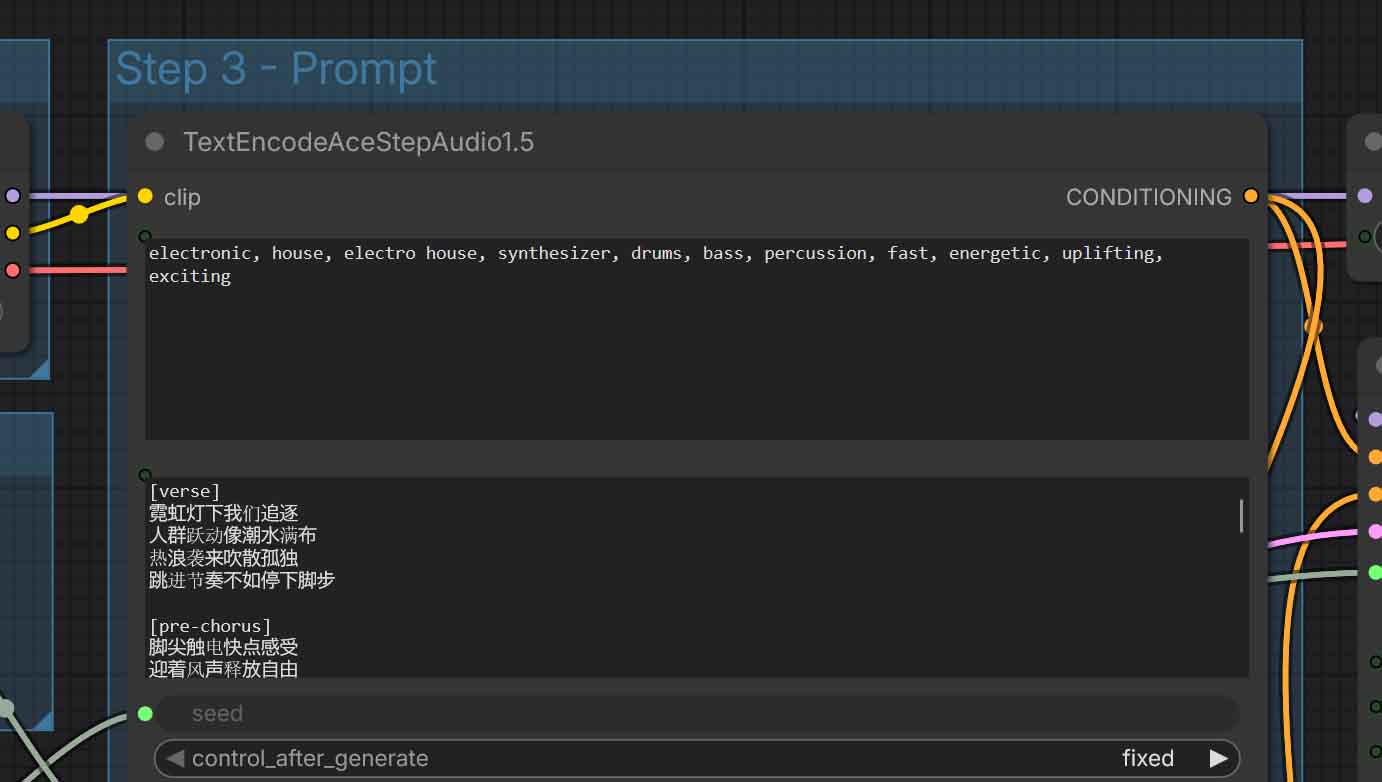
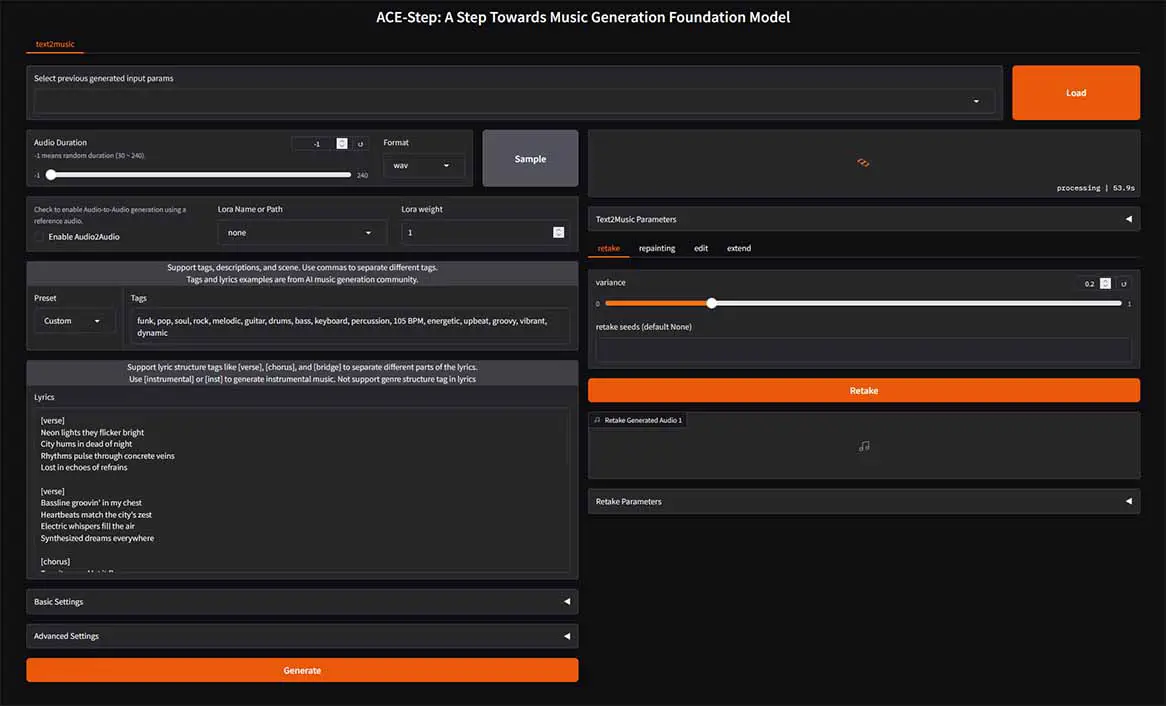
Using ACE-Step is a matter of inputting a combination of two prompts:
- Tags/caption prompt (genre, instrumentation, vibe, performance details).
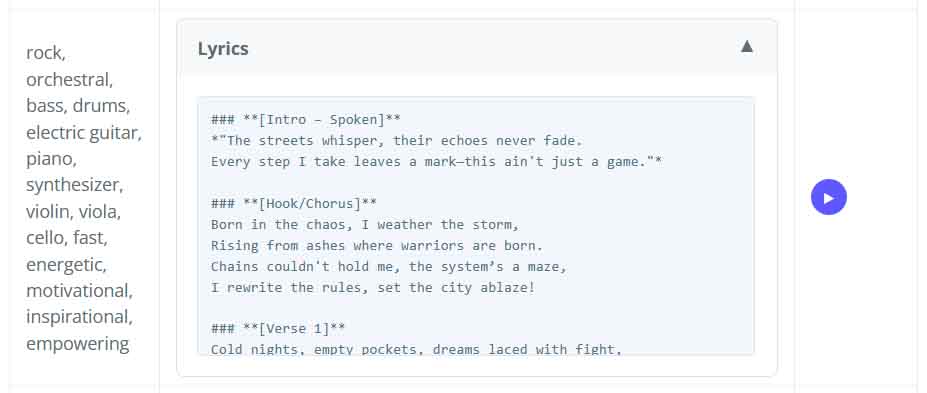
- Lyrics prompt (optionally structured into different song sections).
To prompt the ACE-Step model well:
- In tags, you should input a general natural language description of the genre, instrumentation, energy/vibe, and vocal type. As this input is then further processed by a language model, it can be either very simple and concise, or very complex and detailed.
- In lyrics, you are expected to use blocks like [verse], [bridge], [chorus], [instrumental] etc., followed by the lyrics for the respective parts. This will ensure that the song will follow your desired structure.
If you want to generate instrumental music without any vocals, you can use the [instrumental] / [inst] tag alone.
There is a vast amount of different prompt combination examples (in different languages!) that you can access on the ACE-Step project homepage here. These range from simple one-word prompts like “disco”, to longer, more detailed descriptions such as “drum & bass, 160bpm, ethereal dark liquid, deep bassline, female vocals”. If you need a quick database of prompts to start out with, this is the best place to go to.
Step 5 – Set duration, tempo, key, and language (ACE-Step settings explained)
LM settings (The language model)
These settings have to do with the first part of the pipeline, that is the language model that is responsible for turning your text prompts into enriched data that the DiT (Diffusion Transformer) model will use to generate your songs.
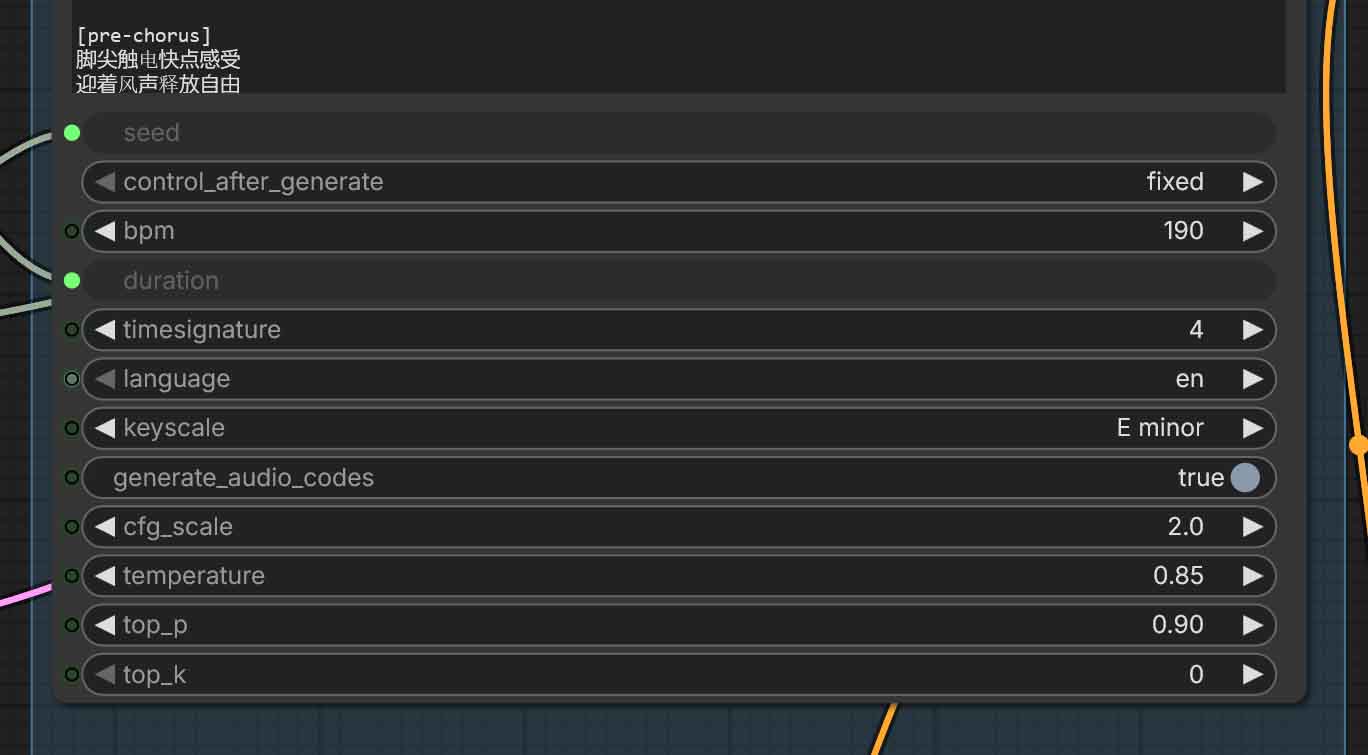
The first, and the most important TextEncodeAceStepAudio1.5 node (that combines text encoding and LM sampling) will first give you access to basic controls that allow you to tweak the characteristics of your newly generated song:
- BPM (Beats Per Minute) – the song tempo (you can check out an average BPM per musical genre list here).
- Time signature – the rhythmic grid. 4 (4/4) is the default for most pop/rock/hip-hop/electronic, 2 (2/4) is also commonly used. Pick 3 (3/4) for waltz-like feel, 6 (6/8) for compound rhythms like rolling triplet grooves often used in genres such as Jazz.
- Key / scale – the key you want your song in. As a rough rule of thumb: major keys are more often used for “happy/bright” compositions, while minor keys are commonly used for “sad/darker” moods.
- Language – you can choose from a rather large list of over 20 different languages including English, Chinese, Japanese, German, French, Portuguese, Italian, Russian, and more.
There is also a separate “Song Duration” node which allows you to set the duration of your newly generated song in seconds upon creating the empty latent. By default, it’s set to 120 seconds.
Then, there are also the generation controls that affect variation vs. strict prompt adherence:
- Seed – the exact same fixed seed values with the exact same settings will always grant you exactly the same output. Minor tweaks to the settings with an unchanged seed will allow you to fine-tune your ideas without the model generating entirely new song ideas each time you press the “Run” button and only making small setting or prompt adjustments.
- Control_after_generate – what happens to the seed after a run. “Fixed” repeats the same seed, while “Randomize” gives you a new one for each new generation.
- Generate_audio_codes – toggles whether the node outputs the intermediate “audio codes” along with conditioning for more advanced workflows, for instance in Cover mode. This can be useful if you plan to pass these codes to a separate refiner or save them for later editing.
- CFG_scale – how strongly the model follows your tags/lyrics conditioning. Higher CFG scale value means more prompt adherence, but it can also easily cause audio artifacts or in general low quality outputs if pushed too far.
- Temperature – controls randomness in token/code sampling. Higher temperature means more variety and more model “creativity” in the outputs, and lower values, less variety and more predictable and “rigid” generations.
- Top_p – nucleus sampling cutoff (probability mass). Lower values constrain choices; higher values allow more diversity.
- Top_k – limits sampling to the top K options.
0usually means “disabled / don’t apply top-k.”
Sampler settings (The DiT model)
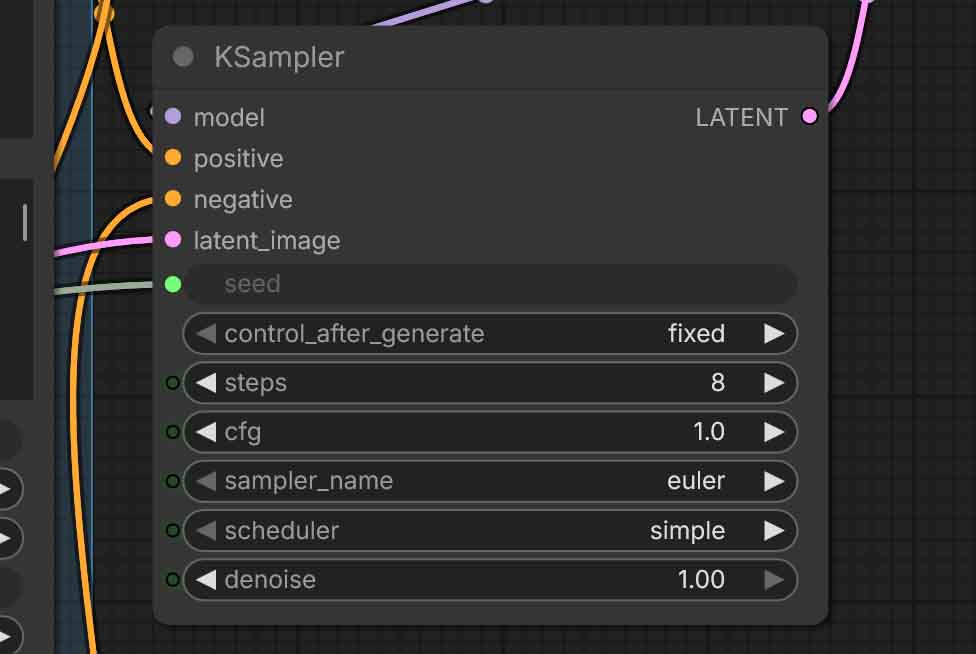
These settings live in the KSampler node (and the small sampling helper nodes around it). They directly affect the DiT model, which is the “heart” of ACE-Step, and the place where the semantic structures generated by the LM in the previous step based on your text prompts are turned into actual tunes.
These settings grant you control over the quality, speed, and how “far” the generation process goes. You might know many of the following names from Stable Diffusion image generation guides. They work very similarly here. Here they are:
- Steps – how many diffusion steps to run. More steps usually improve the generation detail/coherence up to a certain point, but also cost more time. Settling for low step values will make the generation faster, but can have a huge negative impact on the output quality. It’s not recommended to go below 8 here.
- CFG – guidance strength during sampling (different from
cfg_scalein the text-encode node, which affects only the text prompt processing). Higher CFG setting in the KSampler node will push the DiT more toward the prompt conditioning, but can introduce harshness/artifacts, lower values will stray further from your text prompts, following them less closely. - Sampler name – the sampling algorithm (for example euler) used by the sampler. Different samplers can change the outcomes of the generations quite significantly, although if you’re just starting out, it’s best to leave this setting as is.
- Scheduler – the noise schedule which influences how the latent noise is distributed across steps in the generation process. For most intents and purposes, you want to leave it as default, especially if you’re not changing the default sampler from euler.
- Denoise – how strongly the sampling process “rewrites” or modifies the latent. In pure text-to-audio you’ll want to leave this at 1.0. In audio-to-audio/repaint workflows this becomes your main “amount of change to the original imported track” knob with the higher values straying further from the original, and the lower values leaving more of the original track’s characteristics and structure intact. In audio-to-audio workflows, 0.50 is a good value to start out with.
- Seed / control_after_generate – same idea as in the LM portion of the workflow. Lock the seed for controlled iteration, or randomize for rapid variations.
- Model sampling shift in the neighboring ModelSamplingAuraFlow node – a model-specific sampling tweak used by the workflow. Keep the template default unless you’re deliberately experimenting with different versions of the base model. You can learn more about it in the official ACE-Step settings guide here. To cite the source on the effects of the shift settings on generations: “high shift is like ‘draw outline first then fill details,’ low shift is like ‘draw and fix simultaneously'”, depending on the DiT model type.
If you want a deeper understanding of what the workflow is really doing under the hood, you can either check out the settings guide in the ACE-Step GitHub repository linked above, or skim through the paper that came out alongside the model the day it was published: ACE-Step paper (arXiv:2506.00045)
Using ACE-Step v1 3.5B In ComfyUI
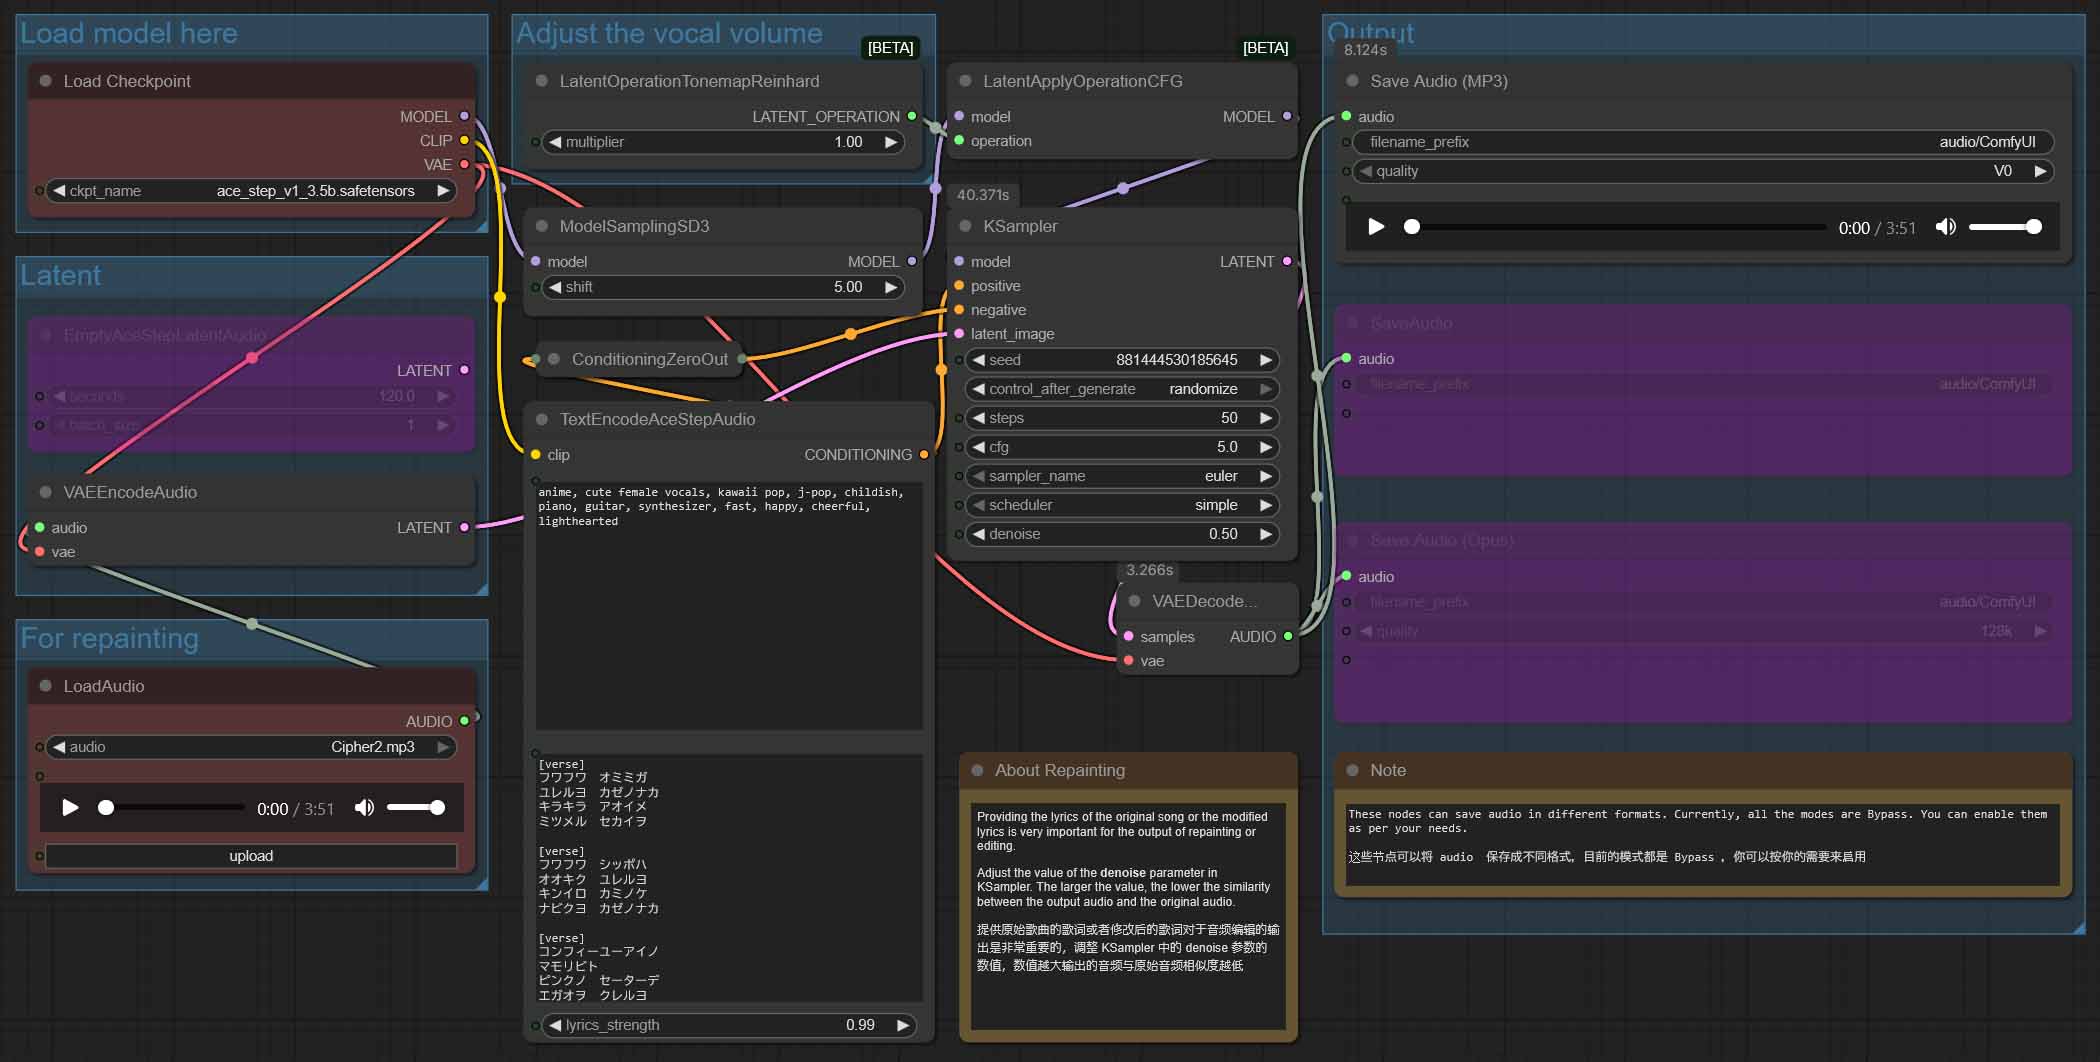
If for one reason or the other you’d like to use the older version of ACE-Step in Comfy, it has readily available workflows as well. Once again, this version of the model is lower quality in comparison to v1.5, but it also comes with an additional native audio-to-audio workflow that you might be interested in.
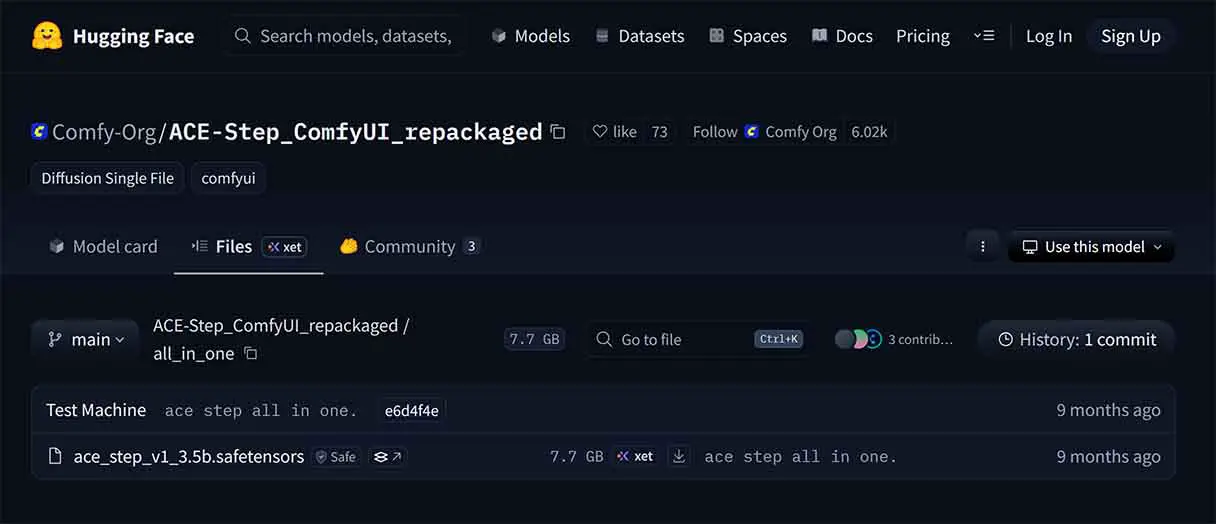
You have two common ways to get the v1 (3.5B) checkpoint. The first is downloading the model automatically from within Comfy, just like we did with the 1.5, the second, downloading the all-in-one version manually from the Comfy-Org HuggingFace repository here.
For the ACE-Step v1, ComfyUI includes both the text-to-audio, and the audio-to-audio workflows in the template browser. You can import and use them in the exact same way we did with the newer version 1.5.
Quick Troubleshooting (Most Common Errors & Solutions)
“I don’t see the ACE-Step 1.5 workflow template in ComfyUI”
- Update your ComfyUI instance to the newest version. If your version is older than the one that can support the newer versions of ACE-Step, the related workflows won’t be displayed in the template browser.
“I’m getting the ‘Model not found’ error”
- If you chose to use the AIO (all-in-one, single file model workflows) – ensure the checkpoint is in the checkpoints folder.
- If you used a split files workflow: ensure each file is downloaded and placed in the correct folders, that is: text_encoders, diffusion_models, vae.
WebUI Alternatives: ace-step-ui & ace-step-studio
If you’re not set on using ACE-Step in ComfyUI, you have a few other options. The first one is setting up the mainline ACE-Step WebUI. You can find the instructions for that in the project’s GitHub repository here.
If you’re truly interested in getting your experience as close to what premium web applications like Suno or Udio can offer, there are a few community-driven WebUI overlays for the ACE-Step engine that you can install and use rather easily.
The first one worth noting is the ace-step-ui by fspecii, another, the ace-step-studio developed by roblaughter. Both of those are really worth exploring if you want to make your experience with ACE-Step even better, especially if your plans lean towards convenience in bulk generation of songs.