
When it comes to upscaling your ComfyUI creations, there are a few methods to choose from. You can either upscale the images directly, pixel by pixel, using dedicated image upscaling models, or you can perform so-called latent upscaling. This process involves taking the latent representation of your generated image, increasing its resolution, and then running it through the diffusion model for a second time, essentially making use of an img2img functionality embedded in your workflow. Let me show you the easiest way to go about it in ComfyUI, without installing any custom nodes.
Very important note: The two-pass upscaling methods shown in this guide are a creative technique that can change the upscaled image substantially, introducing many new details into your input content. While the amount of details added can be controlled to some extent as you’ll learn below, the final results of these adjustments will depend on quite a few different factors. While these methods can also work reasonably well with realistic imagery, these methods are best suited for creative illustrations and cartoon or anime-style images.
A Quick Glossary For This Guide
| Term | Short Description |
|---|---|
| Direct Image Upscale | A post-generation method that increases the resolution of an image using an AI upscaling model. It improves sharpness but in case of most models, adds minimal new detail. |
| Latent Upscaling (Hires Fix) | The general two-pass technique where a small image is generated and then upscaled, right before going through a second model sampling pass to add more details to it. |
| Latent Space Upscaling | The most popular Hires Fix variation where the latent representation of the initial image is upscaled before the second KSampler pass. |
| Pixel Space Upscaling | The second Hires Fix variation where the initial image is first decoded to pixels, upscaled as a standard image, and then re-encoded back into a latent representation before the second KSampler pass. |
| Denoise | A KSampler setting that controls how much the initial image is altered. Higher values allow for more creative changes and detail, while lower values stay closer to the original input. |
| VAE (Variational Autoencoder) | A two-part component that encodes images into a compressed latent space and decodes them back into a viewable pixel-based image. |
| Latent Space | A compressed, non-pixel representation of an image that the diffusion model operates on during generation. |
Important terminology notes:
- Hires Fix is a term that refers to the original component from the Automatic1111 WebUI, and as such, is not present in ComfyUI by default. There are two main methods of recreating it in Comfy without installing any additional nodes, and these are the two methods that will be covered in this tutorial.
- These two methods are as follows: latent space upscaling, and image space upscaling. Both of these are very similar creative image scaling techniques, and the only difference between them is how the images are enlarged before being sent to KSampler for filling in the missing details.
With all that said, let’s get to the tutorial!
Direct Image Upscale vs. Latent Upscaling (Hires Fix)

Why go through with Hires Fix/Latent Upscaling, instead of just using a standard AI image upscaling model to achieve seemingly similar results? The difference, as is often the case, is in the details.
Upscaling using a dedicated AI image upscaling model – Scaling the image up using an additional AI model (you can find hundreds of different ones for instance on OpenModelDB, or over on HuggingFace). This method simply relies on taking your final, pixel-based image and running it through the upscaling model. It can make the image sharper, but it doesn’t really add a lot of new information or details to it.
Latent upscaling – Because this method relies on making your enlarged image do a second pass through the diffusion model used to generate it (or any other checkpoint you deem good for the task), it can add new coherent details that are guided by your prompts. This can result in a much more detailed, sharp, and creative final image. The model isn’t just making the image bigger, but rather, it’s re-imagining it at a higher resolution.
Hires Fix, and What It Really Is
The “Hires Fix” (or hi-res fix) is a feature well-known to users of Automatic1111’s WebUI, but not available by default in Comfy. Knowing its basic premises however, lets us use the base nodes available in the software to make our own version of it.
You can rather easily recreate the first, basic version of hires fix in ComfyUI, by following these steps:
- Generate the initial image at a lower resolution.
- Upscale the image in latent space using a latent upscale node by a chosen factor.
- Pass the upscaled latent image through a KSampler node with a denoise value first set to around 0.50 to introduce a controlled amount of new details while enhancing image resolution.
- Further tune the parameters like denoise strength, CFG scale, generation steps, and upscale factor for optimal results.
Another version of the hires fix implementation is making use of upscaling the image in pixel space, instead of scaling up the image latents directly. We will cover this right after the first method.
Now let’s get to how exactly to do it.
Things You Need First
To follow this guide, you’ll need a standard ComfyUI setup with a checkpoint of your choice imported and ready to go. No custom nodes or special models are required here.
You can learn more about creating simple ComfyUI workflows in this tutorial here: Basic ComfyUI SDXL Workflows – Quick Beginner’s Guide
Nodes Needed For Latent Upscaling
For this workflow, you will need the following nodes:
- Load Checkpoint Base: To load your main model.
- CLIP Text Encode (Prompt): Two of these, for your positive and negative prompts.
- Empty Latent Image: To set the initial image dimensions. If you want to import your own image for upscaling, use a Load Image paired with a VAE Encode node here.
- 2x KSampler: The first one will generate the initial image, and the second one will perform the high-resolution pass.
- Upscale Latent By: This is the core of our hires fix, increasing the resolution of the image latents.
- VAE Decode: To convert the final latent image into a viewable pixel image.
- Save Image: To save your final output.
Tip: If you’re short on VRAM, you can use the VAE Encode/Decode nodes in the “(Tiled)” variants. They will consume much less of your GPU memory when encoding and decoding your images. You should be able to find them in the node browser menu.
Latent Upscaling in ComfyUI – The Simplest Workflow
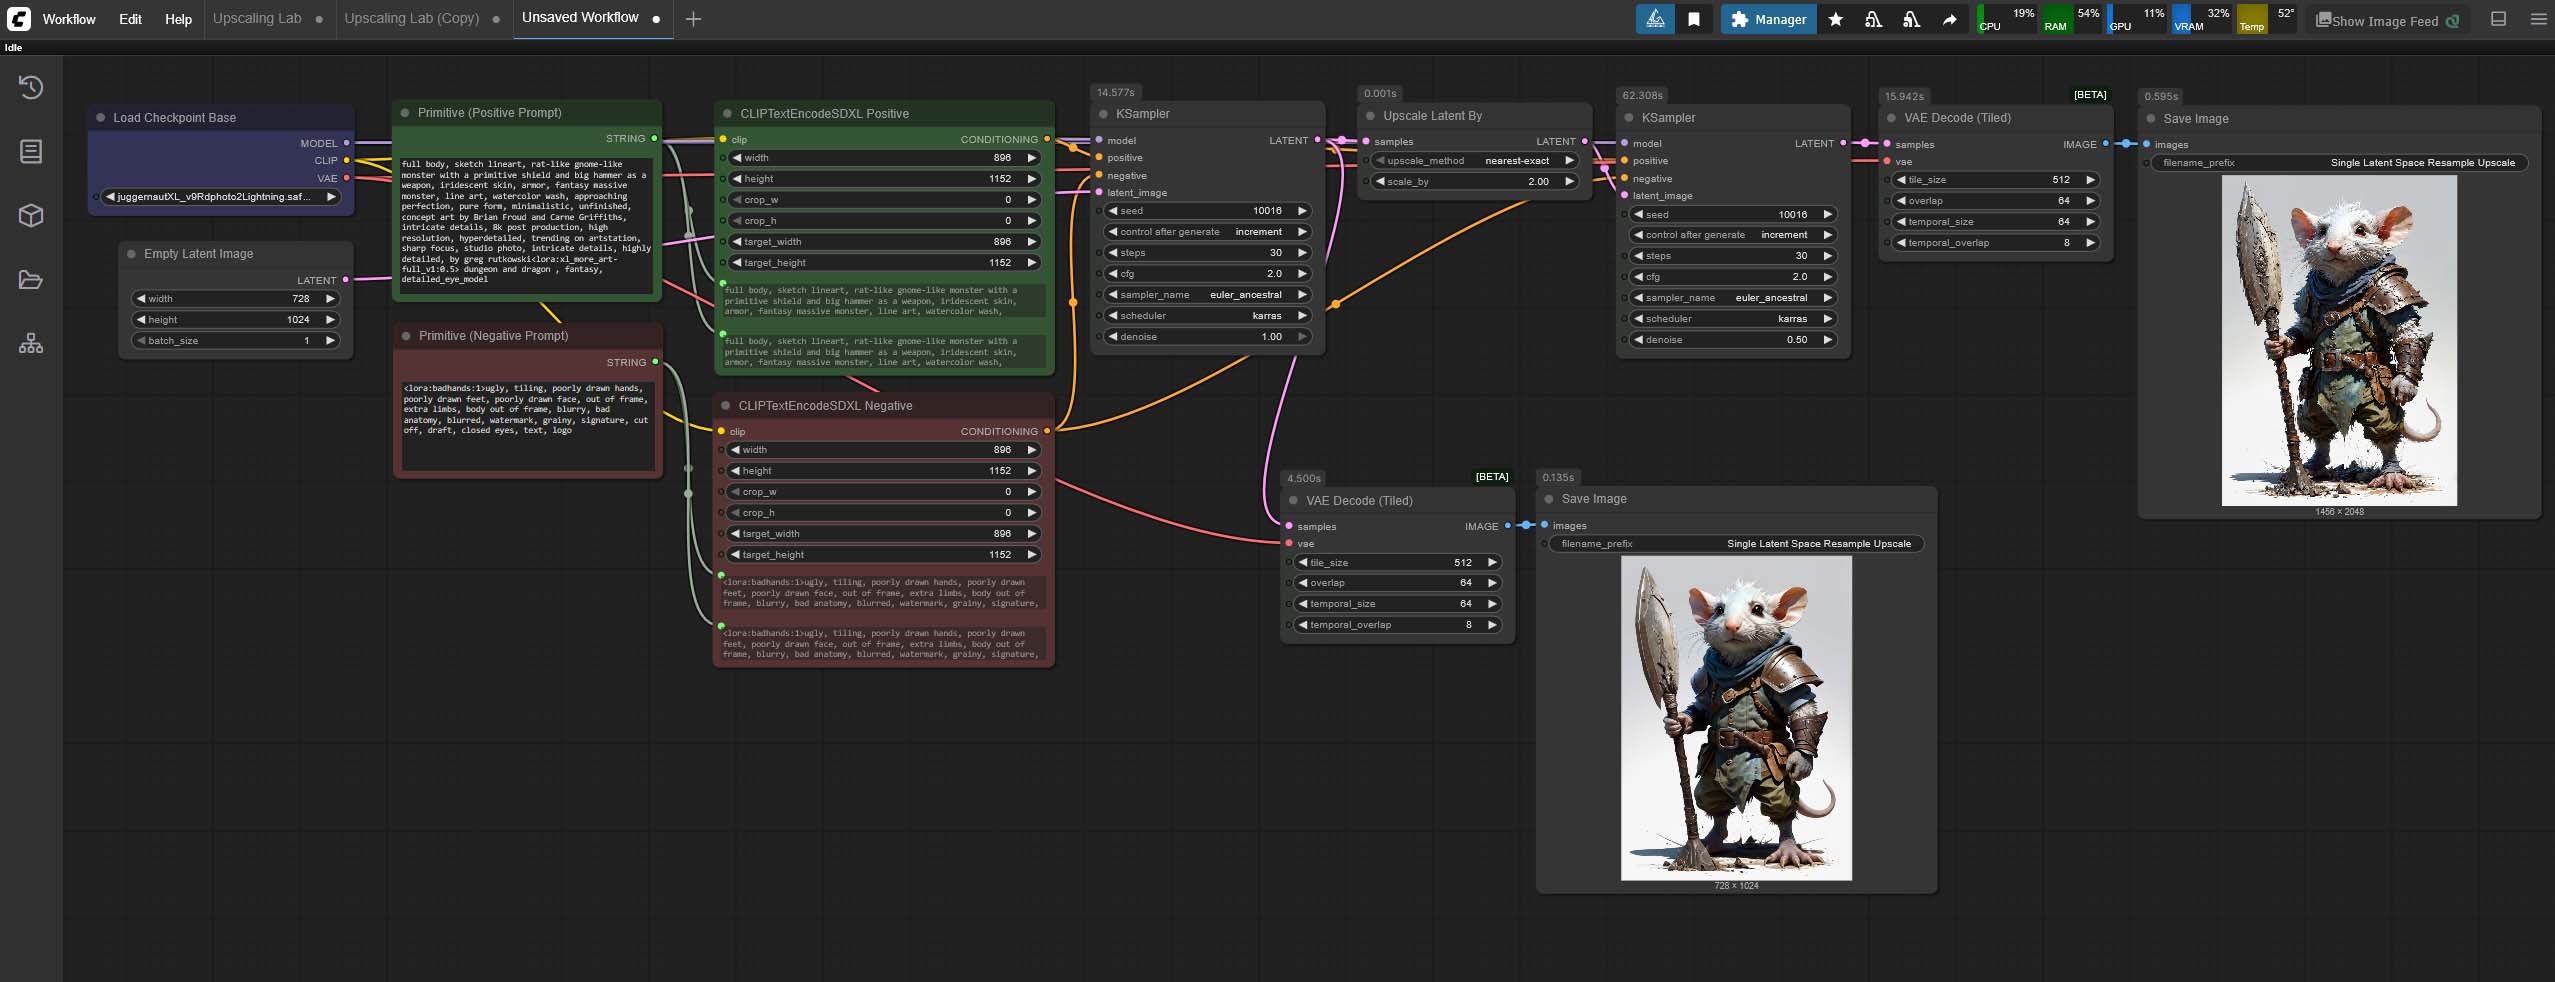
Here’s how to connect the nodes we have just quickly gone through, for a basic custom latent upscaling workflow:
Step 1 – The Initial Image Generation
First, set up a standard text-to-image workflow. Connect your Load Checkpoint Base node to two CLIP Text Encode (Prompt) nodes (one for your positive prompt, one for your negative). Then, connect those to your first and your second KSampler. The latent image input for this KSampler will come from an Empty Latent Image node. This first KSampler will generate your initial, smaller image.
Note that if you have a particular image you want to upscale, you’ll want to use the Load Image and VAE Encode nodes instead of the Empty Latent Image node, in that exact order. You can connect them in the exact same way.
Step 2 – Upscaling the Latent Image
Next, instead of connecting the output of the first KSampler directly to a VAE Decode node like you would if you were to simply save your generated image and be done with it, connect it to an Upscale Latent By node. In this node, you can set the upscale factor (e.g., 2x) or a specific width and height for your final image, and the upscaling algorithm/method (e.g., nearest-exact, bicubic, etc.).
Tip: Scaling the latent image representation over 2x will often give you unpredictable results including object duplication and deformations in your final image. Before experimenting with larger upscale values, 1.5x and 2x are the best places to start.
This will upscale the latent representation of the image without decoding it using the VAE, preparing it for the second sampler pass, which will be done in the next step.
Step 3 – The High-Resolution Pass
Now, connect the output of the Upscale Latent By node to the latent image input of your second KSampler. This KSampler will take the upscaled latent image and, using the same prompts as the first, add more detail. The key here is the denoise setting on this second KSampler. The recommended setting for upscaling images with adding details to them is 0.50, but if you want to see fewer new details introduced to your enlarged image you can try experimenting with lower values.
Note: with the basic latent upscaling workflow like this, denoise values lower than 0.50 can, depending on other settings used and your chosen model, introduce artifacts into your outputs.
If you get visible artifacts when lowering the denoise value below 0.50, you need less than 50% of your image to be changed in the upscaling process, and no setting changes are able to fix it, you can explore other ways to upscale the latent representation of your image including AI upscaling models loaded via appropriate nodes, or, if you’d rather use custom imported nodes, use one of these: ComfyUI_UltimateSDUpscale, SD-Latent-Upscaler, ComfyUi_NNLatentUpscale.
Besides the denoise setting, our second KSampler node will also need a set step count and CFG scale value. You can leave these two exactly as they were in the first KSampler node you used, or tweak them to your liking. The choice of the sampler and scheduler combo is also up to you. In our examples, we used the Euler Ancestral sampler alongside the Karras scheduler.
The last thing that needs to be taken care of here is the positive and negative prompt. When it comes to the prompts you can do two different things here:
- Use the very same positive and negative prompt as you did with the first KSampler – this is the default option most people use.
- Use a different prompt pair by importing additional positive and negative CLIP Text Encode nodes and inputting a variation on the prompts you used in the first KSampler, with more focus on the details you want to be more or less prominent in your upscaled image (for instance putting additional “detailed, complex” tags in the negative prompt, if your new image introduces too many minute details).
Note: If you’re using any LoRA models in your latent upscaling workflow, you can either pass them to both KSampler nodes, or leave them affecting only one of them. It all depends on the effects you want to achieve.
Step 4 – Decoding and Saving The Image
Finally, take the latent image output from the second KSampler and connect it to a VAE Decode node. This will convert the high-resolution latent image into a pixel-based image that you can view and save with a Save Image node. That’s it!
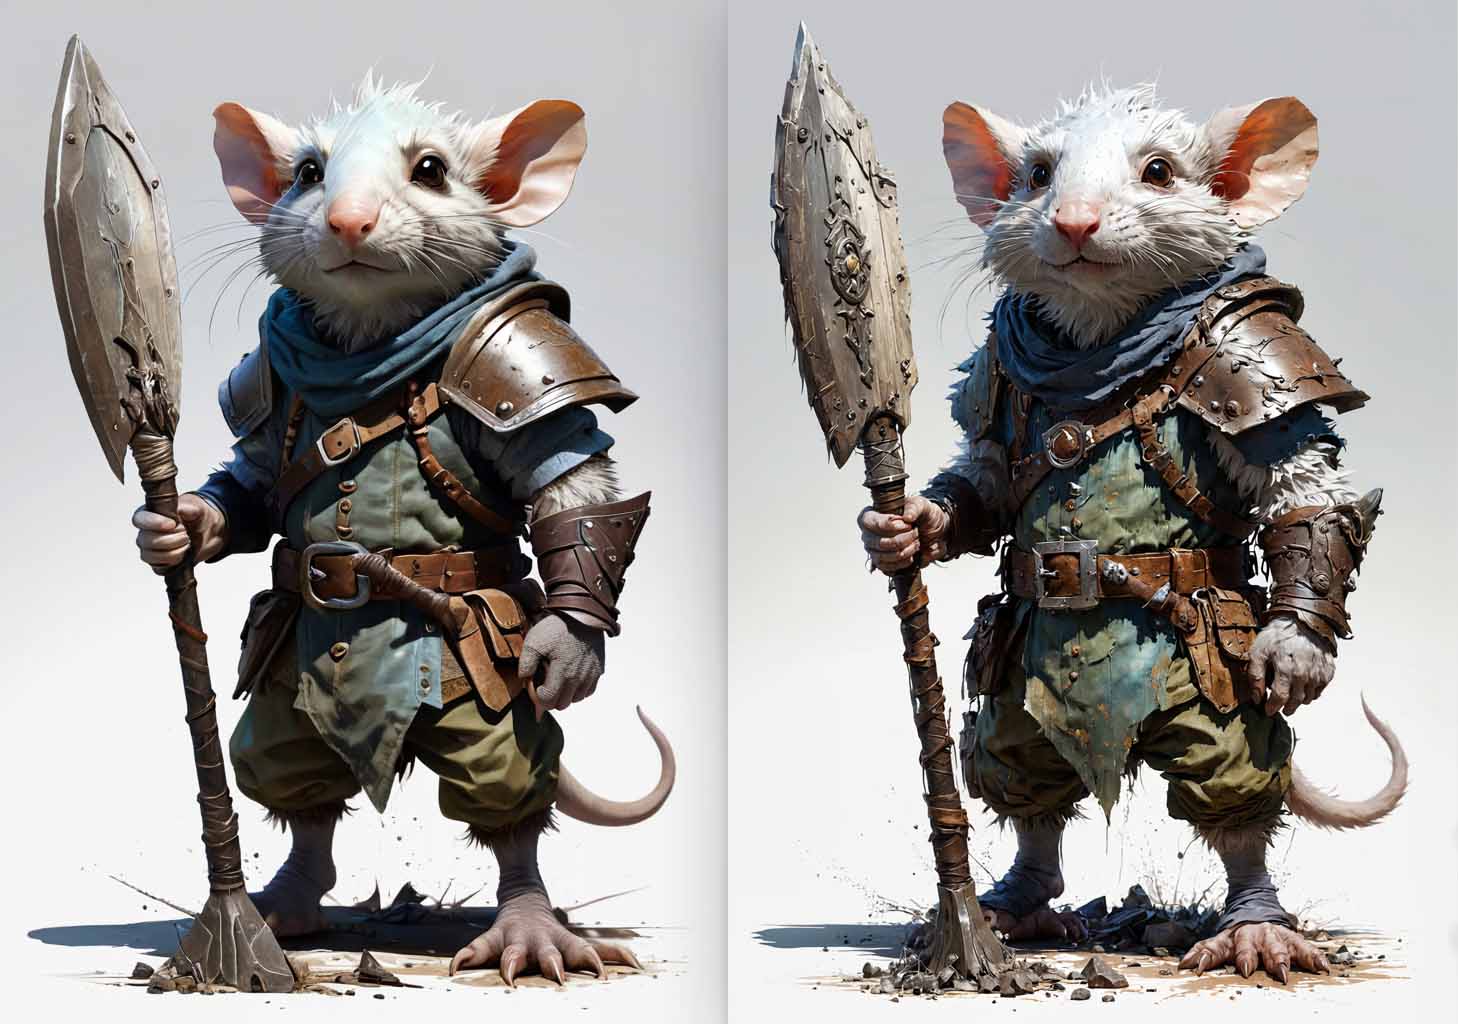
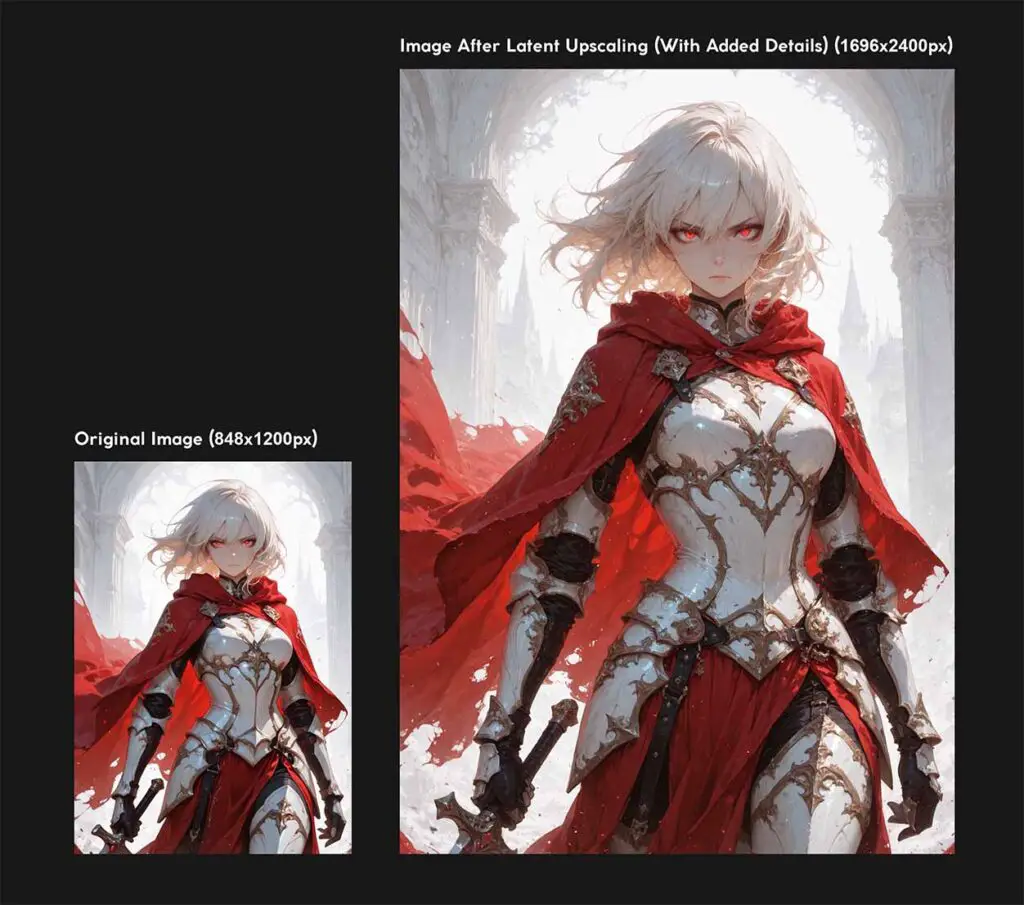
ComfyUI Latent Upscaling Example Effects
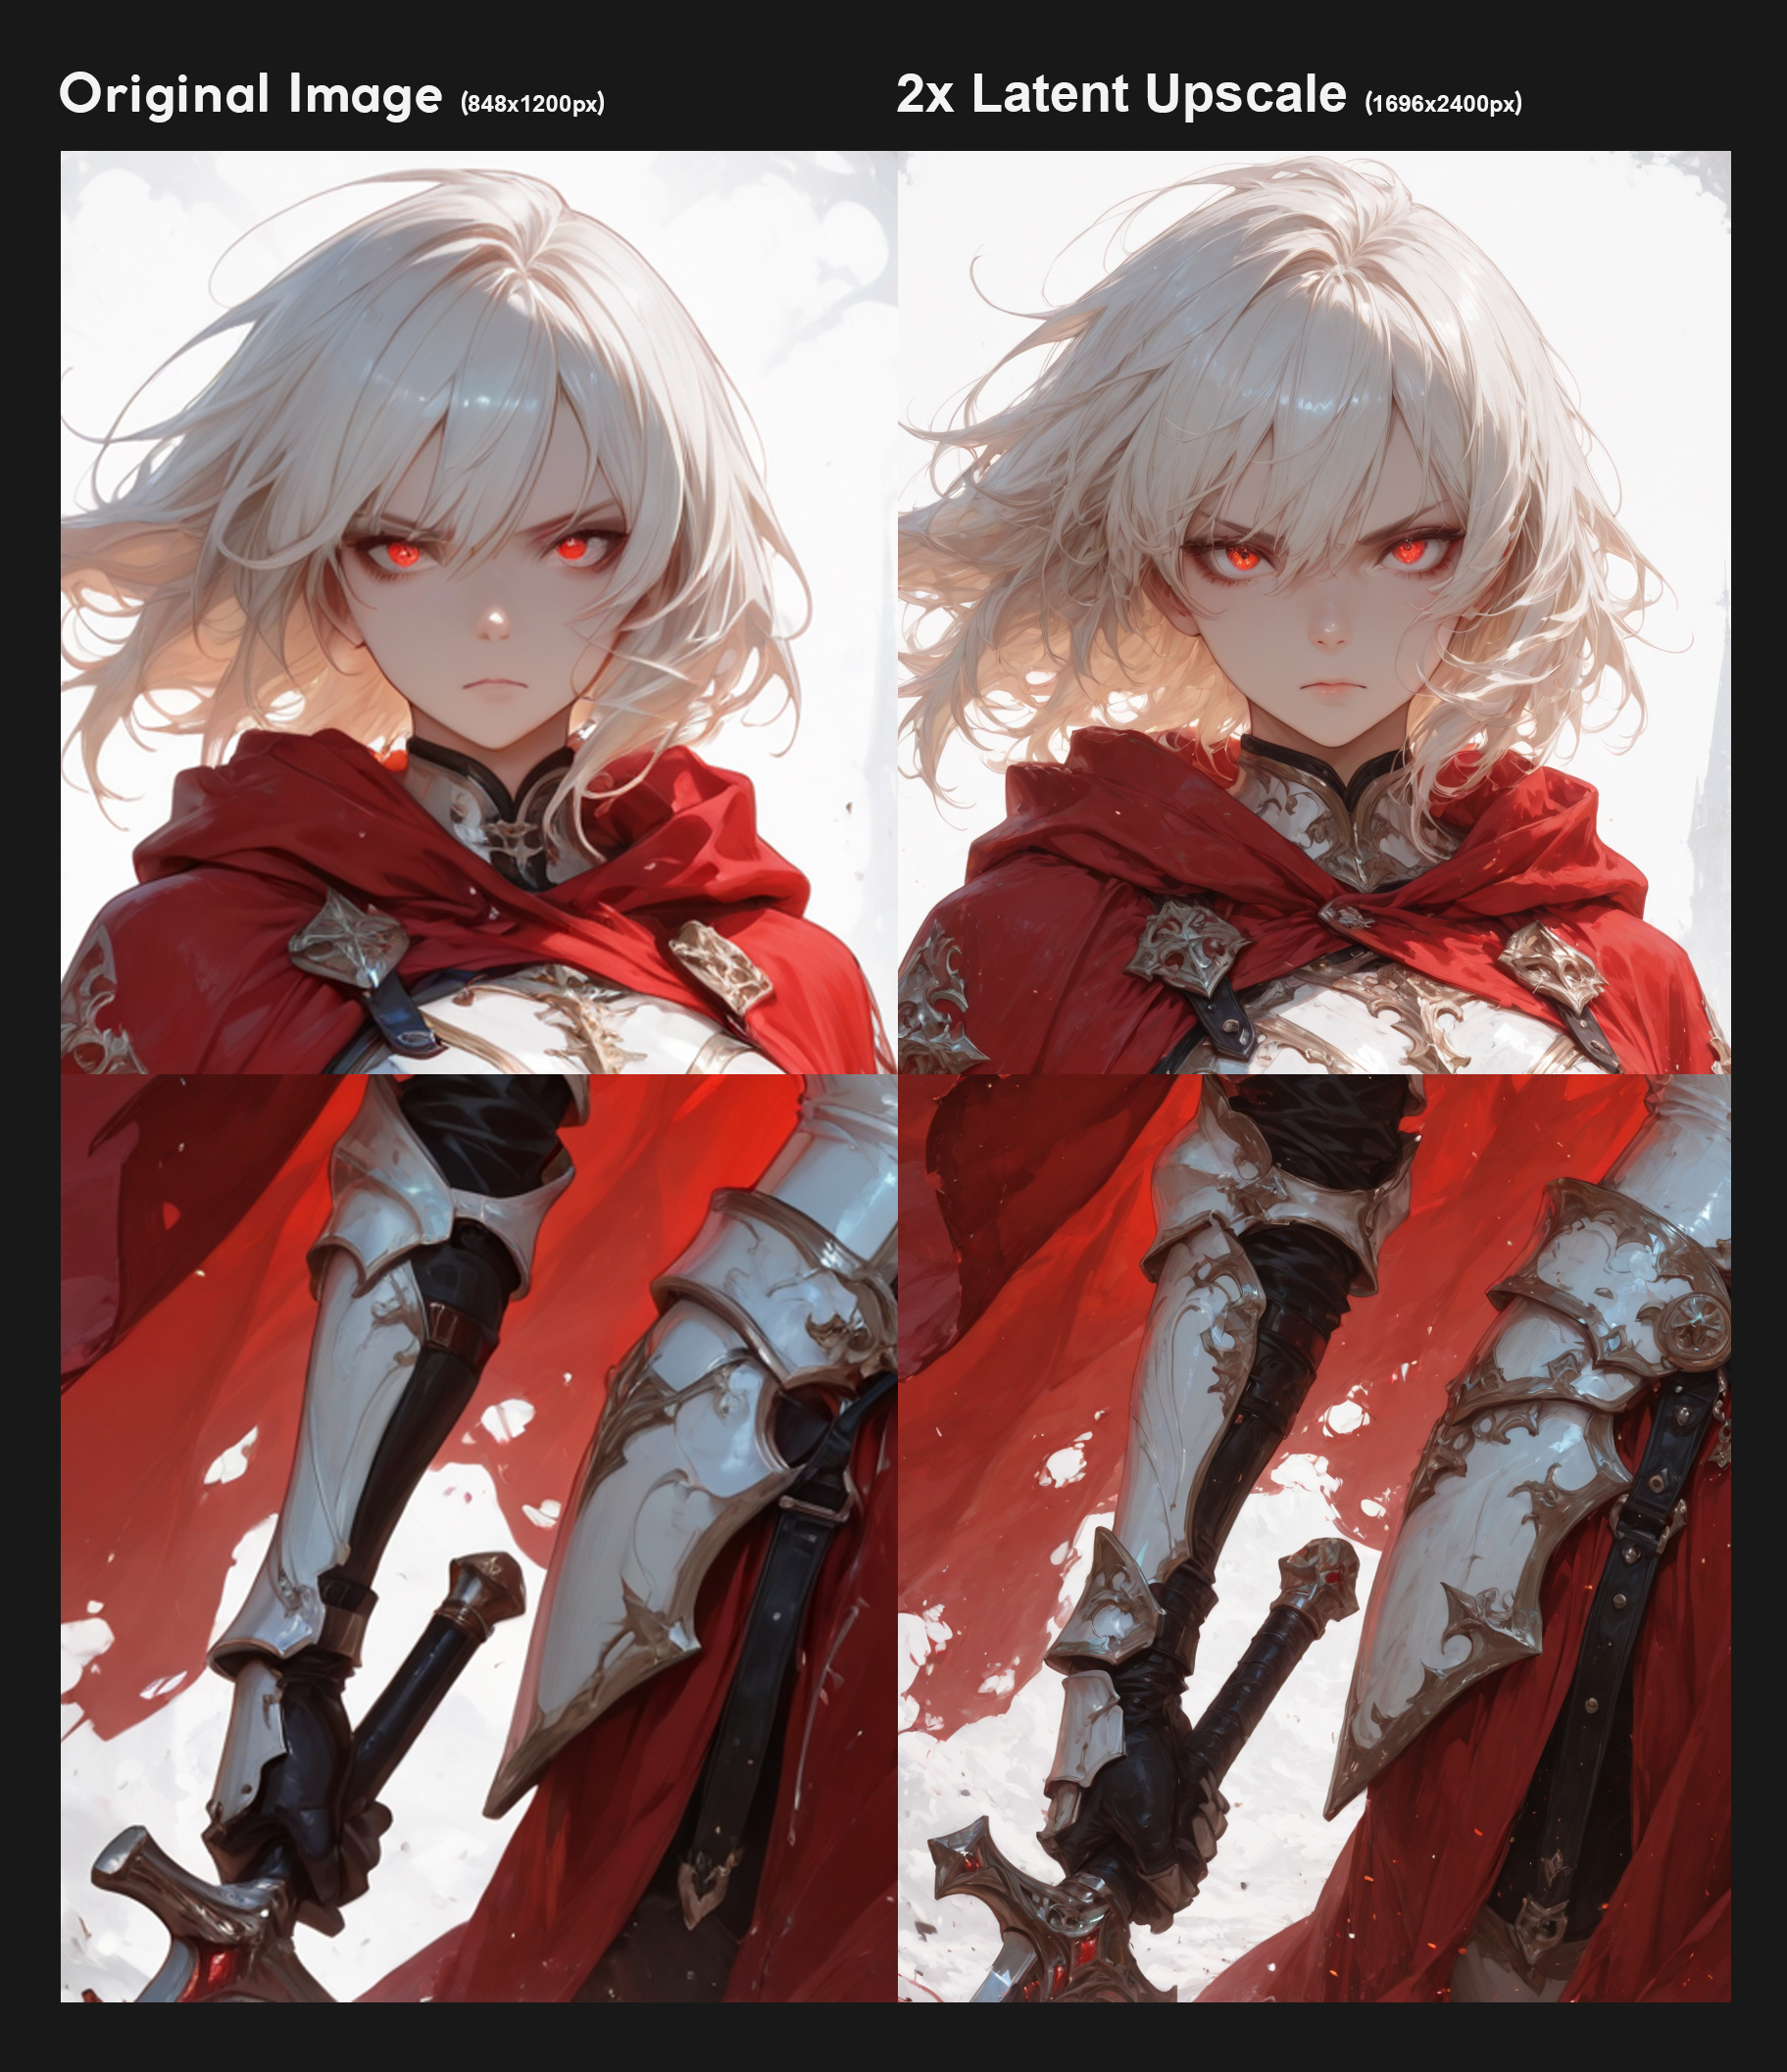
On the image above you can see a better comparison between the original generated image and the upscaled image crops scaled so that both images appear to be the same size and you can take a better look at the details that have been introduced by the process (you can click on it to access the full resolution file).
On the smaller image on the side here, you can see a small in-scale size comparison between the two files. The image latents were upscaled by the factor of 2x, using the nearest-exact scaling method, allowing us to go from the 848×1200 px resolution of the original image, to 1696×2400 px final result.
But, All This Adds Many Unnecessary Details, Doesn’t It?
Yes, and that’s the main point of the latent upscaling method and hires fix in general. The amount of added detail you want will, quite obviously, depend on your workflow. For example, when generating large anime-style images in a single image-generation pipeline, you’ll likely want as much relevant additional details as possible, without paying much attention to the original image’s structure.
When upscaling realistic images on the other hand, you might want to keep them as close to the original as possible. This is where classic latent upscaling can be a little bit less useful. Due to how the upscaling technique works, some small and brand new elements will always be introduced to the larger version of your image.
If you want to minimize the amount of artifacts and new details on your upscaled images (which can be often rather unwelcome if you’re not aiming for overly creative outputs), there are a few things you can do:
- Tweak the denoise setting, experimenting with values lower than 0.50. This can help you preserve more of your original image. If you get weird artifacts on your upscaled images at lower denoise values, and you’re not able to find a way to get rid of them by modifying other settings in your workflow, you can use the three 3rd party nodes for latent upscaling that I’ve mentioned above. These use more sophisticated mechanisms for scaling your images, and should allow you to set the denoise value below 0.50 without visible artifacting.
- As mentioned before, use a different prompt pair with the second KSampler node, with the base copied from the first prompt, but the additional negative prompt tags/keywords focusing on the specific image parts or characteristics you want to avoid.
- Opt for enlarging your images using simple upscaling models instead of doing latent upscaling.
- Instead of upscaling the latent representation of the image in the second step of our method explained above, decode the latents using the VAE, upscale the image in the pixel space, encode the image using the VAE again, and then proceed with the second sampler pass.
So, let’s now quickly talk about the second variation on the hires fix in ComfyUI, which is very similar to standard latent upscaling, with the only difference being that it upscales the image directly before the second sampler pass, instead of scaling up the image latents.
Running The Image Through KSampler In Latent Space vs. Pixel Space (Non-Latent Upscaling)
A very similar upscaling workflow to the one we’ve just created by pushing the generated image through an additional KSampler node and letting it inherit new details via a second model run, can also be done by upscaling our image in pixel space before the second sampler pass.
You can, rather easily, instead of upscaling the image latents, upscale the image itself (also using a selected simple upscaling method that you prefer), and then proceed in the exact same way as you would before, running the upscaled image through a KSampler node at a chosen denoise value.
This method, in my experience, has a higher chance to introduce less fine details, leaving more of the original image in terms of composition, in comparison to latent space image upscaling. This however, will depend on the settings you choose, mainly on the pixel space image upscaling algorithm choice, and of course, on the second sampler step count and set denoise value.
Here you can also try using various AI image upscaling models to enlarge your output before the second sampler pass. The results can vary by a lot depending on how you scale your original image.
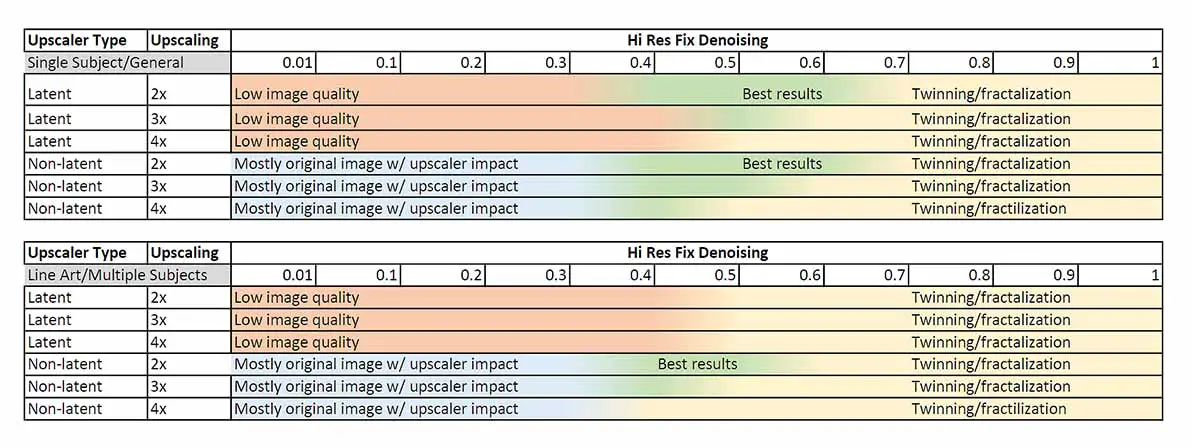
Troubleshooting: Blurriness, Fractalization/Twinning, Denoise Value
As you try all of this in your ComfyUI instance, you might come across some issues along the way. One of the most popular problems with latent upscaling is choosing the right denoise setting value for the process. In the case of simple latent upscaling workflows like the ones explained above, getting below the 0.50 denoise value setting can often introduce some artifacts into your outputs.
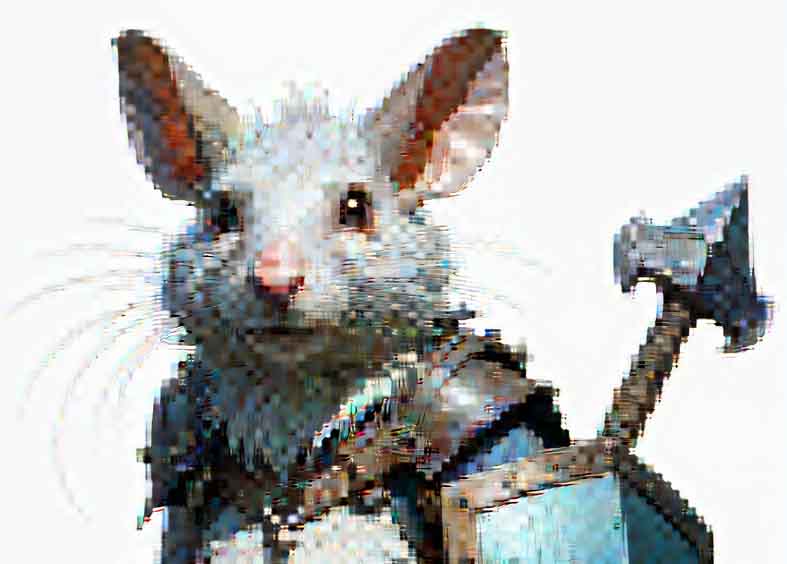
My Image Is Too Blurry / Has Weird Tiled Artifacts On It
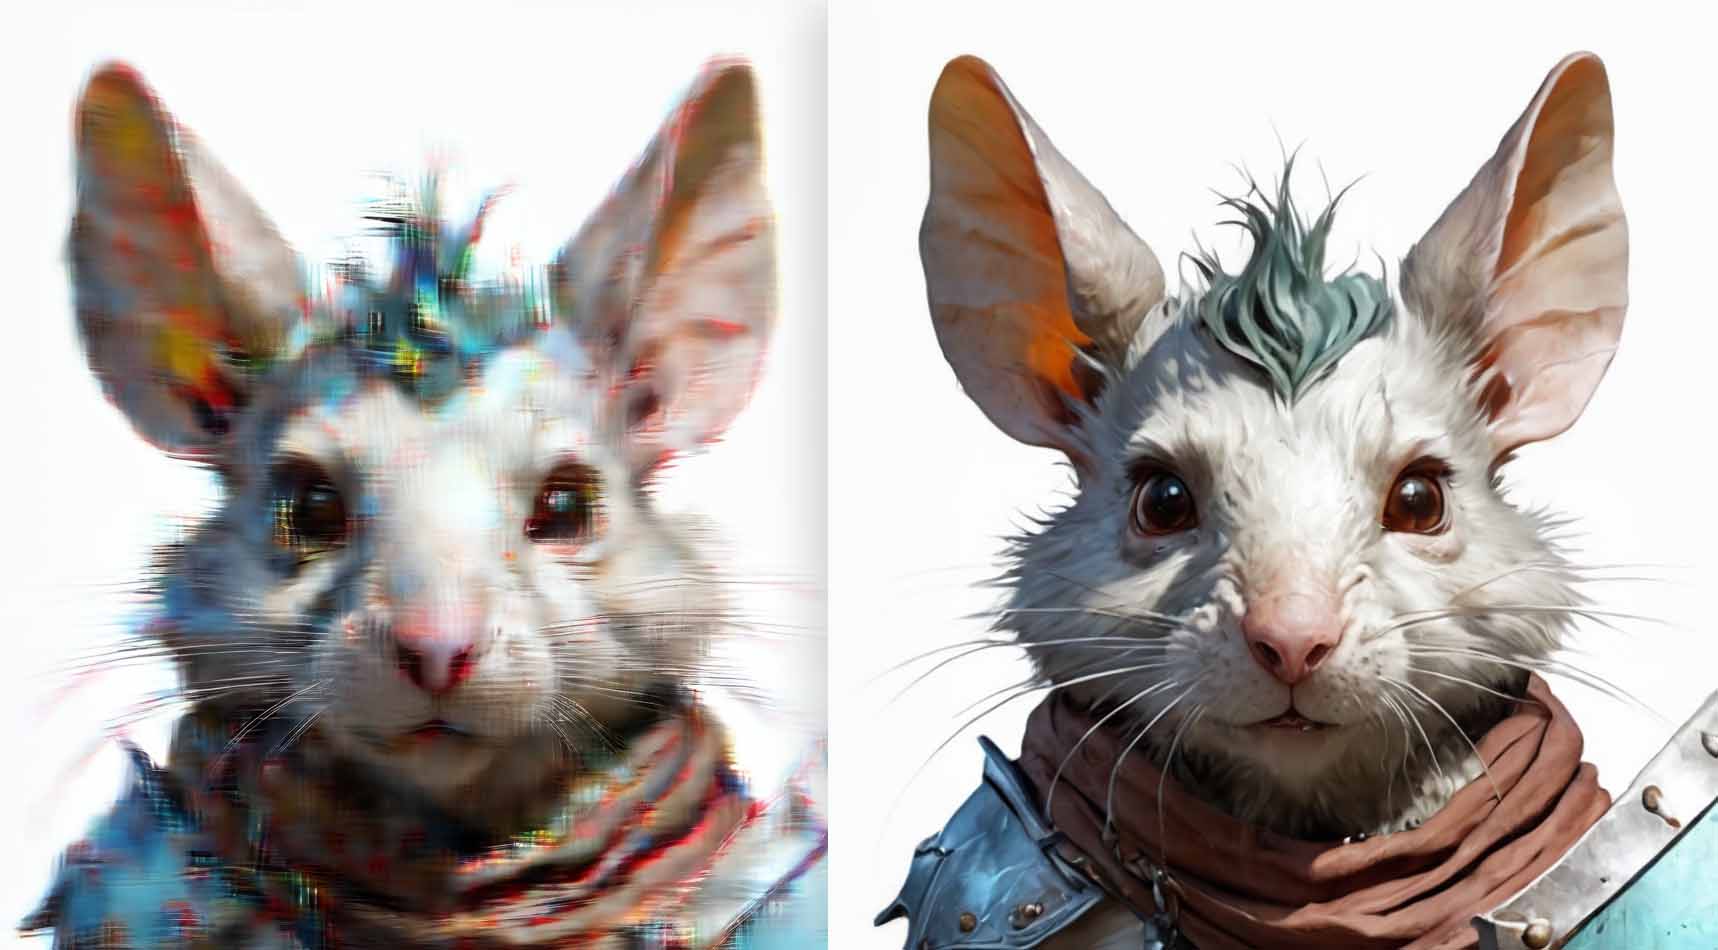
If your image is either blurry, or simply too “soft”, the most likely culprit is the denoise value that is set too low. On the left side of the image above, you can see an output that went through our latent upscaling process with a denoise setting set to 0.30. The second KSampler, during the 30 generation steps changed ~30% of the original upscaled latent as expected, but wasn’t able to get rid of all the random noise introduced when scaling up the image latent.
In the other case, on the right side of the image above, you can see a “soft” and “defocused” output which was a result of an image going through our second upscaling process, with the image being scaled up in pixel space, and then being pushed into the second KSampler for additional detail generation with the denoise value also set to 0.30. In this case, the situation is exactly the same, except that as the image was upscaled in pixel space before going into the sampler, the artifacts simply show as a blurry mask on the whole image.
Both of these issues are easily mitigated by setting your denoise value higher. Start with 0.50, and work your way from there.
And, once again, if you ever find yourself unable to figure out the right settings configuration to be able to utilize lower denoise values (it will be different for every type of workflow/model), you can always turn to these custom nodes, which can help you retain more of your original image when you do latent upscaling on them: ComfyUI_UltimateSDUpscale, SD-Latent-Upscaler, ComfyUi_NNLatentUpscale.
My New Image Is Deformed, and Introduces Many Unwanted Elements
In this case, you probably came across what’s most often called “fractalization”, or “twinning”. This is when you set the denoise value of the second sampler too high, and the model starts cloning certain image elements you introduced in your prompts, most of the time resulting in very unaesthetic outputs.
To avoid this, lower the denoise value until you get rid of said artifacts. As already mentioned, 0.50 is a good value to start with in the case of most models and latent upscaling workflows. Higher denoise value means more creative outputs, but only up to some point, which will be different for every model/workflow.
How To Add Even More Detail To Your Generated Images
- Detailer LoRAs: You can add a “detailer” or “enhancer” LoRA to your workflow. Simply add a Load LoRA node between your checkpoint loader and your KSamplers. This will apply the LoRA’s effects to your image, often adding finer details to things like eyes, skin, and clothing.
- Face Detailer Nodes: For portraits, a face detailer node can make a huge difference. These nodes automatically detect faces in your image and run a separate, more focused pass on them to add more detail and correct any strange artifacts. This is a more advanced technique that requires custom nodes, but it’s surprisingly easy to set up.
- Prompt Manipulation: Don’t forget that in the very end, the contents of your prompt have the largest influence on your final image. Adding descriptive keywords like “4k,” “highly detailed,” “sharp focus,” and “intricate details” can guide the model to generate a more detailed image from the start. This, combined with latent upscaling, can produce some truly stunning results. Note: always keep in mind the recommended prompting style for the model checkpoint/fine-tune that you’re using.
You might also like: ComfyUI FaceDetailer Simple Workflow Guide