
FaceDetailer, which is a part of the ComfyUI-Impact-Pack custom node package, is a direct alternative to the ADetailer extension module mainly known from the Automatic1111 WebUI. As of now, it’s still one of the best and most reliable ways to get rid of deformed or blurry faces and malformed hands with multiple fingers both when it comes to realistic and anime style image generations. Let me quickly show you how to use it in ComfyUI with SDXL-based models, in just seven short steps!
Check out also: Basic ComfyUI SDXL Workflow Templates – No Custom Nodes
Answers To The Questions You Might Have Before We Begin
- The whole setup process should take you less than 10 minutes total.
- FaceDetailer nodes can be used at any point in your workflow, but if you’re making use of latent upscaling it’s often more beneficial to position the nodes after the image is denoised after the upscale.
- Although this guide is based around examples of anime-style image generation workflows using the Illustrious XL family model (specifically Diving Illustrious Anime), the exact same method of incorporating FaceDetailer will work in realistic generations with some basic node setting tweaks.
Requirements – What Do You Need
To use FaceDetailer in ComfyUI, you will need:
- ComfyUI already installed on your system.
- The ComfyUI-Manager extension set up (you can learn how to do that here).
This is all you need to proceed with this tutorial.
The Alternative For ADetailer In ComfyUI
While you can’t use the exact same ADetailer from Automatic1111 in ComfyUI, it has a direct alternative in the form of the “FaceDetailer”, which is a part of the ComfyUI-Impact-Pack.
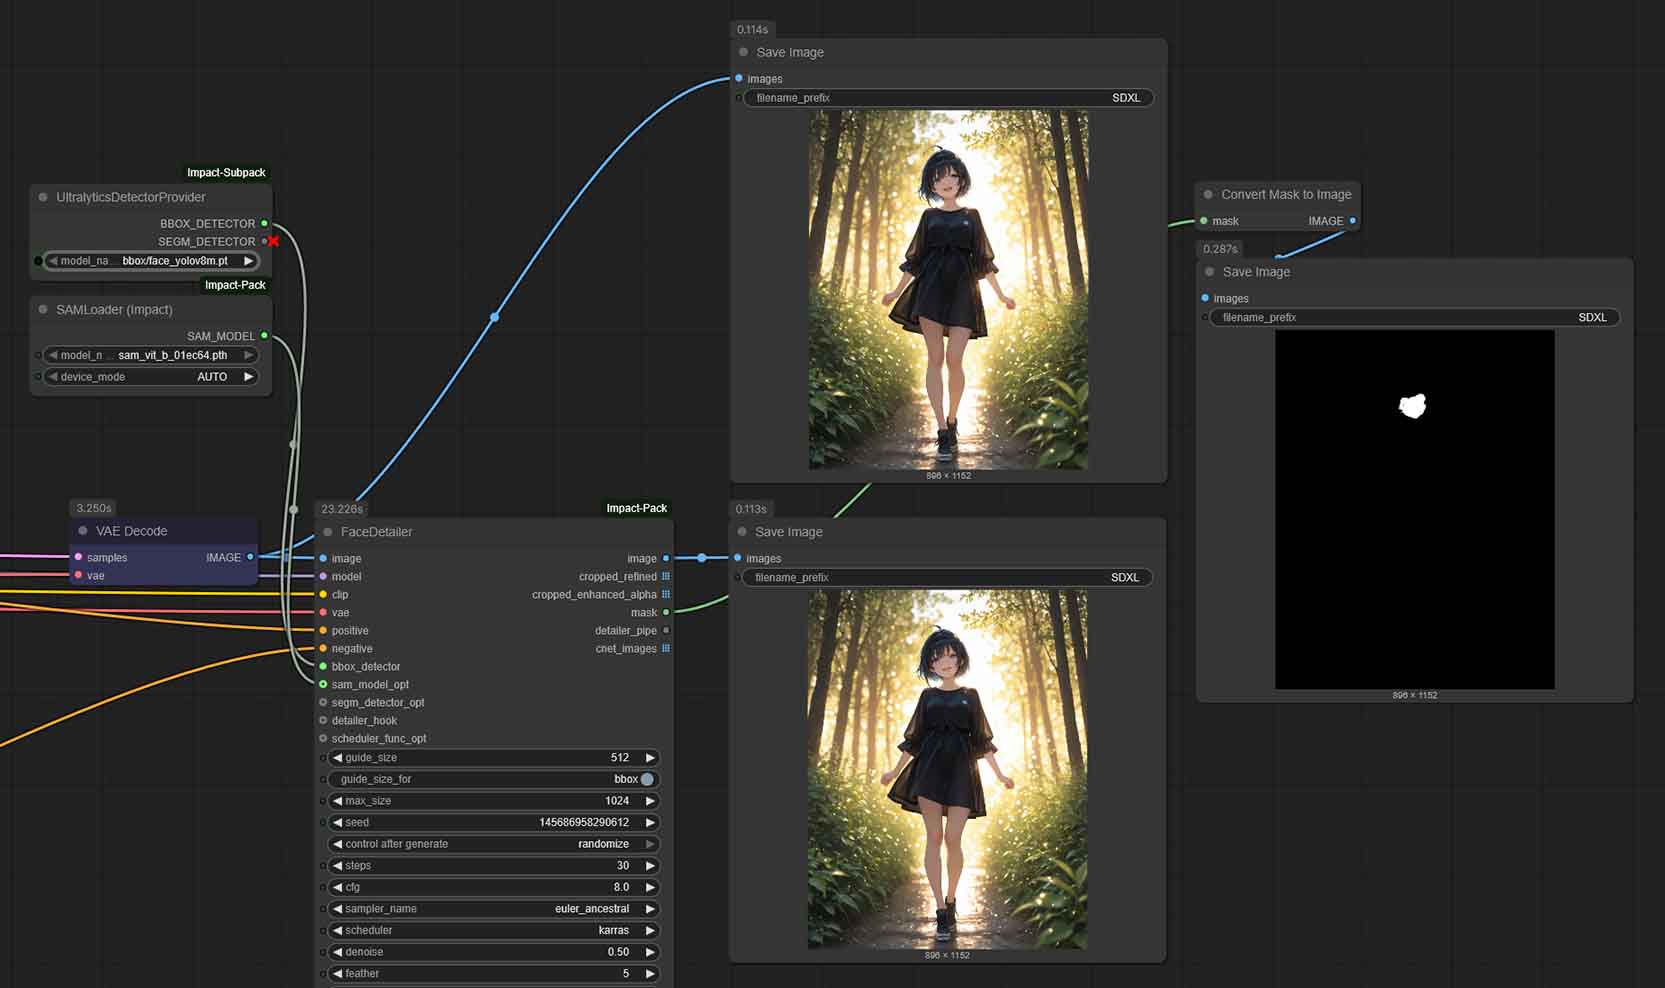
The FaceDetailer node operates by first detecting a specific area of an image, such as a face or hands, and then creating a mask around it. This mask, isolated and visible on the image above, marks the section that needs improvement. The node then re-samples only the masked portion at a higher resolution, adding in missing details and correcting errors.

In the image above, although it’s a low resolution render, you can see how the eyes are refined and small details near the characters mouth have been refined, and the face looks much more natural.
This targeted approach is particularly effective for images where faces are smaller and less detailed, as it can significantly sharpen and clarify these features without altering the entire image.
Although it’s explicitly called a Face Detailer, it also does a pretty good job recognizing hands and eyes of the generated characters in most image styles, and is one of the most popular ways to enhance ComfyUI outputs.
Let’s get to how to set it up in just a few short steps.
Using FaceDetailer in ComfyUI For Better Eyes, Faces & Hands – Step by Step
The whole process consists of downloading and setting up the ComfyUI-Impact node pack and inserting a chosen amount of detailer nodes into your new or existing workflows.
1. Install The ComfyUI-Impact Custom Node Pack
As already mentioned in the requirements above, we start out assuming you have ComfyUI already up and running, with the ComfyUI-Manager custom extension set up. The next thing you’re going to need to do is to install the ComfyUI-Impact-Pack, which the FaceDetailer node is a part of.

To do this, go to the “Manager” menu on the right side of the top menu bar*, and click on “Custom Nodes Manager”. Search for “Impact Pack” and click on “Install” button positioned next to it.

You will also need to install the “Impact Subpack” to get the UltralyticsDetectorProvider node which we will need later on. Use the search function to find it, and click the “Install” button next to it just like before.
When you’re finished installing the nodes, restart your ComfyUI instance.
*Note: If you don’t see the “Manager” button on top of your ComfyUI interface, you might not have the ComfyUI-Manager extension installed. Once again, you can quickly learn how to do that here.
Once you have both the Impact Pack and the Impact Subpack installed, we can proceed.
2. Open The Workflow You Want To Use FaceDetailer In

First, open the workflow that you want to enhance with the FaceDetailer nodes. If you don’t have any workflow prepared yet, you can quickly grab one of my basic ComfyUI workflows here, or check out this guide about generating anime-style images using Illustrious XL which also contains instructions on how to create them yourself.
3. Import the FaceDetailer Nodes Into Your Workflow

Then, the next thing you’re going to have to do is to import the “FaceDetailer” node as well as the “UltralyticsDetectorProvider” and the “SAMLoader (Impact)” nodes dragging them from the Node Library available on the left of the ComfyUI interface or after pressing the “n” key on your keyboard. You can use the search bar to easily find them by name.
Now, the next thing we’re going to have to do is to load the detection models and then connect the nodes together.
4. Download The Detection Models

The FaceDetailer workflow relies on two types of models to function correctly:
- Detection Models (YOLO): These are used by the UltralyticsDetectorProvider node to find the initial bounding box around a face or hand.
- Segmentation Model (SAM): This is used by the SAMLoader node to create a precise mask of the object within the bounding box.
Fortunately, you can download all of these directly through the ComfyUI Manager, which is much easier than finding and placing them manually.

Here is how to do it:
- Click the “Manager” button in the main menu to open the ComfyUI Manager.
- Select “Model Manager” from the menu.
- A new window will appear. Use the search bar at the top to find and install each of the following models:
- Search for yolov8 and install face_yolov8m.pt and hand_yolov8s.pt.
- Search for sam and install the sam_vit_b_01ec64.pth model.
Once you click “Install” for each model, the ComfyUI Manager will download them and automatically place them in the correct directories. They will be ready to use in your nodes immediately without needing to restart ComfyUI.
5. Load The Detection Model Nodes

The FaceDetailer doesn’t do much by itself, until you tell it what to look for. For it to affect the generated image, it has to have a detection model loaded in.
The detection models are used by the node to correctly identify the parts of the image that the node is meant to enhance. There are separate models available for hands, eyes, and whole faces, which can be loaded using the “UltralyticsDetectorProvider” node, which we’re going to have to connect to the “bbox_detector” input on the “FaceDetailer” node. You’ll also need a “SAMLoader (Impact)” node connected to the “sam_model” input.
In the “UltralyticsDetectorProvider” node you have to choose a detection model from the list of the models that we’ve downloaded in the previous step.
Depending on which parts of the image you want the FaceDetailer node to refine, you can pick any model you like, but it’s best to start with either the face or the hand refinement models to test out the results.
Remember that later on, you can use multiple FaceDetailer nodes to, for instance, load a mix of the above to refine both hands and faces in the same generated image.
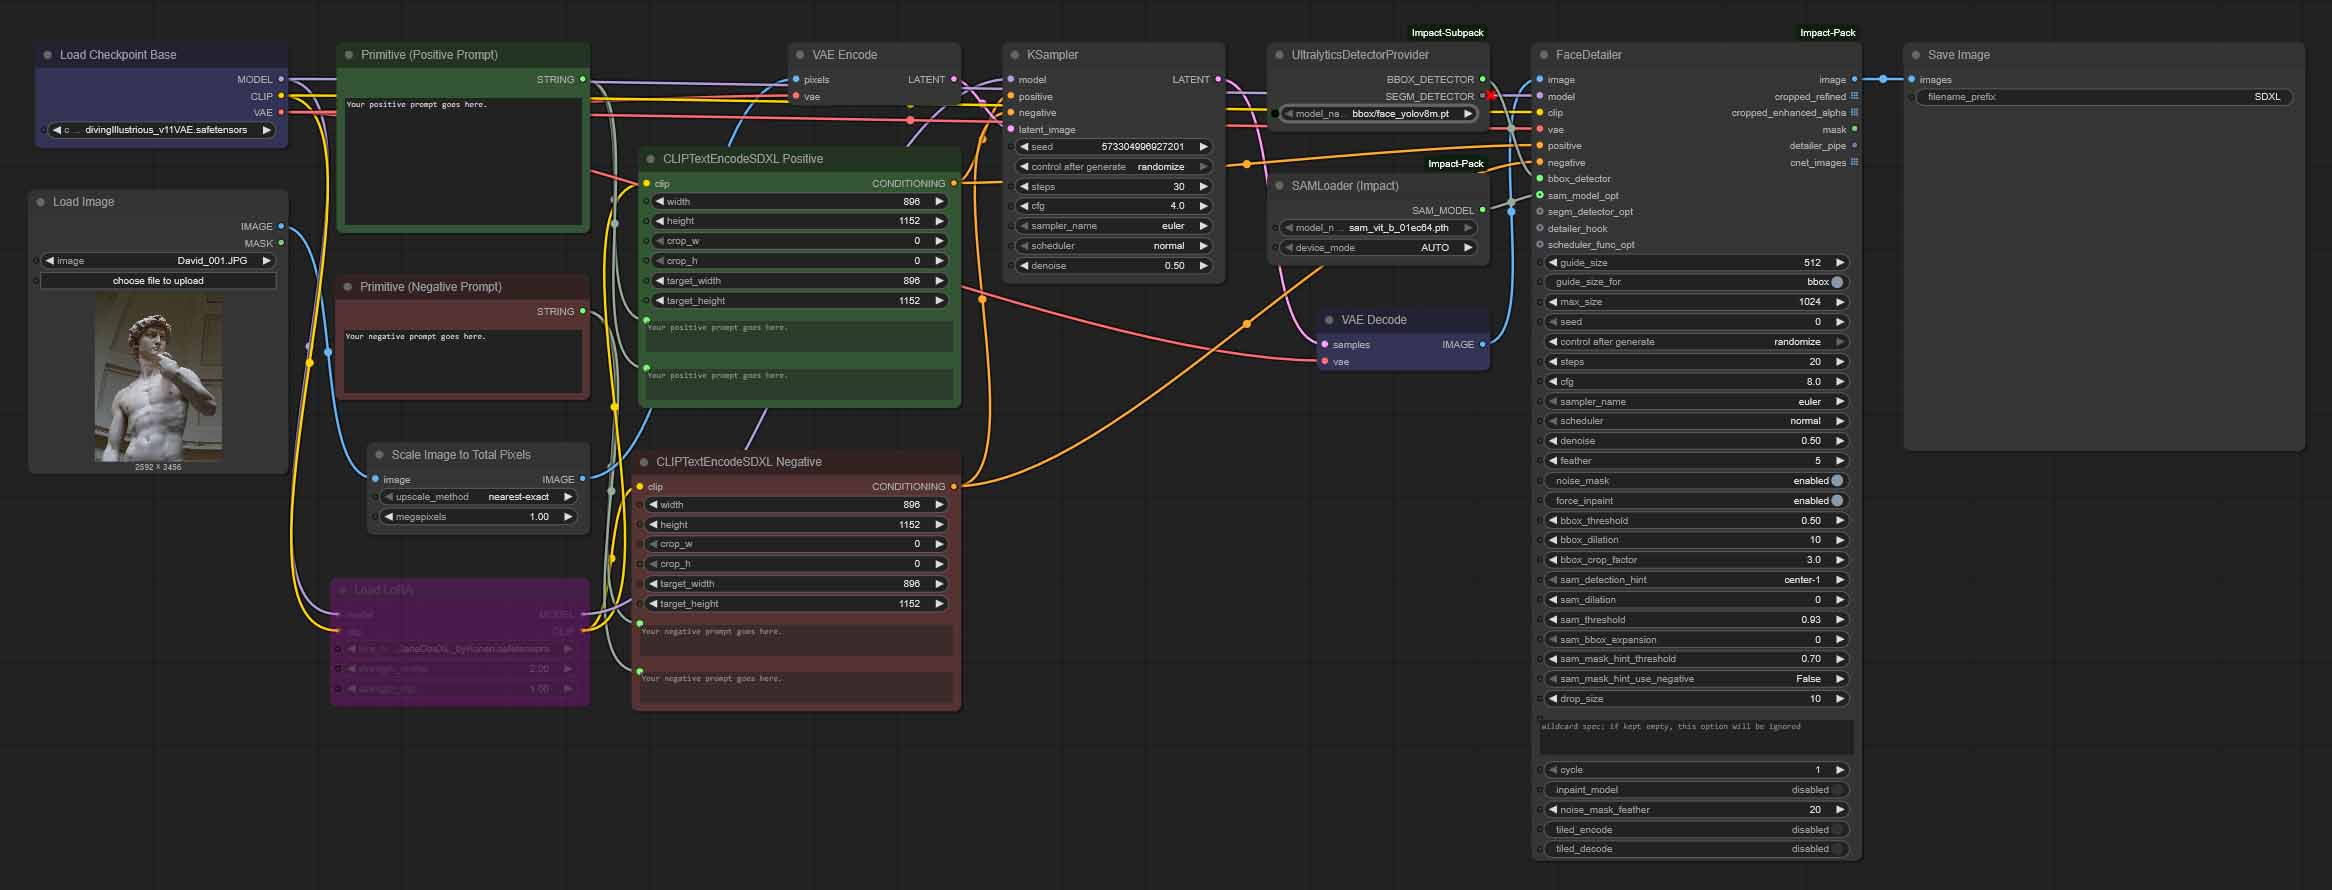
6. Connect The FaceDetailer Nodes To Your Workflow

Once you’ve added the nodes, you will need to connect them to each other and to the rest of your workflow. The FaceDetailer node essentially intercepts the finished image before it’s saved, fixes it, and then passes it along.
You can either follow the connections below, take a look at the image above (you can click on it to zoom it in), or download my example FaceDetailer workflow here. This is the exact same workflow shown in the first image in this article, which can show you the image before and after the character face refinement, as well as the mask in the face detection process.
Here is how to connect the FaceDetailer nodes to the rest of your workflow:
- Connect the main data pipes from your workflow to the FaceDetailer node. It mostly needs the same core information as your KSampler:
- Load Checkpoint MODEL → FaceDetailer model
- Load Checkpoint CLIP → FaceDetailer clip
- Load Checkpoint VAE → FaceDetailer vae
- Positive Prompt CONDITIONING → FaceDetailer positive
- Negative Prompt CONDITIONING → FaceDetailer negative
- Connect the Detector and SAM models to the FaceDetailer:
- UltralyticsDetectorProvider BBOX_DETECTOR → FaceDetailer bbox_detector
- SAMLoader (Impact) SAM_MODEL → FaceDetailer sam_model
- Route the image through the FaceDetailer:
- Disconnect the VAE Decode node’s IMAGE output from your final Save Image or Preview Image node.
- Connect the VAE Decode IMAGE → FaceDetailer image.
- Finally, connect the FaceDetailer image output → your Save Image / Preview Image node.
That’s it! The whole setup is done. Now it’s time to generate our first refined image!
7. Generate a New Image With Refined Details
Once you’re done setting your workflow up, you’re all done. If everything works correctly, once you press the “Run” button you should be able to see that now the image generation process will take a little bit more time searching for the set details and refining them according to the detailer node settings.
One more tip: if you want to be able to compare the results before and after the refiner takes effect, you can plug in another “Save Image” node into your workflow right after the VAE Decode node placed before the detailer pipeline as shown on the image above.
This way you will be able to see both the original image, and the image modified by your detailer node.
You might also like: Top 7 Best Budget GPUs for AI & LLM Workflows This Year
How To Use More Than One Detailer Node in Your Workflow
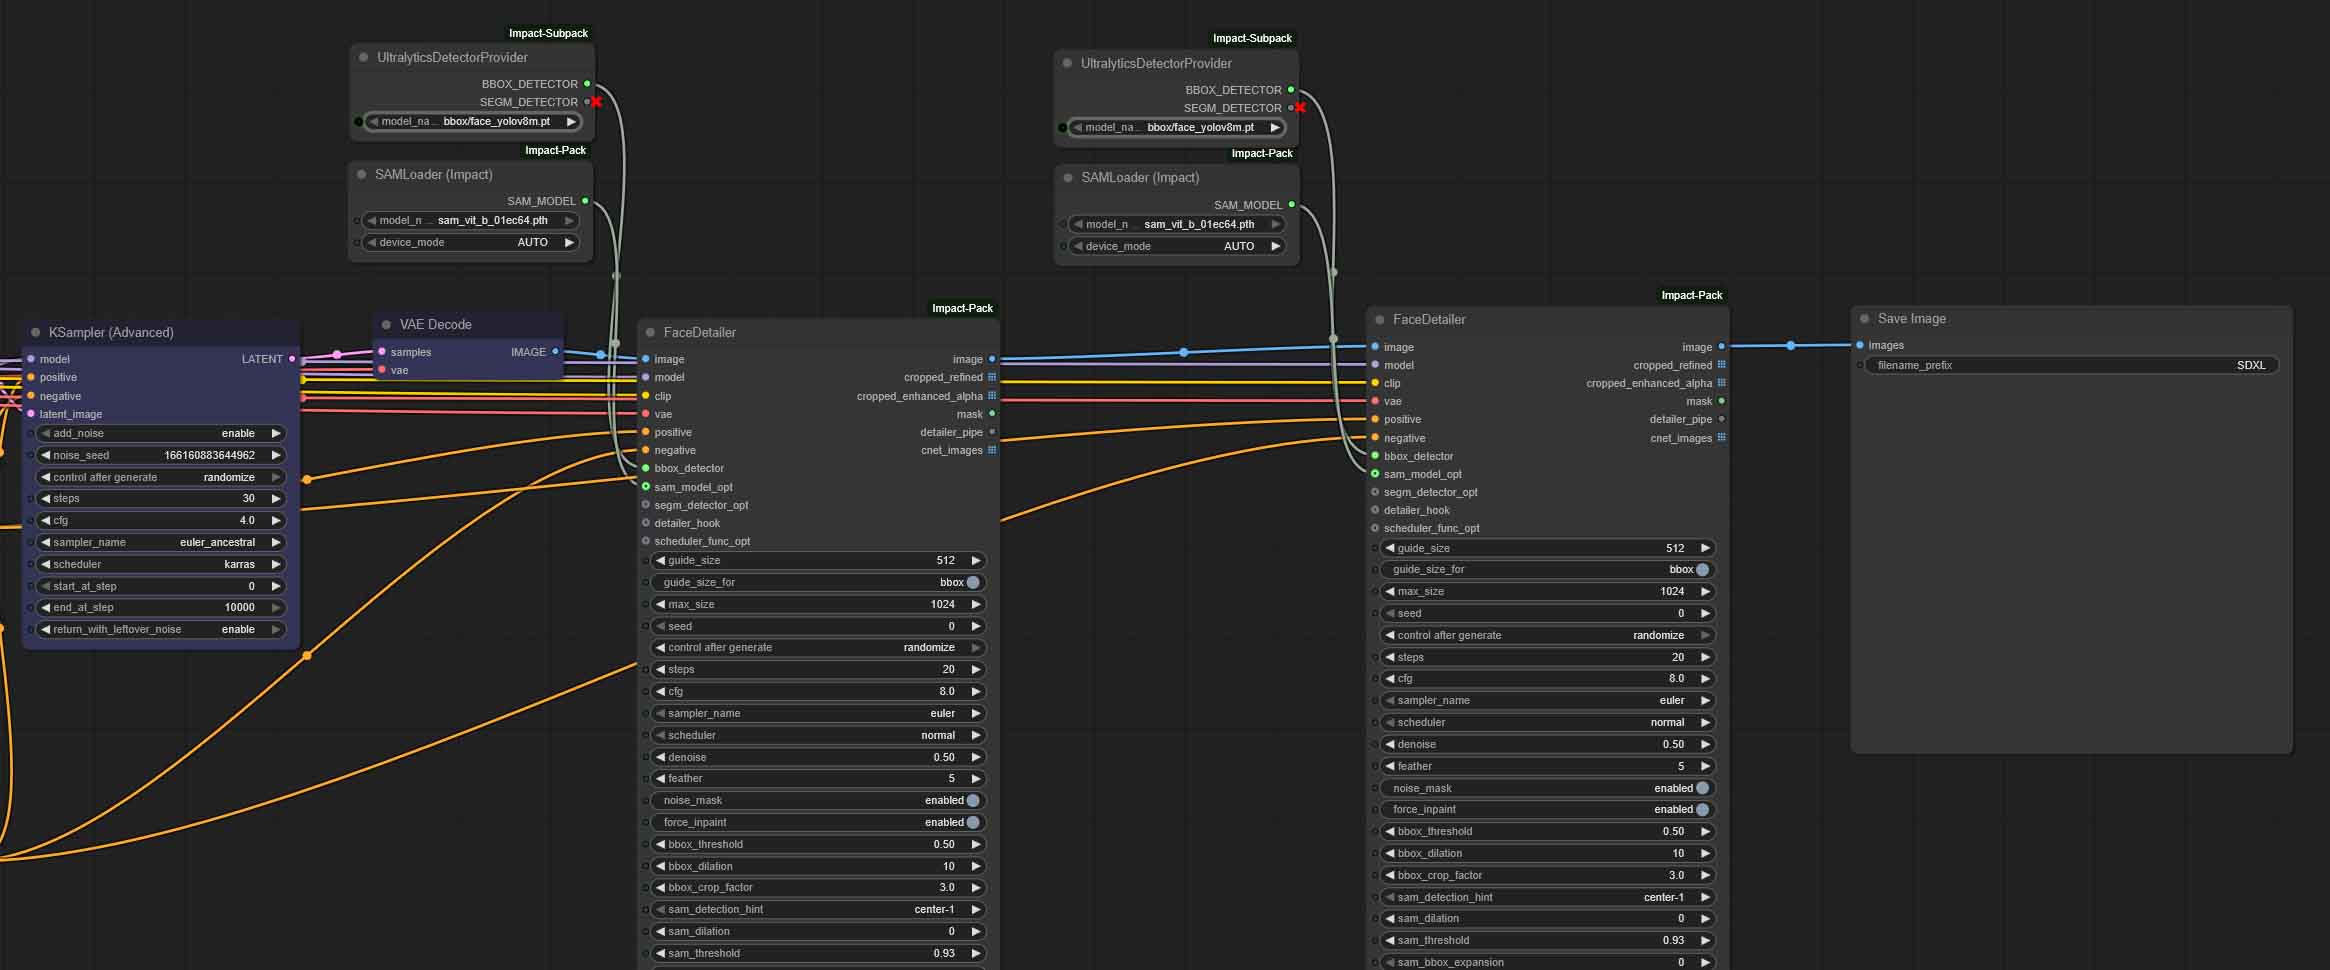
If you need to refine multiple parts of your image, such as the face and hands separately, you can do so by daisy-chaining FaceDetailer nodes with different detection models loaded.
Keep in mind that running more than one detailer node in your workflow will mean a slightly higher memory usage and longer image generation process, as the pipeline needs to process each detailer node set individually in the order they are positioned within the workflow.
Still, my old RTX 2070 Super with 8GB of video memory is still able to generate a 1024×1024 image in just about 30 seconds with two detailer nodes chained in one base SDXL workflow. There really is no good reason not to use it, even when generating images using mid-range GPUs.
You might also like: NVIDIA GeForce 2070 SUPER For AI In 2025 (Stable Diffusion, LLMs & More)