
Here you can find all of my basic ComfyUI workflow presets which include single image generation, img2img and image upscaling workflows with easy to use LoRA model toggles. Simply download the prepared .json files using the supplied links and import or drag-and-drop them into ComfyUI, and you can use all of these right away without having to install any custom nodes. You can find explanations of how each of the presets works down below.
Need a tutorial made specifically for generating anime style images instead? – You don’t want to miss this one: Illustrious XL ComfyUI SDXL Anime Beginners Guide
If you’re in a hurry, you can download all of the workflows at once from my Google Drive here right away.
SDXL ComfyUI Workflows – Single Image, Img2Img and Upscaler (With & Without LoRAs)
All of the workflows presented below are based on the Diving Illustrious XL Anime checkpoint, however you can use them with any SDXL model you like. They have been made to be as simple and as straightforward as possible, and you can easily tweak all of the generation settings within the proposed nodes to your liking.
The nodes used in these workflows are all exclusively native ComfyUI nodes including CheckpointLoaderSimple, LoraLoader, EmptyLatentImage, PrimitiveNodes, CLIPTextEncodeSDXL, KSamplerAdvanced, VAEDecode, SaveImage, and a few helper nodes for the img2img and upscaling image generation pipelines.
No custom node installations are needed for these to work.
All of the supplied workflows come with an additional LoRA model node deactivated (bypassed) by default, although you can easily re-enable the LoRA node in each one of them in two clicks total. We’ll get to that in just a little bit.
How To Import & Use These Workflows In ComfyUI
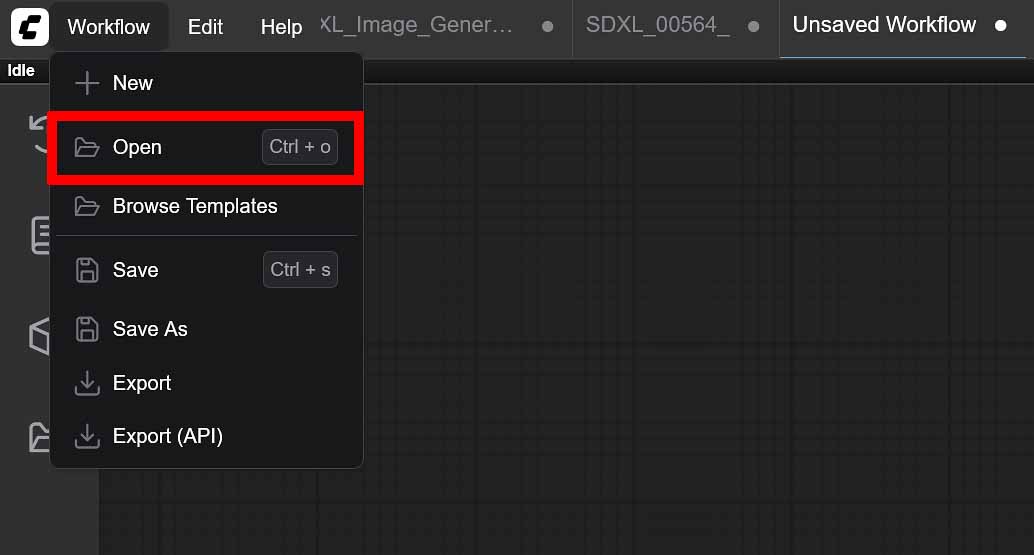
To import these workflows into your ComfyUI instance, you can either simply drag-and-drop the downloaded .json files directly into the ComfyUI interface, or import them using the “Workflow -> Open” menu accessible from the top bar.
To use these workflows to generate images, you will have to provide your own SDXL model and optionally a LoRA model and/or an upscaling model.
Importing SDXL, LoRA & Upscaling Models Into ComfyUI
Which SDXL Models To Pick For Realistic & Anime Image Outputs?
You can find hundreds of different Stable Diffusion XL checkpoints online, with the best and most trusted site for sourcing these being civit.ai.
If you don’t know which checkpoint to start with, you can quickly pick up one of these which I highly recommend:
- Diving-Illustrious Anime – for anime style pictures (the supplied workflows are optimized for this one).
- Juggernaut XL – for realistic imagery (you might have to tweak a few settings within the given workflows for best results).
Where To Put Your Models In The ComfyUI Directory?
Once you have your desired model files on your drive, you need to move them to their designated directories:
ComfyUI\models\checkpoints– for base SDXL models/checkpoints.ComfyUI\models\loras– for LoRA models.ComfyUI\models\upscale_models– for all your upscaling models.
Once your new model files are all in the right places, you need to either restart or refresh the ComfyUI interface (you can do so by pressing F5 while in the main ComfyUI window).
You can learn more about importing SDXL checkpoints, LoRAs and other kind of additional auxiliary models on the official ComfyUI website here.
How To Use Your Downloaded Models In Our Basic ComfyUI Workflows
Then, you can simply select an appropriate model from the drop-down menus in the “Load Checkpoint Base”, “Load LoRA” and “Load Upscale Model” nodes, and begin using your imported workflow.
You can find many great SDXL checkpoints on websites such as civit.ai, and upscaling models for various image styles with usage examples over on openmodeldb.info.
Settings You Might Want To Tweak
All of the .json workflow presets shown here are easily customizable, simple to use, and most importantly, they work without you having to install any custom third-party nodes. All of the default nodes used are arranged to be easily understood and track even if you’re new to ComfyUI and you’re just starting out.
Still, to get the most satisfying results with your particular chosen SDXL models, you will have to tweak some of the most important settings in the supplied nodes:
- Base Model/LoRA Models/Upscaler Models: In the “Load Checkpoint Base” node, as well as in the “Load LoRA” and “Load Upscale Model” nodes (if applicable), you’ll have to select your imported SDXL model that you want to use.
- Image Size: In our workflows set to the default 896×1152 px vertical image format which is optimal for most SDXL based checkpoints. You can tweak this value to your liking, but remember that it has to be changed in both the “Empty Latent Image” and the “ClipTextEncodeSDXL Positive/Negative” nodes.
- CFG: The “Classifier-Free Guidance Scale” value will depend on the SDXL checkpoint you will be using. It regulates how well the image generation process will follow your text prompts. Typical values range from 2 to 7. If your images are too washed out – increase it. If they are distorted and overly vivid/sharp – decrease it.
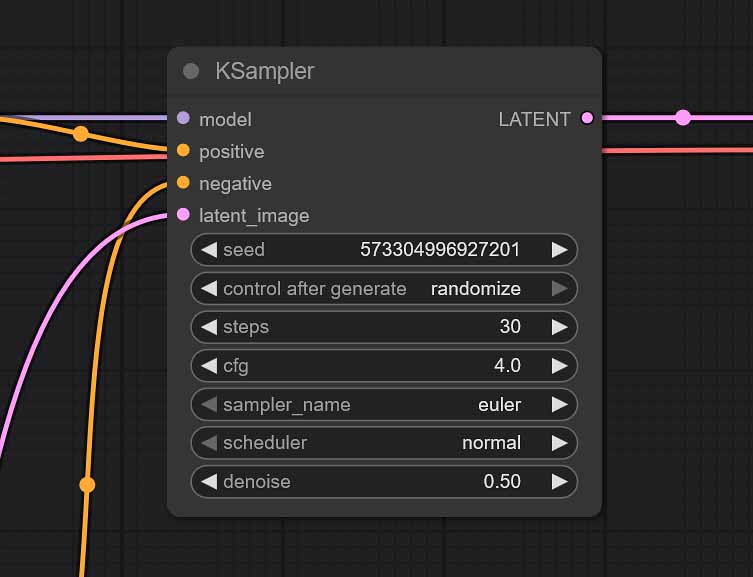
- Denoise (img2img only): The higher you set it, the more your output will deviate from your imported image, the lower it’s set, the more of the original uploaded image characteristics will be visible in your final generation. 0.50 is the best starting value in most cases.
- Samplers/Steps: While our default Euler Ancestral sampler with 30 generation steps combo will work great with most SDXL models you throw at it, there is some room for experimentation here. You can learn much more about Stable Diffusion samplers and sampling methods right here, over on stable-diffusion-art.com.
Now let’s quickly throw in a few words about using LoRA models with all of the workflows available in our pack. It’s really simple!
How To Use LoRA Models In These Workflows
To use your own LoRA models with the our example workflows:
- Download a LoRA model compatible with your selected SDXL checkpoint/model.
- Move the downloaded LoRA file into the
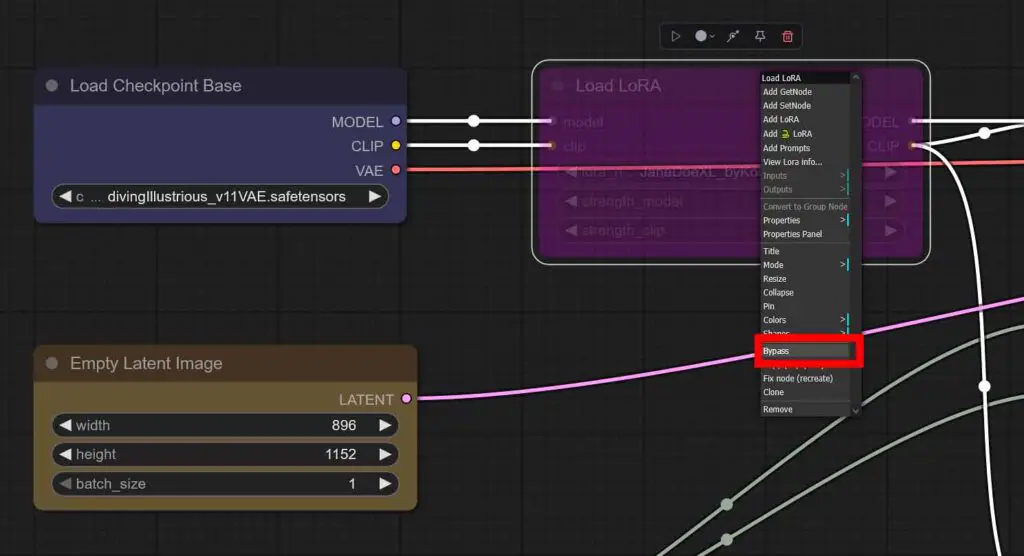
ComfyUI\models\lorasdirectory and refresh the interface by pressing F5 while in the main ComfyUI window. - Locate the “Load LoRA” node on the top left of your imported workflow and if it’s turned off activate it by right clicking it and selecting the “Bypass” option (see below).
- Select your LoRA model from the drop-down menu and adjust the model and CLIP strength values to your liking. Then, if your LoRA requires for certain trigger words to be used, include them in your positive prompt.
- Your generated images will now be affected by your selected LoRA.
Remember to always adjust your LoRA weights to make sure your images come out right. Each LoRA model has different inherent “sensitivity” to the strength parameters. If you’re just starting out, start with modifying the “strength_model” parameter, while keeping the “strength_clip” value close to 1.
If you ever need to use more than one LoRA in your workflow, you can easily daisy-chain LoRA models by using a few “Load LoRA” nodes connected together one after the other.
The LoRA toggle present in each of the workflows in the pack is just a simple “Load LoRA” node that you can freely enable and disable according to your needs. Here is how to do just that.
LoRA Toggle – Enabling & Disabling The LoRA Node
All the workflows listed below come with a single LoRA node which is ready to use, although it’s disabled (bypassed) by default. Here is how to enable it in just two clicks.
If you want to enable the LoRA node:
- Locate the “Load LoRA” node on the top left of your imported workflow.
- Right click anywhere on the node.
- Select the “Bypass” option if you want to enable the LoRA node.
- You can disable the node again by selecting this exact same option one more time.
With that out of the way, let’s proceed to the more detailed descriptions of the supplied workflows, alongside with the download links.
SDXL Single Image Generation Workflow (Plus LoRA)
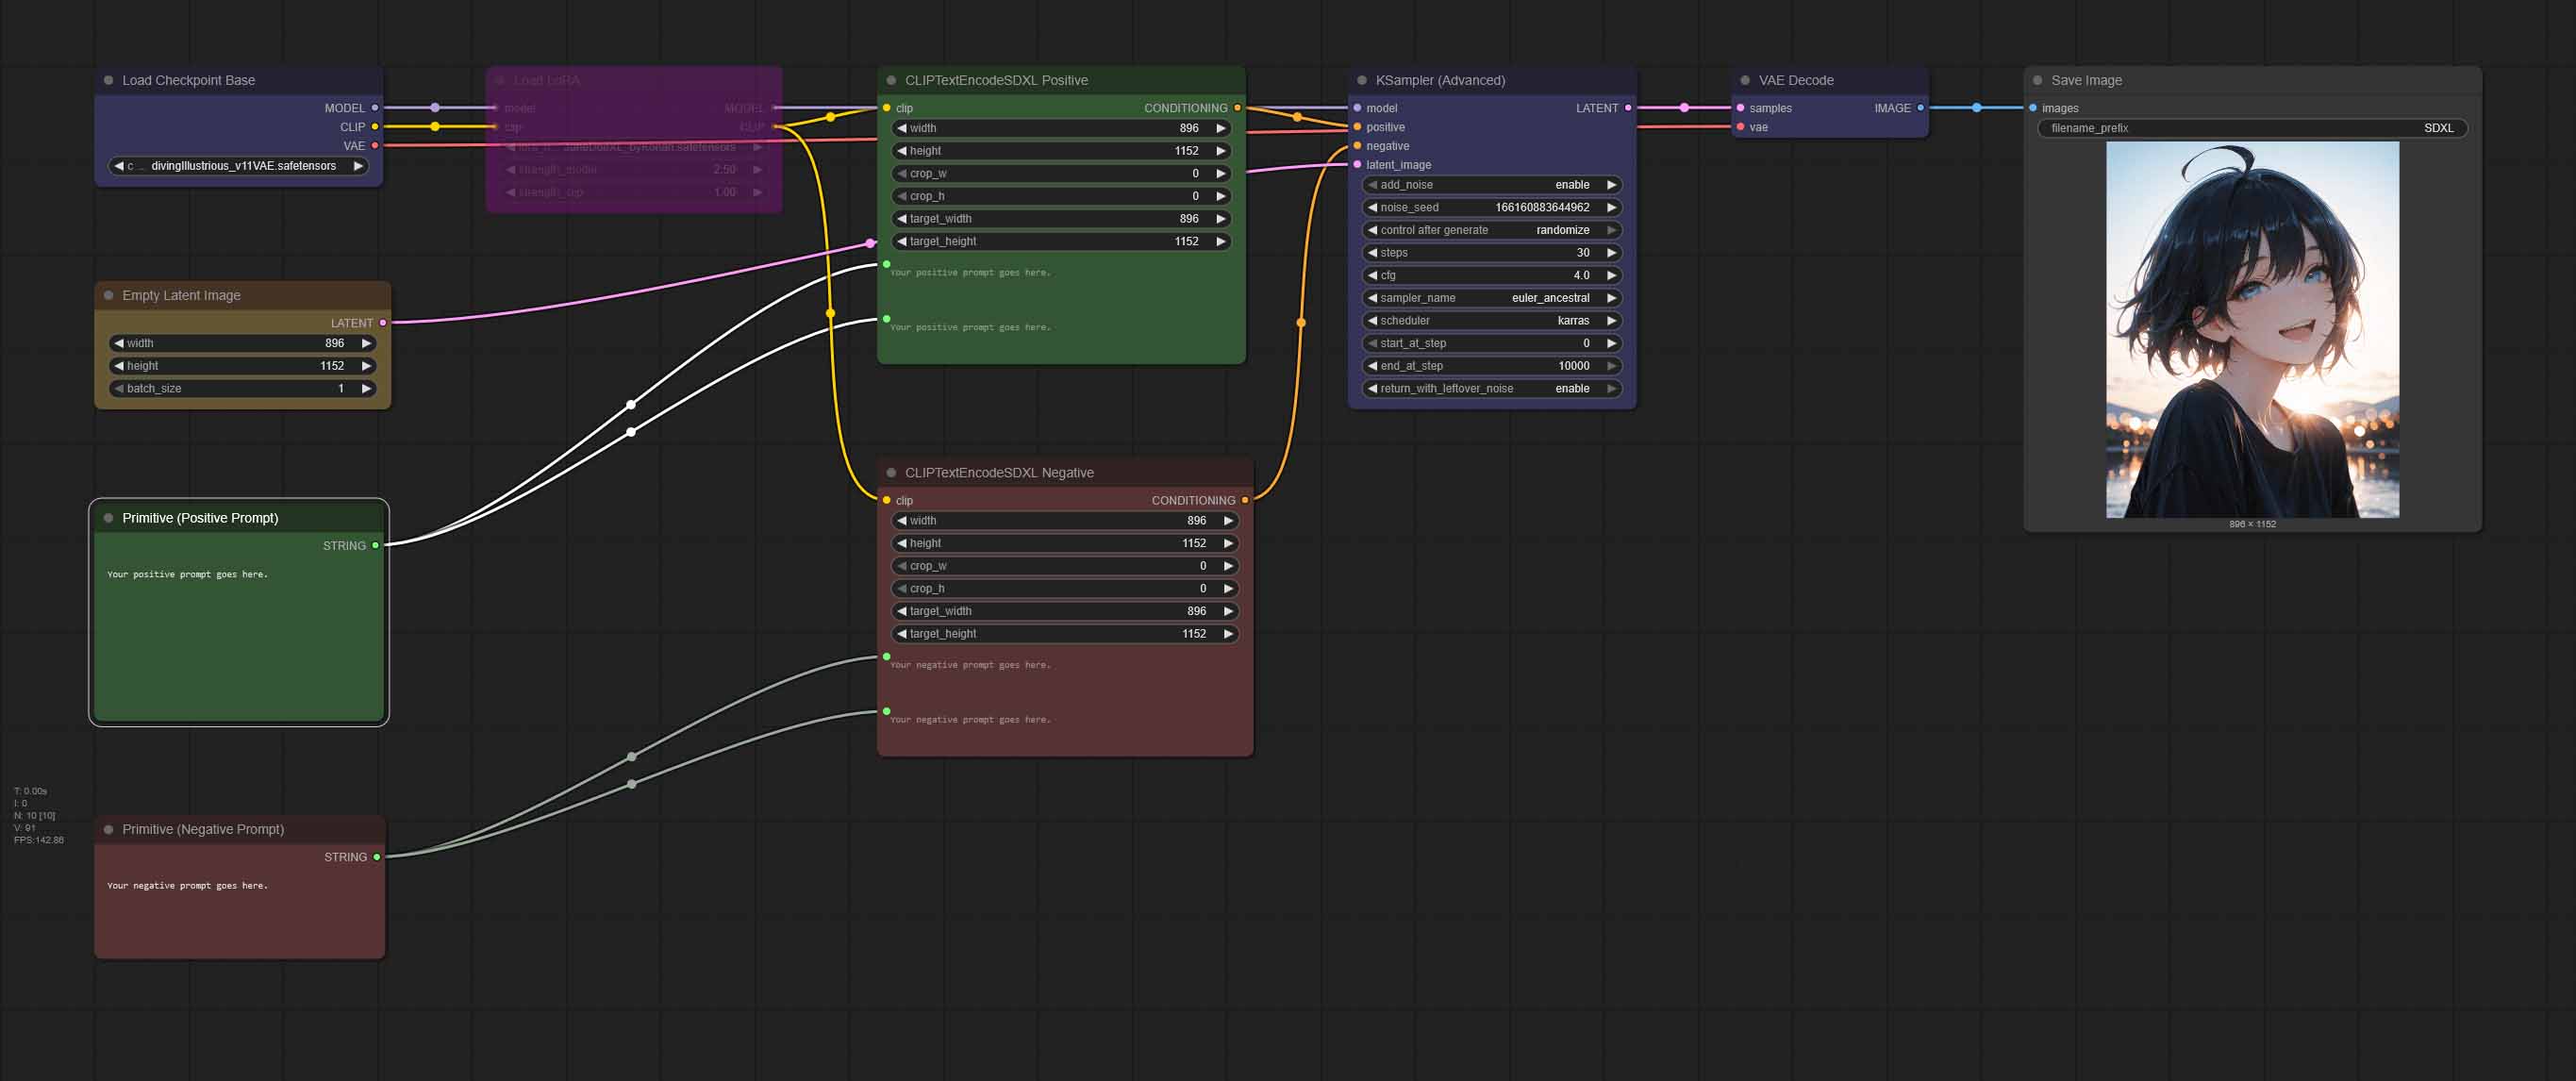
This is our most basic single image generation workflow with an optional LoRA node bypassed by default. It features two convenient green and red fields for your positive and negative prompts as all of the remaining workflow presets, and it’s extremely easy to modify and customize. Here is how it works.
On the left side, a selected SDXL model is loaded into memory in the “Load Checkpoint Base” node – on some systems this process might take up to a few minutes if you’re doing it for the first time.
After the checkpoint loads up, it’s optionally joined by the LoRA model weights that are imported using the “Load LoRA” node (which as you already know in our case is disabled by default).
At the same time, a clear image “canvas” is prepared in the “Empty Latent Image” node and it’s pushed together with both your positive and negative prompt straight to the “KSampler” node which is responsive for the heart of the image creation process. There you can tweak most of the important settings that we’ve mentioned above.
Once the “KSampler” node is done with creating the image, and the “VAE Decode” node translates the latent space data into an actual viewable .png file, your image output will display in the last node called “Save Image”, where it can be viewed and saved on your system.
All of your generated images will also get automatically saved in the “Output” folder in the main ComfyUI directory, so remember that if you ever forget to save any of your pictures from within the WebUI.
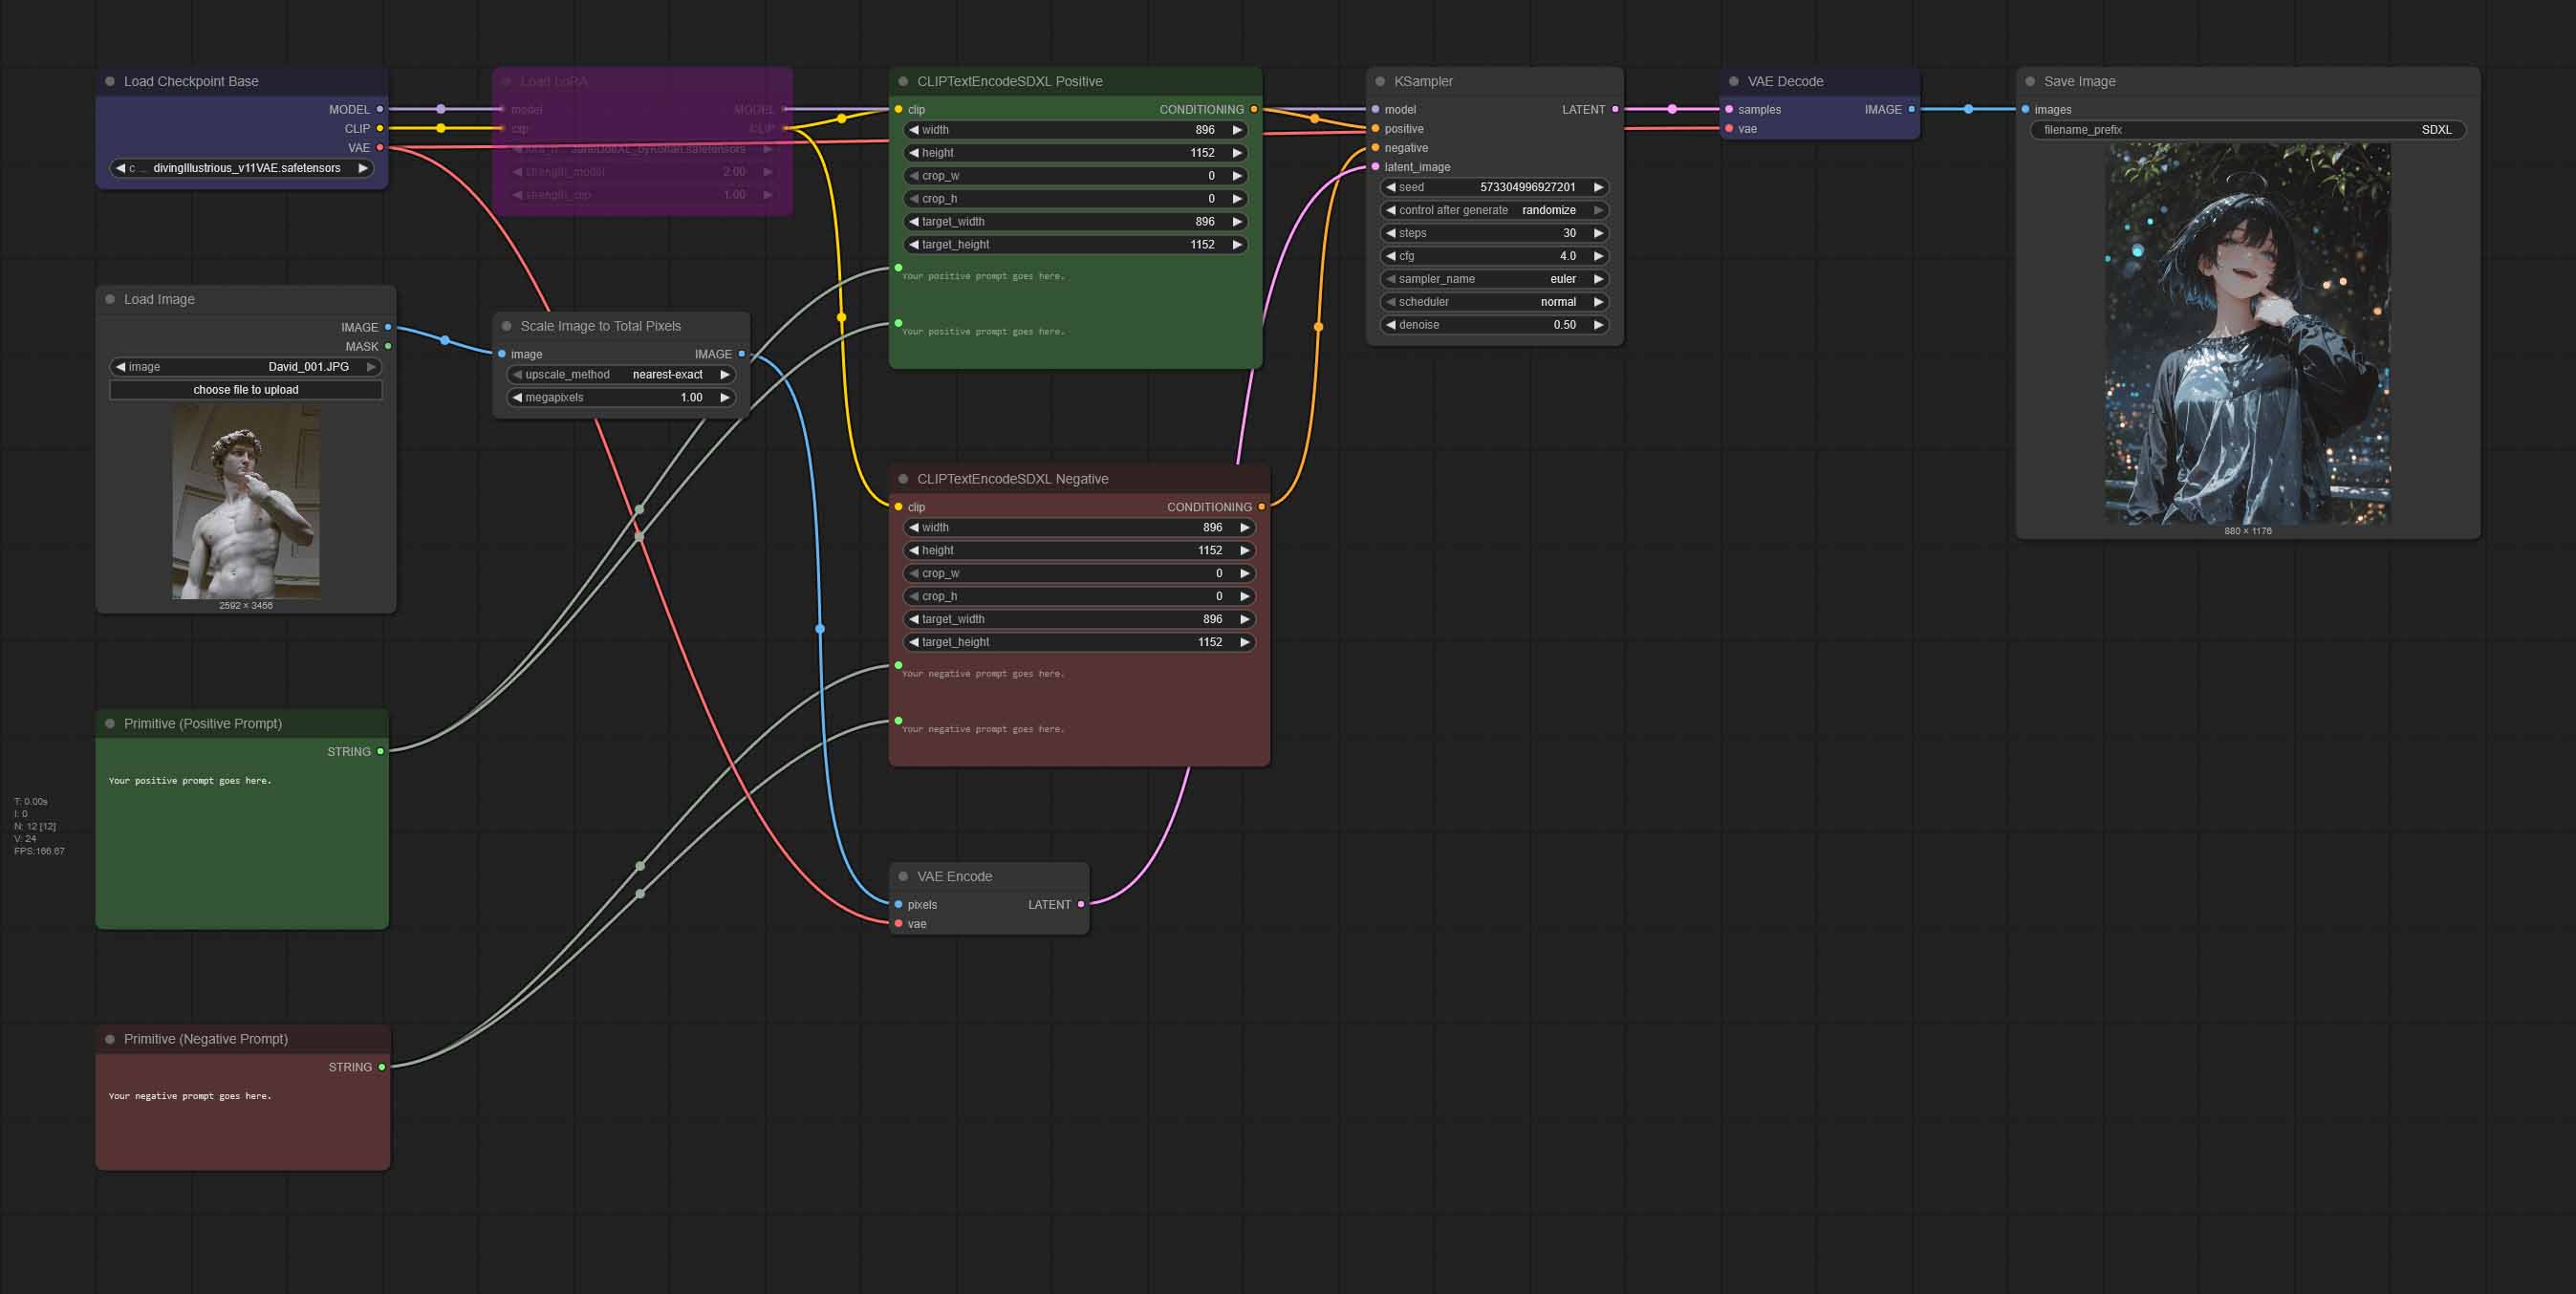
SDXL Img2Img Workflow (Plus LoRA)
- SDXL Img2Img Workflow (LoRA Toggle) – Google Drive
- SDXL Img2Img Workflow (LoRA Toggle) [With Upscaler] – Google Drive
Now we’re stepping up the game adding an extra variable into the whole image generation process – our custom uploaded image which will act as the basis for our new image output. This process is called “img2img” in the Stable Diffusion lingo.
You might be quite surprised, but this workflow is almost entirely the same as the previous one!
Yes, every mechanism described in the previous paragraph works exactly the same here, with one small difference. The “Empty Latent Image” node is missing now, as we don’t need ComfyUI to supply is with an empty “canvas” to work with. We’re providing it ourselves.
The “Load Image” node is the place where you can put any image you like. It’s a lot of fun experimenting with different inputs here!
For this to work image to act as our “canvas” it has to be pushed through something called a Variational Autoencoder (VAE) so that it can be processed in the latent space just as our empty “canvas” was before. This happens in the “VAE Encode” node which just as it was the case with our “Empty Latent Image” node, is piped straight into “KSampler” where the image generation process actually happens.
Scaling Down The Img2Img Input In ComfyUI
But there is one more node between these two – namely the “Scale Image to Total Pixels” node. Why is that? While it’s not really necessary per se, it makes sure that the image you import will always be shrunk to a size that can be processed in a reasonable amount of time.
The “Load Image” node in ComfyUI always preserves the original dimensions and aspect ratio of your imported images, transferring them “as is” to the “canvases” for your new creations.
This means that if you would decide to load up a fairly large image directly, without using our nifty “Scale Image…” helper, the generation process could take long minutes if not more on lower-end GPUs, and yield mediocre results at best due to the resolution mismatch (remember, SDXL models tend to work best with certain select image sizes).
In our default img2img node setup, your input image will be resized to around 1 megapixel while preserving its original aspect ratio, without using any custom nodes in the process.
If you want your output to be a little bit bigger, you can set this value to 2 megapixels and up, however remember that this can drastically stretch the total image generation time. That’s pretty much it!
As you might have already seen, above you can also find a version of our img2img workflow with an image upscaler included in the pipeline. Here is how that works.
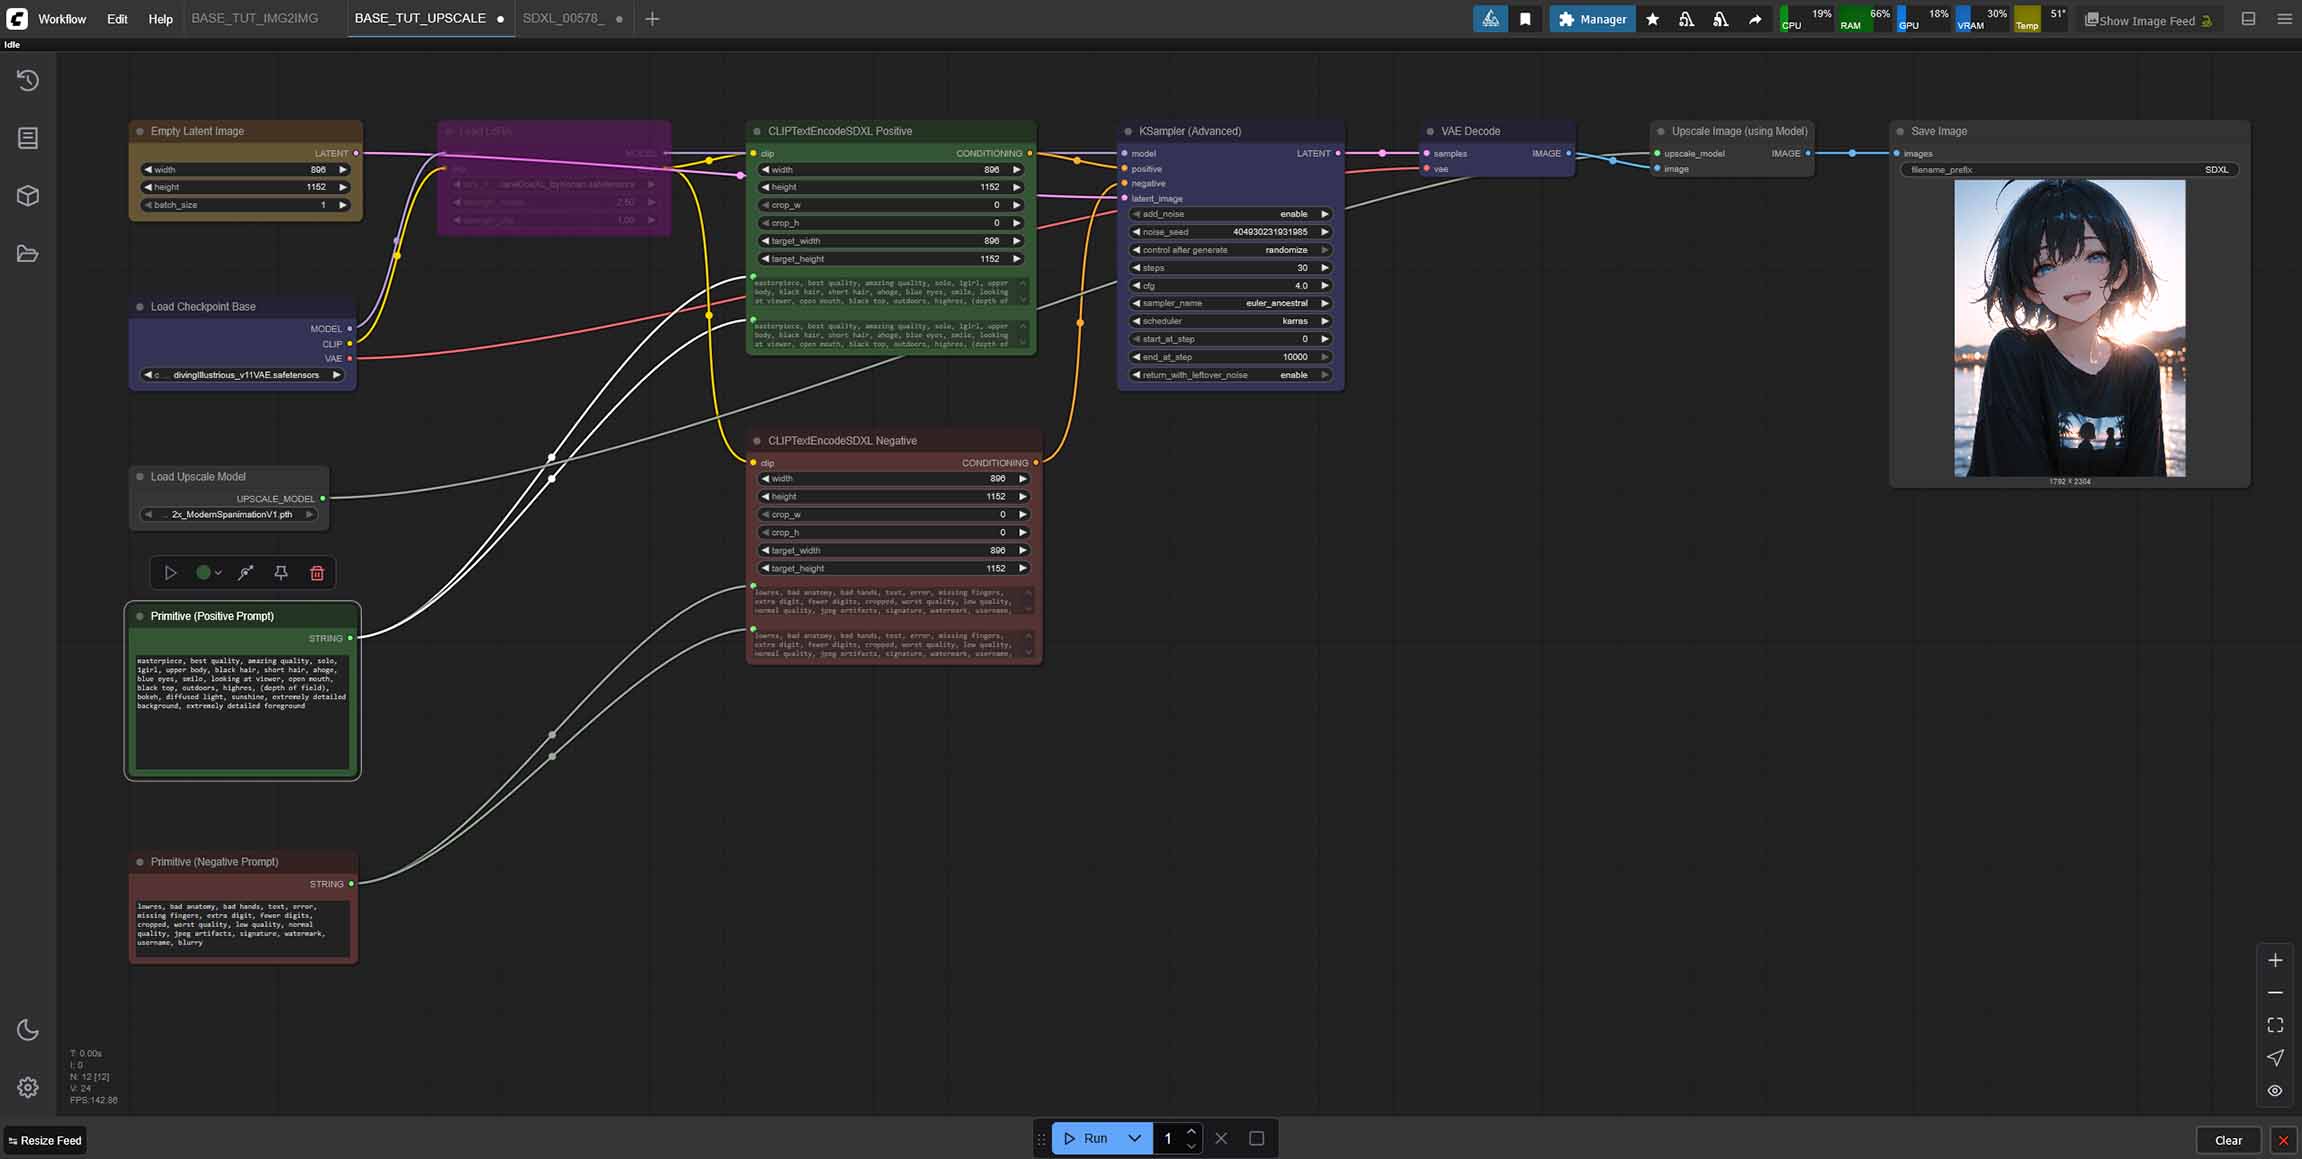
SDXL With Image Upscaling (Plus LoRA)
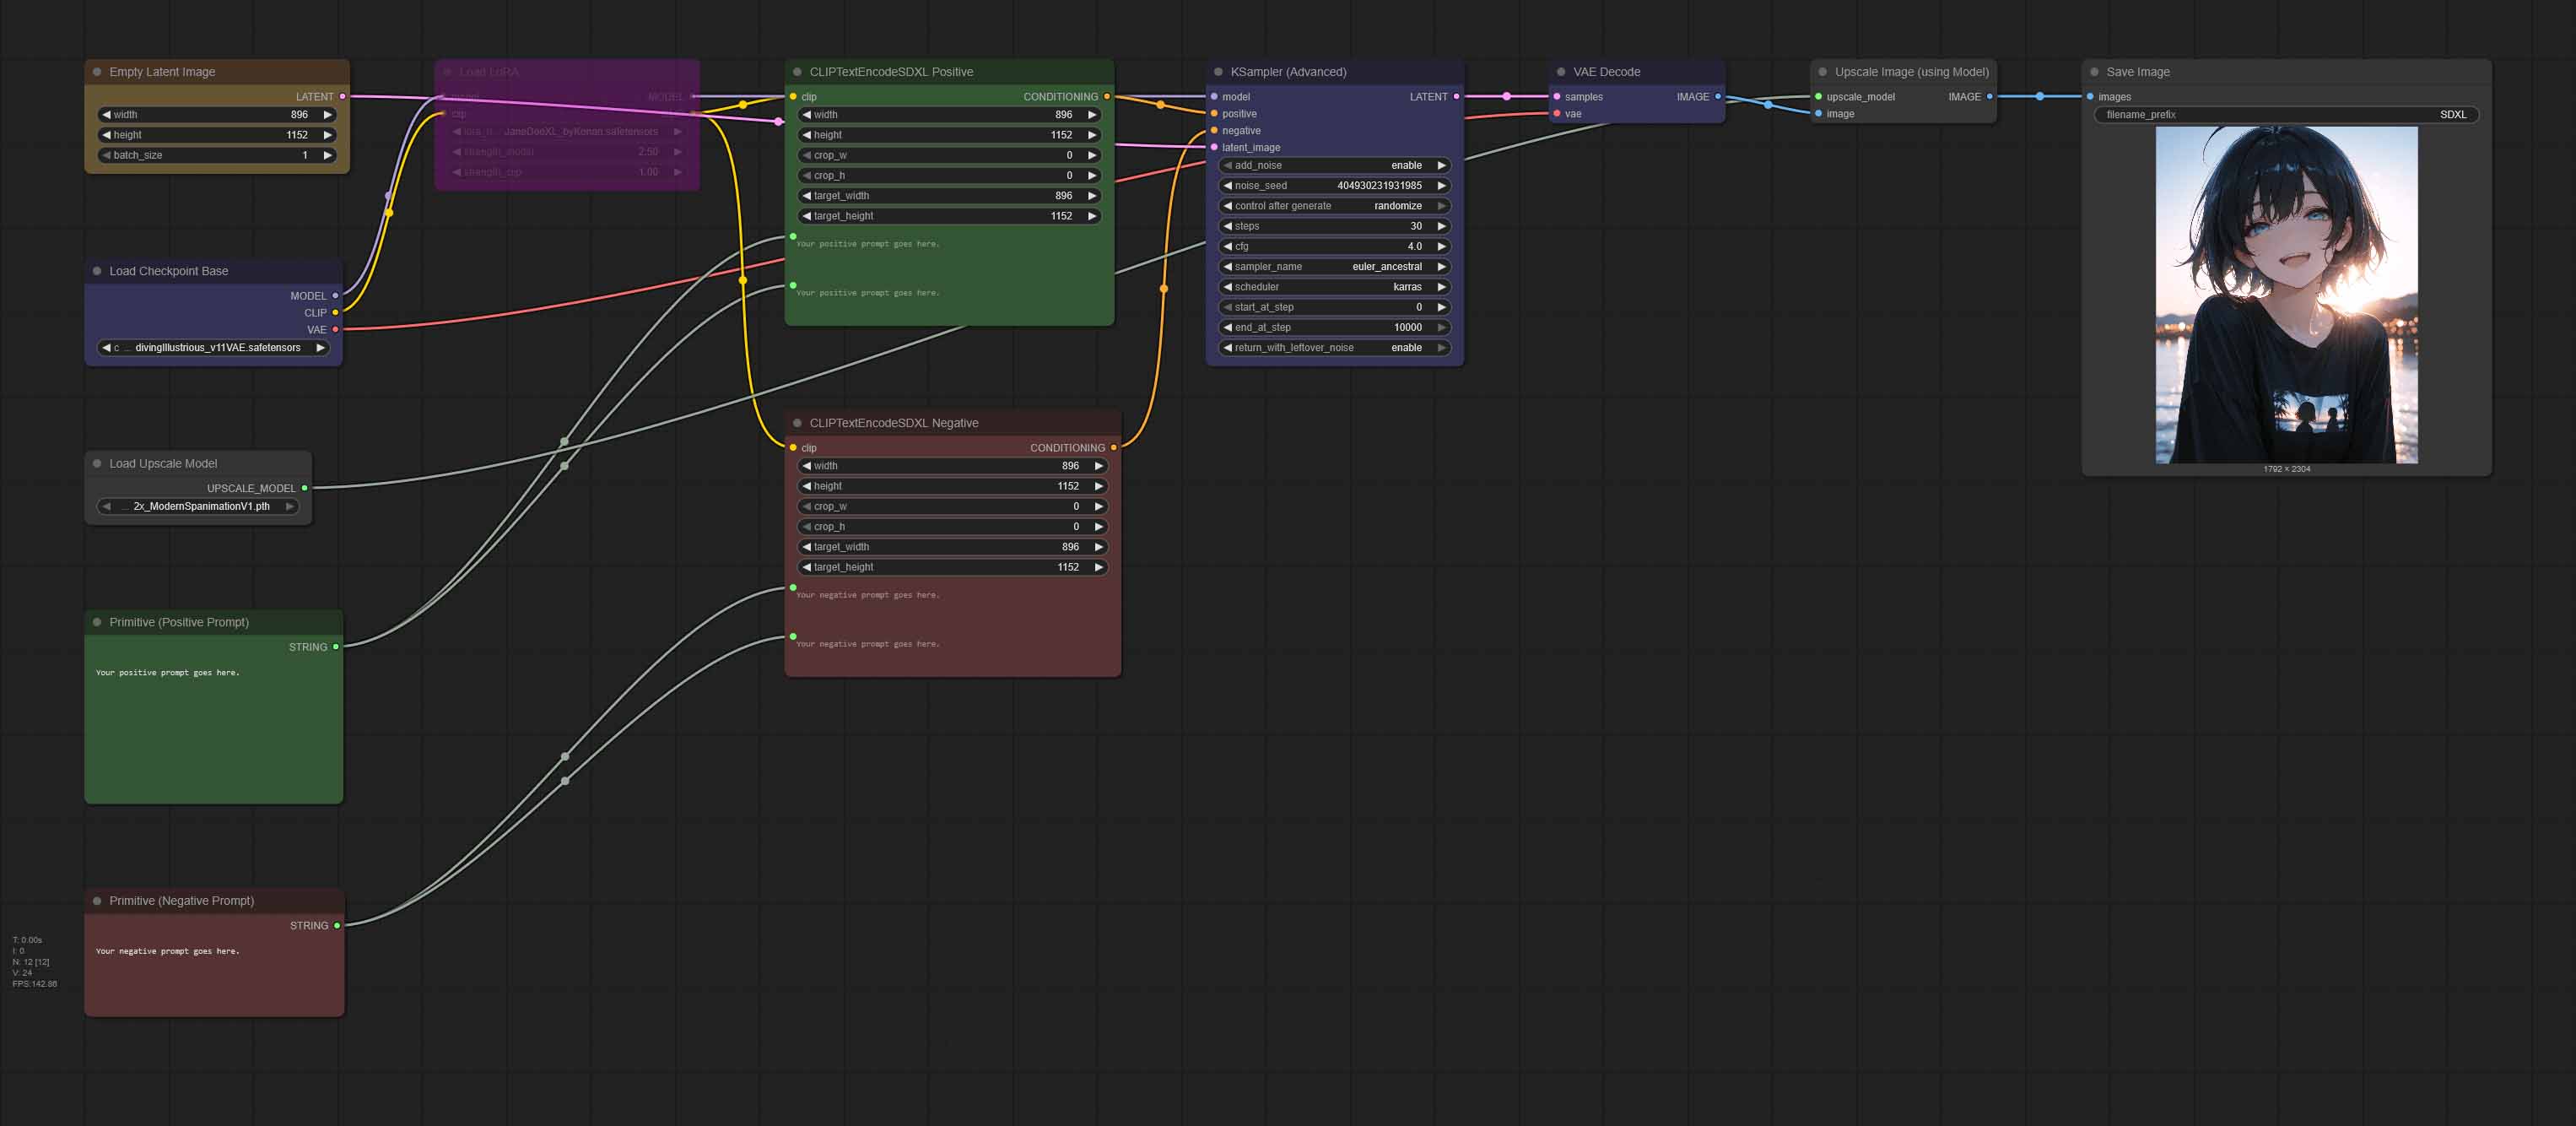
Our last generic workflow is the simple image generation pipeline that you already know, extended with an image upscaling utility. And once again, there are only two new nodes here.
The first one is the “Load Upscale Model” node, which will allow you to load your selected upscaler into your GPU memory once the image generation process starts. The second one is the “Upscale Image (using Model)” node, which after your image is generated and comes out fresh out of the “KSampler”, scales it up to the dimensions pre-defined by the upscaling model that you chose.
To make use of this workflow, you’ll have to download an upscaler of your choice and import it into ComfyUI (see above for the model importing instructions). You can find a lot of compatible upscaling models meant for anime style content over on openmodeldb.info. It’s a really great resource to have on hand.
Most popular upscaling models allow you to enlarge your images without losing detail in 2x, 4x and 8x increments.
And the good news? Most upscaling models do not take up much space in your VRAM, and don’t make the image generation process that much longer. Remember, try experimenting with different upscalers. They can grant you vastly different results on the very same input material.
Why Are The Prompts Repeated Twice In The CLIPTextEncode Nodes? – “text_l” and “text_g”
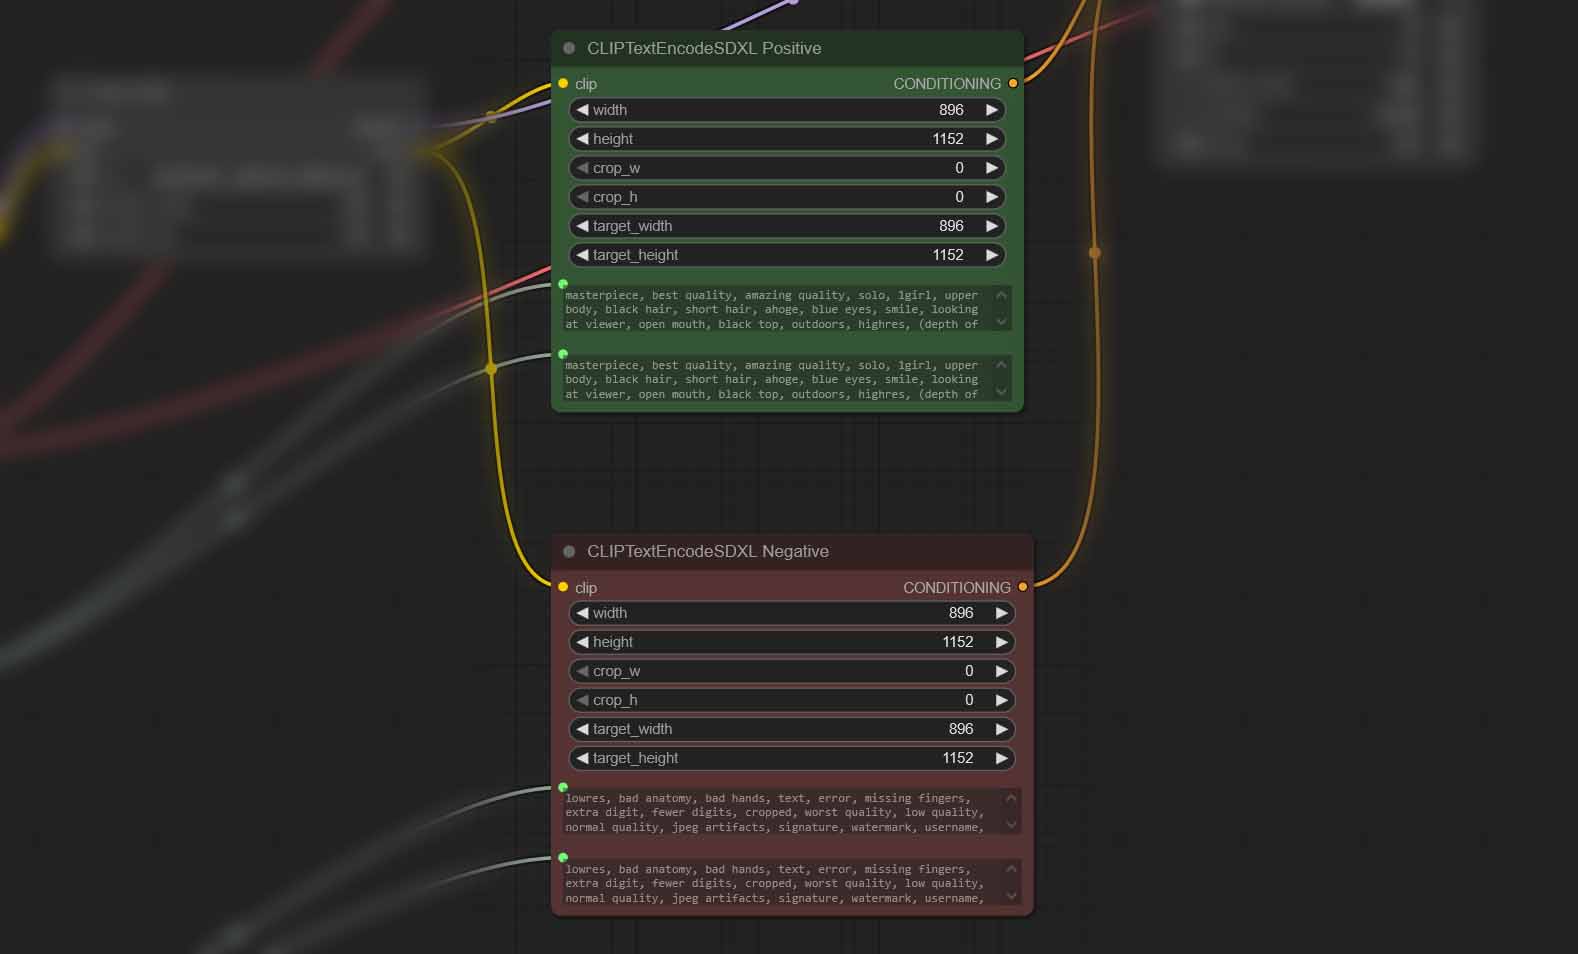
A question you might rightfully ask is: “Why is my prompt duplicated in each of the CLIPTextEncodeSDXL nodes”. Here is a direct yet somewhat simplified answer to that.
SDXL by default carries two independent text encoders, namely the CLIP ViT-g/14 and CLIP ViT-L/14. That’s just how its base model architecture is designed.
ComfyUI therefore gives us two different prompt fields in each CLIP text encoding node: text_g and text_l, one of which feeding each of the mentioned encoders.
Pasting the same positive and negative prompts into both boxes is perfectly fine – the model will concatenate their embeddings and utilize them for generating your image without doubling their meaning in any way.
Leaving either of these fields blank will pass an embedding of an empty string into the sampler node and weaken the model guidance without any real benefits.
Once you get more comfortable with ComfyUI, you can attempt to split your prompts, keeping your general scene description in the text_g field, and fine-detail tags in text_l.
According to the official ComfyUI wiki/documentation, the text_g field is responsible for the “global textual description”, while the text_l – for “local textual description”. The practical implications of this separation however are still widely explored. Once again, experimentation is key!
Want To Learn More? – You’re In The Right Place!
With a plenty of local AI tutorials you can find on TechTactician there are a lot of things you can learn both about Stable Diffusion image generation, and about other exciting uses of local AI models and software, such as chatting with your AI assistant privately on your own PC.
If you’d like to know more about ComfyUI alternatives, you can also check out my full list of local Stable Diffusion clients here, or see which graphics cards are currently the best for generating SDXL & FLUX images locally.
I hope that all this was helpful to you, and I hope to see you next time!
Interested in best GPUs for both base Stable Diffusion, SDXL and FLUX? – You can check out my top list for this year right here!