")
If you want the simplest “download -> import workflow -> generate“ way to run Qwen Image Edit in ComfyUI on a single GPU (including many 12GB VRAM cards with offloading), Phr00t’s Rapid AIO merge is one of the easiest and most straightforward setups right now. It packages the usual moving parts (the base model, Lightning LoRAs, VAE, and CLIP) into a single checkpoint file, so you can easily get started in minutes. Here is how to quickly set it up.
You might also like: Basic ComfyUI SDXL Workflows – No Custom Nodes
While going through the steps of this guide I use:
- GPU/System RAM: RTX 3090 24GB VRAM, 32GB RAM (the merge should work on most 12GB GPUs as confirmed by the creator of the merge, provided you have enough RAM for the model to offload unused data during inference, with 32GB being reasonably safe amount).
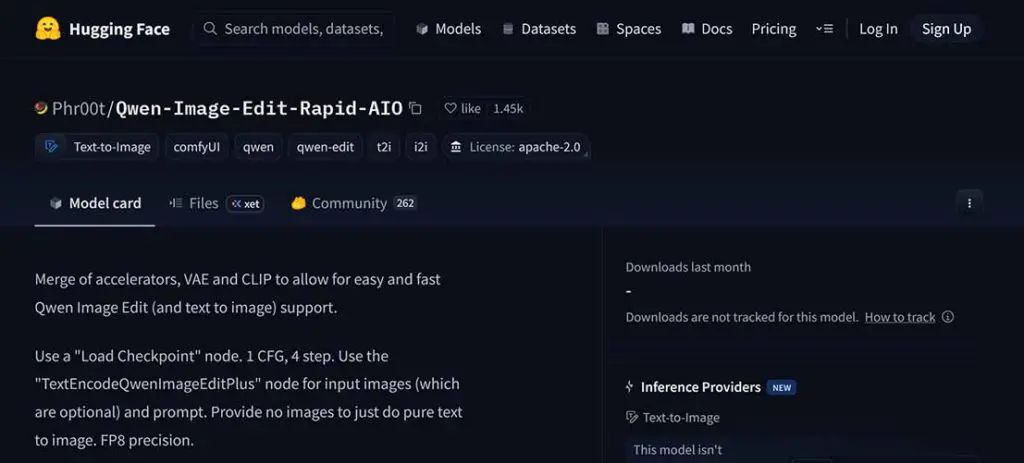
- Model: Phr00t’s Qwen-Image-Edit-Rapid-AIO.
- Workflow: an ever so slightly modified Phr00t ComfyUI workflow, which will work without you having to download any custom nodes.
Note: Please update your ComfyUI before moving on with this tutorial – if you’re using an older version of the software, there is a chance you won’t have some of the Qwen-specific nodes available in the node library by default.
What Qwen Image Edit actually does
Qwen-Image-Edit edits images using two signals at once: it processes the input image through a vision-language path (for “what’s in the image” semantics) and through a VAE encoder (for “how the image looks” appearance), then combines that with your instruction prompt to produce the edited output. That’s why in many cases it can handle “change X but keep the rest consistent” edits better than basic img2img pipelines.
Why the “Rapid AIO” checkpoint is much easier to use
ComfyUI’s official native Qwen-Image-Edit workflow setup example involves providing a few separate model files to the workflow (the diffusion model itself, the text encoder, the VAE, and an optional Lightning LoRA).
Phr00t’s Rapid AIO approach is intentionally made simpler, requiring only the single “all-in-one” model merge to be provided in the Load Checkpoint node. In other words, it’s a single-file merge of the Qwen-Image-Edit base model, baked-in 4-step Lightning LoRAs, VAE and CLIP.
Qwen Image Edit Rapid AIO in ComfyUI – Setup in 5 Steps
Step 1 – Download the AIO merge model file

In the Phr00t’s HuggingFace repository you can find folders with different versions of the merge, and each of the folders comes with SFW (safe-for-work) and NSFW (uncensored) variants of the checkpoint, both of which will be about ~28.4GB.
Navigate to the latest available version folder, then pick one variant depending on your use case, and download it.
In many cases you don’t necessarily have to worry about the total file size of the checkpoint being larger than the amount of VRAM you have on your GPU. During inference, large parts of the model will get offloaded to RAM, in an automatic attempt to prevent you from overflowing your video memory buffer, and allow for efficient inference despite the large size of the merge.
Still, if you don’t have enough memory on hand, you might face either very slow inference, or ComfyUI crashing on you once you load the model or start the image generation process.
After you’ve downloaded the model of your choice, place the file in the ComfyUI/models/checkpoints/
Important: This destination path for your AIO model file differs from the ComfyUI’s base Qwen Image workflow docs, which use models/diffusion_models, models/text_encoders, and models/vae for the separate components mentioned above. Phr00t’s rapid AIO merge avoids that complexity by design, and leaves you with just one file to handle.
You might also like: Best GPUs for Stable Diffusion, SDXL & FLUX Local AI Image Generation
Step 2 – Import the workflow JSON
Workflow JSON (Google Drive): download this slightly modified version of the original Phr00t Rapid AIO merge workflow.
Drag-and-drop the Qwen_Image_Edit_AIO_Phr00t_md.json file into the ComfyUI window, or use the Workflow → Open context menu on the top bar.
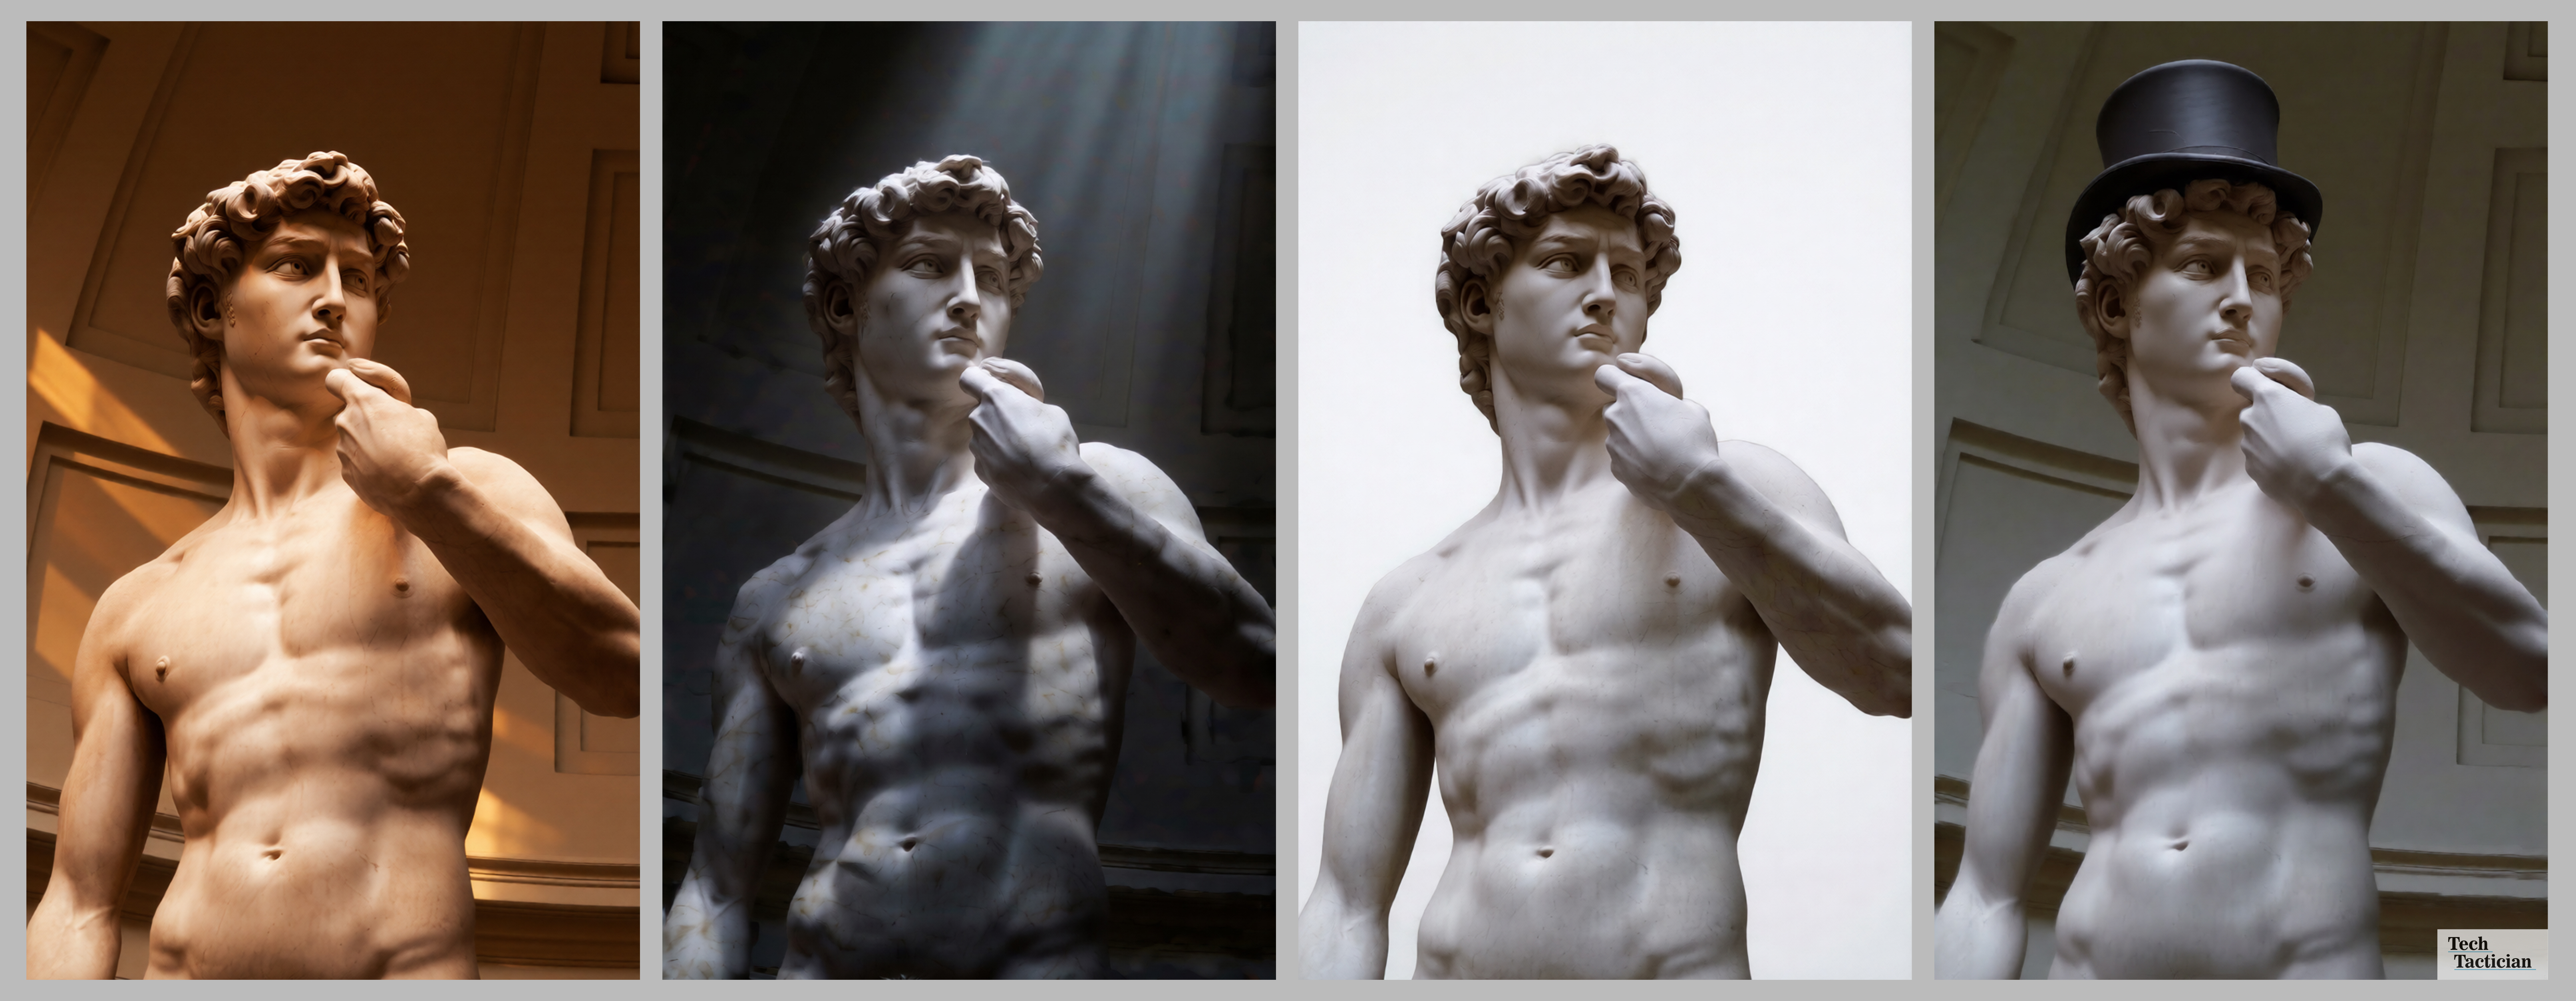
If you’d like to use the very same image of Michelangelo’s David by Jörg Bittner Unna I used in my examples in your first generation, you can get it from Wikimedia, or directly from our site here.
This preset uses the baseline “fast” sampling settings that match the AIO, as it was already merged with a Lightning LoRA that allows you to use less generation steps and still get a satisfying quality output from the model.
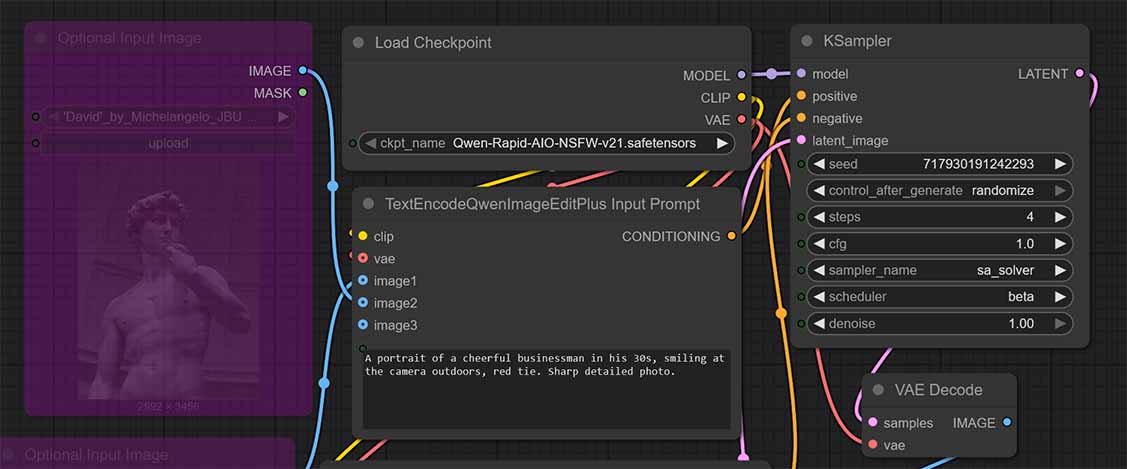
Phr00t’s core recommendation when it comes to sampler settings is 4 steps and CFG equal to 1, plus no additional negative prompt. This is already set up for you, so you don’t need to touch the KSampler node settings at all, if you do not wish to.
Step 3 – Generate Your First Image (Text to Image)
All done. Now you can create your first image. Before getting into image-to-image, which this model was made for, let’s quickly take a look.
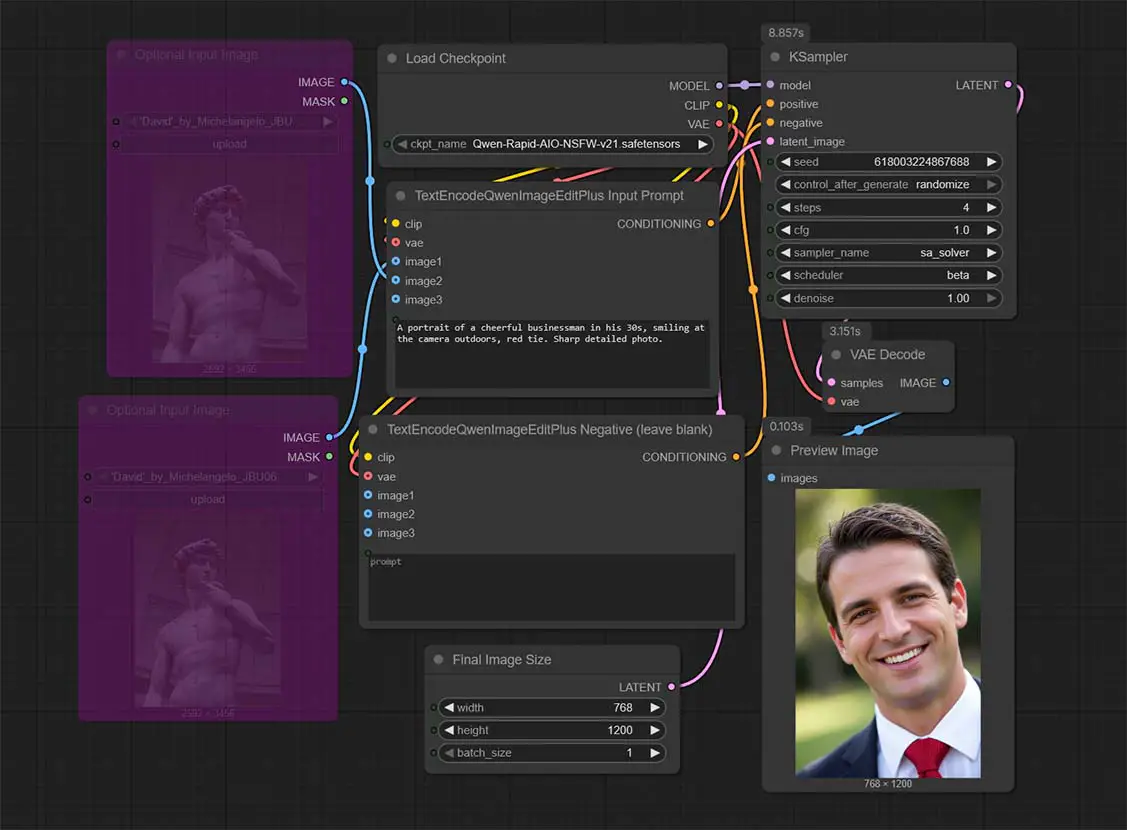
While Qwen Image Edit was trained specifically for img2img workflows, it can also give you reasonably good results for regular text-to-image generations. By default, our workflow preset comes with both the input image nodes bypassed, so that you can try out text to image first.
One of example generic prompts you can use (that I’ve used in the example above) is:
A portrait of a cheerful businessman in his 30s, smiling at the camera outdoors, red tie. Sharp detailed photo.Input this prompt in the TextEncodeQwenImageEditPlus Input Prompt node, while leaving the negative prompt node below empty. Then, press the Run button.
Keep in mind that the very first run can be very slow, especially if you’re storing the model on a HDD drive, instead of an SSD. This is because the very first time you run the workflow, the entirety of the model’s data has to be loaded into memory, and this will take more time the slower your active storage device is.
Moving the checkpoint file from a slow HDD to a reasonably fast NVMe drive can really up the speed of getting your first image here, often going from minutes to seconds.
After the model is loaded, and you haven’t run out of memory in the process, the image generation process will begin, and after a while, you should be greeted with the image you requested.
Now let’s move on to the main strength of Qwen Image Edit, that is, image-to-image workflows.
Step 4 – Edit an Image Using Qwen (Image to Image)
This task is what Qwen Image Edit was really made for. Using it, you can accomplish many image editing tasks, with various complexities. All that is required from you here, is to clearly describe the task in natural language within the positive prompt.
Qwen Image Edit lets you for instance:
- Change the clothing of the person shown on the image (“Dress this person in a tuxedo”, “Remove the hat”, “Replace the baseball cap with a tophat”)
- Swap the background of the input image (“Change the background to an outdoors scene.”, “Remove the background, put the person on a pure white backdrop.”)
- Change the color scheme or feel of the scene (“Change to a warmer color palette.”, “Make this scene more dramatic.”)
- Adjust the position of the actors in the image (“Move the man in a red t-shirt to the back.”, “Put the woman in black next to the man in a tuxedo.”)
- …and pretty much anything that comes to your mind, with a reasonable level of complexity that is within the models capabilities
First, download our example image of the Michelangelo’s David sourced from Wikimedia, or come up with your own input image.
Then, select the top image input node on the left of the workflow, and either use the Ctrl+B keyboard shortcut, or the Bypass/Unbypass button to activate the node. The node should now stop being greyed (or rather purpled) out. You can load your input image by clicking on the Upload button.
Finally, input a simple image edit prompt like the one below, in the TextEncodeQwenImageEditPlus Input Prompt node, and just as before, leave the negative prompt node empty.
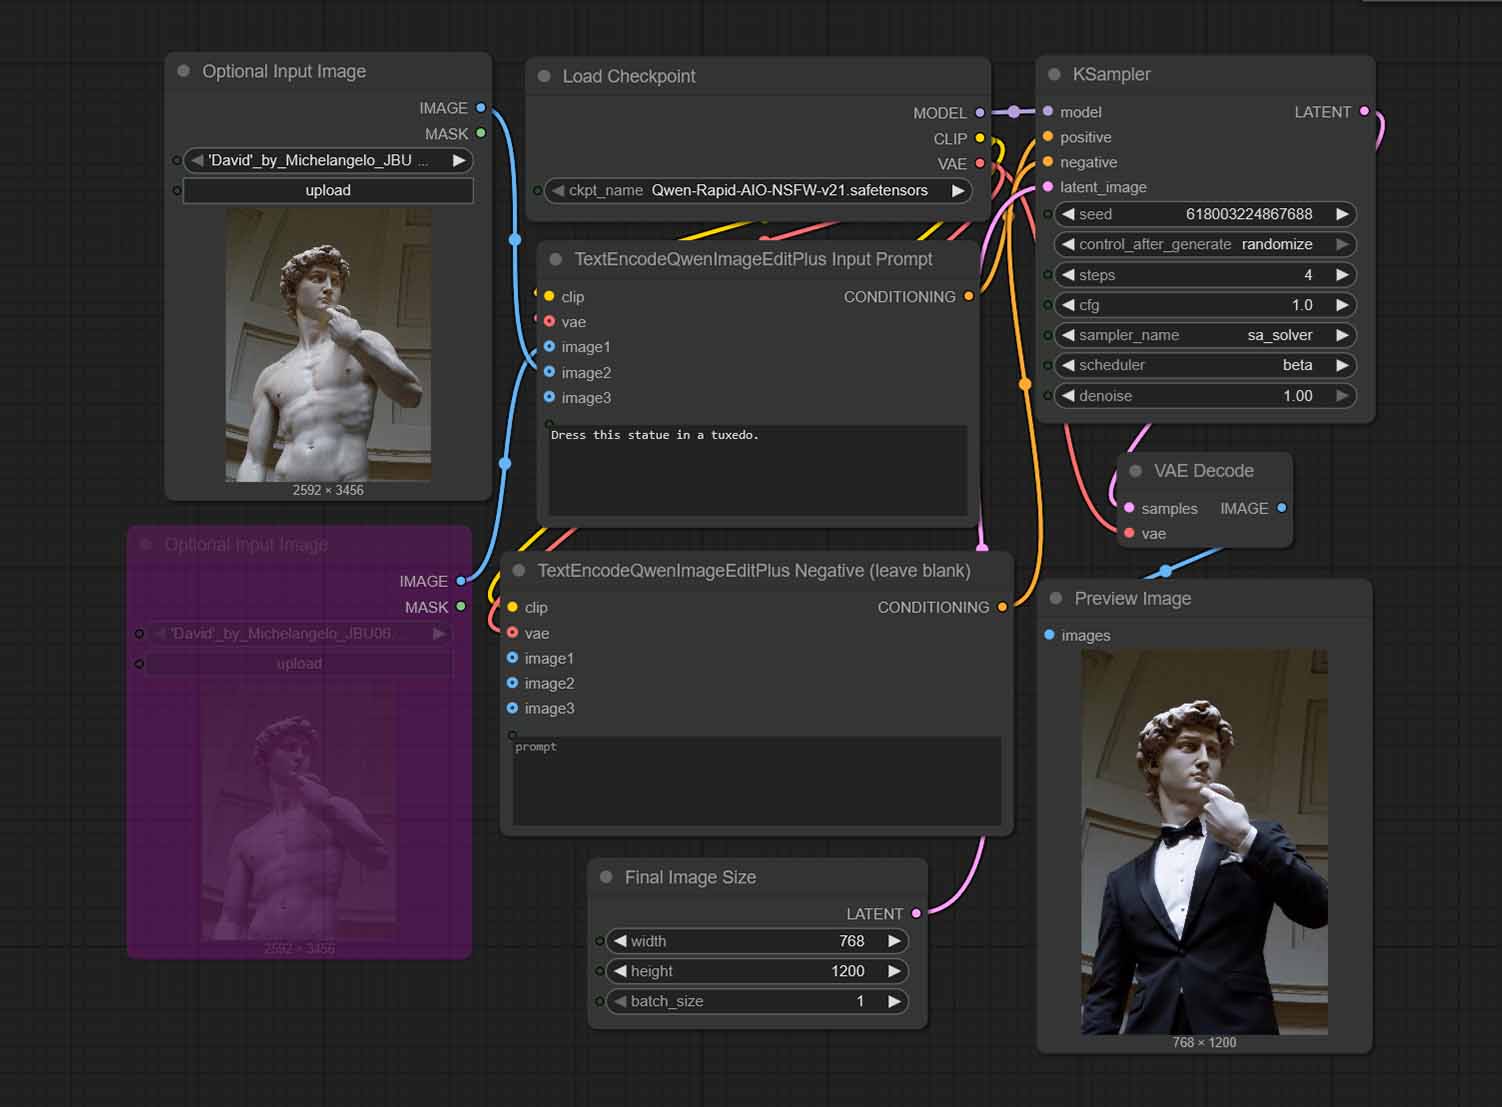
Dress this statue in a tuxedo.Then, click on the Run button, and wait for your image to generate.
The simplest prompts often work the best. In my experiments many times over, especially when it came to basic image edits like hairstyle modifications or background removal, concrete one-sentence prompts proved to be much more effective than longer and more verbose text inputs.
With more complex and longer prompts, or scenes with more elements, you might find that adding a formula similar to “leave everything else as is” can help you minimize changes to the areas of the image you don’t want to be affected by the edit.
Important: The output image size in this workflow is set to 768×1200, which you can freely change. Qwen responds reasonably well to different image resolutions, so if you have the hardware to process larger images, feel free to adjust this to your liking.
By default you should make the final image aspect ratio match the aspect ratio of your input image as closely as possible. If you want to experiment with different output resolutions with non-matching image inputs and prevent your generations from looking “zoomed-in” or cropped, check out the fix detailed below.
Step 5 – Do an Edit With Two or More Input Images
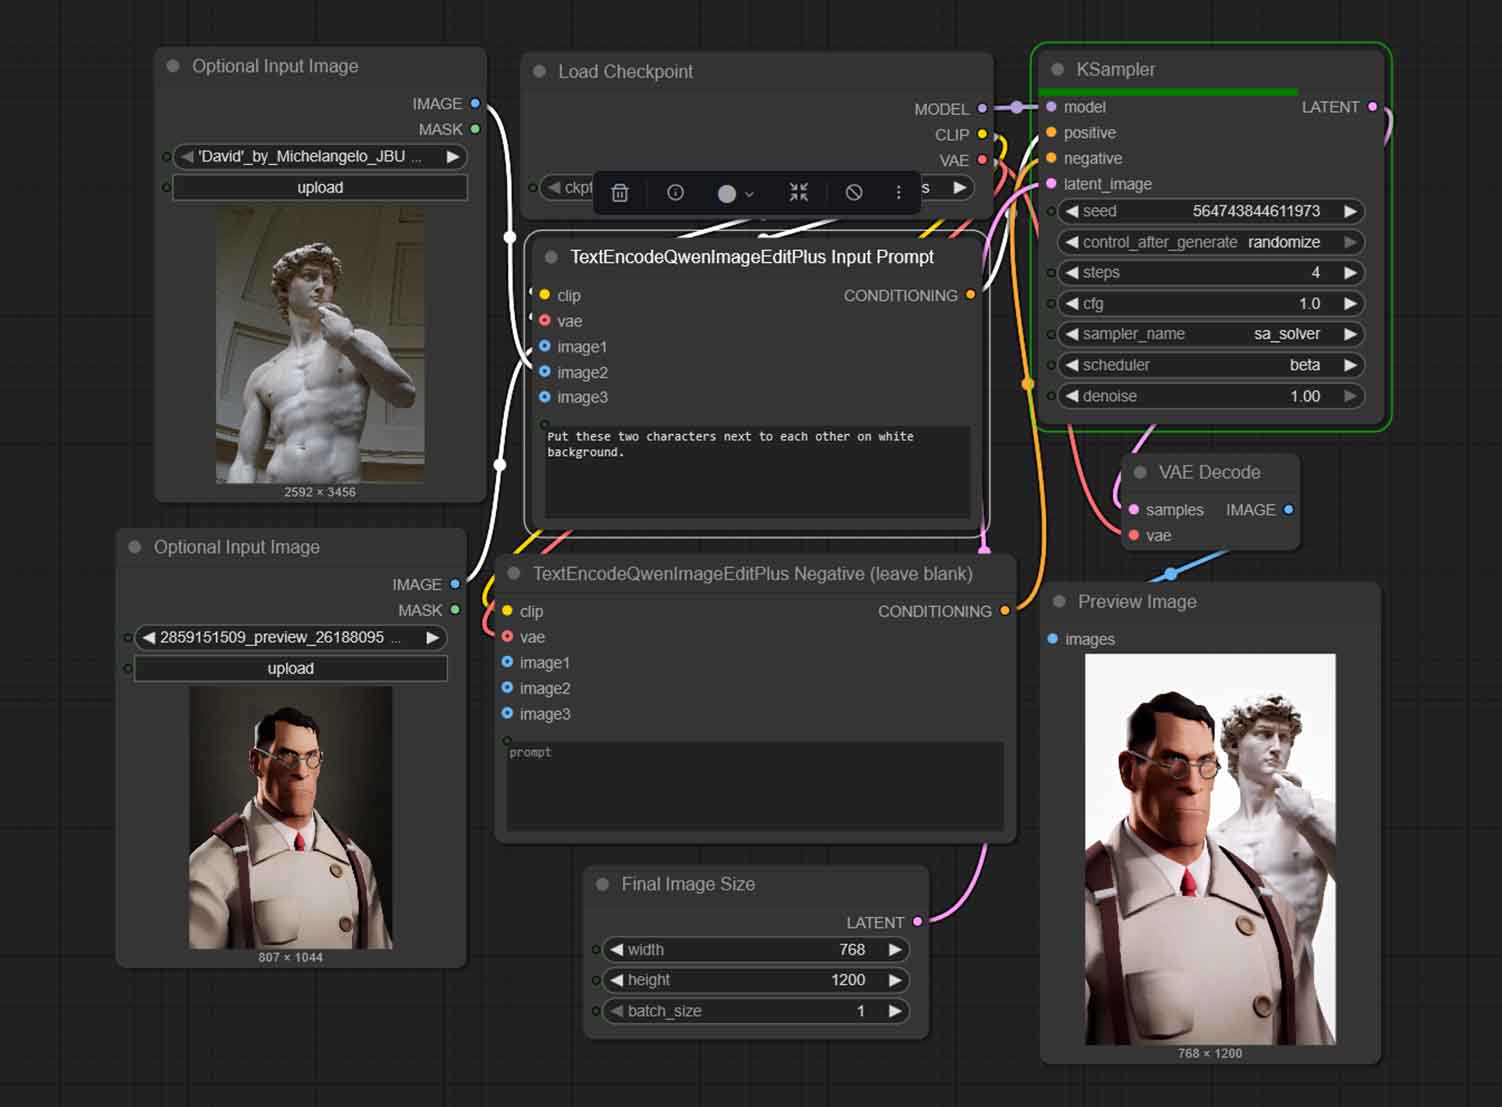
TextEncodeQwenImageEditPlus supports multiple image inputs. The preset shared here also comes with three image inputs already in place. To use the second input, you simply need to unbypass the second input image node and load up the image you want.
To utilize the third input, import an additional Optional Input Image node, and connect it to the TextEncodeQwenImageEditPlus Input Prompt node.
In practice, you can treat this setup like:
- Image 1: what to edit.
- Image 2 and up: reference/style/object cue/object to mix in.
Handling generations with two reference images can be a little bit tricky at times, especially if you care about preserving all of the characteristics of the input images. Feel free to experiment with different image combos and different edit types such as:
- Placing the input objects in different relations to each other.
- Mixing the characteristics of both inputs.
- Applying the style of one of the images to another.
- Treating both inputs as a style reference for a completely new image.
- And more actions similar to these ones.
If you ever need to go back to text-to-image again, just make sure that each of the image input nodes are bypassed.
You might also be interested in: List of Free Local AI Image Generation Software – Fooocus, Automatic1111, ComfyUI & More
If your results look cropped/zoomed/weird
This is quite a widespread issue, directly addressed by Phr00t – the creator of the Rapid AIO merge. The scaling/cropping issues are commonly caused by the default ComfyUI Qwen Text Encode node’s internal resizing, and while they might get fixed with one of the future updates, for now, there exists a quick drop-in fix for them.
This fix is entirely optional. I would only recommend it in the article as a troubleshooting step, as it modifies/replaces one of the native ComfyUI Qwen node files. Only use it if you know what you’re doing. If you don’t have cropping issues, or they don’t really bother you much, you can skip this entirely.
To fix the cropped/zoomed images:
- Back up your original
ComfyUI/comfy_extras/nodes_qwen.pyfirst. - Then, replace it with Phr00t’s
nodes_qwen.v2.pyfile, that you can get here.
As per the readme file here, the v2 version of the fix takes an additional input for the TextEncode node (our positive prompt node). It has to be connected to your target latent (typically the Empty Latent you’re already using) so the node can infer the intended output resolution and resize input images to match it.
As a neat bonus, it also introduces a 4th image input in the node, so that you can make use of an extra input image in your workflows.
Latent Upscaling With Qwen Image Edit Rapid AIO
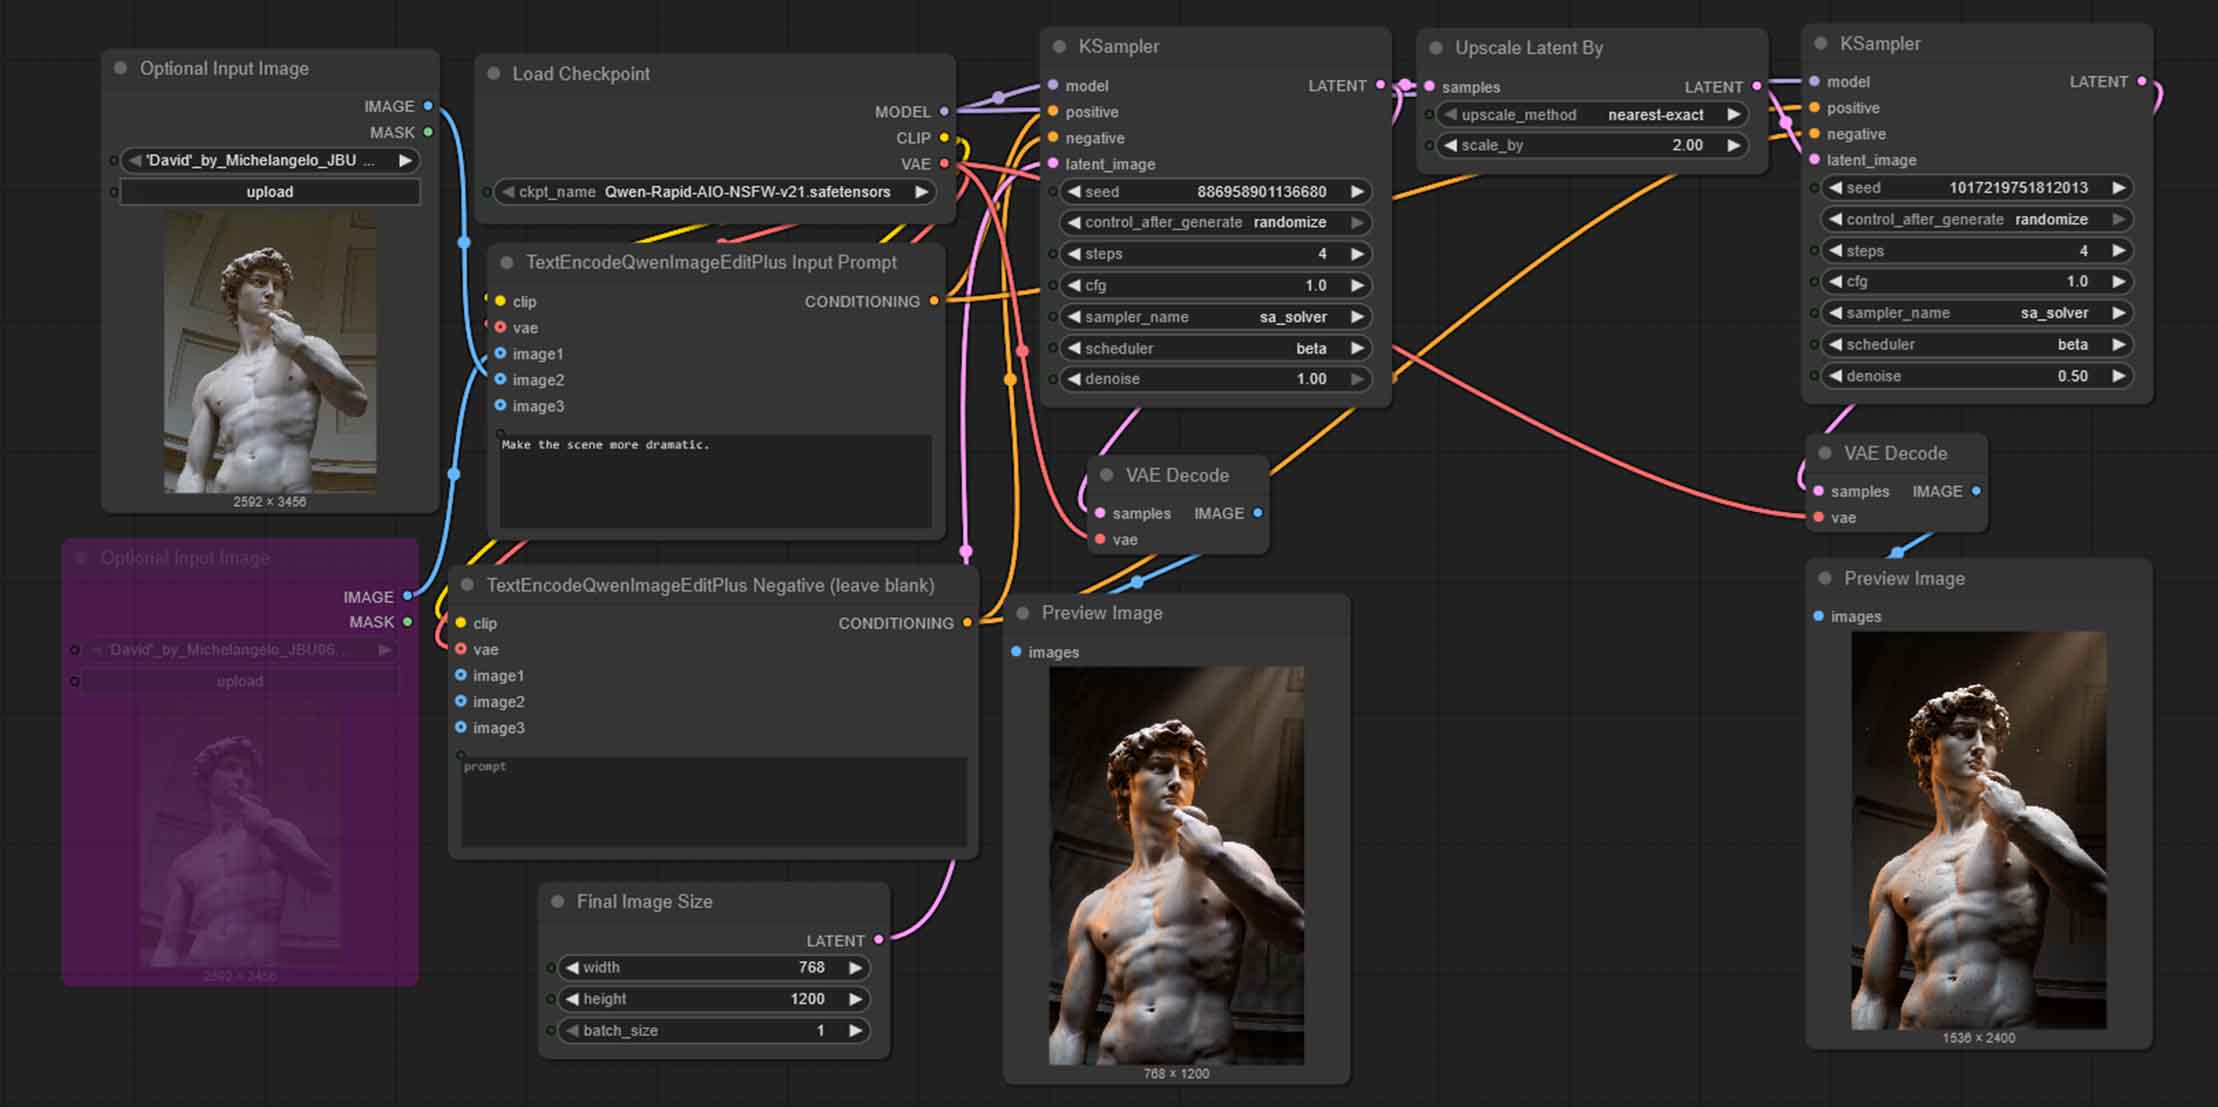
You can rather easily use latent upscaling with this workflow, by chaining another KSampler node with the denoise value set to around 0.50 and using the very same prompt, preceded by an Upscale Latent By node, as shown on the image above.
You can condition the second KSampler node with the very same input image/images and prompts as your original image, or completely different material, depending on what effects you want to achieve.
While Qwen can easily support those higher resolutions out of the box if client memory isn’t an issue, latent upscaling can in many cases be excellent at adding fine details to your images, as you might already know if you’ve read my SDXL latent upscaling guide here.
Keep in mind that when upscaling the latents with higher denoise values you are likely to be getting grid artifacts in your final outputs, as well as having the model stray from your original generated image composition. Adjust with caution.
If you’re interested, here is the very same workflow from the image above, that is, the main workflow, extended by the second pass through the KSampler with original image conditioning with 0.50 denoise value.
You might also like: Latent Upscaling in ComfyUI – Hires Fix Without Custom Nodes
Low on VRAM? Check out what reasonable upgrade options you have this year: Top 7 Best Budget GPUs for AI & LLM Workflows