
Here is how to go through the entire overclocking process on your Miyoo Mini or Miyoo Mini Plus in about 5 minutes total. It’s a matter of creating and editing one single text file, and it can make your handheld even better than it already is at emulating some more demanding systems like NDS or PS1. Let’s get to it.
This web portal is reader-supported, and is a part of the Aliexpress Partner Program, Amazon Services LLC Associates Program and the eBay Partner Network. When you buy using links on our site, we may earn an affiliate commission!
What Does Overclocking Really Do For You on the Miyoo Mini?
Overclocking your Miyoo can help immensely with many of the more demanding games (DS, PS1 games with the Enhanced Resolution feature turned on, as well as some more complex GBA titles), and is one of the best way to deal with FPS dips.
For the overclocking process to work, you will have to have the Onion OS installed on your handheld (you can learn how to do that here).
As we’re not actually increasing the voltage on the chipset itself, but only adjusting the actual CPU clock speed, this method is generally perfectly safe, and you don’t have to worry about damaging your handheld experimenting with different clock speed values.
The only thing that can possibly happen if you attempt to set a clock speed that’s too high for your device, is it either crashing/freezing on game start, or at some point while you’re in-game.
To fix that, you’ll simply have to lower the CPU frequency value in the overclock file and restart your Miyoo Mini. Do this until you find a value that works for you. You will learn how to do all this in just a second.
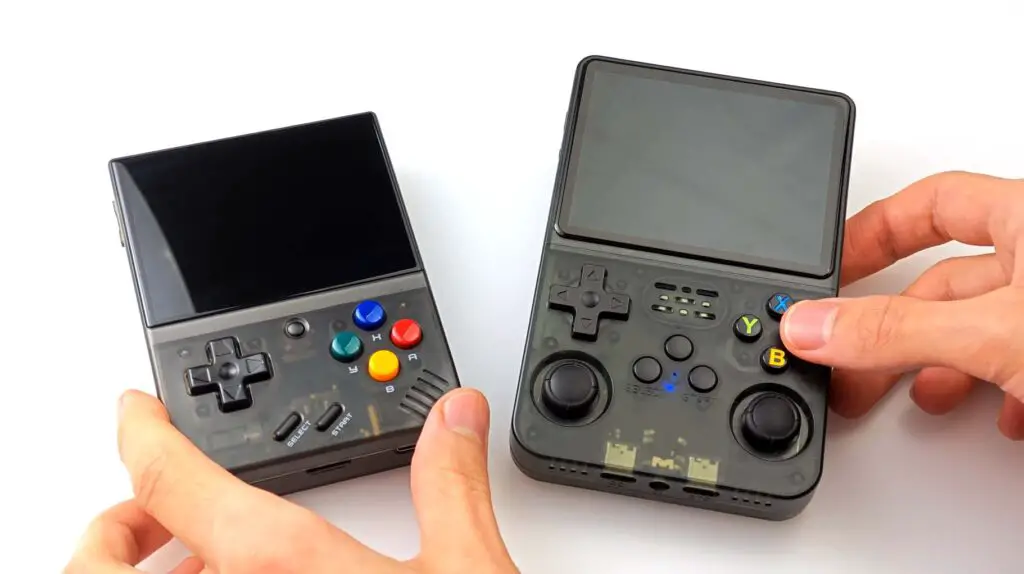
It has to be said however, that even with the overclock in effect, the Miyoo Mini still won’t be able to handle some more modern systems like the N64 without struggling. For this, you’d have to take a look at something like the R36S, shown on the image above.
Having finished this quick introduction, let’s get to the actual process.
How To Overclock Your Miyoo Mini In 3 Short Steps
The overclocking process is exactly the same for all of the Miyoo Mini consoles besides the A30 and the Flip which for now cannot be overclocked. Here is how to do it in 3 steps total.
Note: The DS emulator overclock on the Miyoo is a little bit different, although it’s just as easy. You can find the instructions on how to do it right under the main overclock guide!
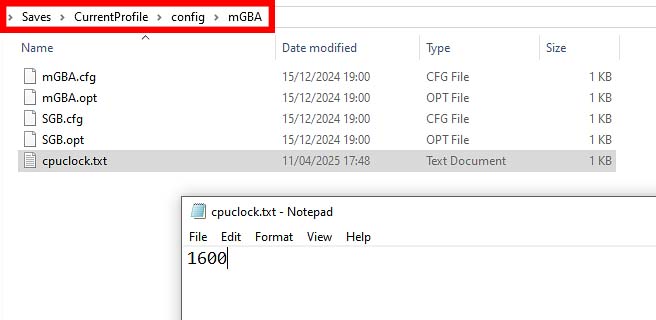
Step 1 – Create the “cpuclock.txt” File
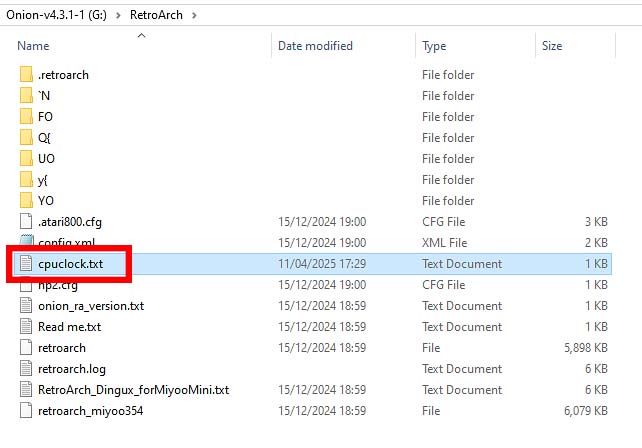
Take the microSD out of your Miyoo Mini, and connect it to your PC. Then, navigate to the RetroArch folder on the card. Next, create a text file called “cpuclock.txt”.
Step 2 – Enter Your Chosen CPU Clock Speed Value
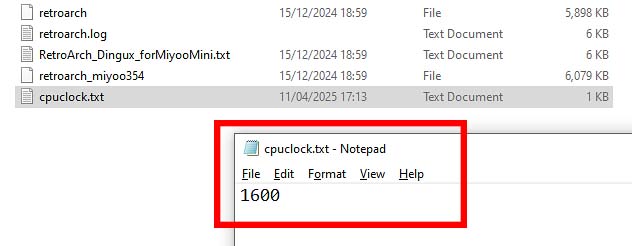
In the newly created file, you’ll have to input a new max CPU clock value in MHz. It will be the new max CPU clock speed you want all your emulators to use.
The base clock speed on all the Miyoo Minis is 1200 MHz. When overclocking, you want to raise this default clock speed limit. You can make it as high as you need it to be, provided you stay within the recommended limits mentioned below, so that you won’t experience any crashes or freezes when playing games.
For reference, here are the recommended overclock values for different Miyoo Mini models:
- Miyoo Mini V1-V4 – 1300-1700 MHz (with 1600 MHz as a recommended stable value)
- Miyoo Mini Plus – 1300-1900 MHz (with 1800 MHz as a recommended stable value)
The values you put in the “cpuclock.txt” text file should always be divisible by 100.
Test out different values and find a sweet spot. This sweet spot will be a value which lets your selected games/systems run at higher framerates and with better performance, and doesn’t lead to your Miyoo Mini crashing or freezing while you’re in-game.
If you’re concerned about the battery drain after overclocking, in most cases the difference is pretty negligible (you can see the exact voltage changes in relation to the clock speed changes listed here over on the Onion OS GitHub page).
At the very end of this tutorial I will also quickly show you how to overclock only select RetroArch emulator cores, if you don’t need more power for all of your emulated games and consoles, but only for just one or a chosen few.
Step 3 – Boot Up Your Miyoo Mini
Now, after you’ve edited the text file to contain your chosen max CPU clock speed value and saved it, it’s time to put the microSD back into your Miyoo Mini, and turn on the handheld. If at any point your console crashes or freezes up during gameplay, simply reduce the value in the “cpuclock.txt” file by 100, and try again.
If you experience a crash during which you’re not able to turn off your console using the power button, you can always disconnect the battery to power down the handheld.
Remember that Onion OS updates can oftentimes delete your set overclock file(s) when upgrading the emulator cores. If that’s the case for you after a new update, you’ll simply have to redo the whole process again.
Important note: The “CPU Frequency” value in your “About device” settings tab will not change after a successful overclock, as this process affects only the select RetroArch emulator cores. Seeing the default 1200 MHz value in the settings menu doesn’t mean that your overclock has failed.
That’s really all there is to it. And here is the promised tip on how to overclock only chosen systems/RetroArch emulators.
Overclocking Specific Emulator Cores
If you don’t need all of the RetroArch cores to make use of the overclock (for instance when you only need it to affect one more demanding console like the GameBoy Advance), there is a way to do that.
To overclock just a single RetroArch emulator core, simply put the “cpuclock.txt” file with the overclock value directly inside your chosen emulator core folder.
The individual core folders can be found under these paths: Saves/CurrentProfile/config/[Chosen RetroArch Core Folder].
If you’re not sure how the shortened core folder names correspond to the individual consoles, you can search for this information online, as well as in the Onion OS documentation.
Once you boot up your Miyoo Mini with the newly created “cpuclock.txt” text files in your chosen core folders and without the very same file in the main RetroArch directory, the overclock should now only affect your selected console emulators.
The DS Emulator Overclock

With the DS emulator, the overclocking process is a little bit different, as it involves editing the settings.json file in the NDS emulator directory and then changing the max CPU clock speed value in the emulator itself.
Enter the Emu/NDS/resources folder, and locate the "settings.json" file. In this file, you will find a “maxcpu:1600” field.
Change the default 1600 MHz value to your desired overclock value (1700 and up depending on your console like in the examples mentioned earlier), and save the file.
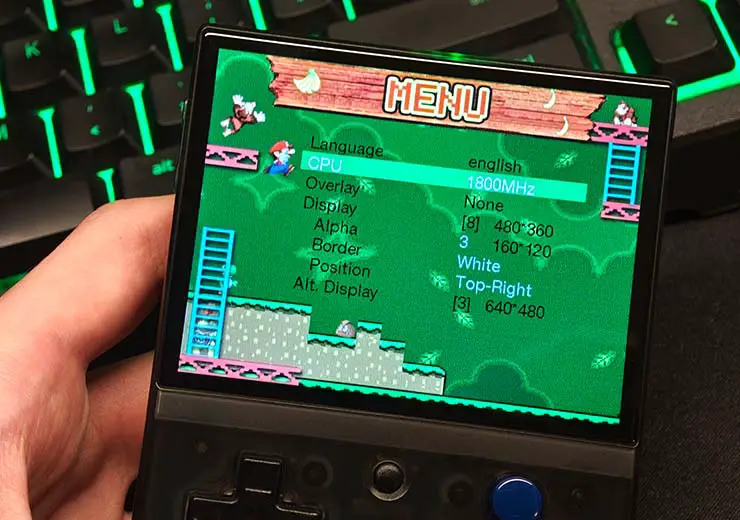
Now, after putting your microSD card back into the Miyoo Mini, turning it on and getting into the DS emulator, press the "Menu + Start" button combination to enter the settings menu, and change the “CPU” value to your newly set max frequency. That’s it!