
The Broadlink RM4 Pro is a powerful bridge for retrofitting “dumb” appliances into a smart home setup, covering both IR (TVs, ACs) and RF 433MHz (blinds, fans). As neat as this device is, its setup process includes a few non-obvious steps to ensure it plays nicely with Home Assistant. Here is the step-by-step process I used to get it running.
Check out my full review of this device here: Broadlink RM4 Pro IR & RF Remote With Home Assistant – Hands-On Review
How to Set Up the Broadlink RM4 Pro with Home Assistant
Step 1: Initial Hardware and App Setup
Before doing anything within Home Assistant, the device must be initialized via the proprietary Broadlink app (available both for Android & iOS). Luckily, after the setup process is done you can uninstall it from your phone and keep on using the RM4 Pro without it.
First, connect the RM4 Pro to power using a Micro-USB cable. Note: The box does not include a power brick, so you will need to provide your own standard 5V 1A USB power supply like this one here.
Second, place the device in a chosen location in the room. The IR blaster sends signals in multiple directions using multiple emitters, so line-of-sight is helpful but the range is generally robust. The RF range generally won’t be a problem, unless your RF devices are positioned far outside of the room the RM4 Pro is in.
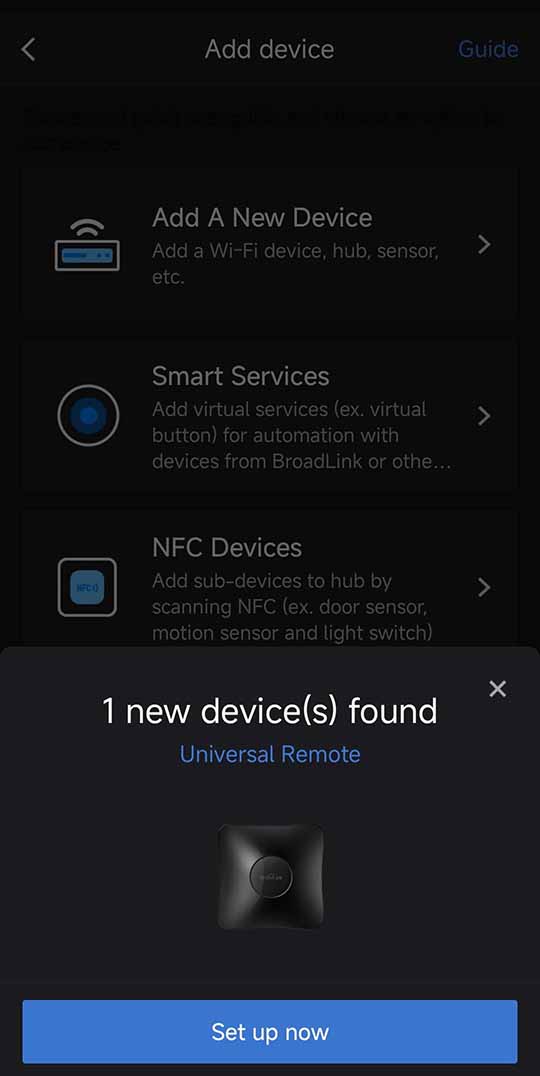
- Broadlink App Configuration:
- Install the Broadlink app on your smartphone and create an account.
- Make sure that your RM4 Pro is connected to a power supply.
- The RM4 Pro should be automatically detected by the application. Click on the Set up now button on the popup to proceed.
- If the device hasn’t been detected by the app, tap Add a New Device -> Remote Controls -> Universal Remote. You can also scan the QR code that’s hidden on the bottom of the device.
- Select the Broadlink RM4 Pro from the list.
- Follow the prompts to connect the device to your 2.4 GHz Wi-Fi network.
Important note: The RM4 Pro does not support 5 GHz networks. If you only have a 5 GHz network available, you’re going to have to enable dual band on your Wi-Fi access point to enable the 2.4 GHz band for the device to connect to (here is how to do that on some TP-Link APs/routers).
Tip: If the pairing fails, just retry. In my case, it took several attempts before the device successfully joined the network both when I was first setting it up, and later on, when I was trying to reconnect it, even though the device was close to the AP.
Once connected, assign the device to a custom named room (e.g., “Living Room”) and name it. The name of the room you choose isn’t really important if you’re handling all of the devices and their areas/zones via Home Assistant anyway.
Step 2: Unlocking the Device in the App
By default, the Broadlink device “locks” itself to the proprietary app for security, which prevents Home Assistant from discovering it. Unlocking it is a matter of changing one setting within the app:
- First, open the device’s menu in the Broadlink app.
- Then, tap the three dots in the top right corner to access settings.
- Scroll down and toggle OFF the option labeled “Lock device”.
- Confirm the action when prompted.
Step 3: Home Assistant Integration
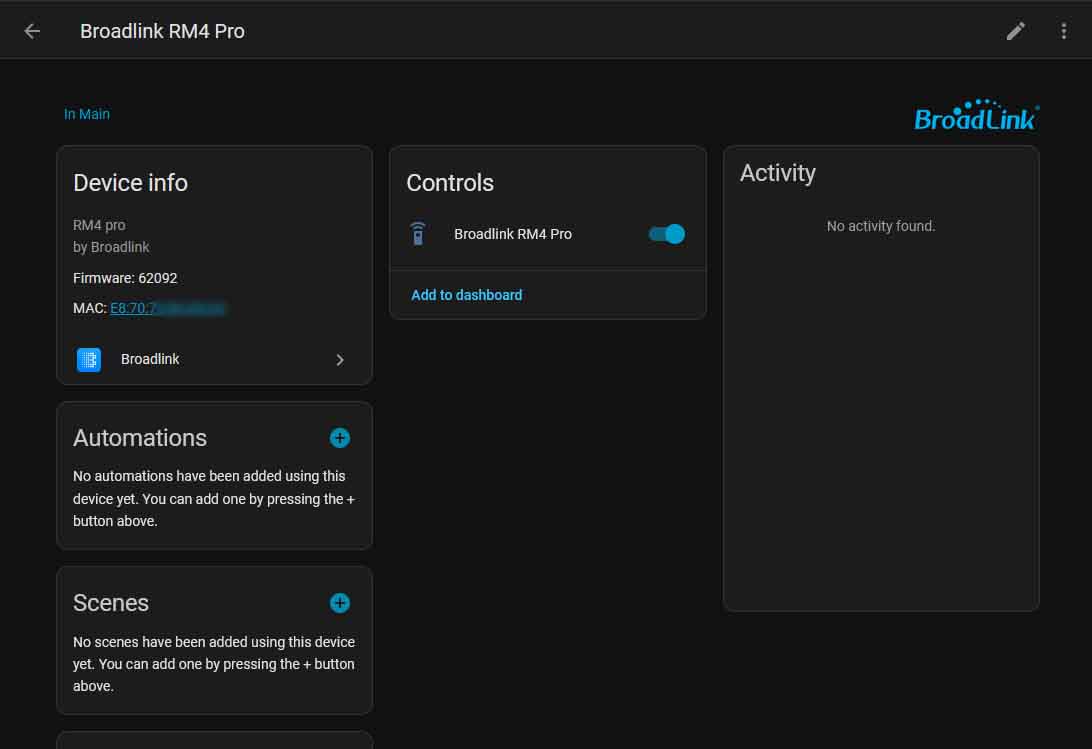
With the device unlocked, we can finally set it up in Home Assistant.
- Open Home Assistant and navigate to the Settings -> Devices & Services menu.
- Home Assistant should automatically discover the new Broadlink device on your network.
- If the Broadlink integration does not appear in the menu by default, select Add Integration button on the bottom right, then pick the Broadlink option. You will be asked to provide the host IP of the RM4 Pro on your network. You can either check it in the Broadlink app, or in your Wi-Fi access point.
- Click on Configure, give the device a recognizable name (e.g., “RM4 Pro Remote”), and assign it to an area in your setup.
Step 4: Learning Remote Commands (IR and RF)
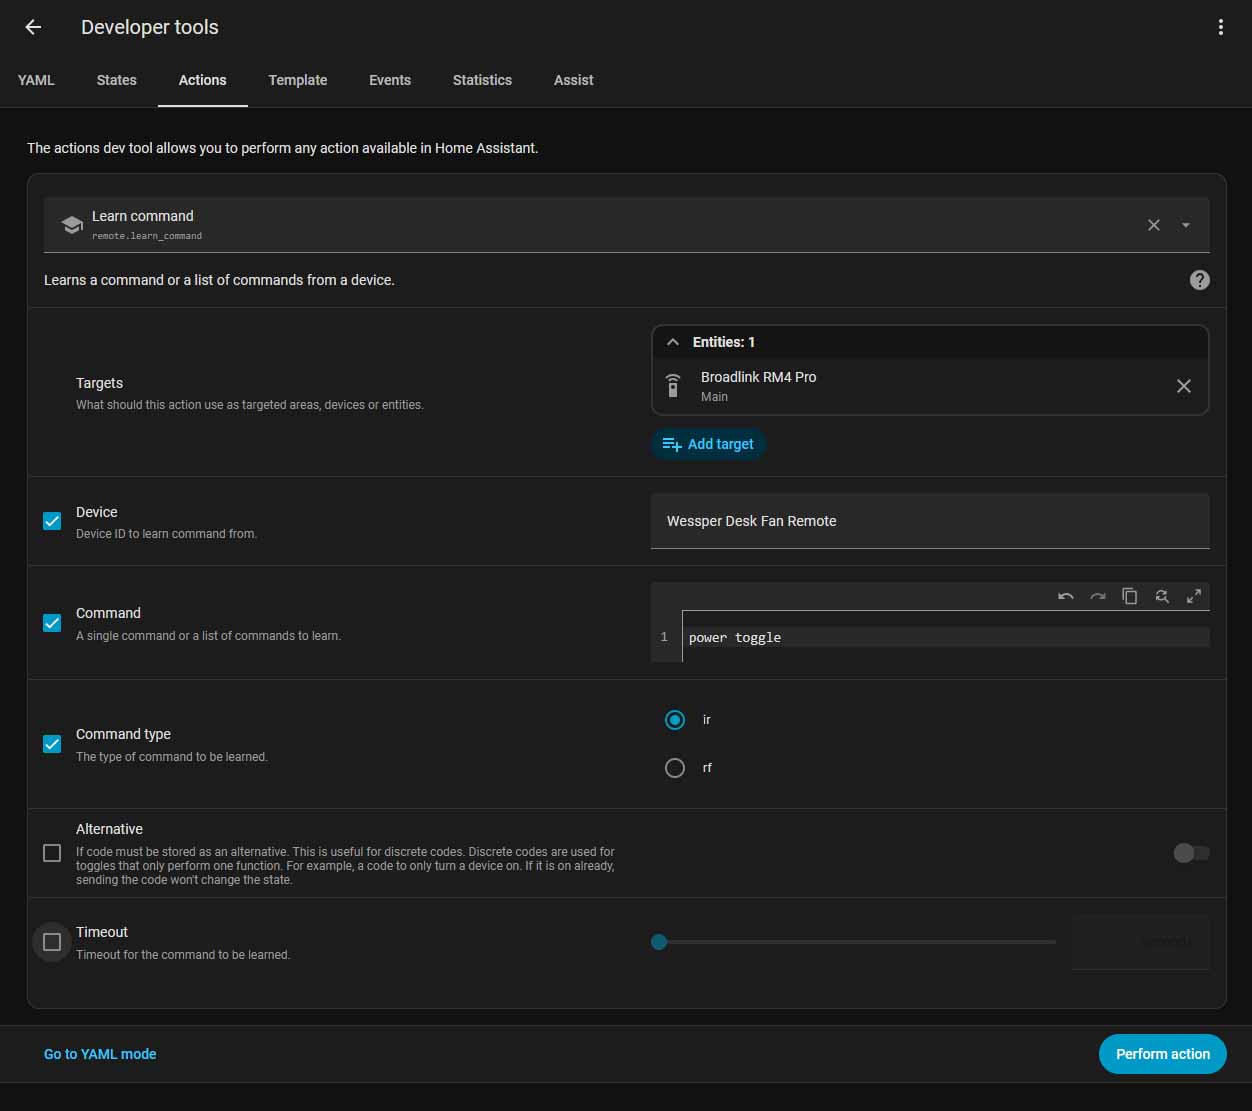
Unfortunately for now, in Home Assistant there isn’t really a nice UI-friendly option for configuring/cloning your remote controls using Broadlink devices. Still, the process is rather simple. Capturing remote control codes with the RM4 Pro is done via the Developer Tools menu. Here is how to do it.
- Navigate to Settings -> Developer Tools -> Actions.
- Search for and select the action named remote.learn_command.
- Configure the Action Call:
- Targets: Select your Broadlink entity (e.g., remote.rm4_pro_remote, depending on your chosen name).
- Device: Create a custom device ID for the appliance you are controlling (here I will use “Wessper Desk Fan Remote” as an example).
- Command: Create a friendly name for the specific button you are about to press (e.g., power toggle, speed toggle, etc.).
- Command Type: Select IR for standard remotes or RF for radio-frequency devices.
- Click on Perform Action.
- Capture the Signal:
- The LED on the physical RM4 Pro unit will turn orange/red indicating it is listening.
- Point your physical remote at the RM4 Pro and press the desired button. You might have to press the button a few times for it to register.
- Once the remote command is captured, the LED on the device will turn off, and a green checkmark should appear in Home Assistant indicating the code was successfully saved.
- Verify: You can view captured codes using the File Editor add-on by browsing to /config/storage/ and looking for a file starting with “broadlink_remote_(…)”. You can also select the remote.send_command option from the actions select menu, and attempt to retransmit the signal you’ve just captured by referring to it by the exact same device ID and command name that you’ve set up during the capture.
This process is going to be exactly the same for IR and RF devices. Remember though, that the RM4 Pro is unable to learn rolling-code RF remotes (codes that change each press, common in some blinds/garage systems).
Tip: If you’re having trouble with the action getting registered, you can check the timeout box in the Action Call menu, raise the value to 30-60 seconds, hold the remote close to the RM4 Pro and press the button repeatedly. This will give the RM4 Pro more time and more chances to read the command that the remote sends.
Note: “Actions” in Home Assistant were previously known as “Services”. This is why in some tutorials you can still see the outdated lingo. This guide uses the current, updated option names.
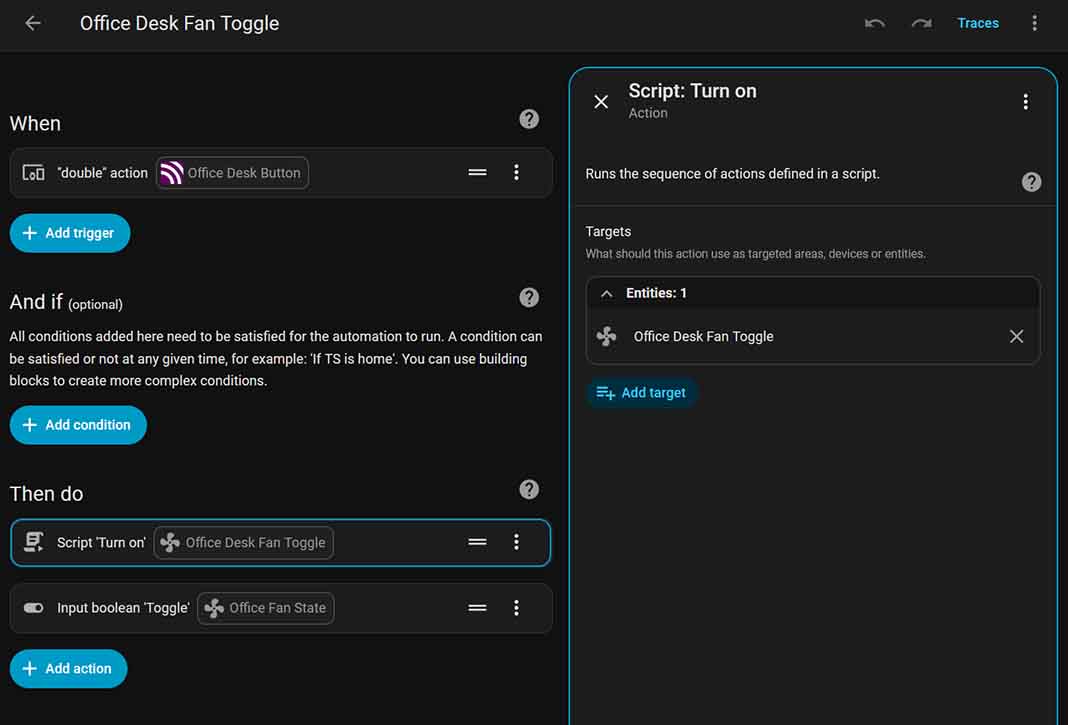
Step 5: Creating Dashboard Buttons
Now, let’s get our RM4 Pro to send our captured command whenever we want it to. To do that, we’ll have to create a simple Script:
- Go to Settings -> Automations & Scenes -> Scripts.
- Select Create Script -> Create new script, and name it according to its function (e.g., “Office Desk Fan Toggle”).
- For the Action, select Perform Action (previously known as Call Service).
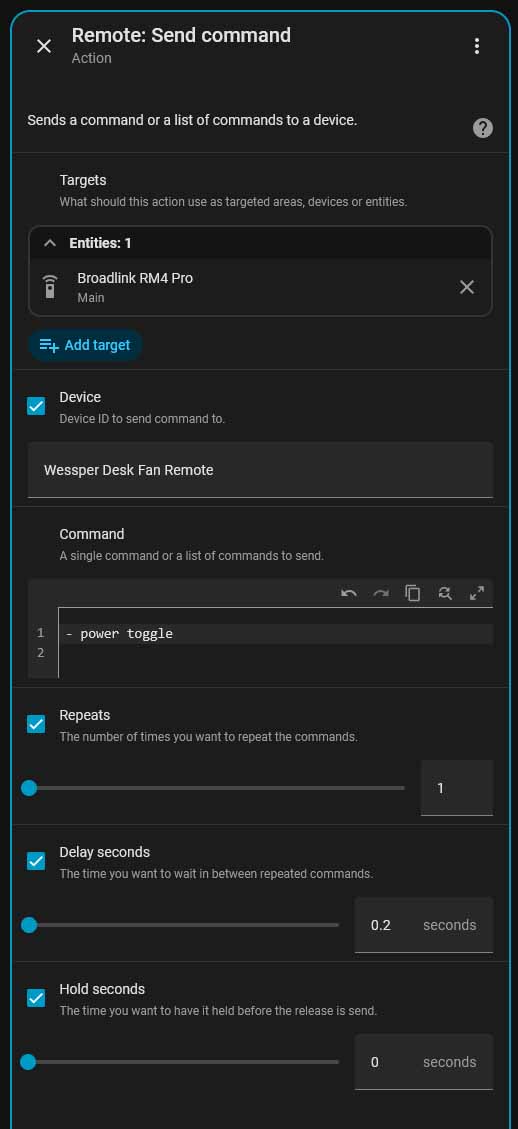
- Select the action named remote.send_command.
- Targets: Set your Broadlink RM4 Pro entity as the action target.
- Device: Enter the exact device ID used in the learning phase (in our example, “Wessper Desk Fan Remote”).
- Command: Enter the exact command name you used during the setup.
- Additional parameters: If you want to, you can set the command to repeat a few times with the Repeats parameter, set the delay between repeats with Delay seconds, and configure the command to be sent as if the button on the remote would have been held down using Hold seconds.
- Save your script before leaving the menu.
After creating a script like this you can use it with dashboard buttons, automations, scenes – pretty much wherever you need it.
Second, you can add the script to a button on your Dashboard (or use it in an automation):
- Go to your Dashboard and click the pencil icon to Edit.
- Click Add Card.
- Select the Button card (or Grid card for multiple buttons).
- Under Entity, select the script you just created (in our example “script.office_desk_fan_toggle”).
- You can now customize the name and icon of the button.
- Save the button card. It will now activate the script assigned to it.
And just like that, you have a fully functional smart button that communicates through Home Assistant to the Broadlink unit to control your IR & RF gizmos. Not really that hard, was it!
You might also be interested in: How To Setup Stream Deck With Home Assistant – Quick Tutorial